Italian conquest of British Somaliland
The Italian conquest of British Somaliland was part of the East African Campaign (1940–1941), which took place in August 1940 between the metropolitan Italian, Eritrean and Somali forces of Fascist Italy and British, Commonwealth and Somali irregulars. The Italian expedition was intended to exploit mobility and speed but was hampered by the Somali terrain, rainy weather and the British defence of the colony, particularly at the Battle of Tug Argan (11–15 August).
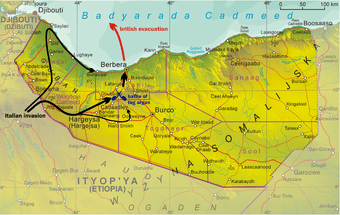
Italian attacks had the advantage of artillery and the outnumbered British, Commonwealth and Imperial forces were gradually worn down and slowly outflanked until the remaining fortified hilltops were made vulnerable to being captured piecemeal. After the failure of a counter-attack towards the Mirgo Pass, the local commander, Major-General Reade Godwin-Austen had too few men to retrieve the situation and to guard an escape route and was given permission to retreat towards Berbera.
The British fought a rearguard action at Barkasan on 17 August and then retreated after dark but the improvised evacuation went better than expected and the second blocking position at Nasiyeh was also abandoned. The Italian advance was slowed by roads being swamped by the rains and the airstrip near Berbera being found to be garrisoned, making a coup de main impractical. The British defeat was controversial and caused a deterioration in relations between General Archibald Wavell, the theatre commander, his subordinates and the Prime Minister Winston Churchill.
Background
Africa Orientale Italiana
On 9 May 1936, Italian dictator Benito Mussolini proclaimed his Africa Orientale Italiana (AOI, Italian East African Empire), formed from Ethiopia and the colonies of Italian Eritrea and Italian Somaliland. During the First Italo-Abyssinian War (1895–1896), Italy had been thwarted in its colonial ambitions but in the Second Italo-Abyssinian War (3 October 1935 – 5 May 1936) the Italians again invaded Ethiopia from Italian Somaliland and Italian Eritrea.[4] On 10 June 1940, Mussolini declared war against Britain and the France, making the Italian forces in Africa a threat to British supply routes along the Mediterranean, the Suez Canal and the Red Sea.[5]
Egypt and the Suez Canal were obvious targets and an Italian invasion of French Somaliland (Djibouti) or British Somaliland was also feasible. Mussolini looked forward to propaganda triumphs in Sudan and British East Africa (Kenya, Tanganyika and Uganda). The Italian General Staff (Comando Supremo) had based its strategic calculations on and assumption that there would be no war until 1942 and the Regio Esercito (Italian Royal Army) and Regia Aeronautica (Italian Royal Air Force) were not prepared for a long war or the occupation of large tracts of Africa.[5]
Middle East Command
The Kingdom of Egypt included Sudan, a condominium between Egypt and Britain, (Anglo-Egyptian Sudan). The British had based military forces in Egypt since 1882 but these were greatly reduced by the terms of the Anglo-Egyptian Treaty of 1936, which only allowed British military forces to occupy Egypt in defence of the Suez Canal.[6] The small British and Commonwealth force garrisoned the Suez Canal and the Red Sea route, which was vital to Britain's communications with its Far Eastern and Indian Ocean territories. In mid-1939, Lieutenant-General Archibald Wavell was appointed General Officer Commanding-in-Chief (GOC-in-C) of the new Middle East Command, with responsibility for the Mediterranean and Middle East.[7] Until the Franco-Italian Armistice (Armistice of Villa Incisa), the Italian 5th Army in Tripolitania (western Libya) faced the French army in Tunisia and the Italian 10th Army in Cyrenaica (eastern Libya), confronted the British in Egypt.[8]
The Royal Army had about 215,000 men in Libya and in Egypt, the British had about 36,000 troops, with another 27,500 men training in Palestine.[8] Wavell had about 86,000 troops at his disposal for Libya, Iraq, Syria, Iran and East Africa. Faced with frontiers guarded by about eight men to the mile, Wavell concluded that a defensive strategy was the only feasible policy and intended to mount delaying actions at the main posts and hope for the best. The Foreign Secretary Anthony Eden convened a conference in Khartoum at the end of October 1940 with Emperor Haile Selassie, the South African General Jan Smuts (an advisor for the region with Winston Churchill), Wavell and the senior military commanders in East Africa, including Lieutenant-General Platt and Lieutenant-General Cunningham. An offensive strategy was decided on against Ethiopia, including the use of Ethiopian irregular forces, by the conference.[9] In November, the British and Commonwealth forces gained an intelligence advantage, when the Government Code and Cypher School (GC & CS) at Bletchley Park broke the high grade cypher of the Royal Army in East Africa. Later that month, the replacement cypher for the Regia Aeronautica was broken by the Combined Bureau, Middle East (CBME).[10]
British Somaliland
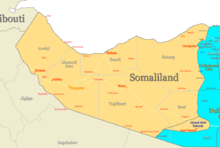
The British had fought the Somaliland Campaign (1900–1920) against Mohammed Abdullah Hassan and the Dervish state, to gain control over the territory. In 1910 the British garrison had been forced to retreat to the coast until the end of the First World War and only after four campaigns did Somali resistance end in 1920, after three weeks of attacks by local troops, a King's African Rifles (KAR) battalion and the Royal Air Force (RAF). The colony had an area of about 68,000 sq mi (176,119 km2) with a plain inland from the coast up to 60 mi (97 km) deep, ending at a mountain range an average of 4,000 ft (1,219 m) high.[11]
There was little scope for agriculture and most of the 320,000 inhabitants lived off livestock herding. Berbera, the biggest town and port, was ringed by desert and scrubland; in the cold season it had a population of about 30,000, falling to around 15,000 in the summer months. The port was a first class anchorage and was the principal entrepôt of the colony, despite having no port installations making it unsuitable for an expeditionary force, since ships had to be unloaded by lighter, a method that took ten days to empty a 3,000 GRT ship. Loading and unloading was impossible during the period from July to August, when the Kharif a strong and hot wind blew.[11]
French Somaliland
.svg.png)
Brigadier-General Paul Legentilhomme, in command of British as well as French forces since the outbreak of war obstructed the enforcement of the Armistice of Villa Incisa and continued to co-operate with the British. On 27 July, the terms of the armistice pertaining to French Somaliland were discovered by the British to be the demilitarisation of the colony and free Italian access to the port and the French part of the Addis Ababa railway. When the governor, Hubert Deschamps said that he would obey instructions from the Vichy regime, Legentlhomme threatened to use force to prevent him. When the local Italian armistice commission tried to make contact, Legentilhomme assured Cairo that he would play for time but anticipated that the Italians would attack.[12]
The 2nd Battalion, the Black Watch was sent to Aden from Egypt by cruiser, ready to reinforce the French, as Legentilhomme feigned ignorance of the armistice terms. Legentilhomme also denied entry to the new Vichy French governor, General Gaëtan Germain (25 July to 7 August). On 19 July, Legentilhomme was opposed in the Governor's Council by the navy and air force commanders and to avoid bloodshed decided that those opposed to Vichy should depart. Legentilhomme had run out of time and left for Aden on 5 August, leaving Germaine to sever relations with the British. Italian apprehension about the possibility of the British using the colony as a bridgehead continued; Germaine was superseded by Pierre Nouailhetas as governor from 7 August, arriving from France on 2 September.[13]
Prelude
British defence schemes

The Somaliland border was 750 mi (1,210 km) long and after the Italian occupation of Ethiopia, all but the 45 mi (72 km) border with French Somaliland was contiguous with the new Italian colony. According to the Hornby Report of 1936, the War Office intended to offer no resistance to an invasion. In 1938, the governor, Arthur Lawrence, deplored such a defeatist policy and suggested that the colony could be demilitarised, that the British could leave or that the colony could be defended. According to Chater, a small reinforcement would give the local garrison the means to resist an invasion of the colony for twelve days, sufficient for a relief force to arrive from India but the policy was rejected. In August 1939 the evacuation policy was revised according to two scenarios, that if the French succeeded in defending Djibouti, the British would withdraw towards them and if the French were defeated, the British would retreat into the hills and wait on events. All of the defence arrangements were based on co-operation with Legentilhomme, who would command both forces if war began.[14]
During the Phoney War Wavell became reluctant for British forces to come under French command, unless the withdrawal plan to Djibouti was implemented, which gave Chater more discretion, provided that he still co-operated with the French. Chater wanted to garrison Hargeisa and Burao to fight delaying actions and then retire towards the hill country. The main road into Somaliland from Djibouti was commanded by hills with six passes good enough for wheeled vehicles; both sides agreed that they must be garrisoned to deny them to the Italians and provide a base for debouching when an Allied counter-offensive began. On December 1939, the British had another change of mind, ordering that an invasion must be resisted and that Berbera must be held for as long as possible as a matter of imperial prestige. The commitments entered into with the French, had led to them to go to the trouble and expense of fortifying their colony; because of dissension between Legentilhomme and Paris and within the British and French alliance, the passes at Jirreh and Dobo, parallel to the border, were left unfortified, despite having permission to base defences in the British colony.[15][16]

In 1940, the 631 members of the Somaliland Camel Corps (SCC) were based in five places in the colony and a small party of police worked at Berbera. The SCC had 29 motor vehicles, 122 horses and 244 camels but no heavy weapons, only old Belgian .475 in (12.1 mm) calibre, single-shot rifles, with 1.4 million rounds of dubious quality ammunition, machine-guns and anti-tank rifles. In February, the British government planned to send 1,100 reinforcements by mid-May but financial wrangling between the War Office and the Colonial Office delayed the arrival of the first infantry battalion until 15 May and the second until 12 July. The garrison of French Somaliland was asked to block the Jirreh and Dobo passes but the British strategy was to hope that French Somaliland was the more tempting target.[17][15]
British preparations
After the Armistice of Villa Incisa, and the end of Legentilhomme's pro-British prevarication, Brigadier Arthur Reginald Chater RM, the British military commander, was ordered to plan an evacuation if the colony became untenable.[18] By August, the garrison consisted of the 1st Battalion Northern Rhodesia Regiment (1st NRR), the 2nd (Nyasaland) Battalion KAR, the 1st East African Light Battery (four 3.7-inch mountain guns) from Kenya, the 1st Battalion 2nd Punjab Regiment and the 3rd Battalion 15th Punjab Regiment from the Colony of Aden and the SCC, including 37 officer and NCO reinforcements from the Southern Rhodesia Regiment; on 8 August, the 2nd Battalion, Black Watch arrived. The troops were a motley collection, with different customs and culinary arrangements, no proper base or headquarters, short of artillery, transport and signalling equipment. Aircraft had to fly from Aden, while also busy with convoy patrols and air defence; only two QF 3-inch 20 cwt anti-aircraft guns of the 23rd Battery, Hong Kong and Singapore Brigade RA could be spared from Aden.[19]
The British expected that Berbera would be the objective of an Italian invasion; the frontier with Ethiopia was too long to guard and there was no position where the approaches to the port through Zeila near French Somaliland, thence east along the coast road or through Hargeisa or via Burao. The inland mountains were passable by wheeled and tracked vehicles only on the Hargeisa and Burao roads, Hargeisa being the more direct route through a gap at Tug Argan and the Burao road through a defile known as Sheikh Pass. Once north of the hills, the coastal plain had no feature where a small force could prevent the advance of a larger one. Chater garrisoned Tug Argan with two battalions and the mountain artillery, one battalion to guard the other two approaches and kept one battalion in reserve. When the Black Watch arrived, it went into reserve and the 3/15th Punjab Regiment reinforced Tug Argan. The Camel Corps formed a screen in advance of the main defences to observe and delay an invader, with patrols of Illalo an armed constabulary, usually used as a frontier police force.[20]
Italian plans
The Italians remained suspicious of French intentions after Legentilhomme was replaced by Germaine, of a British invasion through Djibouti. Despite orders from Rome to be cautious, Aosta wanted to occupy Djibouti to forestall its use by the Allies, with a simultaneous advance on Berbera to counter British interference. Aosta submitted the plan to Mussolini on 18 June and in August received permission for the invasion. While waiting, Aosta and his deputy, General Guglielmo Nasi, completed an appreciation of the likely opposition and the campaign objectives and on 14 July predicted that the main battle would be fought in the Karrim and Jerrato passes; if the defenders stood their ground, the Italian troops would be able to envelop their flanks.[21] The Italian invasion force included five colonial brigades, three Blackshirt battalions and five Bande, half a company of M11/39 medium tanks and a squadron of L3/35 tankettes, several armoured cars, 21 howitzer batteries, pack artillery and air support.[22][23]
Lieutenant-General Carlo de Simone, issued instructions on 25 July, as commander of the main force, the Harrar Division with eleven African infantry battalions in three brigades, the three Blackshirt battalions, the tanks and armoured cars.[24] The French and British were to be prevented from uniting and receiving reinforcements to attack Harrar by occupying British Somaliland and defeating the garrison.[24]Because the hills rose to over 4,500 ft (1,400 m), parallel to the coast some 50 mi (80 km) inland, there were three approaches to Berbera for wheeled and tracked vehicles for the Italians to consider. The direct route with the widest pass was via Hargeisa and the Italian plan was for the western column to seal off French Somaliland and then send light forces eastwards along the coast road.[23] The eastern column (Brigadier-General Arturo Bertello) would move to Odweina and Burao in the south, to cover the flank of the central column and be prepared to link up with it if necessary. De Simone, with the central column would establish a base at Hargeisa and Adalek then carry the main weight of the attack through the Mirgo Pass towards Berbera. The western column (Lieutenant-General Sisto Bertoldi) was to advance towards Zeila to seal the border with French Somaliland and then move eastwards along the coast road towards Berbera.[23]
Battle
3–10 August

On 3 August 1940, British air reconnaissance discovered that about 400 Italians had crossed the frontier at Biyad; early on 4 August the Italian central column was seen advancing on Hargeisa and the SCC skirmished with the Italians, slowly retiring, keeping watch and harassing the advance when possible.The Italians advanced in three widely spaced columns, Nasi communicating with de Simone by wireless and liaison aircraft, the central column heading for Tug Argan as the flanking columns attempted to deceive the defenders and exploit opportunities as they presented themselves.[25][23] Aerial operations began on the opening day, with aircraft 15 RAF squadrons participating.[26][lower-alpha 1]
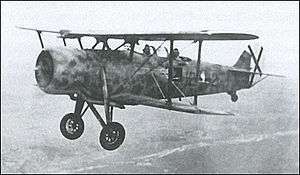
The eastern column comprising mainly Bande, reached Odweina on 6 August and then headed north west toward Adadle, a village on the Tug Argan, instead of towards Burao (tug is the local word for a dry sandy riverbed). The SCC and small patrols of the Illalos, a small force of local levies normally employed on police duties, conducted a delaying action as the other British and Commonwealth forces retreated towards Tug Argan.[27] On 5 August, aircraft of the Regia Aeronautica attacked Hargeisa at 10:00 a.m. as the army began an artillery bombardment.[lower-alpha 2] At 1:00 p.m., twelve light tanks advanced in line; three of the tanks were hit and knocked out by Boys anti-tank rifle fire from the SCC and the company of the NRR defending the hill station.[28]

The Italians paused at Hargeisa for two days to reorganise and then resumed the advance through the Karrim Pass toward the Tug Argan, in the Assa Hills. Aosta urged haste but Nasi refused to rush, because the road was deteriorating under the heavy traffic and rain. The Italian advance resumed on 8 August and for two days closed up to the British defences and made preparations to attack. The defenders reported the presence of Italian medium tanks and the captain of HMAS Hobart donated the ship's QF 3-pounder Hotchkiss saluting gun, a three-man crew and thirty rounds of ammunition.[27][lower-alpha 3] In the north, the Bertoldi column captured Zeila, about 150 mi (240 km) north-west of Berbera, cutting communications between the two Somalilands and then began a slow advance south-east along the coast road, under intermittent air attack from Aden and bombardment from the sea, pushing back the SCC rearguards as far as the village of Bulhar by 17 August.[30][23][lower-alpha 4]
Just before Wavell left Cairo to visit London for talks, reports of the size of the invasion force led him to order most of a field artillery regiment and two anti-tank guns of the 4th Indian Infantry Division to be sent from Egypt to Somaliland by special convoy. The Indian Army was asked to organise the first echelon of the 5th Indian Infantry Division for an infantry battalion, a field battery and a field company to be disembarked at Berbera. Anti-aircraft guns at Port Said were ordered to the colony but this decision was quietly countermanded two days later. Major-General Reade Godwin-Austen was appointed to command the enlarged force, with orders to defend the Tug Argan, defeat the Italian invasion and plan secretly to evacuate the defenders if it became necessary. Godwin-Austen reached Berbera on 11 July and took over command that evening; the reinforcements were too late and were diverted to Sudan.[32][33]
Tug Argan defences

From 7–8 August, the defenders had received reinforcements of the 1/2nd Punjab Regiment and the 2nd Battalion Black Watch; by 10 August, De Simone had closed up on the British positions behind the Tug Argan and prepared the Italian attack. The road from Hargeisa turns north through the Karrim Pass to Tug Argan and then east between the Assa hills to the south, hills and dry riverbeds (tugs) to the north. The pass is a flat stone expanse with occasional thorn bushes, tugs and a few rocky hills about 2,000 to 2,500 yd (1,800 to 2,300 m) apart, named Black, Knobbly, Mill and Observation hills by the defenders, with Castle Hill 2 mi (3.2 km) east of Mill Hill.[20]
The positions had been fortified with machine-gun posts and a modest amount of barbed wire. The defences were impossible to by-pass and had good observation but with so little artillery little advantage could be gained from it. The gap was too wide for the number of defenders, the hills being far enough apart for an attacker to pass between them; only Castle Hill was behind the other fortified hill tops, providing very little scope for defence in depth. There were several camel tracks through the Mirgo Pass 8 mi (13 km) from Black Hill and the Jerato Pass in the Assa Hills, which gave further opportunities for the Italians to exploit their numerical superiority.[34][35]
Battle of Tug Argan
The Australians from Hobart with their Hotchkiss gun arrived at dawn on 10 August but the gun had to be dismantled for loading, which reduced its rate of fire to once every five minutes, while its 32 HE rounds and 32 solid shot lasted.[32] On 11 August, the Italians bombarded then attacked the west end of the Assa Hills at Punjab Ridge with a brigade of infantry, pushed back the company of the 3rd Battalion, 15th Punjab Regiment and the repulsed a counter-attack; attacks on Mill and Knobbly hills failed. On 12 August, all of the British positions were attacked simultaneously and by the evening Mill Hill, the least fortified position had been captured after a determined resistance by troops of the Northern Rhodesian Regiment. Two of the East African Light Battery howitzers were lost and the Italians had established themselves in the Assa Hills, dominating the southern side of the gap.[36] On 13 August, the defenders of Knobbly Hill defeated another attack but the Italians infiltrated down Mirgo Pass past the defended localities and ambushed a convoy carrying water and ammunition, which managed to fight its way through to Castle Hill. Next day, Castle Hill and Observation Hill were bombed and bombarded by artillery but an attack on Observation Hill failed. Mussolini signalled to Aosta,
Pour all available reserves into Somaliland to stimulate the operation. Order the entire Imperial air force to co-operate.
— Mussolini[36]
A counter-attack towards Mirgo Pass, by two companies of the 2nd KAR had some success, before it was forced back by Italian attacks. The Italians were close to positions from which they could cut off the defenders from their sole line of supply and the Italian advantage in artillery meant that the defended localities could be picked off piecemeal. After four days, the defenders were tiring and there was no better position to retreat to; an attempt to hold Berbara alone would be pointless. On 14 August, Godwin-Austen informed Henry Wilson, the General Officer Commanding-in-Chief (GOC-in-C) British Troops in Egypt of the situation, concluding that further resistance at Tug Argan would be futile and likely to result in the loss of the force. Wavell had been called to London and arrived on 7 August but Wilson kept him informed of events, signalling his decision to order the evacuation of the colony to London with a few minutes. Wavell told Churchill who said that it couldn't be helped, then Wavell left to return to Cairo.[37] Withdrawal would result in an estimated 70 percent of the force being saved but if necessary the defenders would fight on; when it was certain clear that the attack towards Mirgo Pass had failed, sufficient troops were left either to retrieve the situation or cover a withdrawal. Early on 15 August, Godwin-Austen signalled his conclusions to Wilson, who ordered Godwin-Austen to withdraw from the colony.[38] Godwin-Austin planned a slow withdrawal to Barkasan, about 33 mi (53 km) from Berbera, then to Nasiyeh, 17 mi (27 km) from the port. Over three nights, civilians then troops would be embarked, the time taken being determined by the monsoon, which usually made it difficult to reach ships by boat at night and before midday.[39]
Air operations
The British airfields at Berbera and Laferug had only small arms for defence, the two 3-inch anti-aircraft guns being reserved for the defence of the port. The landing grounds had been quickly made untenable by Regia Aeronautica bombing, two 94 Squadron Gloster Gladiator fighters being destroyed on the ground. Bombers were withdrawn to Aden, which meant a 400 mi (644 km) round-trip without fighter escort. It was most difficult to influence the tactical situation but the bombers attacked troops and their transport, bases and Addis Ababa, to try to divert Italian fighters. Blenheim Mk Is of 8, 11 and 39 squadrons and 203 squadron with Blenheim IVF fighters and 223 Squadron from Sudan, which arrived at Aden on 14 August and a flight of 84 Squadron from Iraq with Blenheim Mk Is flew standing patrols over Berbera for thirteen days, which limited the ability of the Regia Aeronautica to interfere with the evacuation.[40] Blenheims from 11 Squadron left Aden at 5:35 p.m. on 18 August and carried out a high-level bombing attack on Italian vehicles near Laferug but lost a bomber to CR.42s from 410a Squadriglia, one crewman surviving. While the Italian fighters were attacking the 11 Squadron aircraft, Wellesley bombers from 223 Squadron took off from Perim Island to attack the airfield at Addis Ababa and destroyed Aosta's personal aircraft. One SM.79, a Savoia-Marchetti SM.75 and three Ca.133 aircraft were destroyed according to Italian records and a SM.79 and SM.81 were badly damaged.[41]
Retreat to Berbera
After a long bombardment, the Italians overran Observation Hill and during the night of 15 August, the NRR retreated from Black, Knobbly and Castle hills. The Black Watch, two companies of the 2nd KAR and elements of 1/2nd Punjab Regiment formed a rearguard at Barkasan on the Berbera road, about 10 mi (16 km) behind Tug Argan and other troops moved back to Nasiyeh. The retirement was followed up cautiously by the Italians, who attacked the defenders at Barkasan on 17 August. The Black Watch made several counter-attacks and repulsed the attackers but it was only a matter of time before the defences were outflanked. The evacuation at Berbera went more smoothly than expected and Godwin-Austen was able to withdraw the rearguard at Nasiyeh and once night fell, bring back the rearguard from Barkasan.[39]
Evacuation
The Royal Navy had built an all-tide jetty and had commenced evacuating civilian and administrative officials and on 16 August, the British started to embark troops.[42] Attacks by the Regia Aeronautica on the British vessels in the Gulf of Aden and Berbera had begun on 8 August to little effect; HMAS Hobart was slightly damaged in two attacks and the auxiliary vessel Chakdina suffered splinter damage.[43] On 17 August, the Italian western column at Bulhar, about 40 mi (64 km) west of Berbera, was engaged by the light cruiser HMS Ceres and halted by gunfire.[22] After dark, the rearguard was withdrawn to Berbera with minimal losses and loading was complete by the early hours of 18 August. Before sailing for Aden early on 19 August, Hobart, with the force headquarters aboard, stayed behind to collect stragglers and complete the destruction of buildings, vehicles, fuel and stores. The tug Queen was the only British ship lost in the operation.[44] The Navy embarked 7,140 people, 5,690 of them being front-line troops, 1,266 civilians and 184 sick; Most of the Somalis of the SCC were sent home to wait for the British to return, earlier plans for them to fight a guerilla war being scrapped. SCC members who were embarked, became an armoured car unit under the same title.[45] There was little Italian interference with the evacuation, perhaps because on 15 August, the Duke of Aosta had ordered Nasi to allow the British to evacuate without too much fighting, in the hope of a peace agreement being mediated through the Vatican.[46] Italian troops entered Berbera during the evening of 19 August and Mussolini annexed the colony to the AOI, as part of the Italian Empire.[47]
Aftermath
Analysis
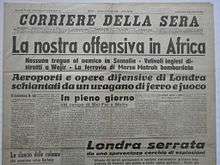
The Italians had shown the ability to co-ordinate columns separated by many miles of desert; the British forces had kept their discipline during the retreat and preserved most of their forces. British Somaliland was annexed to Italian East Africa and Mussolini boasted that Italy had conquered a territory the size of England, British Somaliland, the border outposts of Karora, Gallabat, Kurmak and Kassala in Sudan and Moyale and Buna in Kenya. News of the evacuation came as a shock to British public opinion but Wavell backed Godwen-Austen, saying that he had judged the situation correctly.[47][48] The British had to immobilise and abandon 350 vehicles and most of their stores because of the need to ferry everything to the ships offshore.[49]
Winston Churchill criticised Wavell for the loss of British Somaliland; because of the few casualties, Churchill thought that the colony had not been vigorously defended and proposed a court of enquiry. Wavell refused to co-operate and said that Godwin-Austen and Wilson had conducted a textbook withdrawal in the face of superior numbers. Wavell sent a telegram to Churchill which included the passage
...a big butcher’s bill was not necessarily evidence of good tactics.
— Wavell[50]
Churchill was said by General John Dill, the Chief of the Imperial General Staff (CIGS), to have been moved to "greater anger than he had ever seen him in before"; the incident was the beginning of the end for Wavell.[50] In 2016, Andrew Stewart wrote that given the exiguous nature of the British force in the colony, the defenders had done well to resist for as long as they had. The defence of British Somaliland took place during the Battle of Britain and that the defeat could not be portrayed in heroic terms. Churchill was wrong to condemn Wavell and his subordinates but as Minister of Defence as well as Prime Minister, he could dictate consequences to the defeated generals. Adolf Hitler called the evacuation of the colony a "hard blow" but
...all the British had lost was the privilege of maintaining an expensive garrison in their least valuable colony.
— Cowie War for Britain (1941)[51]
The capture of the colony was the greatest success of the Italians in the East African campaign but they had not been able to exploit the opportunities that they had created and delays caused by the terrain, weather and the cancellation of a coup de main by 300 infantry on the port, enabled the British to get away despite the improvised nature of the embarkation.[52]
Casualties
In 1954, Ian Playfair, the British official historian, wrote that the British suffered 260 casualties and estimated Italian losses of 2,052 men. Seven British aircraft were shot down and ten were badly damaged in the fourteen days' fighting.[53] In 1988, Alberto Rovighi, the Italian official historian, wrote that the Italians suffered 465 men killed, 1,530 wounded and 34 missing, a total of 2,029 men, of which 161 were metropolitan Italians and 1,868 were local Eritrean and Somali Ascari. The British-supporting Somalis suffered about 2,000 casualties during the invasion and occupation; about 1,000 Somalis became casualties fighting on the Italian side.[54][55] In 1993, Harold Raugh wrote that 38 of the British casualties had been killed and 222 wounded.[56] In a 1996 publication, Christopher Shores wrote that the RAF had seven aircraft losses and ten aircraft damaged.[41] In 2007, Andrea Molinari recorded 1,995 Italian casualties and four aircraft destroyed.[57]
Subsequent operations
On 16 March 1941, the British executed Operation Appearance from Aden; the two Sikh battalions of the Indian Army, that had been part of the defence force in August 1940 and a Somali commando detachment, were landed on either side of Berbera from transports escorted by HMS Glasgow, Caledon, Kandahar and Kingston.[58][59] The invasion by the Sikhs was the first successful Allied landing on an occupied beach of the war; few men of the Italian 70th Colonial Brigade offered resistance. Repairs began on the port and supplies for the 11th African Division were passing through within a week, reducing the road transport distance by 500 mi (800 km). The British re-captured the whole of British Somaliland and on 8 April, Chater was appointed Military Governor.[60]
See also
- East African Campaign (World War II)
- Eric Charles Twelves Wilson, awarded the Victoria Cross for actions at Observation Hill.[39]
Notes
- ↑ 39 (Bristol Blenheim), 112 (Gloster Gladiator), 94 (Gladiator), 223 (Vickers Wellesley), 47 (Wellesley, Vickers Vincent, Gloster Gauntlet), 14 (Wellesley), 203, 84, 45, 11 and 8 Squadrons (Blenheim). 102 sent one Martin Maryland and 216 sent one Bristol Bombay. The South African Air Force contributed 1 Squadron, 40 Squadron and 12 Squadron equipped with Hawker Furys (12 Squadron SAAF also operated German Junkers Ju 86 aircraft, purchased from the Luftwaffe in 1937.[26]
- ↑ 4°, 28° and 44° Gruppo of the Regia Aeronautica with 27 bombers, 23 fighters and 7 reconnaissance aircraft.[26]
- ↑ PO H. Jones, AB Hugh Sweeney and AB W. J. Hurren took the 3-pounder, which had been mounted on an improvised carriage, to reinforce the defenders at Tug Argan. The sailors went missing and were feared dead but became the first Australian prisoners of war, until they were liberated at Adi Ugri (now Mendefera) in Eritrea on 1 April 1941.[29]
- ↑ HMS Kimberley, HMS Aukland, Carlisle, Ceres and HMAS Hobart participated in shore bombardments. Hobart was attacked by three Italian fighters and sent its Walrus to attack an Italian headquarters at Zeila. The Walrus crew strafed Italian vehicles and dropped two 112 lb (51 kg) bombs.[31]
Citations
- ↑ Stewart 2016, p. 73.
- ↑ Molinari 2007, p. 115.
- ↑ Collins 1964, p. 39.
- ↑ Playfair 1959, p. 2.
- 1 2 Playfair 1959, pp. 38–40.
- ↑ Playfair 1959, pp. 6–7, 69.
- ↑ Playfair 1959, p. 19.
- 1 2 Playfair 1959, pp. 19, 93.
- ↑ Dear & Foot 2005, p. 245.
- ↑ Dear & Foot 2005, p. 247.
- 1 2 Stewart 2016, p. 62.
- ↑ Playfair 1959, pp. 123–125, 128.
- ↑ Playfair 1959, pp. 128, 167–168.
- ↑ Stewart 2016, pp. 63–64.
- 1 2 Raugh 1993, pp. 75–76.
- ↑ Stewart 2016, p. 65.
- ↑ Stewart 2016, p. 67.
- ↑ Playfair 1959, pp. 167–168.
- ↑ Playfair 1959, pp. 172–173.
- 1 2 Playfair 1959, p. 173.
- ↑ Playfair 1959, pp. 168, 174.
- 1 2 Mackenzie 1951, p. 23.
- 1 2 3 4 5 Playfair 1959, p. 174.
- 1 2 Stewart 2016, p. 75.
- ↑ Stewart 2016, pp. 75–77.
- 1 2 3 Shores 1996, pp. 42–54.
- 1 2 Playfair 1959, pp. 173–175.
- ↑ Stewart 2016, pp. 76–77.
- ↑ Gill 1957, p. 206.
- ↑ Stewart 2016, p. 77.
- ↑ Stewart 2016, p. 79.
- 1 2 Stewart 2016, p. 81.
- ↑ Playfair 1959, p. 175.
- ↑ Mackenzie 1951, p. 22.
- ↑ Playfair 1959, pp. 175–176.
- 1 2 Playfair 1959, p. 176.
- ↑ Raugh 1993, pp. 76–82.
- ↑ Playfair 1959, pp. 176–177.
- 1 2 3 Playfair 1959, p. 177.
- ↑ Playfair 1959, p. 178.
- 1 2 Shores 1996, p. 54.
- ↑ TAC 1942, p. 19.
- ↑ Collins 1964, pp. 39–40.
- ↑ Gill 1957, pp. 205–206.
- ↑ Stewart 2016, pp. 87, 263.
- ↑ Rovighi 1988, p. 138.
- 1 2 Mockler 1984, pp. 245–249.
- ↑ Playfair 1959, p. 179.
- ↑ Stewart 2016, p. 87.
- 1 2 Raugh 1993, pp. 82–83.
- ↑ Stewart 2016, p. 93.
- ↑ Stewart 2016, pp. 93–94.
- ↑ Playfair 1959, pp. 178–179.
- ↑ Maravigna 1949, p. 453.
- ↑ Rovighi 1988, p. 188.
- ↑ Raugh 1993, p. 82.
- ↑ Molinari 2007, p. 117.
- ↑ Playfair 1959, pp. 417.
- ↑ Rohwer & Hümmelchen 1992, p. 54.
- ↑ Playfair 1959, p. 418.
Sources
- Collins, D. J. E. (1964). Prasad, Bisheshwar, ed. The Royal Indian Navy, 1939–1945. Official History of the Indian Armed Forces in the Second World War, 1939–1945: General War Administration and Organisation. Series 2. V. Agra: Agra University Press. OCLC 154168563. Retrieved 7 July 2014.
- Dear, I. C. B. (2005) [1995]. Foot, M. R. D., ed. Oxford Companion to World War II. New York: Oxford University Press. ISBN 978-0-19-280670-3.
- Gill, G. Hermon (1957). "Chapter 5, R. A. N. Ships Overseas June–December 1940". Royal Australian Navy, 1939–1942. Australia in the War of 1939–1945, Series 2. I (online ed.). Canberra, ACT: Australian War Memorial. pp. 140–246. OCLC 848228. Retrieved 20 February 2016.
- Mackenzie, Compton (1951). Eastern Epic: September 1939 – March 1943 Defence. I. London: Chatto & Windus. OCLC 59637091.
- Maravigna, General Pietro (1949). Come abbiamo perduto la guerra in Africa. Le nostre prime colonie in Africa. Il conflitto mondiale e le operazioni in Africa Orientale e in Libia [How We Lost the War in Africa: Our First Colonies in Africa, the World Conflict and Operations in East Africa and Libya] (in Italian). Roma: Tosi. OCLC 643646990.
- Mockler, Anthony (1984). Haile Selassie's War: The Italian−Ethiopian Campaign, 1935–1941. New York: Random House. ISBN 978-0-394-54222-5.
- Molinari, Andrea (2007). La conquista dell'Impero, 1935–1941: La guerra in Africa Orientale [The conquest of the Empire, 1935–1941: The War in East Africa]. Collana Saggi storici/Historical essays series (in Italian). Milan: Hobby & Work. ISBN 978-88-7851-514-7.
- Playfair, Major-General I. S. O.; et al. (1959) [1954]. Butler, J. R. M., ed. The Mediterranean and Middle East: The Early Successes Against Italy (to May 1941). History of the Second World War, United Kingdom Military Series. I (3rd ed.). HMSO. OCLC 494123451. Retrieved 3 September 2015.
- Raugh, H. E. (1993). Wavell in the Middle East, 1939–1941: A Study in Generalship. London: Brassey's UK. ISBN 978-0-08-040983-2.
- Rohwer, Jürgen; Hümmelchen, Gerhard (1992) [1968]. Chronik des Seekrieges 1939–1945: Hrsg. vom Arbeitskreis für Wehrforschung und von der Bibliothek für Zeitgeschichte [Chronology of the War at Sea, 1939–1945: From the Working Group for Military Research and from the Library for Contemporary History] (in German). G. Stalling (2nd trans. ed.). Oldenburg: Naval Institute Press, Annapolis, MD. ISBN 978-1-55750-105-9.
- Rovighi, Alberto (1988) [1952]. Le Operazioni in Africa Orientale: (giugno 1940 – novembre 1941) [Operations in East Africa: (June 1940 – November 1941)] (in Italian). Roma: Stato Maggiore Esercito, Ufficio storico. OCLC 848471066.
- Shores, Christopher (1996). Dust Clouds in the Middle East: The Air War for East Africa, Iran, Syria, Iran and Madagascar, 1940–42. London: Grub Street. ISBN 978-1-898697-37-4.
- Stewart, A. (2016). The First Victory: The Second World War and the East Africa Campaign (1st ed.). New Haven, CT: Yale University Press. ISBN 978-0-300-20855-9.
- The Abyssinian Campaigns: The Official Story of the Conquest of Italian East Africa. Army at War. London: Issued for the War Office by the Ministry of Information (HMSO). 1942. OCLC 894319.
Further reading
- Abdisalam, Mohamed Issa-Salwe (1996). The Collapse of the Somali State: The Impact of the Colonial Legacy. London: Haan Associates. ISBN 978-1-87420-991-1.
- Antonicelli, Franco (1961). Trent'anni di storia italiana 1915–1945: dall'antifascismo alla Resistenza: lezioni con testimonianze [Thirty Years of Italian History 1915–1945: From Antifascism to Resistance: Lessons with Testimonials]. Saggi (in Italian). Torino: Einaudi. OCLC 828603112.
- Ball, S. (2009). The Bitter Sea: The Struggle for Mastery in the Mediterranean 1935–1949 (1st ed.). London: HarperPress. ISBN 978-0-00-720304-8.
- Del Boca, Angelo (1986). Italiani in Africa Orientale: La caduta dell'Impero [The Italians in East Africa, the fall of the Empire] (in Italian). Roma-Bari: Laterza. ISBN 978-88-420-2810-9.
- Ferrara, Orazio (2005). "La battaglia di Tug Argan Pass (La conquista del Somaliland britannico)" [The Battle of Tug Argan Pass (The Conquest of British Somaliland)]. Eserciti nella Storia (in Italian). Parma: Delta. Anno VI (32). ISSN 1591-3031.
- Jackson, Ashley (2006). The British Empire and the Second World War. London: Hambledon Continuum. ISBN 978-1-85285-517-8.
- Official History of the Operations in Somaliland, 1901–04. I (online ed.). London: Harrison and Sons for HMSO War Office, General Staff. 1907. OCLC 903224942. Retrieved 6 September 2017.
- Official History of the Operations in Somaliland, 1901–04. II (online ed.). London: Harrison and Sons for HMSO War Office, General Staff. 1907. OCLC 915556896. Retrieved 6 September 2017.
- Wavell, A. (4 June 1946). "Operations in the Somaliland Protectorate, 1939–1940 (Appendix A – G. M. R. Reid and A. R. Godwin-Austen)" (37594). London: London Gazette. pp. 2719–2727. OCLC 265544298.
External links
| Wikimedia Commons has media related to Italian conquest of British Somaliland. |
- Official Italian "Bulletins of War" on the conquest of British Somaliland (in Italian)
- Photos of the Italian conquest of Somaliland
- Maps and articles on the war in Italian East Africa (in Italian)
- WWII in the Italian colonies (in Italian)
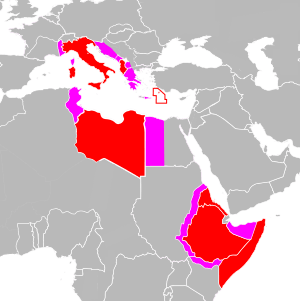
| Subdivisions |
| The Italian empire before WWII is shown in red. Pink areas were annexed/occupied for various periods between 1940 and 1943. Italian concessions and forts in China are not shown. | ||||||||||||
|---|---|---|---|---|---|---|---|---|---|---|---|---|---|---|
| Settlers and Irredentism |
| |||||||||||||
| Architecture |
| |||||||||||||
| Infrastructure | ||||||||||||||
| Political concepts | ||||||||||||||
| Police and military |
| |||||||||||||
| Currencies and Stamps | ||||||||||||||