Battle of Tug Argan
| Battle of Tug Argan | |||||||
|---|---|---|---|---|---|---|---|
| Part of the East African Campaign of the Second World War | |||||||
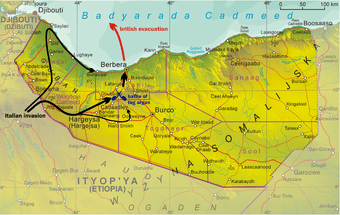 Map depicting the location of the Battle of Tug Agran and the subsequent British retreat from Berbera | |||||||
| |||||||
| Belligerents | |||||||
|
|
| ||||||
| Commanders and leaders | |||||||
|
|
| ||||||
| Strength | |||||||
| 5,000 regular and colonial infantry | At least 24,000 colonial troops with 5,000 Italian regulars | ||||||
| Casualties and losses | |||||||
|
38 killed 102 wounded 120 missing 7 aircraft destroyed 5 artillery pieces captured 5 mortars captured[1] |
465 killed 1530 wounded 34 missing[1] | ||||||
The Battle of Tug Argan was a land battle between forces of the British Empire and Italy, which took place on 11–15 August 1940 in what was British Somaliland (later the independent and renamed Somalia). The struggle determined the outcome of the Italian conquest of British Somaliland, Fascist Italy's successful attempt to conquer the latter British colony, and thus formed a part of the larger East African Campaign of the Second World War.
Italian invasion forces were advancing northwards on a north-south road towards the colonial capital of Berbera through the Tug Argan gap (named after the dry riverbed, or "tug," running across it) in the Assa range of hills, when they encountered British units lying in fortified positions on a number of widely distributed hills across its breadth. Italian forces, after an intense four-day encounter, overcame the relatively weak British positions and were able to seize the gap, compelling the defenders to withdraw to Berbera.
As a result of Italian victory at Tug Argan, the position of British forces in Somaliland was compromised and colonial authorities were forced to initiate a naval evacuation of the garrison from Berbera. Italy was able to quickly secure the territory, an achievement whose propaganda value would ultimately outweigh its relatively minute strategic importance.
Background
As Italy entered the war at the conclusion of the Battle of France, its Fascist dictator Benito Mussolini looked to Africa as a possible location for easy propaganda victories, so as to justify his joining the conflict and glorify Italy's hitherto speculative role it. The remote colony of British Somaliland, a poorly defended area of what is now Somalia, appeared to be easy prey. Though Italy lacked the logistical facilities necessary to support a prolonged campaign in the region, an expedition to Somaliland was authorised, and set for late 1940. Italian forces in East Africa were relatively strong in numbers, if not in quality, with 29 colonial brigades, each consisting of several infantry battalions and some light artillery, concentrated around the recently conquered Ethiopian capital, Addis Ababa. The Italians also possessed at least 60 light and medium tanks as well as 183 aircraft, consisting of both fighters and medium to light bombers.[2]
Italian armies easily outnumbered those of the British, whose skeleton colonial forces were stretched thinly across North and East Africa. With Cyrenaica and the Sudan under threat as well as Somaliland, only token units were available to control what was considered a relatively unimportant possession, devoid of infrastructure, productive capacity, or resources. In fact, until December 1939 British policy had been to abandon Somaliland altogether in the event of such an invasion. However, General Archibald Wavell, the newly-appointed commander of British armies in Africa, successfully argued to the British Chiefs of Staff that Somaliland should be defended, for much the same motives as Italy drew upon in the attempt to seize it. A multiracial congregation of five battalions, the minimum force adjudged capable of defending the region, was assembled by the beginning of August.[3][4] These included two Sikh battalions and the 2nd King's African Rifles, which arrived by sea in from Aden. The Indian units, contrary to expectations, were composed of well-equipped and professional soldiers, a much-needed complement to the inexperienced Rhodesian troops already present.[5]
Berbera, the capital of British Somaliland and its only major city and port, was the obvious destination of any invasion. As plans took shape for the blocking of Italian passage to the city, it became apparent that the border with Ethiopia was too long and open to be defended effectively. However, the rugged Somali countryside (as is pictured below) was impassable by vehicles, meaning that the British could limit their defences to choke points on the only two navigable roads to Berbera, which wound through the desert via the towns of Hargeisa and Burao, respectively. The Hargeisa road, the most direct route to the capital, was most easily clogged at the Tug Argan gap in the Assa hills. Unfortunately for any prospective guardian, the pass was flat and open, meaning that a small force could not hold out for long against superior numbers. In spite of this crippling topographical disadvantage, three battalions of the five originally allocated and a light artillery battery were committed to the defense of Tug Argan. Another battalion was held in reserve.[6]
Britain's tenuous grasp on Somaliland was further loosened by the surrender of France on 22 June. Colonial military planners had anticipated fighting in conjunction with the French, who controlled the westernmost quarter of the Somali coast, and had thus relinquished military control of the border regions adjoining the two protectorates. France had actually stationed a larger garrison in Somaliland than had Britain, and could also count on reinforcements from Madagascar in the event of a serious attack. Britain's dependence on these factors would be severely punished during the disastrous summer of 1940. Though the armistice had been signed at Compiègne, General Paul Le Gentilhomme, Commander-in-Chief of French East African forces, announced that he would not join Vichy France in neutrality, proposing instead to continue the struggle from Djibouti. His dissidence was short-lived. Le Gentilehomme was relieved of command by his frustrated superiors on 22 July, and subsequently fled to Allied territory for protection from the pro-Vichy garrison. His successor soon achieved detente with the Italians, leaving an undermanned British Somaliland out in the cold.[7]
On 3 August, General Guglielmo Nasi led 35,000 Italian troops, the vast majority of them native conscripts, across the border from their staging point at Harar into British Somaliland. The invaders were organised into three columns: one on the left, which would advance north to the coast at Zeila—a route recently vacated by the now-Vichy French—before swinging east to Berbera; one on the right, which would make the opposite motion on the Burao road; and a main central column, led by Carlo de Simone, containing the bulk of his forces. Simone was to capture the British positions at Tug Argan and make straight for Berbera, effectively ending the campaign with a single decisive battle.[5] The Italians advanced upon and soon captured Hargeisa on 6 August, forcing harrying British camel soldiers to withdraw completely. A few days of rest and rearmament ensued before the march was resumed on 8 August. This period of stasis was extended by administrative inertia, as Italian officers complained of heavy rains and unusable roads. It took the frustrated prodding of headquarters staff in Addis Ababa to induce further movement from the desultory Nasi. Following two days of probing, de Simone and his contingent reached the head of the Tug Argan gap and made preparations to surpass it. An initial assault was scheduled for 11 August. In the meantime, General A. R. Godwin-Austen arrived to take command of the enlarged British garrison from Arthur Chater, who would remain in local control of the Tug Argan front.[8][9]
Battle

Having realized that holding Tug Argan was essential to halting any invasion, British command poured all available resources—though diminished by French duplicity—into its defense. A unit of the Black Watch was rushed to the village of Laferug (to the rear of the gap) late on 10 August by truck, and a brigade headquarters was established at nearby Barkasan. Meanwhile, those battalions already present entrenched themselves across the broad arc of the gap.[10] On the British right were positioned three companies of the 3/15 Punjab Regiment, holding a group of southwest-facing strongpoints overlooking the rough wilderness beside the road. The British left was covered by another group of Indian troops, facing directly southward from atop the aptly named 'Punjab Ridge.'[1] The gap itself was manned by the more numerous Rhodesian line infantry. They sat upon a line of rocky knolls, named from north to south Black, Knobbly, Mill, Observation, and Castle Hills, positioned in a ragged diagonal echelon with 2,000–2,500 yard gaps between them across the mouth of the gap. Each was a miniature fortress, housing machine-gun nests surrounded by concentric rings of barbed wire. These strongpoints were keystones in the British arch; fall, and the line would crumble. Given that the front was far too wide for the troops available and the gaps between the hills too large, maintaining this balance in the face of enemy numbers was shaping up to be a difficult task. Worse, the linear pattern of the mounds denied the British position meaningful depth, thereby increasing its vulnerability to individual Italian breakthroughs.[11]
Late on 10 August, the first signs of Italian preparations became apparent to the defenders of Tug Argan. Through the day, the headlights of advancing Axis supply convoys were clearly visible, and Somali refugees, fleeing before De Simone's column, swarmed across the Mirgo Pass on the British left. A K.A.R. patrol skirmished briefly with a quartet of Italian armoured cars, but the exchanged gunfire terrified the British camels and forced their riders to flee.[12] After receiving word from other scouts that the Italian tanks and infantry were easily avoiding the crude minefields laid before the creek, all Allied forces still holding the forward trenches were withdrawn to the prepared battle line. As this maneuver was nearing completion, Italian artillery and aircraft initiated a preliminary bombardment of the hills, and parties of second-rate Ethiopian and Blackshirt troops made a series of futile sallies through the early evening.[13] In the meantime, De Simone deployed his main forces opposite the British positions a move that presaged a traditional set battle. On the Italian left, II Brigade prepared to advance through the wilderness towards the Punjab troops in the north. In the centre, XIV Brigade faced the Rhodesian hilltop positions within the pass, and XV Brigade looked north towards Punjab Ridge on the Italian right. Behind them were XIII Brigade and the armoured vehicles.[1]
The attack on the gap began at 7:30 am on 11 August, as a flight of Savoia-Marchetti SM.81 medium bombers attacked British defenders on Punjab Ridge. This half-hour assault was followed by a long artillery bombardment lasting until noon. At 12:30, the infantry attack began. II Brigade began moving slowly towards the Indians through the trackless wilderness north of the road, XIV Brigade attacked Mill, Knobbly, and Observation Hills, and XV Brigade clambered atop Punjab Ridge, engaging its defenders. The attacks of XIV Brigade against the Rhodesians failed, but XV Brigade managed to drive off the Indian defenders of Punjab Ridge. Counterattacks were mounted against the Italians, but these were unsuccessful.[1][14] The Italian attack on the hills was renewed the next day, 12 August. Black, Knobbly, and Mill Hills were on the receiving end of repeated assaults by XIV Brigade, and the weakest of them, Mill Hill, began to reel under the sustained pressure. By 4:00 pm, the British defences were being overrun, and after nightfall the British retreated from the Hill, spiking their guns as they left.[1]
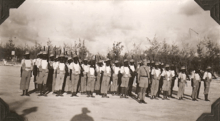
Kenyan troops of the King's African Rifles, who played a prominent role on the British side at Tug Argan
13 August saw little change in the overall situation of the battle. XIV Brigade's attacks on the Rhodesian hilltop positions failed yet again after some intense fighting, while II Brigade continued their trek through the wilderness towards the northern hills. XV Brigade began to infiltrate behind British lines, finding a supply convoy which was attacked and dispersed.[1] On 14 August, the embattled XIV Brigade was relieved of their role in the battle after suffering heavy casualties in their continuous offensives, and was replaced by XIII Brigade. The fresh troops attacked Observation Hill but failed again, even after continuous artillery bombardment throughout the day. II Brigade, meanwhile, had still failed to engage the Indians, and XV Brigade made little progress before fending off a counterattack from two companies of the 2nd King's African Rifles.[14]
By 14 August, Godwin-Austen realised the peril of his situation, with XV Brigade nearly able to cut him off from behind, his troops exhausted, and his artillery completely deficient and running low on ammunition, and informed General Henry Maitland Wilson, who was in command at Cairo while Wavell was absent in England, that retreat from Tug Argan and evacuation from British Somaliland was now a necessity. If his forces could be evacuated, perhaps 70 percent of them might be removed. Otherwise, he would be forced to fight to the death, with his entire command destroyed. Wilson agreed to Godwin-Austen's request the next day, and preparations were made to flee after dark on 15 August.[15] During that day, Observation Hill was attacked for the final time by De Simone's forces. De Simone had decided to continue the attack in the gap, in lieu of completing the flanking manoeuvre and finally this proved successful. By 7:00 pm XIII Brigade had seized Observation Hill and the British retreated from it in disarray. After sundown, the defenders of the remaining hills were withdrawn, along with the Punjab troops, who departed just as II Brigade was able to make inroads through their abandoned positions. British resistance had collapsed, and as Godwin-Austen and his forces fled towards Berbera, the Italians seized control of the Tug Argan positions.[1]
Aftermath

Following the British withdrawal from Tug Argan, the Italians swiftly completed the investment of Berbera. To permit the main body of the colonial garrison to reach the coast, units of the Black Watch, 2nd Battalion King's African Rifles, and the 1/2 Punjab Regiment formed a small rearguard at Barakasan, which fought gamely into the night of 17 August.[16] The Royal Navy had already begun to evacuate military personnel from Berbera on 16 August, operations that Italian aircraft mystifyingly (considering the previous activity of Fascist tactical bombers) ignored, possibly due to uncertainty about whether a peace treaty might be signed in the near future. By 19 August, all remaining British military forces, including the rearguard, the remainder of which had embarked late the previous day, had been evacuated by sea.[17] An estimated 5,300–5,700 troops in total would reach the relative safety of Aden.[18] Italian forces, which had been held up by naval bombardment by HMS Ceres on 17 August, arrived in a deserted Berbera on the 19th. This final advance marked the fall of British Somaliland, which, though bitterly contested by Anglo-African infantry, was almost certainly inevitable. In sum, Britain had suffered extremely light casualties, with 38 dead, 102 wounded, and 120 missing; however, 10 artillery pieces had to be left behind, and were captured by the advancing Italians. By way of comparison, Italy paid dearly for the province, suffering 465 deaths and 1530 wounded.[1]
The retreat from Somaliland, despite the prudent conduct of local commanders, infuriated British Prime Minister Winston Churchill. Irritated by Mussolini's subsequent boasting, Churchill excoriated Wavell via cable, labelling the low casualty numbers on the British side a mark of blatant cowardice and demanding that Godwin-Austen be subjected to a board of inquiry. Wavell responded that "a big butcher's bill is not necessarily evidence of good tactics" in defense of the performance of British troops and commanders during the battle. This retort further enraged Churchill, under whose influence Wavell's promising career stuttered.[19]
Despite the emotional attachments professed by Allied and Axis leaders to the rule of Somaliland, few spoils changed hands as a result of Italian victory. Defeat was a blow to British prestige and pride, but the Somaliland territory itself was a colonial backwater and could be lost without much strategic afterthought. In fact, Britain incurred monetary gains after being relieved of the necessity to station an expensive garrison there. But the impact could have been far greater if the Italians had managed to move faster after the battle. Heavy rains and difficulties supplying the troops damaged these efforts, as well as removed any chance of a sizeable strategic victory.[20]
See also
References
- 1 2 3 4 5 6 7 8 9 Stone 1998.
- ↑ Playfair 1954, pp. 165–166.
- ↑ Playfair 1954, pp. 171–173.
- ↑ Mackenzie 1951, p. 22.
- 1 2 Mockler 2003, p. 243.
- ↑ Playfair 1954, p. 173.
- ↑ Moyse-Bartlett, p. 494.
- ↑ Playfair 1954, p. 174.
- ↑ Mockler 2003, p. 245.
- ↑ Mockler 2003, p. 245.
- ↑ Playfair 1954, p. 175.
- ↑ Moysse-Bartlett 2012, pp. 497-8.
- ↑ Stewart 2016, p. 78.
- 1 2 Playfair 1954, p. 176.
- ↑ Playfair 1954, pp. 176–177.
- ↑ Wavell 1946, p. 2,724.
- ↑ Stewart 2016, p. 87.
- ↑ Tucker 2005, p. 1179.
- ↑ Pitt 2004, pp. 48–49.
- ↑ Stewart 2016, pp. 93–94.
Sources
- Mackenzie, Compton (1951). Eastern Epic: September 1939 – March 1943: Defence. I. London: Chatto & Windus. OCLC 59637091.
- Mockler, Anthony (2003). Haile Selassie's War. Signal Books. ISBN 9781902669533.
- Moyse-Bartlett, Lieutenant-Colonel H. (2012). The King's African Rifles - Volume 2. Andrews UK Limited. ISBN 9781781506639.
- Pitt, Barrie (2004). Churchill and the Generals. Barnsley: Pen and Sword. ISBN 978-1-84415-101-1.
- Playfair, Major-General I. S. O.; et al. (1954). Butler, J. R. M., ed. The Mediterranean and Middle East: The Early Successes Against Italy (to May 1941). History of the Second World War, United Kingdom Military Series. I. London: HMSO. OCLC 494123451. Retrieved 3 September 2015.
- Stewart, Andrew (2016). The First Victory: The Second World War and the East Africa Campaign. London: Yale University Press. ISBN 978-0-300-20855-9.
- Tucker, Spencer (2005). World War II. Santa Barbara, CA: ABC-CLIO. ISBN 978-1-85109-857-6.
- Wavell, A. (1946). Operations in the Somaliland Protectorate, 1939–1940 (Appendix A – G. M. R. Reid and A. R. Godwin-Austen). London: London Gazette. published in "No. 37594". The London Gazette. 4 June 1946. pp. 2719–2727.