Operation Agreement
Operation Agreement comprised a series of ground and amphibious operations carried out by British, Rhodesian and New Zealand forces on Axis-held Tobruk from 13–14 September 1942, during the Second World War. A Special Interrogation Group party, fluent in German, took part in missions behind enemy lines. Diversionary actions extended to Benghazi (Operation Bigamy a.k.a. Snowdrop), Jalo oasis (Operation Nicety a.k.a. Tulip) and Barce (Operation Caravan a.k.a. Hyacinth).[3][lower-alpha 1] Attacking without air support, the Tobruk raid was a disaster. The British force lost several hundred killed and captured, one cruiser, two destroyers, six motor torpedo boats and dozens of small amphibious craft.
Targets
The objective of Operation Agreement was to undermine the Axis war effort in North Africa by destroying airfields, harbour facilities, supply ships, vehicles and large oil stores.[5] The Allies also intended to capture Jalo oasis, which was to be used as a gathering point for the retreating ground forces involved in the other operations.[6]
Prelude
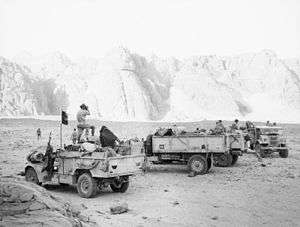
G1 and T1 patrols of the Long Range Desert Group (LRDG) with 50 men, 12 light trucks and five jeeps assaulted Barce airfield and the main barracks, destroying 16 aircraft and damaging seven more.[7][8] In the attack on the barracks the LRDG lost four men and two vehicles. Later near Zaptié the LRDG force was intercepted by an Italian motorised company with all vehicles damaged or destroyed, with the exception of two trucks which were loaded with the most seriously injured, while the others went on foot for 160 km. The Italians took ten prisoners (seven New Zealanders and three Rhodesians), all injured. After a year, four of the New Zealanders were able to escape.[8]
The Special Air Service (Lieutenant Colonel David Stirling), supported by S1 and S2 patrols of the LRDG, were to attempt a big raid on Benghazi but, after running behind schedule, their presence was discovered after a clash at a roadblock as dawn broke. With the element of surprise lost and the protection of darkness receding, Stirling ordered a withdrawal.[3] The attack on Jalo oasis was carried out by the Sudan Defence Force and S1 and S2 patrols of the LRDG. The first attack on the night of 15/16 September, was easily repelled by the defenders, who had been alerted to the operation in advance and had been reinforced. The attackers withdrew on 19 September, as an Italian relief column approached the oasis.[8]
Main attack
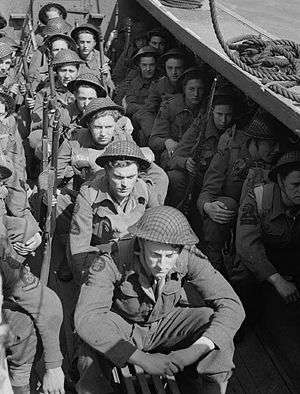
Allied strength for Operation Agreement involved an amphibious force of about 400 Royal Marines, 180 Argyll and Sutherland Highlanders under Captain Norman MacFie, 14 Platoon of Z Company, 1 Battalion Royal Northumberland Fusiliers led by Lieutenant Ernest Raymond, army engineers and about 150 SAS approaching from the desert ("Force B"). The amphibious force was split into "Force A", supported by destroyers and intended to land on the peninsula north of Tobruk, while "Force C", composed by coastal units, was directed towards an inlet east of Tobruk harbor. Initially successes from Force "B" led to the capture of an Italian 152 mm coastal battery, but this was quickly retaken by Italian marines from the San Marco Battalion. Force "B" commander, Lt. Col. John Edward Haselden, was killed in action. Most of the shore batteries and positions remained in Axis hands.
Force A
A group of commandos from the submarine HMS Taku ("Force E") failed to set up beacons on the shore to guide the main British force, due to bad sea conditions. The garrison had been reinforced and British destroyers bringing in the seaborne troops landed them on the wrong beach, far to the west of the intended one.[9] The British destroyer Sikh, which led the landing attempt, was hit by Italian 152 mm (6-inch) shore batteries and German 88 mm anti-tank guns while taking on troops. Zulu had gone to the rescue but was unable to pull Sikh clear and it eventually sank; 115 crew were reported killed and the survivors were taken prisoner. On the afternoon of 14 September, while returning to Alexandria, Coventry was badly damaged by German Ju-87 dive bombers from Crete and 63 crew were killed. Coventry was scuttled by Zulu which was hit by Italian fighter-bombers a little later and needed assistance. While under tow and 100 nautical miles (120 mi; 190 km) from Alexandria Zulu sank with the loss of 39 crew.[10][11][12]
Force C
Another landing by motor launches and boats, carrying Argyll and Sutherland Highlanders and Royal Northumberland Fusiliers (whose Vickers medium machine-guns were to take care of perimeter defence), partially failed to reach the planned landing point. Because of extremely heavy fire from Tobruk harbor, only two MTBs made it into Marsa Umm el Sciausc, the target cove. One became stranded in the shallow water, the other managed to land Sergeant Miller and his group of Geordie Fusiliers and sail out.[13] The three motor launches (ML 353, Ml 352 and ML 349) and 17 MTBs were beaten off by boom defences and an Italian flotilla of torpedo boats and armed motor barges. ML 353 was set on fire and scuttled, either hit by the Italian warships[14][15] or strafed by Italian Macchi C.200 fighters, while ML 352, MTB 308, MTB 310 and MTB 312 were lost to Axis aircraft.[16] MTB 314, the motor torpedo boat that was damaged and ran aground during the battle, was captured by the German harbour minesweeper R-10 at dawn, with 117 seamen and soldiers on board.[17] Although they were frequently dive-bombed and strafed during their return journey, the bulk of the MTBs and the surviving ML reached Alexandria.[18]
Aftemath
Dozens of British seamen and marines were rescued from the sea by the Italian Spica-class torpedo boat Castore, the Generali-class Montanari, the armed tug Vega, a flotilla of German harbour minesweepers and several Italian and German motor barges.[1] A couple of makeshift motor amphibious craft, stragglers from "Force A" and attempting to reach Alexandria at very low speed, were also captured with their crews.[19]
Losses amounted to about 300 Royal Marines, 160 soldiers, 280 sailors, one light cruiser (HMS Coventry), two destroyers (HMS Sikh and Zulu), two motor launches, four MTBs and several small craft.[3] The Royal Marines suffered 81 killed and the Royal Navy destroyers Sikh and Zulu and the cruiser Coventry reported the loss of another 217 men. About 576 British survivors were captured.[18] Axis losses were 15 Italians and one German killed, and 43 Italians and seven Germans wounded.[3].
See also
Notes
Footnotes
- 1 2 3 4 L'operazione Daffodil nel piano Agreement (in Italian)
- 1 2 Desert Raiders: Axis and Allied Special Forces, 1940-43, Andrea Molinari, p. 71, Osprey Publishing, 2007
- 1 2 3 4 Molinari & Anderson (2007), p. 71
- ↑ O'Carroll 2005, pp. 25–26
- ↑ Smith, pp. 22–23
- ↑ Molinari & Anderson (2007), p. 70
- ↑ O'Carroll 2005, p. 62
- 1 2 3 Molinari & Anderson (2007), p. 72
- ↑ Smith, pp. 90–95
- ↑ HMS Sikh uboat.net
- ↑ HMS Zulu uboat.net
- ↑ HMS Coventry uboat.net
- ↑ Smith, p. 111
- ↑ Sadler, John (2016). Operation Agreement: Jewish Commandos and the Raid on Tobruk. Bloomsbury Publishing. p. 268. ISBN 1472814894.
- ↑ Bragadin, Marc'Antonio (1957). The Italian Navy in World War II. Annapolis: United States Naval Institute. p. 220. ISBN 978-0-405-13031-1.
- ↑ Sadler (2008), pp. 266-67
- ↑ Rohwer 2005 p. 196
- 1 2 Operation "Agreement"
- ↑ Smith, pp. 122, 144
References
- Landsborough, Gordon (1989). Tobruk Commando: The Raid to Destroy Rommel's Base. London: Presidio Press. ISBN 1-85367-025-1.
- Molinari, Andrea; Anderson, Duncan (2007). Desert Raiders: Axis and Allied Special Forces 1940–43. Oxford: Osprey. pp. 68–73. ISBN 1-84603-006-4.
- O'Carroll, Brendan (2004). The Barce Raid. Wellington, NZ: Ngaio Press. ISBN 0-9582243-8-2.
- Rohwer, Jürgen; Hümmelchen, Gerhard; Weis, Thomas (2005). Chronology of the War at Sea 1939–1945: The Naval History of World War Two (3rd rev. ed.). London: Chatham. ISBN 1-86176-257-7.
- Smith, Peter Charles (1987). Massacre at Tobruk: The Story of Operation Agreement. London: Kimber. ISBN 0-7183-0664-3.