Operation Claymore
Operation Claymore was the code name for a British commando raid on the Lofoten Islands in Norway during the Second World War. The Lofoten Islands were an important centre for the production of fish oil and glycerine, used in the German war economy. The landings were carried out on 4 March 1941, by the men of No. 3 Commando, No. 4 Commando, a Royal Engineers Section and 52 men from the Norwegian Independent Company 1. Supported by the 6th Destroyer Flotilla and two troop transports of the Royal Navy, the force made an unopposed landing and generally continued to meet no opposition. The original plan was to avoid contact with German forces and inflict the maximum of damage to German-controlled industry. They achieved their objective of destroying fish oil factories and some 3,600 t (3,500 long tons) of oil and glycerine. The British experienced only one accident; an officer injuring himself with his own revolver and returned with some 228 German prisoners, 314 loyal Norwegian volunteers and a number of Quisling regime collaborators.
Through naval gunfire and demolition parties, 18,000 tons of shipping were sunk. Perhaps the most significant outcome of the raid was the capture of a set of rotor wheels for an Enigma cypher machine and its code books from the German armed trawler Krebs. German naval codes could be read at Bletchley Park, providing the intelligence needed to allow Allied convoys to avoid U-boat concentrations.[1] In the aftermath, the evaluation of the operation differed, with the British, especially Winston Churchill and the Special Operations Executive, deeming it a success. In the eyes of the British the main value of such actions was to tie up large German forces on occupation duties in Norway. Martin Linge and the other Norwegians involved were more doubtful of the value of such raids against the Norwegian coast but were not told of the value of the seized cryptographic information. Following Operation Claymore, the Norwegian special operations unit Norwegian Independent Company 1 was established for operations in Norway.
Background
After the British Expeditionary Force (BEF) had achieved the Dunkirk evacuation in 1940, British Prime Minister Winston Churchill called for a force to be assembled and equipped to inflict casualties on the Germans and bolster British morale. Churchill told the joint chiefs of staff to propose measures for an offensive against German-occupied Europe and stated that "...they must be prepared with specially trained troops of the hunter class who can develop a reign of terror down the enemy coast".[2] Lieutenant-Colonel Dudley Clarke, had already submitted such a proposal to General Sir John Dill, the Chief of the Imperial General Staff. Dill, aware of Churchill's intentions, approved Clarke's proposal.[2] Three weeks later, the first commando raid—Operation Collar—took place. The raiders failed to gather any intelligence or damage any German equipment; their only success was in killing two German sentries.[2]
The commandos came under the operational control of the Combined Operations Headquarters. The man initially selected as the commander was Admiral Roger Keyes, a veteran of the Gallipoli Campaign and the Zeebrugge Raid in the First World War.[3] In 1940, the call went out for volunteers from among the serving Army soldiers within certain formations still in Britain and men of the disbanding divisional Independent Companies originally raised from Territorial Army divisions who had seen service in Norway.[lower-alpha 1] In November 1940, the new army units were organised into a special service brigade under Brigadier J.C. Haydon, with four special service battalions.[5] By the autumn of 1940, more than 2,000 men had volunteered for commando training and the special service brigade now consisted of twelve units which were called commandos.[6]
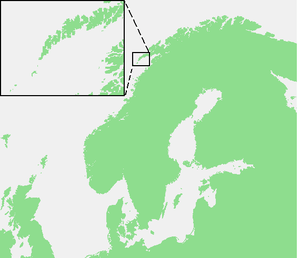
After an inauspicious start, the first large-scale commando raid was to be on the Lofoten Islands, which are just off the Norwegian coast and inside the Arctic Circle, about 900 mi (1,400 km) from Britain. Once at the islands, the raiders would be landed at four small ports to destroy fish oil-producing factories. All the oil produced was being shipped to Germany, which extracted the glycerine, a vital ingredient in the manufacture of high explosives.[7] The commandos would be transported to the islands aboard two new infantry landing ships, escorted by four Tribal-class and one L-class destroyer of the 6th Destroyer Flotilla.[7]
Mission
.jpg)
The commander of the raid was Rear Admiral L. H. K. Hamilton.[8] The objectives of Operation Claymore were threefold. The Royal Navy were asked to safely escort the transports carrying the landing force to the islands and back. While there, they were to destroy or capture any German shipping or Norwegian shipping working for the Germans and provide naval gunfire support for the landing forces. The naval forces taking part were the escorts from the 6th Destroyer Flotilla: HMS Somali, HMS Bedouin, HMS Tartar, HMS Eskimo, and HMS Legion under the command of Captain C. Caslon. Two newly converted landing ships, HMS Queen Emma and HMS Princess Beatrix, were to transport the landing force.[9]
The landing force was provided by the special service brigade (Brigadier J. C. Haydon). The commandos taking part were 250 all ranks from No. 3 Commando (Major John Durnford-Slater), 250 all ranks of No. 4 Commando (Lieutenant Colonel D. S. Lister). They were supported by a section of Royal Engineers of No. 55 Field Company, (Second Lieutenant H. M. Turner) and four officers and 48 other ranks of the Norwegian Independent Company 1, (Captain Martin Linge).[9] The landing force were to destroy the oil-producing facilities in the ports of Stamsund, Henningsvær, Svolvær and Brettesnes, engage the German garrison and attempt to take prisoners of war found in the area. They were also to detain any supporters of the Norwegian Quisling party and persuade the local population to leave the island and join the Free Norwegian Forces.[9]
The force began its assembly at Scapa Flow in the Orkney Islands on 21 February 1941 and remained there for almost a week, before leaving for Norway just after midnight on 1 March 1941. The landing force was distributed amongst the ships, headquarters special service brigade were transported on Somali. No. 4 Commando which had been assigned landings at Svolvær and Brettesnes were on board Queen Emma. No. 3 Commando, which had been assigned landings at Stamsund and Henningsvær, were on board Princess Beatrix. The Royal Engineers and Norwegian forces were divided between both the landing ships.[9]
The time they had spent at Scapa Flow was used getting acquainted with the transport ships and the Landing Craft Assault they would be using to reach the shore. The problems the navy perceived providing gunfire support were also discussed, as the destroyers would not be able to approach closer than 1 mi (1.6 km) to shore owing to the shallows. Because of this, the commandos were trained to rely on their own weapons to provide covering fire and support each other from their landing craft. Plans were also made for them to look after themselves in case the destroyers were called away to deal with a naval threat, which included every man being ordered to take enough rations to last for 48 hours ashore.[10]
Landings
The naval task force known by the codename Rebel left Scapa Flow and headed towards the Faroes. They berthed in the Skálafjørður at 19:00 hours 1 March 1941 to take on fuel. Refuelling took five hours and the naval task force set out again heading northwards towards the Arctic to avoid detection by German air and sea patrols. They then turned east and headed towards Norway. They arrived at the Lofoten Islands during the early morning of 4 March 1941, just before 04:00 hours. Entering the Vestfjorden they were surprised to see all the harbour navigational lights illuminated, which they believed to be a sign that they were not expected and had achieved complete surprise.[10]
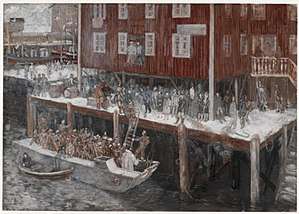
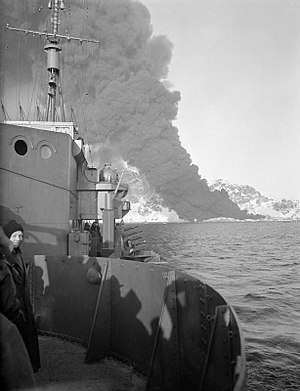
During the planning for the operation, plans were drawn up that called for simultaneous landings at all their targets at 06:30 hours, but on arrival, they decided to postpone the landings by 15 minutes so they would not be landing in total darkness. When they did commence to disembark the landing force, they were all ashore by 06:50 hours.[10] On shore, the landing force commenced their operations unopposed. The only shots fired were by the armed trawler Krebs, which managed to fire four rounds at HMS Somali before being sunk.[10] Other ships sunk by the landing forces were the merchant ships Hamburg, Pasajes, Felix, Mira, Eilenau, Rissen, Andø, Grotto, and Bernhard Schulte, which amounted to 18,000 tons of shipping.[7][11]
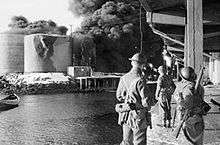
The force that landed at Stamsund destroyed the Lofotens Cod Boiling Plant. Two factories were destroyed at Henningsvær and 13 at Svolvær. In total, about 800,000 imperial gallons (3,600 m3) of fish oil, paraffin were set on fire.[11] They captured 228 prisoners of war, seven from the Kriegsmarine, three from the Heer, 15 from the Luftwaffe, two from the Schutzstaffel (SS), 147 from the Merchant Navy and 14 civilians.[11] Perhaps the most significant result of the raid was the capture of a set of rotor wheels for an Enigma cypher machine, and its code books. These were rescued from the sinking Krebs, although her commander, Lieutenant Hans Kupfinger, threw his machine (one of three known to be on the island) overboard minutes before he was killed. Documents found disclosed the Kriegsmarine Home Waters key for February and also helped solve the April traffic which was sent between 1 March and 10 May.[1] Their capture enabled Bletchley Park to read all the German naval codes for some time and provided the intelligence needed to allow Allied convoys to avoid U-boat concentrations.[12] By 13:00 hours, both the infantry landing ships Princess Beatrix and Queen Emma had embarked all their troops and were ready to sail.[10] With them came 300 volunteers for the Free Norwegian Forces in Britain.[7]
Aftermath
Operation Claymore was the first of twelve commando raids directed against Norway during the Second World War.[13] The Germans eventually increased the number of troops in Norway. By 1944, the German garrison in Norway was 370,000 men strong.[14] A British infantry division in 1944 had an establishment of 18,347 men.[15] No. 3 and No. 4 Commandos, would become part of the 1st Special Service Brigade that took part in the Normandy landings in June 1944. After the successful completion of the mission, Prime Minister Churchill issued a personal memo "to all concerned ... my congratulations on the very satisfactory operation".
See also
Notes
Footnotes
- ↑ The 10 independent companies were raised from volunteers in second line Territorial Army divisions in April 1940. They were intended for guerrilla-style operations in Norway following the German invasion. Each of the 10 companies initially consisted of 21 officers and 268 other ranks.[4]
Citations
- 1 2 West 2015, p. 10.
- 1 2 3 Haskew, pp. 47–48
- ↑ Chappell, p.6
- ↑ Moreman, p.13
- ↑ Joslen, p. 454
- ↑ Haskew, p. 48
- 1 2 3 4 Chappel, p. 12
- ↑ "The Royal Navy during the Second World War: A6801 (photograph)". Imperial War Museum Collection Search. Imperial War Museum. Retrieved 5 July 2010.
- 1 2 3 4 "No. 38331". The London Gazette (Supplement). 22 June 1948. p. 3687.
- 1 2 3 4 5 "No. 38331". The London Gazette (Supplement). 22 June 1948. p. 3688.
- 1 2 3 "No. 38331". The London Gazette (Supplement). 22 June 1948. p. 3689.
- ↑ Chappell, p.13
- ↑ Messenger, p.15
- ↑ Chappell, p.14
- ↑ Brayley & Chappell, p.17
Bibliography
- Brayley, Martin; Chappell, Mike (2001). British Army 1939–45: North-West Europe. I. Osprey. ISBN 978-1-84176-052-0.
- Chappell, Mike (1996). Army Commandos 1940–1945. Osprey. ISBN 978-1-85532-579-1.
- Haskew, Michael E. (2007). Encyclopaedia of Elite Forces in the Second World War. Barnsley: Pen and Sword. ISBN 978-1-84415-577-4.
- Joslen, H. F. (1990). Orders of Battle, Second World War, 1939–1945. Uckfield: Naval & Military Press. ISBN 978-1-84342-474-1.
- Messenger, Charles (1991). The Last Prussian: a Biography of Field Marshal Gerd von Rundstedt, 1875–1953. London: Brassey's. ISBN 978-0-08-036707-1.
- Moreman, Timothy Robert (2006). British Commandos 1940–46. Osprey. ISBN 978-1-84176-986-8.
- Roskill, S. W. (1957) [1954]. Butler, J. R. M., ed. The War at Sea 1939–1945: The Defensive. History of the Second World War, United Kingdom Military Series. I (4th ed.). London: HMSO. OCLC 881709135. Retrieved 7 May 2018.
- West, Nigel (2015). Double Cross in Cairo: The True Story of the Spy who Turned the Tide of War in the Middle East. London: Biteback. ISBN 978-1-84954-796-3.
Further reading
- Sebag-Montefiore, Hugh (2001) [2000]. Enigma: The Battle for the Code (4th, pbk. Phoenix ed.). London: Weidenfeld & Nicolson. ISBN 978-0-75381-130-6.