Action at Mechili, 24 January 1941
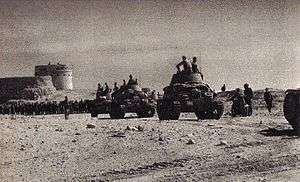
The Action at Mechili was an engagement between Commonwealth and Italian forces during Operation Compass.
Background
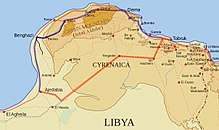
After the fall of Bardia (5 January 1941) and Tobruk (22 January), the Commonwealth command attempted to destroy the remainder of the 10th Army, which was retreating from Cyrenaica. The 6th Australian Infantry Division headed towards Derna, advancing along the Via Balbia, while the 7th Armoured Division was sent into the backcountry, along the Trigh Capuzzo track, towards Fort Capuzzo and Mechili.
The 6th Australian Division was temporarily halted at Derna by the 60th Infantry Division Sabratha reinforced by the Libyan paratrooper battalion Ascari del Cielo and reserve units, while the 7th Armoured Division approached Mechili, a crossroads of some tactical importance; its fall would have allowed the British forces to outflank the 10th Army as it retreated along the Via Balbia and encircle it.
Prelude
The Italian forces defending Mechili consisted of the Babini Group, the Piana Motorized Group and the Bignami Column. The Babini Group included 138 officers, 2,200 men (which included the 10th Bersaglieri Regiment), 57 M13/40 medium tanks, 25 Fiat L3 tankettes, six armoured cars, eight 75/27 mm guns, eight 100/17 mm guns, eight 47/32 mm guns, sixteen machine guns (twelve Fiat 1935 and four 12,7 mm machine guns), seven Solothurn anti-tank rifles, six mortars, 30 flamethrowers, 90 light trucks, 160 heavy trucks and 180 motorcycles. The Piana Group was composed of 121 officers, 2,241 men, twelve 105/28 mm guns, twenty-four 75/27 mm guns, twelve 65/17 mm guns, sixteen Fiat 35 machine guns, eighteen 45 mm mortars, ten flamethrowers, 115 light trucks, 83 heavy trucks and 120 motorcycles. The Bignami Column was composed of the XXV and XXVII Bersaglieri Motorized Battalions, a group of twelve 75/27 mm guns detached from the 25th Infantry Division Bologna and the VI and XXI Tank Battalions, with 37 M13/40 tanks each; the Piana Group and the Bignami Column were kept in reserve.
The 7th Armoured Division had 50 Cruiser tanks and 95 Light Tanks Mk VI. The vanguard of the 7th Armoured Division was the 4th Armoured Brigade, with the 3rd Hussars (equipped with 25 light tanks and nine cruiser tanks), the 7th Hussars (26 Mk VI and one cruiser) and the 2nd Royal Tank Regiment (six Mk VI, three Cruiser Mk I, seven were Cruiser Mk II and eleven Cruiser Mk III).
Battle
The area east of the Jebel Akhdar mountains was garrisoned by XX Corps (Lieutenant-General Annibale Bergonzoli) with the 60th Infantry Division Sabratha and the Babini Group, which had 120 tanks. The tank force included 82 new M.13/40 tanks, which needed ten days to be made battle-worthy but had been rushed forward anyway. The Sabratha Division held a line from Derna, along Wadi Derna to Mechili, with the Babini Group at Mechili, Giovanni Berta and Chaulan, guarding the flank and rear of the infantry.[1][2] On 23 January, the 10th Army commander, General Giuseppe Tellera ordered a counter-attack against the British, to avoid an envelopment of XX Corps from the south. Next day, the Babini Group, with ten to fifteen of the new M.13/40s, attacked the 7th Hussars as they headed west to cut the Derna–Mechili track north of Mechili. The British swiftly retired, calling for help from the 2nd RTR, which complacently ignored the signals. The British lost several tanks and knocked out two M.13s, until eventually, the 2nd RTR mobilised and caught the Italian tanks while they were sky-lined on a ridge and knocked out seven M.13s, for the loss of a cruiser and six light tanks.[3][4]
To the north, the 2/11th Australian Battalion engaged the Sabratha Division and Bersaglieri companies of the Babini Group at Derna airfield, making slow progress against determined resistance. The 19th Australian Brigade began to arrive in the morning and Italian bombers and fighters attacked the Australians. The Italians swept the flat ground with field artillery and machine-guns, stopping the Australian advance 3,000 yd (1.7 mi; 2.7 km) short of the objective.[5] On 26 January, the 2/4th Australian Battalion cut the Derna–Mechili road and a company crossed Wadi Derna during the night against bold Italian counter-attacks.[6] The Italians disengaged on the night of 28/29 January, before the garrison was trapped and rearguards of the Babini Group cratered roads, planted mines and booby-traps and managed to conduct several skilful ambushes, which slowed the British pursuit.[7] Derna was occupied unopposed on 29 January and the Australians began a pursuit along the Via Balbia, closing on Giovanni Berta during 31 January.[8]
Derna
Unlike Tobruk and Bardia, Derna had not been subjected to bombing before the attack.[9] On 25 January in the north, the 2/11th Australian Battalion engaged the Sabratha Division and the 10th Bersaglieri of the Babini Group at Derna airfield, making slow progress against determined resistance. Italian bombers and fighters flew sorties against the 2/11th Australian Battalion as it attacked the airfield and high ground at Siret el Chreiba. The 10th Bersaglieri swept the flat ground with field artillery and machine-guns, stopping the Australian advance 3,000 yd (1.7 mi; 2.7 km) short of the objective.[5]
The 4th Armoured Brigade was ordered to encircle Mechili and cut the western and north-western exits, while the 7th Armoured Brigade cut the road from Mechili to Slonta but the Babini Group had slipped away from Mechili during the night. The group retreated south of Slonta to Bir Melez and Antelat, covering 140 mi (220 km) through sandstorms and air attacks, pursued by the 4th Armoured Brigade until it had to stop on 28 January due to lack of fuel, exhaustion and the camel tracks turning to deep mud in the rains.[10][2] On 26 January, Graziani ordered Tellera to continue the defence of Derna and to use the Babini Group to stop an advance westwards from the Mechili–Derna area. Tellera requested more tanks but this was refused, until the defences of Derna began to collapse the next day. During the day, the 2/4th Australian Battalion in the Derna–Giovanni Berta area, attacked and cut the Derna–Mechili road and a company crossed Wadi Derna during the night. On the northern edge of the wadi, a bold counter-attack with artillery support was made across open ground by the 10th Bersaglieri of the Babini Group, which, with reports in the morning that the group was attacking round the southern flank, deterred the Australians from continuing the advance on Derna but cost 40 Bersaglieri killed and 56 captured.[6]
During 27 January, Australian attempts to attack were met by massed artillery-fire, against which the Australian artillery were rationed to ten rounds per-gun per-day; the 2/4th Australian Battalion repulsed another battalion-strength counter-attack.[11] A column of Bren carriers of the 6th Australian Cavalry Regiment was sent south to reconnoitre the area where the Italian tanks had been reported and was ambushed by a party of the Babini Group with concealed anti-tank guns and machine guns; four Australians were killed and three taken prisoner. The 11th Hussars found a gap at Chaulan, south of Wadi Derna, that threatened the Babini Group and the defenders in Derna with encirclement; General Annibale Bergonzoli ordered a retirement. The Italians disengaged on the night of 28/29 January, before the garrison could be trapped and Babini Group rearguards cratered roads, planted mines and booby-traps and managed to conduct several skilful ambushes, which slowed the British pursuit.[7]
Footnotes
- ↑ Macksey 1972, pp. 121–123.
- 1 2 Playfair 1954, p. 353.
- ↑ Long 1952, p. 242.
- ↑ Macksey 1972, p. 123.
- 1 2 Long 1952, pp. 242–245.
- 1 2 Macksey 1972, pp. 124–127.
- 1 2 Long 1952, pp. 250–253, 255–256.
- ↑ Macksey 1972, pp. 127–129.
- ↑ Mechili & Derna Fall
- ↑ Parri nd.
- ↑ Long 1952, pp. 245–247, 250.
References
Books
- Long, Gavin (1952). To Benghazi (PDF). Australia in the War of 1939–1945. Canberra: Australian War Memorial. OCLC 314648263. Retrieved 15 July 2015.
- Macksey, Major Kenneth (1972) [1971]. Beda Fomm: The Classic Victory. Ballantine's Illustrated History of the Violent Century. SBN 345-09748-3. New York: Ballantine Books. OCLC 473687868.
- Montanari, Mario (1990). Sidi el Barrani (giugno 1940 – Febbraio 1941) [Sidi Barrani, June 1940 – February 1941]. Le operazioni in Africa Settentrionale/Operations in North Africa. I. Roma: Stato maggiore dell'Esercito, Ufficio storico. OCLC 247554735.
- Playfair, Major-General I. S. O.; et al. (1954). Butler, J. R. M., ed. The Mediterranean and Middle East: The Early Successes Against Italy (to May 1941). History of the Second World War, United Kingdom Military Series. I. HMSO. ISBN 1-84574-065-3.
Websites
- Parri, M. "Storia del 32° Rgt. Carri dalla Costituzione del Reggimento fino al termine del Secondo Conflitto Mondiale" [History of the 32nd Armoured Regiment from its Establishment until the end of the Second World War]. www.assocarri.it (in Italian). no date. Retrieved 26 July 2015.
Further reading
Books
- French, David (2001) [2000]. Raising Churchill's Army: The British Army and the War against Germany 1919–1945. Oxford: Oxford University Press. ISBN 0-19-924630-0.
- Moorehead, A (2009) [1944]. The Desert War: The Classic Trilogy on the North African Campaign 1940–43 (Aurum Press ed.). London: Hamish Hamilton. ISBN 978-1-84513-391-7.
- Walker, Ian W. (2003). Iron Hulls, Iron Hearts: Mussolini's Elite Armoured Divisions in North Africa. Marlborough: Crowood. ISBN 1-86126-646-4.
Theses
- Christie, H. R. (1999). Fallen Eagles: The Italian 10th Army in the Opening Campaign in the Western Desert, June 1940 – December 1940 (MA). Fort Leavenworth, KS: U. S. Army Command and General Staff College. OCLC 465212715. A116763. Retrieved 9 March 2015.
Websites
- Harding, J. (BGS) (23 February 1941). "Cyrenaica Command Intelligence Summary No. 5 and XIII Corps Intelligence Summary No. 18 and Appendix E, H.Q. Cyrenaica Command Intelligence Summary No. 6 (23 Feb 41) WO 169/1258". The National Archives. Retrieved 26 July 2015.