Battle of Midway
The Battle of Midway (Japanese: ミッドウェー海戦, Hepburn: Middowē kaisen) was a significant naval battle in the Pacific Theater of World War II that took place on 4–7 June 1942, six months after Japan’s attack on Pearl Harbor and one month after the Battle of the Coral Sea.[7][8] The U.S. Navy under Admirals Chester W. Nimitz, Frank J. Fletcher, and Raymond A. Spruance defeated an attacking fleet of the Imperial Japanese Navy under Admirals Isoroku Yamamoto, Chūichi Nagumo, and Nobutake Kondō near Midway Atoll, inflicting devastating damage on the Japanese fleet that proved irreparable. Military historian John Keegan called it "the most stunning and decisive blow in the history of naval warfare",[9] while naval historian Craig Symonds called it "one of the most consequential naval engagements in world history, ranking alongside Salamis, Trafalgar, and Tsushima Strait, as both tactically decisive and strategically influential".[10]
The Japanese operation, like the earlier attack on Pearl Harbor, hoped to eliminate the United States as a strategic power in the Pacific, thereby giving Japan a free hand in establishing its Greater East Asia Co-Prosperity Sphere. The Japanese hoped another demoralizing defeat would force the U.S. to capitulate in the Pacific War and thus ensure Japanese dominance in the Pacific. Luring the American aircraft carriers into a trap and occupying Midway was part of an overall "barrier" strategy to extend Japan's defensive perimeter, in response to the Doolittle air raid on Tokyo. This operation was also considered preparatory for further attacks against Fiji, Samoa, and Hawaii itself.
The plan was handicapped by faulty Japanese assumptions of the American reaction and poor initial dispositions. Most significantly, American cryptographers were able to determine the date and location of the planned attack, enabling the forewarned U.S. Navy to prepare its own ambush. Four Japanese and three American aircraft carriers participated in the battle. The four Japanese fleet carriers—Akagi, Kaga, Sōryū and Hiryū, part of the six-carrier force that had attacked Pearl Harbor six months earlier—were sunk, as was the heavy cruiser Mikuma. The U.S. lost the carrier Yorktown and the destroyer Hammann.
After Midway and the exhausting attrition of the Solomon Islands campaign, Japan's capacity to replace its losses in materiel (particularly aircraft carriers) and men (especially well-trained pilots and maintenance crewmen) rapidly became insufficient to cope with mounting casualties, while the United States' massive industrial and training capabilities made losses far easier to replace. The Battle of Midway, along with the Guadalcanal campaign, is widely considered a turning point in the Pacific War.
Background

After expanding the war in the Pacific to include Western outposts, the Japanese Empire had attained its initial strategic goals quickly, taking the Philippines, Malaya, Singapore, and the Dutch East Indies (modern Indonesia); the latter, with its vital oil resources, was particularly important to Japan. Because of this, preliminary planning for a second phase of operations commenced as early as January 1942.
There were strategic disagreements between the Imperial Army (IJA) and Imperial Navy (IJN), and fighting between the Navy's GHQ and Admiral Isoroku Yamamoto's Combined Fleet, and a follow-up strategy was not formed until April 1942.[11] Admiral Yamamoto finally won the bureaucratic struggle with a thinly veiled threat to resign, after which his plan for the Central Pacific was adopted.[12]
Yamamoto's primary strategic goal was the elimination of America's carrier forces, which he regarded as the principal threat to the overall Pacific campaign. This concern was acutely heightened by the Doolittle Raid on 18 April 1942, in which 16 United States Army Air Forces (USAAF) B-25 Mitchell bombers launched from USS Hornet bombed targets in Tokyo and several other Japanese cities. The raid, while militarily insignificant, was a shock to the Japanese and showed the existence of a gap in the defenses around the Japanese home islands as well as the accessibility of Japanese territory to American bombers.[13]
This, and other successful hit-and-run raids by American carriers in the South Pacific, showed that they were still a threat, although seemingly reluctant to be drawn into an all-out battle.[14] Yamamoto reasoned that another air attack on the main U.S. naval base at Pearl Harbor would induce all of the American fleet to sail out to fight, including the carriers. However, considering the increased strength of American land-based air power on the Hawaiian Islands since the 7 December attack the previous year, he judged that it was now too risky to attack Pearl Harbor directly.[15]
Instead, Yamamoto selected Midway, a tiny atoll at the extreme northwest end of the Hawaiian Island chain, approximately 1,300 miles (1,100 nautical miles; 2,100 kilometres) from Oahu. This meant that Midway was outside the effective range of almost all of the American aircraft stationed on the main Hawaiian islands. Midway was not especially important in the larger scheme of Japan's intentions, but the Japanese felt the Americans would consider Midway a vital outpost of Pearl Harbor and would therefore be compelled to defend it vigorously.[16] The U.S. did consider Midway vital: after the battle, establishment of a U.S. submarine base on Midway allowed submarines operating from Pearl Harbor to refuel and re-provision, extending their radius of operations by 1,200 miles (1,900 km). In addition to serving as a seaplane base, Midway's airstrips also served as a forward staging point for bomber attacks on Wake Island.[17]
Yamamoto's plan: Operation MI
.jpg)
Typical of Japanese naval planning during World War II, Yamamoto's battle plan for taking Midway (named Operation MI) was exceedingly complex.[18] It required the careful and timely coordination of multiple battle groups over hundreds of miles of open sea. His design was also predicated on optimistic intelligence suggesting that USS Enterprise and USS Hornet, forming Task Force 16, were the only carriers available to the U.S. Pacific Fleet. During the Battle of the Coral Sea one month earlier, USS Lexington had been sunk and USS Yorktown suffered so much damage that the Japanese believed she too had been lost.[19] However, following hasty repairs at Pearl Harbor, Yorktown sortied and ultimately played a critical role in the discovery and eventual destruction of the Japanese fleet carriers at Midway. Finally, much of Yamamoto's planning, coinciding with the general feeling among the Japanese leadership at the time, was based on a gross misjudgment of American morale, which was believed to be debilitated from the string of Japanese victories in the preceding months.[20]
Yamamoto felt deception would be required to lure the U.S. fleet into a fatally compromised situation.[21] To this end, he dispersed his forces so that their full extent (particularly his battleships) would be concealed from the Americans prior to battle. Critically, Yamamoto's supporting battleships and cruisers trailed Vice Admiral Chūichi Nagumo's carrier force by several hundred miles. They were intended to come up and destroy whatever elements of the U.S. fleet might come to Midway's defense once Nagumo's carriers had weakened them sufficiently for a daylight gun battle;[22] this tactic was doctrine in most major navies of the time.[23]
What Yamamoto did not know was that the U.S. had broken parts of the main Japanese naval code (dubbed JN-25 by the Americans), divulging many details of his plan to the enemy. His emphasis on dispersal also meant none of his formations were in a position to support the others.[24] For instance, despite the fact that Nagumo's carriers were expected to carry out strikes against Midway and bear the brunt of American counterattacks, the only warships in his fleet larger than the screening force of twelve destroyers were two Kongō-class fast battleships, two heavy cruisers, and one light cruiser. By contrast, Yamamoto and Kondo had between them two light carriers, five battleships, four heavy cruisers, and two light cruisers, none of which saw action at Midway.[22] The light carriers of the trailing forces and Yamamoto's three battleships were unable to keep pace with the carriers of the Kidō Butai[nb 1] and so could not have sailed in company with them. The distance between Yamamoto and Kondo's forces and Nagumo's carriers had grave implications during the battle: the invaluable reconnaissance capability of the scout planes carried by the cruisers and carriers, as well as the additional antiaircraft capability of the cruisers and the other two battleships of the Kongō-class in the trailing forces, was unavailable to Nagumo.[25]
Aleutian invasion
In order to obtain support from the Imperial Japanese Army for the Midway operation, the Imperial Japanese Navy agreed to support their invasion of the United States through the Aleutian Islands of Attu and Kiska, part of the organized incorporated Alaska Territory. The IJA occupied these islands to place the Japanese home islands out of range of U.S. land-based bombers across Alaska, making Japan the first foreign nation to occupy U.S. soil since the War of 1812. Similarly, most Americans feared that the occupied islands would be used as bases for Japanese bombers to attack strategic targets and population centers along the West Coast of the United States. The Japanese operations in the Aleutian Islands (Operation AL) removed yet more ships that could otherwise have augmented the force striking Midway. Whereas many earlier historical accounts considered the Aleutians operation as a feint to draw American forces away, according to the original Japanese battle plan, AL was intended to be launched simultaneously with the attack on Midway. A one-day delay in the sailing of Nagumo's task force resulted in Operation AL beginning a day before the Midway attack.[26]
Prelude
American reinforcements
_in_a_dry_dock_at_the_Pearl_Harbor_Naval_Shipyard%2C_29_May_1942_(80-G-13065).jpg)
To do battle with an enemy expected to muster four or five carriers, Admiral Chester W. Nimitz, Commander in Chief, Pacific Ocean Areas, needed every available flight deck. He already had Vice Admiral William Halsey's two-carrier (Enterprise and Hornet) task force at hand, though Halsey was stricken with severe dermatitis and had to be replaced by Rear Admiral Raymond A. Spruance, Halsey's escort commander.[27] Nimitz also hurriedly recalled Rear Admiral Frank Jack Fletcher's task force, including the carrier Yorktown, from the South West Pacific Area.[28]
Despite estimates that Yorktown, damaged in the Battle of the Coral Sea, would require several months of repairs at Puget Sound Naval Shipyard, her elevators were intact and her flight deck largely so.[29] The Pearl Harbor Naval Shipyard worked around the clock, and in 72 hours she was restored to a battle-ready state,[30] judged good enough for two or three weeks of operations, as Nimitz required.[31][32] Her flight deck was patched, and whole sections of internal frames were cut out and replaced. Repairs continued even as she sortied, with work crews from the repair ship USS Vestal, herself damaged in the attack on Pearl Harbor six months earlier, still aboard.[33]
Yorktown's partially depleted air group was rebuilt using whatever planes and pilots could be found. Scouting Five (VS-5) was replaced with Bombing Three (VB-3) from USS Saratoga. Torpedo Five (VT-5) was also replaced by Torpedo Three (VT-3). Fighting Three (VF-3) was reconstituted to replace VF-42 with sixteen pilots from VF-42 and eleven pilots from VF-3, with Lieutenant Commander John S. "Jimmy" Thach in command. Some of the aircrew were inexperienced, which may have contributed to an accident in which Thach's executive officer Lieutenant Commander Donald Lovelace was killed.[34] Despite efforts to get Saratoga (which had been undergoing repairs on the American West Coast) ready, the need to resupply and assemble sufficient escorts meant she was unable to reach Midway until after the battle.[35]
On Midway, by 4 June the U.S. Navy had stationed four squadrons of PBYs—31 aircraft in total—for long-range reconnaissance duties, and six brand-new Grumman TBF Avengers from Hornet's VT-8.[36] The Marine Corps stationed 19 Douglas SBD Dauntless, seven F4F-3 Wildcats, 17 Vought SB2U Vindicators, and 21 Brewster F2A Buffalos. The USAAF contributed a squadron of 17 B-17 Flying Fortresses and four Martin B-26 Marauders equipped with torpedoes: in total 126 aircraft. Although the F2As and SB2Us were already obsolete, they were the only aircraft available to the Marine Corps at the time.[37]
Japanese shortcomings

During the Battle of the Coral Sea one month earlier, the Japanese light carrier Shōhō had been sunk, while the fleet carrier Shōkaku had been severely damaged by three bomb hits and was in drydock for months of repair. Although the fleet carrier Zuikaku escaped the battle undamaged, she had lost almost half her air group, and was in port in Kure awaiting replacement planes and pilots. That there were none immediately available is attributable to the failure of the IJN crew training program, which already showed signs of being unable to replace losses. Instructors from the Yokosuka Air Corps were employed in an effort to make up the shortfall.[38]
Historians Jonathan Parshall and Anthony Tully believe that by combining the surviving aircraft and pilots from Shōkaku and Zuikaku, it is likely that Zuikaku could have been equipped with almost a full composite air group. They also note that doing so would have violated Japanese carrier doctrine, which stressed that carriers and their airgroups must train as a single unit (in contrast, American air squadrons were considered interchangeable between carriers). In any case, the Japanese apparently made no serious attempt to get Zuikaku ready for the forthcoming battle.[39]
Thus, Carrier Division 5, consisting of the two most advanced aircraft carriers of the Kido Butai, were not available, which meant that Vice-Admiral Nagumo had only two-thirds of the fleet carriers at his disposal: Kaga and Akagi forming Carrier Division 1 and Hiryū and Sōryū as Carrier Division 2. This was partly due to fatigue; Japanese carriers had been constantly on operations since 7 December 1941, including raids on Darwin and Colombo.[40] Nonetheless, the First Carrier Strike Force sailed with 248 available aircraft on the four carriers (60 on Akagi, 74 on Kaga (B5N2 squadron oversized), 57 on Hiryū and 57 on Sōryū).[41]
The main Japanese carrier-borne strike aircraft were the D3A1 "Val" dive bomber and the B5N2 "Kate", which was used either as a torpedo bomber or as a level bomber. The main carrier fighter was the fast and highly maneuverable A6M "Zero". For a variety of reasons, production of the "Val" had been drastically reduced, while that of the "Kate" had been stopped completely and, as a consequence, there were none available to replace losses.[42] In addition, many of the aircraft being used during the June 1942 operations had been operational since late November 1941 and, although they were well-maintained, many were almost worn out and had become increasingly unreliable. These factors meant all carriers of the Kido Butai had fewer aircraft than their normal complement, with few spare aircraft or parts stored in the carriers' hangars.[43][nb 2]
In addition, Nagumo's carrier force suffered from several defensive deficiencies which gave it, in Mark Peattie's words, a "'glass jaw': it could throw a punch but couldn't take one."[45] Japanese carrier anti-aircraft guns and associated fire control systems had several design and configuration deficiencies which limited their effectiveness. The IJN's fleet combat air patrol (CAP) consisted of too few fighter aircraft and was hampered by an inadequate early warning system, including a lack of radar. Poor radio communications with the fighter aircraft inhibited effective command and control of the CAP. The carriers' escorting warships were deployed as visual scouts in a ring at long range, not as close anti-aircraft escorts, as they lacked training, doctrine, and sufficient anti-aircraft guns.[46]
Japanese strategic scouting arrangements prior to the battle were also in disarray. A picket line of Japanese submarines was late getting into position (partly because of Yamamoto's haste), which let the American carriers reach their assembly point northeast of Midway (known as "Point Luck") without being detected.[47] A second attempt at reconnaissance, using four-engine H8K "Emily" flying boats to scout Pearl Harbor prior to the battle and detect whether the American carriers were present, part of Operation K, was thwarted when Japanese submarines assigned to refuel the search aircraft discovered that the intended refueling point—a hitherto deserted bay off French Frigate Shoals—was now occupied by American warships, because the Japanese had carried out an identical mission in March. Thus, Japan was deprived of any knowledge concerning the movements of the American carriers immediately before the battle.[48]
Japanese radio intercepts did notice an increase in both American submarine activity and message traffic. This information was in Yamamoto's hands prior to the battle. Japanese plans were not changed; Yamamoto, at sea in Yamato, assumed Nagumo had received the same signal from Tokyo, and did not communicate with him by radio, so as not to reveal his position.[49] These messages were, contrary to earlier historical accounts, also received by Nagumo before the battle began. For reasons which remain unclear, Nagumo did not alter his plans or take additional precautions.[50]
US code-breaking
Admiral Nimitz had one critical advantage: US cryptanalysts had partially broken the Japanese Navy's JN-25b code.[51] Since early 1942, the US had been decoding messages stating that there would soon be an operation at objective "AF". It was initially not known where "AF" was, but Commander Joseph Rochefort and his team at Station HYPO were able to confirm that it was Midway: Captain Wilfred Holmes devised a ruse of telling the base at Midway (by secure undersea cable) to broadcast an uncoded radio message stating that Midway's water purification system had broken down.[52] Within 24 hours, the code breakers picked up a Japanese message that "AF was short on water".[53] No Japanese radio operators who intercepted the message seemed concerned that the Americans were broadcasting uncoded that a major naval installation close to the Japanese threat ring was having a water shortage, which could have tipped off Japanese intelligence officers that it was a deliberate attempt at deception.[54]
HYPO was also able to determine the date of the attack as either 4 or 5 June, and to provide Nimitz with a complete IJN order of battle.[55]
Japan had a new codebook, but its introduction had been delayed, enabling HYPO to read messages for several crucial days; the new code, which took several days to be cracked, came into use on 24 May, but the important breaks had already been made.[56]
As a result, the Americans entered the battle with a good picture of where, when, and in what strength the Japanese would appear. Nimitz knew that the Japanese had negated their numerical advantage by dividing their ships into four separate task groups, too widely separated to be able to support each other.[57] This dispersal resulted in few fast ships being available to escort the Carrier Striking Force, reducing the number of anti-aircraft guns protecting the carriers. Nimitz calculated that the aircraft on his three carriers, plus those on Midway Island, gave the U.S. rough parity with Yamamoto's four carriers, mainly because American carrier air groups were larger than Japanese ones. The Japanese, by contrast, remained mainly unaware of their opponent's true strength and dispositions even after the battle began.[56]
Battle
Order of battle
Initial air attacks

| 4 June |
|
| 5 June |
|
At about 09:00 on 3 June, Ensign Jack Reid, piloting a PBY from U.S. Navy patrol squadron VP-44,[58] spotted the Japanese Occupation Force 500 nautical miles (580 miles; 930 kilometers) to the west-southwest of Midway. He mistakenly reported this group as the Main Force.[59]
Nine B-17s took off from Midway at 12:30 for the first air attack. Three hours later, they found Tanaka's transport group 570 nautical miles (660 miles; 1,060 kilometers) to the west.[60]
Under heavy anti-aircraft fire, they dropped their bombs. Although their crews reported hitting four ships,[60] none of the bombs actually hit anything and no significant damage was inflicted.[61] Early the following morning, the Japanese oil tanker Akebono Maru sustained the first hit when a torpedo from an attacking PBY struck her around 01:00. This was the only successful air-launched torpedo attack by the U.S. during the entire battle.[61]
At 04:30 on 4 June, Nagumo launched his initial attack on Midway itself, consisting of 36 Aichi D3A dive bombers and 36 Nakajima B5N torpedo bombers, escorted by 36 Mitsubishi A6M Zero fighters. At the same time, he launched his eight search aircraft (one from the heavy cruiser Tone launched 30 minutes late). Japanese reconnaissance arrangements were flimsy, with too few aircraft to adequately cover the assigned search areas, laboring under poor weather conditions to the northeast and east of the task force. As Nagumo's bombers and fighters were taking off, 11 PBYs were leaving Midway to run their search patterns. At 05:34, a PBY reported sighting two Japanese carriers and another spotted the inbound airstrike 10 minutes later.[62]
Midway's radar picked up the enemy at a distance of several miles, and interceptors were scrambled. Unescorted bombers headed off to attack the Japanese carriers, their fighter escorts remaining behind to defend Midway. At 06:20, Japanese carrier aircraft bombed and heavily damaged the U.S. base. Midway-based Marine fighters led by Major Floyd B. Parks, which included six F4Fs and 20 F2As,[63] intercepted the Japanese and suffered heavy losses, though they managed to destroy four B5Ns, as well as a single A6M. Within the first few minutes, two F4Fs and 13 F2As were destroyed, while most of the surviving U.S. planes were damaged, with only two remaining airworthy. American anti-aircraft fire was intense and accurate, destroying three additional Japanese aircraft and damaging many more.[64]
Of the 108 Japanese aircraft involved in this attack, 11 were destroyed (including three that ditched), 14 were heavily damaged, and 29 were damaged to some degree. The initial Japanese attack did not succeed in neutralizing Midway: American bombers could still use the airbase to refuel and attack the Japanese invasion force, and most of Midway's land-based defenses were intact. Japanese pilots reported to Nagumo that a second aerial attack on Midway's defenses would be necessary if troops were to go ashore by 7 June.[65]
Having taken off prior to the Japanese attack, American bombers based on Midway made several attacks on the Japanese carrier force. These included six Grumman Avengers, detached to Midway from Hornet's VT-8 (Midway was the combat debut of both VT-8 and the TBF); Marine Scout-Bombing Squadron 241 (VMSB-241), consisting of 11 SB2U-3s and 16 SBDs, plus four USAAF B-26s of the 18th Reconnaissance and 69th Bomb Squadrons armed with torpedoes, and 15 B-17s of the 31st, 72nd, and 431st Bomb Squadrons. The Japanese repelled these attacks, losing three fighters while destroying five TBFs, two SB2Us, eight SBDs, and two B-26s.[66] Among the dead was Major Lofton R. Henderson of VMSB-241, killed while leading his inexperienced Dauntless squadron into action. The main airfield at Guadalcanal was named after him in August 1942.[67]
One B-26, piloted by Lieutenant James Muri, after dropping his torpedo and searching for a safer escape route, flew directly down the length of the Akagi while being chased by interceptors and anti-aircraft fire, which had to hold their fire to avoid hitting their own flagship. During the fly down the length, the B-26 strafed Akagi, killing two men.[68][69] Another B-26, piloted by 1st Lieutenant Herbert C. Mayes, after being seriously damaged by anti-aircraft fire, didn't pull out of its run, and instead headed directly for Akagi's bridge.[70][71] The aircraft, either attempting a suicide ramming, or out of control due to battle damage or a wounded or killed pilot, narrowly missed crashing into the carrier's bridge, which could have killed Nagumo and his command staff, before it cartwheeled into the sea.[72][73] This experience may well have contributed to Nagumo's determination to launch another attack on Midway, in direct violation of Yamamoto's order to keep the reserve strike force armed for anti-ship operations.[66]
Nagumo's dilemma
.jpg)
In accordance with Yamamoto's orders for Operation MI, Admiral Nagumo had kept half of his aircraft in reserve. These comprised two squadrons each of dive bombers and torpedo bombers. The dive bombers were as yet unarmed (although this was doctrinal, dive bombers were to be armed on the flight deck). The torpedo bombers were armed with torpedoes should any American warships be located.[75]
At 07:15, Nagumo ordered his reserve planes to be re-armed with contact-fused general-purpose bombs for use against land targets. This was a result of the attacks from Midway, as well as of the morning flight leader's recommendation of a second strike. Re-arming had been underway for about 30 minutes when, at 07:40,[76] the delayed scout plane from Tone signaled that it had sighted a sizable American naval force to the east, but neglected to describe its composition. Later evidence suggests Nagumo did not receive the sighting report until 08:00.[77]
Nagumo quickly reversed his order to re-arm the bombers with general-purpose bombs and demanded that the scout plane ascertain the composition of the American force. Another 20–40 minutes elapsed before Tone's scout finally radioed the presence of a single carrier in the American force. This was one of the carriers from Task Force 16. The other carrier was not sighted.[78]
Nagumo was now in a quandary. Rear Admiral Tamon Yamaguchi, leading Carrier Division 2 (Hiryū and Sōryū), recommended that Nagumo strike immediately with the forces at hand: 18 Aichi D3A1 dive bombers each on Sōryū and Hiryū, and half the ready cover patrol aircraft.[79] Nagumo's opportunity to hit the American ships[80] was now limited by the imminent return of his Midway strike force. The returning strike force needed to land promptly or it would have to ditch into the sea. Because of the constant flight deck activity associated with combat air patrol operations during the preceding hour, the Japanese never had an opportunity to position ("spot") their reserve planes on the flight deck for launch.[81]
The few aircraft on the Japanese flight decks at the time of the attack were either defensive fighters or, in the case of Sōryū, fighters being spotted to augment the combat air patrol.[82] Spotting his flight decks and launching aircraft would have required at least 30 minutes.[83] Furthermore, by spotting and launching immediately, Nagumo would be committing some of his reserve to battle without proper anti-ship armament, and likely without fighter escort; indeed, he had just witnessed how easily the unescorted American bombers had been shot down.[84]
Japanese carrier doctrine preferred the launching of fully constituted strikes rather than piecemeal attacks. Without confirmation of whether the American force included carriers (not received until 08:20), Nagumo's reaction was doctrinaire.[85] In addition, the arrival of another land-based American air strike at 07:53 gave weight to the need to attack the island again. In the end, Nagumo decided to wait for his first strike force to land, then launch the reserve, which would by then be properly armed with torpedoes.[86]
In the final analysis, it made no difference; Fletcher's carriers had launched their planes beginning at 07:00 (with Enterprise and Hornet having completed launching by 07:55, but Yorktown not until 09:08), so the aircraft that would deliver the crushing blow were already on their way. Even if Nagumo had not strictly followed carrier doctrine, he could not have prevented the launch of the American attack.[87]
Attacks on the Japanese fleet

The Americans had already launched their carrier aircraft against the Japanese. Fletcher, in overall command aboard Yorktown, and benefiting from PBY sighting reports from the early morning, ordered Spruance to launch against the Japanese as soon as was practical, while initially holding Yorktown in reserve in case any other Japanese carriers were found.[88]
Spruance judged that, though the range was extreme, a strike could succeed and gave the order to launch the attack. He then left Halsey's Chief of Staff, Captain Miles Browning, to work out the details and oversee the launch. The carriers had to launch into the wind, so the light southeasterly breeze would require them to steam away from the Japanese at high speed. Browning therefore suggested a launch time of 07:00, giving the carriers an hour to close on the Japanese at 25 knots (46 km/h; 29 mph). This would place them at about 155 nautical miles (287 km; 178 mi) from the Japanese fleet, assuming it did not change course. The first plane took off from Spruance's carriers Enterprise and Hornet a few minutes after 07:00.[89] Fletcher, upon completing his own scouting flights, followed suit at 08:00 from Yorktown.[90]
Fletcher, along with Yorktown's commanding officer, Captain Elliott Buckmaster, and their staffs, had acquired first-hand experience in organizing and launching a full strike against an enemy force in the Coral Sea, but there was no time to pass these lessons on to Enterprise and Hornet which were tasked with launching the first strike.[91] Spruance ordered the striking aircraft to proceed to target immediately, rather than waste time waiting for the strike force to assemble, since neutralizing enemy carriers was the key to the survival of his own task force.[90][91]
While the Japanese were able to launch 108 aircraft in just seven minutes, it took Enterprise and Hornet over an hour to launch 117.[92] Spruance judged that the need to throw something at the enemy as soon as possible was greater than the need to coordinate the attack by aircraft of different types and speeds (fighters, bombers, and torpedo bombers). Accordingly, American squadrons were launched piecemeal and proceeded to the target in several different groups. It was accepted that the lack of coordination would diminish the impact of the American attacks and increase their casualties, but Spruance calculated that this was worthwhile, since keeping the Japanese under aerial attack impaired their ability to launch a counterstrike (Japanese tactics preferred fully constituted attacks), and he gambled that he would find Nagumo with his flight decks at their most vulnerable.[90][91]
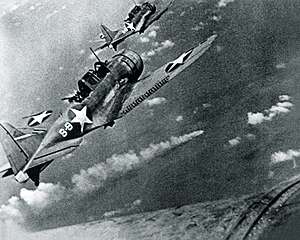
American carrier aircraft had difficulty locating the target, despite the positions they had been given. The strike from Hornet, led by Commander Stanhope C. Ring, followed an incorrect heading of 265 degrees rather than the 240 degrees indicated by the contact report. As a result, Air Group Eight's dive bombers missed the Japanese carriers.[93][94] Torpedo Squadron 8 (VT-8, from Hornet), led by Lieutenant Commander John C. Waldron, broke formation from Ring and followed the correct heading. The 10 F4Fs from Hornet ran out of fuel and had to ditch.[95]
_on_4_June_1942_(80-G-41686).jpg)
Waldron's squadron sighted the enemy carriers and began attacking at 09:20, followed at 09:40[96] by VF-6 from Enterprise, whose Wildcat fighter escorts lost contact, ran low on fuel, and had to turn back.[95] Without fighter escort, all 15 TBD Devastators of VT-8 were shot down without being able to inflict any damage. Ensign George H. Gay, Jr. was the only survivor of the 30 aircrew of VT-8. He completed his torpedo attack on the aircraft carrier Sōryū before he was shot down, but Sōryū evaded his torpedo.[97] Meanwhile, VT-6, led by LCDR Eugene E. Lindsey lost nine of its 14 Devastators (one ditched later), and 10 of 12 Devastators from Yorktown's VT-3 (who attacked at 10:10) were shot down with no hits to show for their effort, thanks in part to the abysmal performance of their unimproved Mark 13 torpedoes.[98] Midway was the last time the TBD Devastator was used in combat.[99]
The Japanese combat air patrol, flying Mitsubishi A6M2 Zeros,[100] made short work of the unescorted, slow, under-armed TBDs. A few TBDs managed to get within a few ship-lengths range of their targets before dropping their torpedoes—close enough to be able to strafe the enemy ships and force the Japanese carriers to make sharp evasive maneuvers—but all of their torpedoes either missed or failed to explode.[101] Remarkably, senior Navy and Bureau of Ordnance officers never questioned why half a dozen torpedoes, released so close to the Japanese carriers, produced no results.[102] The performance of American torpedoes in the early months of the war was scandalous, as shot after shot missed by running directly under the target (deeper than intended), prematurely exploded, or hit targets (sometimes with an audible clang) and failed to explode at all.[103][104]
Despite their failure to score any hits, the American torpedo attacks achieved three important results. First, they kept the Japanese carriers off balance and unable to prepare and launch their own counterstrike. Second, the poor control of the Japanese combat air patrol (CAP) meant they were out of position for subsequent attacks. Third, many of the Zeros ran low on ammunition and fuel.[105] The appearance of a third torpedo plane attack from the southeast by VT-3 from Yorktown, led by LCDR Lance Edward Massey at 10:00 very quickly drew the majority of the Japanese CAP to the southeast quadrant of the fleet.[106] Better discipline and the employment of a greater number of Zeroes for the CAP might have enabled Nagumo to prevent (or at least mitigate) the damage caused by the coming American attacks.[107]
By chance, at the same time VT-3 was sighted by the Japanese, three squadrons of SBDs from Enterprise and Yorktown were approaching from the southwest and northeast. The Yorktown squadron (VB-3) had flown just behind VT-3, but elected to attack from a different course. The two squadrons from Enterprise (VB-6 and VS-6) were running low on fuel because of the time spent looking for the enemy. Air Group Commander C. Wade McClusky, Jr. decided to continue the search, and by good fortune spotted the wake of the Japanese destroyer Arashi, steaming at full speed to rejoin Nagumo's carriers after having unsuccessfully depth-charged U.S. submarine Nautilus, which had unsuccessfully attacked the battleship Kirishima.[108] Some bombers were lost from fuel exhaustion before the attack commenced.[109]
McClusky's decision to continue the search and his judgment, in the opinion of Admiral Chester Nimitz, "decided the fate of our carrier task force and our forces at Midway ..."[110] All three American dive-bomber squadrons (VB-6, VS-6 and VB-3) arrived almost simultaneously at the perfect time, locations and altitudes to attack.[111] Most of the Japanese CAP was directing its attention to the torpedo planes of VT-3 and was out of position; meanwhile, armed Japanese strike aircraft filled the hangar decks, fuel hoses snaked across the decks as refueling operations were hastily being completed, and the repeated change of ordnance meant that bombs and torpedoes were stacked around the hangars, rather than stowed safely in the magazines, making the Japanese carriers extraordinarily vulnerable.[112]
Beginning at 10:22, the two squadrons of Enterprise's air group split up with the intention of sending one squadron each to attack Kaga and Akagi. A miscommunication caused both of the squadrons to dive at Kaga. Recognizing the error, Lieutenant Richard Halsey Best and his two wingmen were able to pull out of their dives and, after judging that Kaga was doomed, headed north to attack Akagi. Coming under an onslaught of bombs from almost two full squadrons, Kaga sustained at least four direct hits, which caused heavy damage and started multiple fires. One of the bombs landed on or right in front of the bridge, killing Captain Jisaku Okada and most of the ship's senior officers.[113] Lieutenant Clarence E. Dickinson, part of McClusky's group, recalled:
We were coming down in all directions on the port side of the carrier ... I recognized her as the Kaga; and she was enormous ... The target was utterly satisfying ... I saw a bomb hit just behind where I was aiming ... I saw the deck rippling and curling back in all directions exposing a great section of the hangar below ... I saw [my] 500-pound [230 kg] bomb hit right abreast of the [carrier's] island. The two 100-pound [45 kg] bombs struck in the forward area of the parked planes ... [114]
Several minutes later, Best and his two wingmen dove on Akagi. Mitsuo Fuchida, the Japanese aviator who had led the attack on Pearl Harbor, was on Akagi when it was hit, and described the attack:
A look-out screamed: "Hell-Divers!" I looked up to see three black enemy planes plummeting towards our ship. Some of our machineguns managed to fire a few frantic bursts at them, but it was too late. The plump silhouettes of the American Dauntless dive-bombers quickly grew larger, and then a number of black objects suddenly floated eerily from their wings.[115]
Although Akagi sustained only one direct hit (almost certainly dropped by Lieutenant Best), it proved to be a fatal blow: the bomb struck the edge of the mid-ship deck elevator and penetrated to the upper hangar deck, where it exploded among the armed and fueled aircraft in the vicinity. Nagumo's chief of staff, Ryūnosuke Kusaka, recorded "a terrific fire ... bodies all over the place ... Planes stood tail up, belching livid flames and jet-black smoke, making it impossible to bring the fires under control."[116] Another bomb exploded under water very close astern; the resulting geyser bent the flight deck upward "in grotesque configurations" and caused crucial rudder damage.[101][116][nb 3]
Simultaneously, Yorktown's VB-3, commanded by Max Leslie, went for Sōryū, scoring at least three hits and causing extensive damage. Some of Leslie's bombers did not have bombs as they were accidentally released when the pilots attempted to use electrical arming switches. Nevertheless, Leslie and others still dove, strafing carrier decks and providing cover for those who had bombs.[118] Gasoline ignited, creating an "inferno", while stacked bombs and ammunition detonated.[115] VT-3 targeted Hiryū, which was hemmed in by Sōryū, Kaga, and Akagi, but achieved no hits.[119]
Within six minutes, Sōryū and Kaga were ablaze from stem to stern, as fires spread through the ships. Akagi, having been struck by only one bomb, took longer to burn, but the resulting fires quickly expanded and soon proved impossible to extinguish; she too was eventually consumed by flames and had to be abandoned. As Nagumo began to grasp the enormity of what had happened, he appears to have gone in a state of shock. Witnesses saw Nagumo standing near the ship’s compass looking out at the flames on his flagship and two other carriers in a trance-like daze. Despite being asked to abandon ship, Nagumo didn’t move and was reluctant to leave the Akagi, just muttering, “It's not time yet,”. Nagumo's chief of staff, Rear Admiral Ryūnosuke Kusaka, was able to persuade him to leave the critically damaged Akagi. Nagumo, with a barely perceptible nod, with tears in his eyes, agreed to go.[120][121] At 10:46, Admiral Nagumo transferred his flag to the light cruiser Nagara.[122] All three carriers remained temporarily afloat, as none had suffered damage below the waterline, other than the rudder damage to Akagi caused by the near miss close astern. Despite initial hopes that Akagi could be saved or at least towed back to Japan, all three carriers were eventually abandoned and scuttled.[119][nb 4]
Japanese counterattacks
Hiryū, the sole surviving Japanese aircraft carrier, wasted little time in counterattacking. Hiryū's first attack wave, consisting of 18 D3As and six fighter escorts, followed the retreating American aircraft and attacked the first carrier they encountered, Yorktown, hitting her with three bombs, which blew a hole in the deck, snuffed out all but one of her boilers, and destroyed one anti-aircraft mount. The damage also forced Admiral Fletcher to move his command staff to the heavy cruiser Astoria. Damage control parties were able to temporarily patch the flight deck and restore power to several boilers within an hour, giving her a speed of 19 knots (35 km/h; 22 mph) and enabling her to resume air operations. Yorktown yanked down her yellow breakdown flag and up went a new hoist—"My speed 5."[124] Captain Buckmaster had his signalmen hoist a huge new (10 feet wide and 15 feet long) American flag from the foremast. Sailors, including Ensign John d'Arc Lorenz called it an incalculable inspiration: "For the first time I realized what the flag meant: all of us—a million faces—all our effort—a whisper of encouragement."[124] Thirteen Japanese dive bombers and three escorting fighters were lost in this attack (two escorting fighters turned back early after they were damaged attacking some of Enterprise's SBDs returning from their attack on the Japanese carriers).[125]
_is_hit_by_a_torpedo_on_4_June_1942.jpg)
Approximately one hour later, Hiryū's second attack wave, consisting of ten B5Ns and six escorting A6Ms, arrived over Yorktown; the repair efforts had been so effective that the Japanese pilots assumed that Yorktown must be a different, undamaged carrier.[127] They attacked, crippling Yorktown with two torpedoes; she lost all power and developed a 23-degree list to port. Five torpedo bombers and two fighters were shot down in this attack.[128]
News of the two strikes, with the mistaken reports that each had sunk an American carrier, greatly improved Japanese morale. The few surviving aircraft were all recovered aboard Hiryū. Despite the heavy losses, the Japanese believed that they could scrape together enough aircraft for one more strike against what they believed to be the only remaining American carrier.[129]
American counterattack
.jpg)
Late in the afternoon, a Yorktown scout aircraft located Hiryū, prompting Enterprise to launch a final strike of 24 dive bombers (including six SBDs from VS-6, four SBDs from VB-6, and 14 SBDs from Yorktown's VB-3). Despite Hiryū being defended by a strong cover of more than a dozen Zero fighters, the attack by Enterprise and orphaned Yorktown aircraft launched from Enterprise was successful: four bombs (possibly five) hit Hiryū, leaving her ablaze and unable to operate aircraft. Hornet's strike, launched late because of a communications error, concentrated on the remaining escort ships, but failed to score any hits.[131]
After futile attempts at controlling the blaze, most of the crew remaining on Hiryū were evacuated and the remainder of the fleet continued sailing northeast in an attempt to intercept the American carriers. Despite a scuttling attempt by a Japanese destroyer that hit her with a torpedo and then departed quickly, Hiryū stayed afloat for several more hours. She was discovered early the next morning by an aircraft from the escort carrier Hōshō, prompting hopes she could be saved, or at least towed back to Japan. Soon after being spotted, Hiryū sank. Rear Admiral Tamon Yamaguchi, together with the ship's captain, Tomeo Kaku, chose to go down with the ship, costing Japan perhaps its best carrier officer.[131]
As darkness fell, both sides took stock and made tentative plans for continuing the action. Admiral Fletcher, obliged to abandon the derelict Yorktown and feeling he could not adequately command from a cruiser, ceded operational command to Spruance. Spruance knew the United States had won a great victory, but he was still unsure of what Japanese forces remained and was determined to safeguard both Midway and his carriers. To aid his aviators, who had launched at extreme range, he had continued to close with Nagumo during the day and persisted as night fell.[132]
Finally, fearing a possible night encounter with Japanese surface forces,[132] and believing Yamamoto still intended to invade, based in part on a misleading contact report from the submarine Tambor,[133] Spruance changed course and withdrew to the east, turning back west towards the enemy at midnight.[134] For his part, Yamamoto initially decided to continue the engagement and sent his remaining surface forces searching eastward for the American carriers. Simultaneously, he detached a cruiser raiding force to bombard the island. The Japanese surface forces failed to make contact with the Americans because Spruance had decided to briefly withdraw eastward, and Yamamoto ordered a general withdrawal to the west.[135] It was fortunate for the U.S. that Spruance did not pursue, for had he come in contact with Yamamoto's heavy ships, including Yamato, in the dark and considering the Japanese Navy's superiority in night-attack tactics at the time, there is a very high probability his cruisers would have been overwhelmed and his carriers sunk.[136]
Spruance failed to regain contact with Yamamoto's forces on 5 June, despite extensive searches. Towards the end of the day he launched a search-and-destroy mission to seek out any remnants of Nagumo's carrier force. This late afternoon strike narrowly missed detecting Yamamoto's main body and failed to score hits on a straggling Japanese destroyer. The strike planes returned to the carriers after nightfall, prompting Spruance to order Enterprise and Hornet to turn on their lights to aid the landings.[137]
At 02:15 on the night of 5/6 June, Commander John Murphy's Tambor, lying 90 nautical miles (170 km; 100 mi) west of Midway, made the second of the submarine force's two major contributions to the battle's outcome, although its impact was heavily blunted by Murphy himself.[138] Sighting several ships, neither Murphy nor his executive officer, Edward Spruance (son of Admiral Spruance), could identify them. Uncertain of whether they were friendly or not and unwilling to approach any closer to verify their heading or type, Murphy decided to send a vague report of "four large ships" to Admiral Robert English, Commander, Submarine Force, Pacific Fleet (COMSUBPAC). This report was passed on by English to Nimitz, who then sent it to Spruance. Spruance, a former submarine commander, was "understandably furious" at the vagueness of Murphy's report, as it provided him with little more than suspicion and no concrete information on which to make his preparations.[139] Unaware of the exact location of Yamamoto's "Main Body" (a persistent problem since the time PBYs had first sighted the Japanese), Spruance was forced to assume the "four large ships" reported by Tambor represented the main invasion force and so he moved to block it, while staying 100 nautical miles (190 km; 120 mi) northeast of Midway.[140]
In reality, the ships sighted by Tambor were the detachment of four cruisers and two destroyers Yamamoto had sent to bombard Midway. At 02:55, these ships received Yamamoto's order to retire and changed course to comply.[140] At about the same time as this change of course, Tambor was sighted and during maneuvers designed to avoid a submarine attack, the heavy cruisers Mogami and Mikuma collided, inflicting serious damage on Mogami's bow. The less severely damaged Mikuma slowed to 12 knots (22 km/h; 14 mph) to keep pace.[141] Only at 04:12 did the sky brighten enough for Murphy to be certain the ships were Japanese, by which time staying surfaced was hazardous and he dived to approach for an attack. The attack was unsuccessful and at around 06:00 he finally reported two westbound Mogami-class cruisers, before diving again and playing no further role in the battle.[133] Limping along on a straight course at 12 knots—roughly one-third their top speed—Mogami and Mikuma had been almost perfect targets for a submarine attack. As soon as Tambor returned to port, Spruance had Murphy relieved of duty and reassigned to a shore station, citing his confusing contact report, poor torpedo shooting during his attack run, and general lack of aggression, especially as compared to Nautilus, the oldest of the 12 boats at Midway and the only one which had successfully placed a torpedo on target (albeit a dud).[138][139]
Over the following two days, several strikes were launched against the stragglers, first from Midway, then from Spruance's carriers. Mikuma was eventually sunk by Dauntlesses,[142] while Mogami survived further severe damage to return home for repairs. The destroyers Arashio and Asashio were also bombed and strafed during the last of these attacks.[143] Captain Richard E. Fleming, a U.S. Marine Corps aviator, was killed while executing a glide bomb run on Mikuma and was posthumously awarded the Medal of Honor.[144]
Meanwhile, salvage efforts on Yorktown were encouraging, and she was taken in tow by USS Vireo. In the late afternoon of 6 June, the Japanese submarine I-168, which had managed to slip through the cordon of destroyers (possibly because of the large amount of debris in the water), fired a salvo of torpedoes, two of which struck Yorktown. There were few casualties aboard, since most of the crew had already been evacuated, but a third torpedo from this salvo struck the destroyer USS Hammann, which had been providing auxiliary power to Yorktown. Hammann broke in two and sank with the loss of 80 lives, mostly because her own depth charges exploded. With further salvage efforts deemed hopeless, the remaining repair crews were evacuated from Yorktown. Throughout the night of 6 June and into the morning of 7 June, Yorktown remained afloat; but by 05:30 on 7 June, observers noted that her list was rapidly increasing to port. Shortly afterwards, the ship turned over onto her port side, and lay that way, revealing the torpedo hole in her starboard bilge—the result of the submarine attack. Captain Buckmaster's American flag was still flying.[145] All ships half-masted their colors in salute; all hands who were topside with heads uncovered and came to attention, with tears in their eyes. Two patrolling PBYs appeared overhead and dipped their wings in a final salute.[145] At 07:01, the ship rolled upside-down, and slowly sank, stern first, with her battle flags flying.[146][147] To most who witnessed the sinking, the Yorktown went quietly and with enormous dignity—"like the great lady she was," as one of them put it.[145]
Japanese and US casualties
.jpg)
By the time the battle ended, 3,057 Japanese had died. Casualties aboard the four carriers were: Akagi: 267; Kaga: 811; Hiryū: 392; Soryū: 711 (including Captain Yanagimoto, who chose to remain on board); a total of 2,181.[148] The heavy cruisers Mikuma (sunk; 700 casualties) and Mogami (badly damaged; 92) accounted for another 792 deaths.[149]
In addition, the destroyers Arashio (bombed; 35) and Asashio (strafed by aircraft; 21) were both damaged during the air attacks which sank Mikuma and caused further damage to Mogami. Floatplanes were lost from the cruisers Chikuma (3) and Tone (2). Dead aboard the destroyers Tanikaze (11), Arashi (1), Kazagumo (1) and the fleet oiler Akebono Maru (10) made up the remaining 23 casualties.[nb 5]
At the end of the battle, the U.S. lost the carrier Yorktown and a destroyer, Hammann. 307 Americans had been killed, including Major General Clarence L. Tinker, Commander, 7th Air Force, who personally led a bomber strike from Hawaii against the retreating Japanese forces on 7 June. He was killed when his aircraft crashed near Midway Island.
Aftermath

After winning a clear victory, and as pursuit became too hazardous near Wake,[150] American forces retired. Spruance once again withdrew to the east to refuel his destroyers and rendezvous with the carrier Saratoga, which was ferrying much-needed replacement aircraft. Fletcher transferred his flag to Saratoga on the afternoon of 8 June and resumed command of the carrier force. For the remainder of that day and then 9 June, Fletcher continued to launch search missions from the three carriers to ensure the Japanese were no longer advancing on Midway. Late on 10 June a decision was made to leave the area and the American carriers eventually returned to Pearl Harbor.[151]
Historian Samuel E. Morison noted in 1949 that Spruance was subjected to much criticism for not pursuing the retreating Japanese, thus allowing their surface fleet to escape.[152] Clay Blair argued in 1975 that had Spruance pressed on, he would have been unable to launch his aircraft after nightfall, and his cruisers would have been overwhelmed by Yamamoto's powerful surface units, including Yamato.[150] Furthermore, the American air groups had suffered considerable losses, including most of their torpedo bombers. This made it unlikely that they would be effective in an airstrike against the Japanese battleships, even if they had managed to catch them during daytime.[153] Also, by this time Spruance's destroyers were critically low on fuel.[154][155]
On 10 June, the Imperial Japanese Navy conveyed to the military liaison conference an incomplete picture of the results of the battle. Chūichi Nagumo's detailed battle report was submitted to the high command on 15 June. It was intended only for the highest echelons in the Japanese Navy and government, and was guarded closely throughout the war. In it, one of the more striking revelations is the comment on the Mobile Force Commander's (Nagumo's) estimates: "The enemy is not aware of our plans (we were not discovered until early in the morning of the 5th at the earliest)."[156] In reality, the whole operation had been compromised from the beginning by American code-breaking efforts.[157]
The Japanese public and much of the military command structure were kept in the dark about the extent of the defeat: Japanese news announced a great victory. Only Emperor Hirohito and the highest Navy command personnel were accurately informed of the carrier and pilot losses. Consequently, even the Imperial Japanese Army (IJA) continued to believe, for at least a short time, that the fleet was in good condition.[158]
On the return of the Japanese fleet to Hashirajima on 14 June the wounded were immediately transferred to naval hospitals; most were classified as "secret patients", placed in isolation wards and quarantined from other patients and their own families to keep this major defeat secret.[159] The remaining officers and men were quickly dispersed to other units of the fleet and, without being allowed to see family or friends, were shipped to units in the South Pacific, where the majority died in battle.[160] None of the flag officers or staff of the Combined Fleet were penalized, with Nagumo later being placed in command of the rebuilt carrier force.[161]
As a result of the defeat, new procedures were adopted whereby more Japanese aircraft were refueled and re-armed on the flight deck, rather than in the hangars, and the practice of draining all unused fuel lines was adopted. The new carriers being built were redesigned to incorporate only two flight deck elevators and new firefighting equipment. More carrier crew members were trained in damage-control and firefighting techniques, although the losses later in the war of Shōkaku, Hiyō, and especially Taihō suggest that there were still problems in this area.[162]
Replacement pilots were pushed through an abbreviated training regimen in order to meet the short-term needs of the fleet. This led to a sharp decline in the quality of the aviators produced. These inexperienced pilots were fed into front-line units, while the veterans who remained after Midway and the Solomons campaign were forced to share an increased workload as conditions grew more desperate, with few being given a chance to rest in rear areas or in the home islands. As a result, Japanese naval air groups as a whole progressively deteriorated during the war while their American adversaries continued to improve.[163]
American prisoners
Three U.S. airmen were captured during the battle: Ensign Wesley Osmus,[164] a pilot from Yorktown; Ensign Frank O'Flaherty,[165] a pilot from Enterprise; and Aviation Machinist's Mate Bruno Peter Gaido,[166] O'Flaherty's radioman-gunner.[167][168] Osmus was held on Arashi; O'Flaherty and Gaido on the cruiser Nagara (or destroyer Makigumo, sources vary); all three were interrogated and then killed by being tied to water-filled kerosene cans and thrown overboard to drown.[169] The report filed by Nagumo tersely states that Ensign Osmus, "...died on 6 June and was buried at sea";[170] O'Flaherty and Gaido's fates were not mentioned in Nagumo's report.[171] The execution of Ensign Wesley Osmus in this manner was apparently ordered by Arashi's captain, Watanabe Yasumasa. Yasumasa died when the destroyer Numakaze sank in December 1943, but had he survived, he would have likely been tried as a war criminal.[172]
Japanese prisoners

Two enlisted men from Mikuma were rescued from a life raft on 9 June by USS Trout and brought to Pearl Harbor. After receiving medical care, at least one of these sailors cooperated during interrogation and provided intelligence. Another 35 crewmen from Hiryū were taken from a lifeboat by USS Ballard on 19 June after being spotted by an American search plane. They were brought to Midway and then transferred to Pearl Harbor on USS Sirius.
Impact

The Battle of Midway has often been called "the turning point of the Pacific".[177] It was the Allies' first major naval victory against the Japanese,[178] won despite the Japanese Navy having more forces and experience than its American counterpart. Had Japan won the battle as thoroughly as the U.S. did, it might have been able to conquer Midway Island. Saratoga would have been the only American carrier in the Pacific, with no new ones being completed before the end of 1942. While the U.S. would probably not have sought peace with Japan as Yamamoto hoped, his country might have revived Operation FS to invade and occupy Fiji and Samoa; attacked Australia, Alaska, and Ceylon; or even attempted to conquer Hawaii.[179]
Although the Japanese continued to try to secure more territory, and the U.S. did not move from a state of naval parity to one of supremacy until after several more months of hard combat,[180] Midway allowed the Allies to switch to the strategic initiative, paving the way for the landings on Guadalcanal and the prolonged attrition of the Solomon Islands campaign. Midway allowed this to occur before the first of the new Essex-class fleet carriers became available at the end of 1942.[181] The Guadalcanal Campaign is also regarded by some as a turning point in the Pacific War.[182]
Some authors have stated that heavy losses in carriers and veteran aircrews at Midway permanently weakened the Imperial Japanese Navy.[183] Parshall and Tully have stated that the heavy losses in veteran aircrew (110, just under 25% of the aircrew embarked on the four carriers)[184] were not crippling to the Japanese naval air corps as a whole; the Japanese navy had 2,000 carrier-qualified aircrew at the start of the Pacific war.[185] The loss of four large fleet carriers and over 40% of the carriers' highly trained aircraft mechanics and technicians, plus the essential flight-deck crews and armorers, and the loss of organizational knowledge embodied in such highly trained crews, were still heavy blows to the Japanese carrier fleet.[186][nb 6] A few months after Midway, the Imperial Japanese Navy Air Service sustained similar casualty rates in the Battle of the Eastern Solomons and Battle of the Santa Cruz Islands, and it was these battles, combined with the constant attrition of veterans during the Solomons campaign, which were the catalyst for the sharp downward spiral in operational capability.[186]
After the battle, Shōkaku and Zuikaku were the only large carriers of the original Pearl Harbor strike force still afloat. Of Japan's other carriers, Taihō, which was not commissioned until early 1944, would be the only fleet carrier worth teaming with Shōkaku and Zuikaku; Ryūjō and Zuihō were light carriers, while Jun'yō and Hiyō, although technically classified as fleet carriers, were second-rate ships of comparatively limited effectiveness.[187] In the time it took Japan to build three carriers, the U.S. Navy commissioned more than two dozen fleet and light fleet carriers, and numerous escort carriers.[188] By 1942 the United States was already three years into a shipbuilding program mandated by the Second Vinson Act of 1938.[189]
Both the United States and Japan accelerated the training of aircrew, but the United States had a more effective pilot rotation system, which meant that more veterans survived and went on to training or command billets, where they were able to pass on lessons they had learned in training, instead of remaining in combat, where errors were more likely to be fatal.[190] By the time of the Battle of the Philippine Sea in June 1944, the Japanese had nearly rebuilt their carrier forces in terms of numbers, but their planes, many of which were obsolete, were largely flown by inexperienced and poorly trained pilots.[nb 7]
Midway showed the worth of pre-war naval cryptanalysis and intelligence-gathering. These efforts continued and were expanded throughout the war in both the Pacific and Atlantic theaters. Successes were numerous and significant. For instance, cryptanalysis made possible the shooting down of Admiral Yamamoto's airplane in 1943.[192]
The Battle of Midway redefined the central importance of air superiority for the remainder of the war when the Japanese suddenly lost their four main aircraft carriers and were forced to return home. Without any form of air superiority, the Japanese never again launched a major offensive in the Pacific.[193][194]
Discovery of sunken vessels
Because of the extreme depth of the ocean in the area of the battle (more than 17,000 ft or 5,200 m), researching the battlefield has presented extraordinary difficulties. On 19 May 1998, Robert Ballard and a team of scientists and Midway veterans from both sides located and photographed Yorktown, which was located 16,650 feet deep (3.1 miles). The ship was remarkably intact for a vessel that had sunk in 1942; much of the original equipment and even the original paint scheme were still visible.[195] Ballard's subsequent search for the Japanese carriers was unsuccessful.
In September 1999, a joint expedition between Nauticos Corp. and the U.S. Naval Oceanographic Office searched for the Japanese aircraft carriers. Using advanced renavigation techniques in conjunction with the ship's log of the submarine USS Nautilus, the expedition located a large piece of wreckage, subsequently identified as having come from the upper hangar deck of Kaga. The crew of the Petrel research vessel, in conjunction with the US Navy, revealed on 18 October 2019 that it had found the Japanese carrier Kaga lying 5.4 km beneath the waves. The crew of the research vessel Petrel confirmed the discovery of another Japanese carrier, the Akagi on 21 October 2019. The Akagi was found in the Papahānaumokuākea Marine National Monument resting in nearly 18,000 feet (5,490 meters) of water more than 1,300 miles (2,090 kilometers) northwest of Pearl Harbor.
Remembrances

Chicago Municipal Airport, important to the war effort in World War II, was renamed Chicago Midway International Airport (or simply Midway Airport) in 1949 in honor of the battle.[196]
Waldron Field, an outlying training landing strip at Corpus Christi NAS, as well as Waldron Road leading to the strip, was named in honor of John C. Waldron, the commander of USS Hornet's Torpedo Squadron 8. Yorktown Boulevard leading away from the strip was named for the U.S. carrier sunk in the battle.[197]
Henderson Field (Guadalcanal) was named in honor of United States Marine Corps Major Lofton Henderson, who was the first Marine aviator to perish during the battle.[198]
An escort carrier, USS Midway (CVE-63) was commissioned on 17 August 1943. She was renamed St. Lo on 10 October 1944 to clear the name Midway for a large fleet aircraft carrier,[199] USS Midway (CV-41), which was commissioned on 10 September 1945, eight days after the Japanese surrender, and is now docked in San Diego, California, as the USS Midway Museum.[200]
On 13 September 2000, Secretary of the Interior Bruce Babbitt designated the lands and waters of Midway Atoll National Wildlife Refuge as the Battle of Midway National Memorial.[201]
Tinker Air Force Base, outside Oklahoma City, Oklahoma is named in honor of Major General Clarence L. Tinker, Commander, 7th Air Force, who personally led a bomber strike from Hawaii against the retreating Japanese forces on 7 June.
John Ford directed two films about the events: the 18-minute 1942 Movietone News documentary (released by the War Activities Committee) The Battle of Midway,[202] which received the 1942 Academy Award for Best Documentary; and the eight-minute documentary Torpedo Squadron 8, which describes the heroism of Torpedo Squadron 8 of the USS Hornet.[203][204][205] Ford, who was USNR Commander at the time, was present on Midway Atoll's power plant at Sand Island during the Japanese attack and filmed the attack.[206] He received combat wounds from enemy fire in his arm during the filming.[203][207][208][209]
Portrayals in literature and popular culture
Movies
The following is the list of the movies dealing with the Midway battle or portraying the act of battle as the crucial moment of the film's plot:
- Hawai Middouei daikaikusen: Taiheiyo no arashi (1960)
- Rengō Kantai Shirei Chōkan: Yamamoto Isoroku (1968)
- Midway (1976)
- Isoroku (2011)
- Midway (2019)
Other
- The battle has been the subject of video games including Secret Weapons Over Normandy, Blazing Angels: Squadrons of WWII, Heroes of the Pacific, Battlestations: Midway and Battlestations: Pacific, with the last providing an alternate history timeline in which Japan is victorious at Midway.
- In the 2004 anime series Zipang, the crew of the JMSDF Mirai, are transported back sixty years through time to June 4/5, 1942, the first day of the Battle of Midway.
- Swedish metal band Sabaton included a song about the Battle of Midway titled Midway on their 2010 album Coat of Arms.
See also
- First Bombardment of Midway, a 7 December 1941 attack on Midway by two Japanese destroyers
- Imperial Japanese Navy of World War II
- Imperial Japanese Navy Air Service
- WWII carrier-versus-carrier engagements between American and Japanese naval forces:
Footnotes
- The Kidō Butai (機動部隊, "Mobile Unit/Force") was the Combined Fleet's tactical designation for its carrier battle group. This title was used as a term of convenience and was not a formal name for the organization. One month after Midway, the Kidō Butai was disbanded and its surviving ships were transferred to Third Fleet.
- The code names "Val", "Kate" and "Zeke", which are often applied to these aircraft, were not introduced until late 1943 by the Allied forces. The D3A was normally referred to by the Japanese as Type 99 Navy dive bomber, the B5N as the Type 97 Navy torpedo bomber and the A6M as the Type 0 Navy fighter; the latter was colloquially known as the "Zero".[44]
- Other sources claim a stern hit, but Parshall and Tully make a case for a near miss, because of rudder damage from a high explosive bomb.[117]
- Parshall and Tully argue that even if Kaga had been towed back to Japan, the permanent structural damage caused by the inferno onboard would likely have made the carrier unusable for anything except scrapping.[123]
- Japanese casualty figures for the battle were compiled by Sawaichi Hisae for her book Midowei Kaisen: Kiroku p. 550: the list was compiled from Japanese prefectural records and is the most accurate to date.[5]
- Pre-war Japan was less mechanized than America and the highly trained aircraft mechanics, fitters and technicians lost at Midway were all but impossible to replace and train to a similar level of efficiency. In contrast, the extensive use of machinery in the United States meant that a much larger portion of the population had a mechanical/technical background.[185]
- Shinano, commissioned on 19 November 1944, was only the fourth fleet carrier commissioned by Japan during the war, after Taihō, Unryū, and Amagi.[191]
Notes
- Blair 1975, p. 240 map
- Parshall & Tully 2005, pp. 90–91
- "The Battle of Midway". Office of Naval Intelligence.
- Parshall & Tully 2005, p. 524
- Parshall & Tully 2005, pp. 114, 365, 377–380, 476
- Dull 1978, p. 166
- "A Brief History of Aircraft Carriers: Battle of Midway". U.S. Navy. 2007. Archived from the original on 12 June 2007. Retrieved 12 June 2007.
- Keegan 2005, p. 275
- Symonds 2018, p. 293
- Prange, Goldstein & Dillon 1982, pp. 13–15, 21–23; Willmott 1983, pp. 39–49; Parshall & Tully 2005, pp. 22–38.
- Parshall & Tully 2005, p. 33; Prange, Goldstein & Dillon 1982, p. 23
- Prange, Goldstein & Dillon 1982, pp. 22–26
- Parshall & Tully 2005, pp. 31–32
- Parshall & Tully 2005, p. 33
- Willmott 1983, pp. 66–67; Parshall & Tully 2005, pp. 33–34.
- "After the Battle of Midway". Midway Atoll National Wildlife Refuge. Archived from the original on 15 January 2009.
- Prange, Goldstein & Dillon 1982, pp. 375–379; Willmott 1983, pp. 110–117; Parshall & Tully 2005, p. 52
- Parshall & Tully 2005, p. 63
- Parshall & Tully 2005, p. 50
- Parshall & Tully 2005, p. 53, derived from Japanese War History Series (Senshi Sōshō), Volume 43 ('Midowei Kaisen'), p. 118.
- Parshall & Tully 2005, pp. 51, 55
- Parshall & Tully 2005, pp. 43–45, derived from Senshi Sōshō, p. 196.
- "Oil and Japanese Strategy in the Solomons: A Postulate". www.combinedfleet.com.
- Parshall & Tully 2005, pp. 55–56
- Parshall & Tully 2005, pp. 43–45, derived from Senshi Sōshō, pp. 119–121.
- Prange, Goldstein & Dillon 1982, pp. 80–81; Cressman 1990, p. 37
- Lord 1967, pp. 23–26
- Willmott 1983, p. 337
- Cressman 1990, pp. 37–45; Lord 1967, pp. 37–39
- Willmott 1983, p. 338
- Zimmerman, Dwight (26 May 2012). "Battle of Midway: Repairing the Yorktown After the Battle of the Coral Sea". Defense Media Network. Faircount Media Group. Retrieved 21 January 2015.
- Lord 1967, p. 39; Willmott 1983, p. 340
- Willmott 1983, pp. 340–341
- Parshall & Tully 2005, pp. 93–94
- Scrivner 1987, p. 8
- Parshall & Tully 2005, p. 96
- Willmott 1983, p. 101
- Parshall & Tully 2005, pp. 65–67
- Parshall & Tully 2005, pp. 63–64, 91
- Parshall & Tully 2005, pp. 450–451
- Parshall & Tully 2005, p. 89
- Parshall & Tully 2005, pp. 89–91
- Parshall & Tully 2005, pp. 78–80
- Peattie, p. 159
- Parshall and Tully, pp. 85 and 136–145; Peattie, pp. 155–59: Stille, pp. 14–15, 50–51
- Willmott 1983, p. 351; Parshall & Tully 2005, pp. 98–99
- Lord 1967, pp. 37–39; Parshall & Tully 2005, p. 99
- Parshall & Tully 2005, pp. 102–104; Willmott 1983, pp. 349–351
- Parshall & Tully 2005, pp. 101–102
- Smith 2000, p. 134
- "U.S. National Park Service: The Battle of Midway: Turning the Tide in the Pacific 1. Out of Obscurity".
- "AF Is Short of Water". The Battle of Midway. Historical Publications. Retrieved 6 September 2011.
- Baker, Benjamin (8 January 2016). "What If Japan Had Won The Battle of Midway?". The Diplomat. Retrieved 10 January 2016.
- Smith 2000, pp. 138–141
- Willmott 1983, p. 304
- Parshall & Tully 2005, p. 409
- Watson, Richard. "VP-44 at Ford Island and the Battle of Midway". Archived from the original on 7 December 2013. Retrieved 5 October 2013.
- Lundstrom 2006, p. 238
- Admiral Nimitz's CinCPac report of the battle. From Hyperwar. Retrieved 13 February 2008.
- "Interrogation of: Captain Toyama, Yasumi, IJN; Chief of Staff Second Destroyer Squadron, flagship Jintsu (CL), at Midway". USSBS From Hyperwar. Retrieved 14 February 2008.
- Parshall & Tully 2005, pp. 107–112, 126–128, 132–134
- Stephen 1988, pp. 166–167
- Parshall & Tully 2005, pp. 200–204
- Lord 1967, p. 110; Parshall & Tully 2005, p. 149
- Prange, Goldstein & Dillon 1982, pp. 207–212; Parshall & Tully 2005, pp. 149–152; "Office of Naval Intelligence Combat Narrative: "Midway's Attack on the Enemy Carriers"". Retrieved 28 January 2012.
- Parshall & Tully 2005, p. 176
- Parshall and Tulley 2005, pp. 151–153.
- Johnston, Clair (4 June 2010). "WWII Battle of Midway pilot honored". Billings Gazette. Retrieved 8 February 2013.
- Lord 1967, pp. 116–118
- Parshall and Tully, p. 549
- Parshall & Tully 2005, pp. 151–152
- Lundstrom, p. 337
- Parshall & Tully 2005, p. 182
- Parshall & Tully 2005, pp. 130–132
- Parshall & Tully 2005, pp. 156–159
- Isom 2007, pp. 129–139
- Prange, Goldstein & Dillon 1982, pp. 216–217; Parshall & Tully 2005, pp. 159–161, 183
- Bicheno 2001, p. 134
- Parshall & Tully 2005, pp. 165–170
- Parshall & Tully 2005, pp. 168–173
- Parshall & Tully 2005, p. 231, derived from Senshi Sōshō, pp. 372–378.
- Parshall & Tully 2005, pp. 121–124
- Prange, Goldstein & Dillon 1982, p. 233
- Prange, Goldstein & Dillon 1982, pp. 217–218, 372–373; Parshall & Tully 2005, pp. 170–173.
- Prange, Goldstein & Dillon 1982, pp. 231–237; Parshall & Tully 2005, pp. 170–173; Willmott 1983, pp. 395–398
- Parshall & Tully 2005, pp. 174–175; Willmott 1983, pp. 395–398
- "1942 – Battle of Midway". Joel Shepherd. Retrieved 23 July 2015.
- Lundstrom 1984, pp. 332–333
- Cressman 1990, pp. 84–89; Parshall & Tully 2005, pp. 215–216, 226–227; Buell 1987, p. 494
- "Battle of Midway". Joel Shepherd. Retrieved 23 July 2015.
- Parshall & Tully 2005, p. 174
- Mrazek 2008, p. 113
- Lundstrom 1984, p. 341
- Ewing 2004, pp. 71, 85, 86, 307
- Cressman 1990, pp. 91–94
- "Recollections of Lieutenant George Gay, USNR". Naval History and Heritage Command. 21 September 2015.
- Blair 1975, p. 238
- "Douglas TBD Devastator Torpedo Bomber (1937)". Military Factory. Archived from the original on 7 September 2015. Retrieved 27 August 2015.
- Thruelsen 1976, pp. 186, 189, 190
- "Battle of Midway: June 4 – 6, 1942". www.cv6.org.
- Crenshaw 1995, p. 158
- Morison 1949, pp. 230–232
- Patrick, John (2013). "The Hard Lessons of World War II Torpedo Failures". Undersea Warfare (47). Archived from the original on 23 July 2015. Retrieved 23 July 2015.
- Parshall & Tully 2005, pp. 215–216, 226–227
- Parshall & Tully 2005, pp. 226–227
- Bicheno 2001, p. 62
- "IJN Kirishima: Tabular Record of Movement". Senkan!. combinedfleet.com. 2006. Archived from the original on 10 June 2007. Retrieved 6 June 2007.
- Tillman 1976, pp. 69–73
- "Accounts – C. Wade McClusky". cv6.org. Retrieved 26 January 2012.
- Prange, Goldstein & Dillon 1982, pp. 259–261, 267–269; Cressman 1990, pp. 96–97; Parshall & Tully 2005, pp. 215–216, 226–227
- Parshall & Tully 2005, p. 250
- Parshall & Tully 2005, pp. 235–236
- Miller 2001, p. 123.
- Beevor 2012, p. 310.
- Keegan 2004, p. 216.
- Parshall & Tully 2005, pp. 253–259
- Tillman 2012, p. 39
- Parshall & Tully 2005, pp. 330–353
- Lord 1967, pp. 183
- Parshall & Tully 2005, p. 260
- Bob Hackett & Sander Kingsepp (1997–2009). "HIJMS Nagara: Tabular Record of Movement". Imperial Japanese Navy Page.
- Parshall & Tully 2005, p. 337.
- Lord 1967, pp. 216–217
- Parshall & Tully 2005, pp. 262, 292–299, 312
- Parshall & Tully 2005, pp. 312–318
- Parshall & Tully 2005, p. 312
- Parshall & Tully 2005, pp. 311, 316, 318
- Parshall & Tully 2005, p. 323
- Parshall & Tully 2005, p. 356
- Parshall & Tully 2005, pp. 328–329, 354–359
- Potter & Nimitz 1960, p. 682
- Blair 1975, pp. 246–247
- Parshall & Tully 2005, p. 344
- Parshall & Tully 2005, pp. 382–383
- Blair 1975, pp. 246–247; Willmott 1983, pp. 381–382
- Parshall & Tully 2005, pp. 364–365
- Blair 1975, p. 250
- Parshall & Tully 2005, p. 359
- Prange, Goldstein & Dillon 1982, p. 320; Parshall & Tully 2005, p. 345.
- Parshall & Tully 2005, pp. 345–346, diagram 347, 348
- Allen, Thomas B. (April 1999). "Return to the Battle of Midway". Journal of the National Geographic Society. Washington, D.C.: National Geographic. 195 (4): 80–103 (p. 89). ISSN 0027-9358. Archived from the original on 11 October 2009.
- Parshall & Tully 2005, p. 377
- Parshall & Tully 2005, p. 362
- Lord 1967, pp. 280
- "Yorktown". Dictionary of American Naval Fighting Ships. Navy Department, Naval History and Heritage Command. 7 April 2014. Retrieved 10 April 2015.
- Parshall & Tully 2005, pp. 374–375, 383
- Parshall & Tully 2005, p. 476
- Parshall & Tully 2005, pp. 378, 380
- Blair 1975, p. 247
- Lundstrom 2006, pp. 293–296
- Morison 1949, pp. 142–143
- Parshall & Tully 2005, p. 330
- Parshall & Tully 2005, p. 382
- Toll 2012, p. 471
- Chūichi Nagumo (June 1942). "CINC First Air Fleet Detailed Battle Report no. 6".
- Parshall & Tully 2005, pp. 92–93
- Bix 2001, p. 449
- Parshall & Tully 2005, p. 386
- Parshall & Tully 2005, pp. 386–387
- Parshall & Tully 2005, p. 388
- Parshall & Tully 2005, pp. 388–389
- Parshall & Tully 2005, pp. 390–391
- "Navy.togetherweserved: Osmus, Wesley, ENS"
- "Navy.togetherweserved: O'Flaherty, Frank Woodrow, ENS"
- "Navy.togetherweserved: Gaido, Bruno Peter, PO1"
- "War crimes of the Imperial Japanese Navy"
- "Enterprise pilots and aircrewmen taken POW"
- Barde 1983, pp. 188–192
- Parshall & Tully 2005, p. 583
- Parshall & Tully 2005, p. 566
- Parshall & Tully 2005, p. 584
- SBD-2 Aircraft, Bureau Number 2106, National Naval Aviation Museum Collections, 13 January 1994, archived from the original on 29 June 2016, retrieved 12 April 2016
- Dull 1978, p. 166; Prange, Goldstein & Dillon 1982, p. 395
- U.S. Naval War College Analysis, p.1; Parshall & Tully 2005, pp. 416–430.
- Baker, Benjamin David (8 January 2016). "What If Japan Had Won The Battle of Midway?". The Diplomat.
- Willmott 1983, pp. 522–523; Parshall & Tully 2005, pp. 416–430.
- Parshall & Tully 2005, pp. 422–423
- Fisher, Scott; Forney, Nathan (1996). "The Turning Point of the Pacific War: Two Views". CombinedFleet.com. Retrieved 8 January 2017.
- Dull 1978, p. 166; Willmott 1983, pp. 519–523; Prange, Goldstein & Dillon 1982, p. 395
- Parshall & Tully 2005, p. 432
- Parshall & Tully 2005, p. 417
- Parshall & Tully 2005, pp. 416–417, 432
- Parshall & Tully 2005, p. 421
- "Why Japan Really Lost The War". CombinedFleet.com. Retrieved 23 July 2015.
- Davidson 1996, p. 21
- Parshall & Tully 2005, pp. 390–392
- Chesneau 1980, pp. 169–170, 183–184
- Zimmerman, Dwight Jon. "Operation Vengeance: The Mission to Kill Admiral Yamamoto". DefenseMediaNetwork. Archived from the original on 15 September 2015. Retrieved 27 August 2015.
- Gordon W. Prange, Miracle at Midway (1982)
- For the Japanese perspective see Jonathan Parshall and Anthony Tully, Shattered Sword: The Untold Story of the Battle of Midway (2005)
- "Titanic explorer finds Yorktown". CNN. 4 June 1998. Retrieved 1 July 2007.
- "Midway History". Chicago Department of Aviation. Archived from the original on 10 September 2015. Retrieved 27 August 2015.
- "Navy Landing Airfield (NALF) Waldron". Global Security.org. Retrieved 27 August 2015.
- "Lofton R Henderson". Veteran Tributes. Archived from the original on 5 August 2015. Retrieved 27 August 2015.
- "A brief history of the U.S.S. St. Lo (formerly Midway) CVE 63". dondennisfamily.com. Archived from the original on 3 October 2015. Retrieved 27 August 2015.
- "USS Midway (CVB-41)". navsource.org. Archived from the original on 18 August 2015. Retrieved 27 August 2015.
- "Battle of Midway National Memorial". U.S. Fish and Wildlife Service. 22 March 2012. Archived from the original on 14 January 2009. Retrieved 10 March 2012.
- For Academy Film Archive of the film, see The Battle of Midway.
- Harris, Mark (28 February 2014). "In the Line of Fire". Entertainment Weekly. p. 78.
- "The Battle of Midway". IMDb. 14 September 1942.
- "Torpedo Squadron 8". IMDb. 1942.
- Bogdanovich, Peter (1971). Directed by John Ford. American Film Institute. OCLC 436284884. See the interview of Henry Fonda.
- "Biography of Rear Admiral John Ford; U.S. Naval Reserve". Naval Historical Center. Archived from the original on 5 September 2006.
- "Oral History – Battle of Midway:Recollections of Commander John Ford". Naval Historical Center. Archived from the original on 17 February 2001.
- Parrish, Robert (1976). Growing Up in Hollywood. New York: Harcourt, Brace, Jovanovich. ISBN 9780151374731. OCLC 1659633.
References
- Barde, Robert E. (December 1983). "Midway: Tarnished Victory". Military Affairs. 47 (4). ISSN 0899-3718.CS1 maint: ref=harv (link)
- Beevor, Antony (2012). The Second World War. New York: Back Bay Books. ISBN 978-0-316-02375-7.CS1 maint: ref=harv (link)
- Bicheno, Hugh (2001). Midway. London: Orion Publishing Group. ISBN 978-0-304-35715-4.CS1 maint: ref=harv (link)
- Bix, Herbert P. (2001). Hirohito and the Making of Modern Japan. New York: Perennial / HarperCollinsPublishers. ISBN 0-06-019314-X.CS1 maint: ref=harv (link)
- Blair, Clay, Jr. (1975). Silent Victory: The U.S. Submarine War Against Japan. Philadelphia: J.B. Lippincott. ISBN 978-0-397-00753-0.CS1 maint: ref=harv (link)
- Buell, Thomas B. (1987). The Quiet Warrior: A Biography of Admiral Raymond A. Spruance. Annapolis, Maryland: Naval Institute Press. ISBN 0-87021-562-0.CS1 maint: ref=harv (link)
- Chesneau, Roger, ed. (1980). Conway's All the World's Fighting Ships, 1922–1946. London: Conway Maritime Press. ISBN 978-0-85177-146-5.CS1 maint: ref=harv (link)
- Crenshaw, Russell Sydnor (1995). The Battle of Tassafaronga. Baltimore, Maryland: Nautical & Aviation Pub. Co. of America. ISBN 978-1-877853-37-1.CS1 maint: ref=harv (link)
- Cressman, Robert J.; Ewing, Steve; Tillman, Barrett; Horan, Mark; Reynolds, Clark; Cohen, Stan (1990). "A Glorious Page in our History", Adm. Chester Nimitz, 1942: The Battle of Midway, 4–6 June 1942. Missoula, Montana: Pictorial Histories Pub. Co. ISBN 0-929521-40-4.
- Davidson, Joel R. (1996). The Unsinkable Fleet: the Politics of U.S. Navy Expansion in World War II. Annapolis, Maryland: Naval Institute Press. ISBN 978-1-55750-156-1.CS1 maint: ref=harv (link)
- Dull, Paul S. (1978). A Battle History of the Imperial Japanese Navy (1941–1945). Annapolis, Maryland: Naval Institute Press. ISBN 1-59114-219-9.CS1 maint: ref=harv (link)
- Ewing, Steve (2004). Thach Weave: The Life of Jimmie Thach. Annapolis, Maryland: Naval Institute Press. ISBN 1-59114-248-2.CS1 maint: ref=harv (link)
- Isom, Dallas Woodbury (2007). Midway Inquest: Why the Japanese Lost the Battle of Midway. Bloomington, Indiana: Indiana University Press. ISBN 978-0-253-34904-0.CS1 maint: ref=harv (link)
- Keegan, John (2004). Intelligence in War. New York: Vintage Books. ISBN 0-375-70046-3.CS1 maint: ref=harv (link)
- Keegan, John (2005). The Second World War. New York: Penguin. ISBN 978-0-14-303573-2. OCLC 904565693.CS1 maint: ref=harv (link)
- Lord, Walter (1967). Incredible Victory. New York: Harper and Row. ISBN 1-58080-059-9.CS1 maint: ref=harv (link)
- Lundstrom, John B. (1984). The First Team: Pacific Naval Air Combat from Pearl Harbor to Midway. Annapolis, Maryland: Naval Institute Press. ISBN 1-59114-471-X.CS1 maint: ref=harv (link)
- Lundstrom, John B. (2006). Black Shoe Carrier Admiral: Frank Jack Fletcher at Coral Sea, Midway, and Guadalcanal. Annapolis: Naval Institute Press. ISBN 978-1-59114-475-5. OCLC 62782215.CS1 maint: ref=harv (link)
- Miller, Donald L. (2001). The Story of World War II. New York: Simon & Schuster. ISBN 978-0-7432-2718-6.CS1 maint: ref=harv (link)
- Morison, Samuel E. (1949). Coral Sea, Midway and Submarine Actions: May 1942 – August 1942. History of United States Naval Operations in World War II. Volume 4. Boston: Little, Brown. ISBN 978-0-316-58304-6.CS1 maint: ref=harv (link)
- Mrazek, Robert (2008). A Dawn Like Thunder: The True Story of Torpedo Squadron Eight. New York: Little, Brown. ISBN 978-0-316-02139-5. OCLC 225870332.CS1 maint: ref=harv (link)
- Parshall, Jonathan; Tully, Anthony (2005). Shattered Sword: The Untold Story of the Battle of Midway. Dulles, Virginia: Potomac Books. ISBN 1-57488-923-0.CS1 maint: ref=harv (link)
- Potter, E. B.; Nimitz, Chester W. (1960). Sea Power: A Naval History. Prentice-Hall Englewood Cliffs, New Jersey. OCLC 395062.CS1 maint: ref=harv (link)
- Prange, Gordon W.; Goldstein, Donald M.; Dillon, Katherine V. (1982). Miracle at Midway. New York: McGraw-Hill. ISBN 0-07-050672-8.CS1 maint: ref=harv (link)
- Scrivner, Charles L. (1987). TBM/TBF Avenger in Action. Carrollton, Texas: Squadron/Signal Publications. ISBN 0-89747-197-0.CS1 maint: ref=harv (link)
- Smith, Michael (2000). The Emperor's Codes: Bletchley Park and the Breaking of Japan's Secret Ciphers. London: Bantam Press. ISBN 0-593-04642-0.CS1 maint: ref=harv (link)
- Stephen, Martin (1988). Sea Battles in Close-up: World War Two. London: Ian Allan. ISBN 978-0-7110-1596-8.CS1 maint: ref=harv (link)
- Symonds, Craig L. (2018). World War Two at Sea: A Global History. Oxford University Press. ISBN 978-0-1902-4367-8.
- Thruelsen, Richard (1976). The Grumman Story. Praeger Press. ISBN 0-275-54260-2.CS1 maint: ref=harv (link)
- Tillman, Barrett (1976). The Dauntless Dive-bomber of World War Two. Annapolis, Maryland: Naval Institute Press. ISBN 0-87021-569-8.CS1 maint: ref=harv (link)
- Toll, Ian W. (2012). Pacific Crucible, War in the Pacific, 1941–1942. New York: W.W. Norton. ISBN 978-0-393-06813-9.CS1 maint: ref=harv (link)
- Willmott, H. P. (1983). The Barrier and the Javelin: Japanese and Allied Strategies, February to June 1942. Annapolis, Maryland: Naval Institute Press. ISBN 1-59114-949-5.CS1 maint: ref=harv (link)
Further reading
- Evans, David; Peattie, Mark R. (1997). Kaigun: Strategy, Tactics, and Technology in the Imperial Japanese Navy, 1887–1941. Annapolis, Maryland: Naval Institute Press. ISBN 0-87021-192-7.
- Fuchida, Mitsuo; Masatake Okumiya (1955). Midway: The Battle that Doomed Japan, the Japanese Navy's Story. Annapolis, Maryland: Naval Institute Press. ISBN 0-87021-372-5. A Japanese account; numerous assertions in this work have been challenged by more recent sources.
- Hanson, Victor D. (2001). Carnage and Culture: Landmark Battles in the Rise of Western Power. New York: Doubleday. ISBN 0-385-50052-1.
- Hara, Tameichi (1961). Japanese Destroyer Captain. New York: Ballantine Books. ISBN 0-345-27894-1. First-hand account by Japanese captain, often inaccurate.
- Holmes, W. (1979). Double-Edged Secrets: U.S. Naval Intelligence Operations in the Pacific During World War II (Bluejacket Books). Annapolis, Maryland: Naval Institute Press. ISBN 1-55750-324-9.
- Kahn, David. The Codebreakers: The Comprehensive History of Secret Communication from Ancient Times to the Internet. New York: Scribner. ISBN 0-684-83130-9. Significant section on Midway
- Kernan, Alvin (2005). The Unknown Battle of Midway. New Haven, Connecticut: Yale University Press. ISBN 0-300-10989-X. An account of the blunders that led to the near total destruction of the American torpedo squadrons, and of what the author calls a cover-up by naval officers after the battle.
- Layton, Edwin T. (1985). And I Was There: Pearl Harbor and Midway. New York: W. Morrow. ISBN 978-0-688-04883-9.
- Peattie, Mark R. (2007). Sunburst: The Rise of Japanese Naval Air Power, 1909–1941. Annapolis, Maryland: Naval Institute Press. ISBN 978-1-59114-664-3.
- Smith, Douglas V. (2006). Carrier Battles: Command Decision in Harm's Way. Annapolis, Maryland: Naval Institute Press. ISBN 1-59114-794-8.
- Smith, Peter C. (2007). Midway Dauntless Victory; Fresh perspectives on America's Seminal Naval Victory of 1942. Barnsley, UK: Pen & Sword Maritime. ISBN 978-1-84415-583-5. Detailed study of battle, from planning to the effects on World War II
- Stephan, John J. (1984). Hawaii Under the Rising Sun: Japan's Plans for Conquest after Pearl Harbor. Honolulu: University of Hawaii Press. ISBN 0-8248-2550-0.
- Stille, Mark (2007). USN Carriers vs IJN Carriers: The Pacific 1942. New York: Osprey. ISBN 978-1-84603-248-6.
- Willmott, H. P. (2004). The Second World War in the Far East. Smithsonian History of Warfare. Washington, D.C.: Smithsonian Books. p. 240. ISBN 1-58834-192-5.
External links
| Wikimedia Commons has media related to Battle of Midway. |
- The Japanese Story of the Battle of Midway, prepared by U.S. Naval Intelligence from captured Japanese documents
- Battle of Midway (1942) – U.S. Navy propaganda film directed by John Ford. The Battle of Midway (1942) on IMDb
- Victory At Sea: Midway Is East (1952) – Episode 4 from a 26-episode series about naval combat during World War II.
- "The Course to Midway Turning Point in the Pacific". Archived from the original on 23 October 2014. Comprehensive historic overview created by Bill Spencer, archive.org
- Naval History and Heritage Command Midway Page
- "The Japanese Story of the Battle of Midway" – ONI Review – Vol. 2, No. 5 (May 1947)
- WW2DB: The Battle of Midway
- After Midway: The Fates of the U.S. and Japanese Warships by Bryan J. Dickerson
- Animated History of The Battle of Midway
- Midway Chronology 1
- "Midway Chronology 2". Archived from the original on 2 October 2014. Retrieved 26 April 2006.
- Destination Point Luck: Voices From Midway (2008) – U.S. Navy Interviews of Battle of Midway Veterans
- A real tragedy by Ray Daves, a crewman on the USS Yorktown; from the memoir Radioman: An Eyewitness Account of Pearl Harbor and World War II in the Pacific, as told to Carol Edgemon Hipperson