Indian Ocean raid
The Indian Ocean raid (known in Japan as Operation C[2]) was a naval sortie carried out by the Imperial Japanese Navy (IJN) from 31 March to 10 April 1942. Japanese aircraft carriers under Admiral Chūichi Nagumo struck Allied shipping and naval bases around Ceylon, but failed to locate and destroy the bulk of the British Eastern Fleet. The Eastern Fleet, commanded by Admiral Sir James Somerville, was forewarned by intelligence and sailed from its bases prior to the raid; its attempt to attack the Japanese was frustrated by poor tactical intelligence.
| Indian Ocean raid | |||||||
|---|---|---|---|---|---|---|---|
| Part of the Pacific Theatre of World War II | |||||||
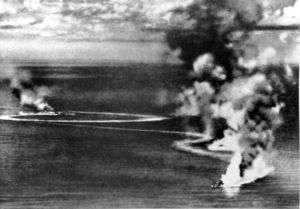 British heavy cruisers HMS Dorsetshire and Cornwall under Japanese air attack and heavily damaged on 5 April 1942 British heavy cruisers HMS Dorsetshire and Cornwall under Japanese air attack and heavily damaged on 5 April 1942. | |||||||
| |||||||
| Belligerents | |||||||
|
|
| ||||||
| Commanders and leaders | |||||||
|
|
| ||||||
| Units involved | |||||||
|
|
| ||||||
| Strength | |||||||
|
3 carriers 5 battleships 7 cruisers 15 destroyers 7 submarines 100+ aircraft 30 smaller warships 50+ merchant ships |
5 carriers 4 battleships 7 cruisers 19 destroyers 5 submarines 350 aircraft | ||||||
| Casualties and losses | |||||||
|
1 light carrier sunk 2 heavy cruisers sunk 2 destroyers sunk 1 Armed Merchant Cruiser (AMC) sunk 1 corvette sunk 1 sloop sunk 23 merchant ships sunk 40+ aircraft destroyed | 20+ aircraft destroyed | ||||||
Following the attack the British expected a major Japanese offensive in the Indian Ocean. The main base of the Eastern Fleet relocated to East Africa, and Ceylon was reinforced, but Admiral Sir James Somerville kept his fast carrier division, Force A, "...in Indian waters, to be ready to deal with any attempt by the enemy to command those waters with light forces only."[3] However, the Japanese had no short-term plans to follow up on their success, and within the year operations in the Pacific made it impossible to do so.
Background
Strategic situation
The island of Ceylon was strategically important, since it commanded the Indian Ocean. Thus it controlled access to India, the vital Allied shipping routes to the Middle East and the oilfields of the Persian Gulf. Ceylon held most of the British Empire's resources of rubber. An important harbour and naval base, Trincomalee, was located on the island’s eastern coast. Japanese propaganda had an effect on some of the Sinhalese population, who now awaited their arrival.
The fall of Singapore on 15 February 1942 broke the United Kingdom's eastern defensive perimeter of the Bay of Bengal; and Japanese occupation of the Andaman Islands on 23 March 1942 gave Japan control of the Andaman Sea enabling ships to resupply Japanese troops in the Burma Campaign for control of India. Both German and British authorities anticipated Japanese capture of Ceylon to solidify control of the Bay of Bengal and disrupt British resupply for defence of India, Australia, and perhaps the Middle East. Ceylon was hastily garrisoned by Australian troops returning from North Africa; and HMS Indomitable was relieved of naval duties to serve as a high-speed aircraft ferry shuttling available planes to Ceylon.[4]
Japanese intentions to mount a major offensive into the Indian Ocean were placed on hold in March 1942; strong naval forces were needed in the western Pacific against the United States, and the Imperial Japanese Army (IJA) refused to allocate troops for an invasion of Ceylon. In response, the IJN developed Operation C, a plan for an aggressive raid into the Indian Ocean in early April. Operation C aimed to destroy the British Eastern Fleet, and disrupt British lines of communications in the Bay of Bengal in support of the Burma Campaign.[2]
British intelligence correctly assessed the Japanese strategy. The Americans were notified; the Doolittle Raid – which was already in progress – took on the additional role as a diversion.[2]
Japanese preparations
Admiral Isoroku Yamamoto issued the initial order to proceed with Operation C to the IJN's southern force, commanded by Admiral Nobutake Kondō, on 9 March 1942. By 16 March, the plan was to depart from Staring Bay, Celebes, on 26 March for an attack on Colombo ("C day") on 5 April.[5] The Japanese expected to destroy the British Eastern Fleet in port. Japanese intelligence on the composition of the British Eastern Fleet was reasonably accurate, but overestimated air strength on Ceylon.[6]
The Japanese force, commanded by Admiral Chūichi Nagumo, had a core of five aircraft carriers; Akagi, Shōkaku and Zuikaku in Carrier Division 5, and Sōryū and Hiryū in Carrier Division 2.[1] The carriers were accompanied by all four Kongo-class battleships, and both Tone-class cruisers.[7]
The Japanese stationed reconnaissance submarines outside of the known British anchorages at Colombo and Trincomalee; their effectiveness was limited.[8] At least one submarine was sent to scout the Maldive Islands but failed to detect Port T at Addu Atoll.[9]
At the same time as Operation C, the IJN also dispatched Malay Force, consisting of Ryūjō, six cruisers, and four destroyers to destroy shipping in the Bay of Bengal on 1 April. Malay Force was not part of Operation C.[10]
British preparations
The reinforcement of the British Eastern Fleet depended on transfers from Britain and the Mediterranean, a reflection of active warzones and the demands on the Royal Navy's (RN) resources.
In late-December 1941, a reassessment of the threat posed by Japan envisioned transferring the majority of the RN's heavy units to the Eastern Fleet. Matters were made urgent by the crippling of the United States Pacific Fleet's battle line at Pearl Harbor, which exposed the weak forces in Malaya to attack. Heavy units were freed up by American reinforcements in the Atlantic. The construction programs of the late-1930s were also starting to yield new heavy units. The Mediterranean yielded far fewer reinforcements than expected due to serious losses in that theatre in 1941.[11]
The Eastern Fleet that Vice Admiral Sir James Somerville assumed command of in March 1942 was smaller than what had been envisioned in December 1941. Somerville divided the fleet into two groups, based on speed. The faster "Force A" included the aircraft carriers HMS Formidable and HMS Indomitable, the modernized battleship HMS Warspite (as flagship), as well as the modern cruisers and destroyers. The slower "Force B" was formed around the old carrier HMS Hermes, and four unmodernized Revenge-class battleships. A few submarines were also available.[12][9][13][14] The ships had never operated together before, and both ship and air crews were deficient in training.[12]
Allied intelligence accurately assessed the strength of the Japanese force.[5] Sommerville planned to evade the Japanese during the day and close to launch torpedo strikes with radar-equipped Fairey Albacore bombers during the night.[9] However, the plan was based on information provided by the Far East Combined Bureau (FECB), which identified only two carriers in the Japanese force. FECB also believed the Japanese would sail from Staring Bay on 21 March for a "C day" of 1 April. Thus, Somerville sailed early expecting to fight a smaller and manageable enemy force, particularly in aircraft strength.[5] As such, Somerville likely did not see his plan as incompatible with his orders from the Admiralty, which were to protect the lines of communications in the Indian Ocean, and to maintain the Eastern Fleet as a fleet in being by avoiding unnecessary risks.[5]
Ceylon was defended by three Royal Air Force (RAF) squadrons of Hawker Hurricanes (two at Colombo, and one at Trincomalee), and two squadrons of RN Fleet Air Arm (FAA) Fairey Fulmars.[15]
Raid
First moves

The Japanese sailed from Staring Bay on 26 March as planned.[7]
Somerville sailed on 30 March in expectation of an attack on 1 April, and deployed his fleet in a patrol area 100 miles (160 km) south of Ceylon.[16] Force B remained close to Force A, possible to cover the aircraft carriers from fast IJN capital ships attack at night or in poor weather.[9] British land-based aerial reconnaissance was concentrated to the southeast, where the Japanese were expected to approach to launch strikes at Colombo and Trincomalee. Late on 2 April, the British retired toward Port T – 600 miles (970 km) southwest of Ceylon – to refuel.[16] Somerville also detached various ships to resume previous commitments; the heavy cruisers HMS Cornwall and HMS Dorsetshire were sent to Colombo, and Hermes to Trincomalee.[9]
On the afternoon of 4 April[17] Nagumo's fleet was detected 360 mi (310 nmi; 580 km) south-east of Ceylon by a Catalina flying boat[16] on a course that would have entered Somerville's previous patrol area from the south.[17] The Catalina transmitted the sighting, but not the size of the fleet, before being shot down.[16] At this time, Somerville was refuelling at Port T; Force A sailed eastward toward the Japanese upon receiving the sighting;[9] Force B could not be ready until 5 April.[15]
Admiral Geoffrey Layton, on Ceylon, ordered ships put to sea to avoid being attacked in harbour. Cornwall and Dorsetshire, which had just reached Colombo, were sent to rejoin Force A;[15] they sailed late on 4 April.[18] Hermes sailed from Trincomalee and ordered to hide northeast of Ceylon.[15]
The Japanese did not perform an aerial reconnaissance sweep along their intended course on the afternoon of 4 April, and a planned reconnaissance of Colombo harbour by cruiser floatplanes was cancelled.[8]
Attack on Colombo
At dawn on 5 April 1942, the Japanese launched aerial reconnaissance aircraft to the south-west and north-west; they would fly out to a maximum of 200 miles (320 km) over the next few hours. A reconnaissance Fulmar launched from Force A at 0800 spotted one of the Japanese aircraft at the extreme edge of the south-west search area at 0855 about 140 miles (230 km) ahead of Force A.[19]
Shortly after 0600[20] the Nagumo's force began launching 91 bombers and 36 fighters for the strike on Colombo; the strike hit at 0800 but the harbour was not put out of action.[15] The armed merchant cruiser HMS Hector (which was due to be released back to trade) and the old destroyer HMS Tenedos were in the harbour. Eighteen Japanese planes were lost to heavy anti-aircraft fire. The Japanese only admitted to five losses, three of them over land – as only three destroyed planes were discovered on land. The RAF lost at least 27 aircraft.
Nagumo changed course to west-southwest at 0830[20] – unknowingly causing the opposing fleets to steam toward one another[1] – and recovered the Colombo strike from 0945 to 1030.[1]
The size of the airstrike on Colombo was Somerville's first concrete evidence that the Japanese force contained more than the two carriers he expected. Nonetheless he continued to steam toward the enemy at 18 knots. Radar-based fighter direction would allow Force A to avoid surprise attack by neutralizing shadowing Japanese aircraft.[19]
Loss of Dorsetshire and Cornwall

At 1000, an aircraft from Tone's searching the southwest area spotted and began shadowing Dorsetshire's force; the aircraft reported that the cruiser was heading southwest and making 24 knots.[1] The cruisers reported the shadower, but had no means to drive it off.[18] Nagumo increased speed from 24 to 28 knots upon receiving the sighting. Carrier Division 5's reserve strike force was ordered rearmed with anti-ship torpedoes, replacing the high explosive bombs intended for a second strike on Colombo. The rearming encountered delays, and the strike was carried out by Carrier Division 2 instead; Soryu and Hiryu began flying off dive bombers at 1145.[1] Force A radar detected the air strike on Dorsetshire's force at 1344, putting the aircraft 34 miles (55 km) to the northeast.[19] Cornwall and Dorsetshire were sunk at 1400;[21] ultimately 424 officers and crew were lost.[18]
The Japanese missed an opportunity to find Force A after sinking the cruisers. The aircraft shadowing the cruisers flew another 50 miles (80 km) along the cruisers' course before returning to Tone. It would have detected Force A if it had flown southwest another ten minutes.[21]
Nagumo recovered the strike against the cruisers at 1445.[21]
Nagumo evades Somerville
Somerville launched four Albacores from Indomitable at 1400 to search an arc to the northeast out to 200 miles (320 km). Nagumo's southeasterly course would have taken the Japanese fleet right through the centre of the arc. However, at 1500 or 1530, Nagumo changed course to the southwest. Carrier Division 2 did not immediately follow; it performed a series of kinking manoeuvres starting at 1500 that initially took it northwest.[21] Carrier Division 2 was spotted by the two northerly Albacores around 1600. Hiryū launched Mitsubishi A6M Zero fighters to intercept the scouts; one Albacore was damaged at 1604, and the other shot down at 1628 without reporting.[22] The two southernmost Albacores missed Nagumo's main body.[21]
Somerville did not receive the damaged Albacore's sighting report until 1655; the report gave the position of Carrier Division 2 with reasonable accuracy, placed the Japanese 125 miles (201 km) away, but contained no other data. At 1700 he received signals intelligence (SIGINT) from Colombo reporting the Japanese course at 1400 as southwesterly at 24 knots. Somerville ordered a course change to the southwest at 1726, not knowing that Nagumo's main body was 120 miles (190 km) away, and that Carrier Division 2 was only 100 miles (160 km) away. The course change was presumably to maintain distance between a superior enemy that was believed to be still closing, or to cover Port T from attack, but it also meant the British lost an opportunity to meet the enemy; had Force A continued on its easterly course, Carrier Division 2 would have passed right in front of it at 2100 at range of about 20 miles (32 km).[22]
The damaged Albacore landed at 1745, less than a half-hour before sunset, and the crew was debriefed. There were two resulting revisions to the 1600 sighting, which were transmitted to Somerville at 1800 and 1817 respectively, and differed significantly from the other and the original report. The final revision correctly identified the two carriers of Carrier Division 2 – which Somerville likely realized to be only part of the enemy force – but also claimed they were heading toward the northwest at a position 25 miles (40 km) or the original sighting. The course heading conflicted with the first revision, which suggested a course toward the southeast. Late on 5 April, FECB decrypted a JN 25B message containing Nagumo's planned movement on 6 April, but this did not aid Somerville as the transmission to the fleet was garbled. Somerville declined to launch a strike based on poor information, and opted to head northwest in pursuit. One radar-equipped aircraft was launched to search a northern arc out to 200 miles (320 km). Later, aircraft were sent to search the easterly arc. By this time it was too late to reestablish contact with the Japanese.[23]
For the Japanese, too, there was a lost opportunity to find the British before night fell. Nagumo did not order a search for the British carriers at the appearance of British carrier-based aircraft. Search aircraft might require homing signals from the carriers to return, homing signals which the enemy could use to locate the Japanese. The Japanese continued southeast at 20 knots completely unaware of the presence of Force A.[24] Carrier Division 2 rejoined the main body's track at 1800,[25] and caught up at 2200 180 miles (290 km) due east of Force A.[23] The Japanese circled wide to the south and then east in preparation for striking Trincomalee. Along the way, from 6 to 8 April, they conducted searches for the British carriers, which were by that time far to the west;[18] the dawn search on 6 April was not comprehensive.[26]
By 6 April, British SIGINT indicated the Japanese force contained four carriers and three battleships, a force Somerville clearly realized as beyond the Eastern Fleet's capability to engage without undue risk. The declining serviceability of his fighter force also reinforced his caution.[26] Even so, Somerville did not immediately withdraw or return to port. Force B rejoined early on 6 April. In the afternoon 1,122 survivors[18] from Dorsetshire's force were recovered, while maintaining a look-out for the superior enemy force with all-around air reconnaissance.[27] Intelligence from Ceylon put the Japanese between Port T and Ceylon. Somerville cautiously arrived at Port T from the west at 1100 on 8 April and refuelled.[18]
On 6 April heavy cruisers Kumano and Suzuya with destroyer Shirakumo sank the British merchant ships Silksworth, Autolycus, Malda and Shinkuang and the American ship Exmoor.[28].
Trincomalee and Batticaloa
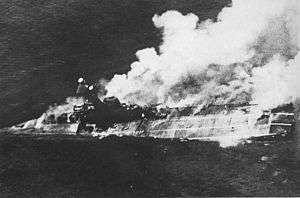
On the afternoon of 8 April, a Catalina detected Nagumo's force steaming toward Ceylon, 400 miles (640 km) east of the island. The harbour at Trincomalee was cleared that night; Hermes, escorted by HMAS Vampire, were sent south along the coast; they were 65 miles (105 km) away when Trincomalee was attacked. The Japanese air group, about the same size as the one that attacked Colombo, was detected early on 9 April and met by 22 British fighters. The Trincomalee harbour facilities suffered considerable damage.[29]
Hermes's group reversed course at 0900 on 9 April, and detected by Japanese aerial scouts shortly afterwards. At 1030 they were attacked before the arrival of ground-based fighter cover. Hermes was hit by over 40 bombs in ten minutes and sunk. Vampire, the corvette HMS Hollyhock, and two tankers were also sunk. 600 survivors were rescued by a nearby hospital ship.[29]
During the day, nine Bristol Blenheim bombers from RAF No. 11 Squadron[29] attacked Nagumo's force. They were not detected inbound by the combat air patrol (CAP). Hiryū spotted the aircraft but failed to relay a warning to the other ships. As a result, the attack achieved total surprise.[30] The bombers unloaded at 11,000 feet (3,353 m)[31] on Akagi; the bombs fell close to the target with no hits.[30] Four bombers were shot down over the carriers by CAP A6M2 Zeroes (two of which were claimed by Kaname Harada), and another by Japanese aircraft returning from the strike on Hermes. In return, a Zero was shot down near the carriers and another in the returning strike.[31] This was the first time a Japanese carrier force had faced a concerted air attack.[30]
Aftermath
British reaction
The Japanese inflicted disproportionate damage on the enemy. They damaged port facilities, sank one carrier and two cruisers, destroyed a third of enemy ground-based fighters and nearly all of the enemy ground-based strike aircraft. In addition, 23 merchant ships,[27] totalling 112,312 tons,[29] were sunk, including those by the separate Japanese Malay Force. In return, the Japanese lost only 18 aircraft, with damage to about 31 more. Conversely, they failed to destroy, or even locate, the main bulk of the British Eastern Fleet.[27]
The British interpreted their position as precarious. Ceylon and the Eastern Fleet were required to safeguard the sea lines of communications through the Indian Ocean. The British expected the Japanese to continue threatening these lines. SIGINT suggested that the Japanese were preparing a deliberate advance across the Indian Ocean.[32] The raid demonstrated that the RAF was too weak to defend Ceylon and the naval anchorages,[3] and that the navy was ill-prepared to meet a Japanese carrier force.[33]
The Eastern Fleet transferred its main base to Kilindini, Kenya, in East Africa, temporarily ceding the eastern Indian Ocean to the Japanese; from there it continued contesting control of the central Indian Ocean on better terms.[32] Force A, including its two aircraft carriers, Indomitable and Formidable, retired to Bombay,[3] and Somerville regularly deployed a fast carrier force to the central Indian Ocean over the next six months, during which he operated from or near Ceylon for nearly half that time. On 18 April, naval planning accorded the Eastern Fleet the highest priority for reinforcement, which also included transferring most of the carriers from the Home Fleet and the Mediterranean, with the intention of returning to Ceylon in September.[34]
By June, Ceylon was defended by three RAF squadrons (64 aircraft, plus reserves), three strike squadrons (including one of Beauforts), and much improved radar and anti-aircraft defences.[35] Ground defences were manned by two Australian army brigades.[36]
The invasion scare was short-lived. British intelligence detected the movement of the Japanese carrier force eastward in mid-April, and their deployment in the Pacific in mid-May.[37] After the Battle of Midway in June, it was realized that there was no longer the threat of major Japanese naval activity in the Indian Ocean. In September, British intelligence predicted Japan would go over to the defensive. As a result, the Eastern Fleet was not reinforced as planned and, instead, shrank after early July.[38]
Japanese reaction
The Japanese did not exploit their victory as the British feared. The decision to postpone major operations in the Indian Ocean was upheld. The Japanese aircraft carriers required maintenance and replenishment after months of intensive operations,[39] and there was already difficulty in maintaining the strength of frontline air units.[40] Japanese attention also lay elsewhere. In early May, Japanese carriers fought the Battle of the Coral Sea in the southwest Pacific,[39] followed in June by the Battle of Midway.[38] In both cases, losses constrained Japanese options further.
In June, the IJA developed a plan for a major offensive in the Indian Ocean, including an invasion of Ceylon. The Germans were advancing in North Africa, which made an Axis link-up in the Middle East attractive. Resource constraints forced the IJN to reject it, especially once the Guadalcanal Campaign started.[38]
Subsequently, the limit of Japanese operations in the Indian Ocean was against trade using submarines and armed merchant cruisers.[41] Notably, a submarine group patrolling off East Africa attacked the harbour at Diego-Suarez, Madagascar, while the Allies were capturing the island.[42] Ironically, the Allies were motivated by overblown fears that the Japanese might establish a base there to attack trade.[35] Overall, Japanese attacks on trade enjoyed some success, but after 1942 the presence of major Japanese naval units in the Indian Ocean virtually ceased.[43]
Criticism of Nagumo
Nagumo's leadership was criticised as rigid and unimaginative, which contributed to the failure to find and destroy the British Eastern Fleet. The manoeuvring of his fleet was mainly to facilitate strikes on Colombo and Trincomalee; the possibility that the enemy might be at sea was apparently not seriously considered. He failed to appreciate that the direction that Dorsetshire's force was sailing, and the later appearance of British carrier-based aircraft, were related. Furthermore, aerial reconnaissance was poor. Standard dawn searches were made on 5 and 6 April, but for much of the remainder Nagumo's had little concrete information of what was around him, especially to his front and exposed flanks. He was not served by the confidence that there was nothing else to be found outside of the few searches made.[6]
Problems with Japanese carrier operations
The raid also provided early examples of problems with Japanese carrier operations. Inadequate aerial reconnaissance failing to locate the enemy fleet in a timely fashion, the difficulty of rearming aircraft for a different mission at short notice, and the penetration of the CAP by enemy aircraft due to the lack of radar-directed fighter control, would all recur at the Battle of Midway.[6]
Criticism of Somerville
Somerville's leadership was characterized by a willingness to take risks, bordering on recklessness.
The initial deployment of the fleet on 30 March endangered the British fleet in multiple ways. Somerville was relying on radar – manned by inexperienced personnel – to locate the enemy and facilitate night strikes. If the Japanese approached as expected from the southeast and the British failed to find the Japanese before dawn, the distance between the two fleets would be no more than 100 miles (160 km); the British would be detected by Japanese aerial reconnaissance at dawn and be subject to air attack for the entire day. Much the same could have been expected had Somerville still been on station when the Japanese arrived – as they did – from the southwest.[8] Somerville's decision to refuel at Port T – rather than on Ceylon – on 2 April allowed the Eastern Fleet to avoid Nagumo a few days later, likely saved the Eastern Fleet from destruction.[9]
The failure of the Japanese fleet to appear on 1–2 April led Somerville to mistakenly believe that the entirety, rather than a part, of Allied intelligence concerning Operation C was flawed. As a result he detached Cornwall, Dorsetshire, and Hermes, which were subsequently lost after being sent into areas overflown by Japanese aerial reconnaissance.[9]
Boyd notes:
[Somerville] underestimated the risks he was running at least up to dusk on 5 April. He drew over-optimistic conclusions from the available intelligence, he grossly underestimated IJN air strength. and he hazarded his fleet in direct contravention of his instructions from the chiefs of staff. Ceylon was not his finest hour.[44]
The disquieted Admiralty broadly agreed.[44]
Somerville faced challenges not experienced by the RN in the Atlantic or Mediterranean. Japanese air superiority made it difficult to scout, close, and attack during the day. Radar-enabled night attack was the only viable offensive option. This was a high-risk strategy. A combination of careful positioning, luck, and Japanese errors nearly produced the preconditions for a strike on the night of 5 April; the enemy was within 125 miles (201 km) – 1-hour flight range in an Albacore – but accurate information on the enemy's vector was missing. Even then, it required experienced air crews to find their targets at night, using radar with a range of just 20 miles (32 km) and new tactics.[45]
References
Notes
- Boyd, p. 373
- Boyd, p. 364
- Roskill, p. 29
- Churchill, Winston (1950). The Hinge of Fate. Boston: Houghton Mifflin Company. pp. 138&172–178.
- Boyd, p. 366
- Boyd, p. 381
- Boyd, p. 367
- Boyd, p. 369
- Boyd, p. 370
- Shores, Cull & Izawa, Vol. II, pp. 393, 408–11
- Boyd, p. 356
- Boyd, p. 365
- Somerville, Sir James. Report of Proceedings (ROP) Of Eastern Fleet – 1942
- Roskill, p. 23
- Roskill, p. 26
- Boyd, p. 368
- Boyd, p. 375
- Roskill, p. 27
- Boyd, p. 372
- Boyd, p. 371
- Boyd, p. 374
- Boyd, p. 377
- Boyd, p. 379
- Boyd, p. 378
- Boyd, p. 376
- Boyd, p. 380
- Boyd, p. 384
- L, Klemen (1999–2000). "Allied Merchant Ship Losses in the Pacific and Southeast Asia". Forgotten Campaign: The Dutch East Indies Campaign 1941–1942.
- Roskill, p. 28
- Parshall, p. 145
- Shores 1993, p. 426-7
- Boyd, p. 385
- Boyd, p. 388
- Boyd, p. 389
- Boyd, p. 392
- Boyd, p. 391
- Boyd, p. 393
- Boyd, p. 395
- Parshall, ch. 1
- Parshall, ch. 5
- Boyd and Yoshida, p. 90
- Boyd and Yoshida, p. 89
- Kowner, Rotem (July 2017). "When economics, strategy, and racial ideology meet: inter-Axis connections in the wartime Indian Ocean" (PDF). Journal of Global History. Cambridge University Press. 12 (2): 240. doi:10.1017/S1740022817000067. Retrieved 5 May 2019.
- Boyd, p. 383
- Boyd, p. 382
Books
- Boyd, Andrew (2017). The Royal Navy in Eastern Waters. Seaforth Publishing. ISBN 978-1-4738-9248-4.
- Boyd, Carl; Yoshida, Akihiko (2013). The Japanese Submarine Force and World War II. Naval Institute Press. ISBN 978-1-5575-0015-1.
- Brown, David (1990). Warship Losses of World War Two. Naval Institute Press. ISBN 1-55750-914-X.
- Crusz, Noel, The Cocos Islands Mutiny, Fremantle: Fremantle Arts Centre Press, 2001.
- D'Albas, Andrieu (1965). Death of a Navy: Japanese Naval Action in World War II. Devin-Adair Pub. ISBN 0-8159-5302-X.
- Dull, Paul S. (1978). A Battle History of the Imperial Japanese Navy, 1941–1945. Naval Institute Press. ISBN 0-87021-097-1.
- Gill, G. Hermon (1968). Volume II – Royal Australian Navy, 1942–1945. Australia in the War of 1939–1945. Canberra: Australian War Memorial. Retrieved 20 November 2006.
- Morison, Samuel Eliot (2001) [1958]. The Rising Sun in the Pacific 1931 – April 1942, vol. 3 of History of United States Naval Operations in World War II. Castle Books. ISBN 0-7858-1304-7.
- Parshall, Jonathan; Tully, Anthony (2005). Shattered Sword: The Untold Story of the Battle of Midway. Dulles, Virginia: Potomac Books. ISBN 1-57488-923-0. Uses recently translated Japanese sources.
- Roskill, Stephen (1956). WAR AT SEA 1939-1945, VOLUME II, THE PERIOD OF BALANCE. UNITED KINGDOM MILITARY SERIES. London: HMSO. Retrieved 2 September 2015.
- Shores, Christopher; Brian Cull; Yasuho Izawa (2002). Bloody Shambles: Volume One: The Drift to War to the Fall of Singapore. Grub Street.
- Shores, Christopher; Brian Cull; Yasuho Izawa (1993). Bloody Shambles: Volume Two: The Defence of Sumatra to the Fall of Burma. Grub Street.
- Tomlinson, Michael The Most Dangerous Moment: The Japanese Assault on Ceylon 1942, London: William Kimber & Co Ltd, 1976, ISBN 955-564-000-9.
External links
| Wikimedia Commons has media related to Indian Ocean raid. |