55th (West Lancashire) Infantry Division
The West Lancashire Division was an infantry division of the British Army, active during both the First and Second World Wars. The division was raised in 1908 following the creation of the Territorial Force (TF). Following the outbreak of the First World War, the majority of the division's men volunteered for overseas service. Through 1915, the division was slowly wound down as entire units were dispatched overseas. Those who did not volunteer, were used to form new reserve units and eventually the 2nd West Lancashire Division.
| West Lancashire Division 55th (West Lancashire) Division 55th (West Lancashire) Motor Division 55th (West Lancashire) Infantry Division | |
|---|---|
 | |
| Active | 1908–1915 1916–1919 1920–1945 |
| Country | |
| Branch | |
| Type | Infantry Motorised infantry |
| Peacetime HQ | Liverpool |
| Motto(s) | First World War: "We win or die who wear the rose of Lancaster"[3] |
| Engagements | Battle of the Somme Battle of Passchendaele Battle of Cambrai Battle of Estaires |
| Commanders | |
| Notable commanders | Hugh Jeudwine |
| Insignia | |
| First World War divisional insignia[4] | _WW1.svg.png) |
In 1916, the division was reformed in France as the 55th (West Lancashire) Division, and was reassigned the units that had been transferred. During the Battle of the Somme, the division fought several actions at Guillemont, Ginchy, and Morval. In 1917, the division fought at Pilckem and Menin Road Ridges during the Battle of Passchendaele, gaining an excellent reputation. Late in 1917, the division fought in the Battle of Cambrai. Towards the end of the battle, the division was forced back around 1 mile (1.6 km) by a large German attack. A court of enquiry convened to examine this loss of territory, and delivered findings that proved controversial with contemporary soldiers and modern historians. In 1918, the division faced the German Spring Offensive, conducting a much-lauded defence of Givenchy during the Battle of Estaires. After the German offensive stalled, the division joined in the Hundred Days Offensive, the culminating offensive of the war. The division suffered almost 36,000 casualties in more than two years of combat.
In 1920, the TF was reformed as the Territorial Army (TA), which the division became part of. It served in the United Kingdom throughout the 1920s and 30s. In the late 1930s, the division was reduced from three to two infantry brigades and gave up some artillery and other support units to become a motorised formation, the 55th (West Lancashire) Motor Division; the intention was to increase battlefield mobility. Following the Battle of France, the motor division concept was abandoned, the division regained its third infantry brigade, and became the 55th (West Lancashire) Infantry Division. It remained within the United Kingdom, assigned to anti-invasion duties. In 1944, it was scheduled to be sent overseas for combat, but instead was stripped of its units, which were sent overseas to join other formations. The remnant of the division was used in Operation Fortitude, the deception effort that supported the Allied invasion of France. At the end of the war, the division was demobilised.
Formation
In 1901, following lessons learnt from the Second Boer War and increasing tension with the aggressive German Empire, the United Kingdom sought to reform the British Army to be able to fight a European adversary. This task fell to Secretary of State for War, Richard Haldane, who implemented the Haldane Reforms. The Territorial and Reserve Forces Act 1907 created a new Territorial Force (TF) by merging the Yeomanry and the Volunteer Force in 1908.[5] This resulted in the creation of 14 divisions, including the West Lancashire Division.[6] The territorials were liable to serve only in the United Kingdom, and the divisions would take over the defence of the country when the regular army was abroad on military service. In 1910, the Imperial Service Obligation was introduced. This allowed territorials to volunteer for overseas service in advance on any national emergency. Haldane saw the primary function of the TF as a way to expand the British expeditionary forces, and was confident that up to a quarter of the men would do so on mobilisation. It was expected that on the outbreak of war, it would take the divisions up to six months to come up to an acceptable training standard.[7]
The new division was placed under the command of Major-General Edward Dickson and was composed of the North Lancashire, Liverpool and South Lancashire Brigades. The division recruited from Lancashire (including modern Merseyside, parts of modern Cheshire, Greater Manchester) and southern Cumbria. The divisional headquarters and two brigade headquarters were based in Liverpool and the North Lancashire Brigade headquarters was based in Lancaster. The majority of the divisional artillery was based in Liverpool, with elements at Seaforth Barracks. The rest of the division was spread out, with garrisons in Blackpool, Blundellsands, Kendal, Lancaster, Liverpool, Southport, St Helens and Warrington.[8] The division was inspected by Edward VII in July 1909 at Knowsley. A month later, it began its first annual training camp at Caerwys, Wales, the first Territorial division to conduct field training.[9] In peacetime, the divisional headquarters was at 21 Islington in Liverpool.[10][11]
At its first training camp, the division was reviewed by French Général Hippolyte Langlois who also witnessed the division during manoeuvres.[12][13] Langlois lauded the soldiers' use of terrain, initiative, stamina, a unit cohesion founded on civilian life relationships and morale and motivation that he saw coming from a sense of patriotism. His criticisms included limited technical and tactical proficiency, especially in the field artillery. The flaws he believed, in part, were due to the small training areas available and due to inadequate live fire practise.[14] Langlois believed the division capable of meeting the TF mandate of repelling of an invasion.[15] The historian Ian Beckett commented there were deficiencies with the force: in 1910 "a third ... had failed the modest musketry requirements of firing off 23 rounds"; in 1912, only around two thirds had completed their required training and divisions failed to retain soldiers.[16] The historian Kevin Mitchinson wrote that the division "was not particularly highly rated" and was 2,900 men below establishment prior to the outbreak of war.[17]
First World War
Early years
The pre-war deployment plan was for the West and East Lancashire Divisions, due to their proximity, was to be deployed to Ireland to relieve regular army formations. On the outbreak of the First World War, the West Lancashire Division returned from its annual training in Wales, to barracks and depots in Lancashire. In turn, advanced elements departed for Ireland to establish billets at various locations, including Limerick. This move was called off on 5 August, and five days latter it was announced that local Irish reserve forces would ideally relieve the regular army formations instead. The cancellation largely surrounded the logistical difficulties of transporting inbound and outbound troops, as well as a lack of equipment and transport among the two Lancashire divisions.[18] The historian Kevin Mitchinson commented an extra dimension existed, as "there was concern among the authorities that some of the King's Liverpool battalions might have rather too much sympathy with potentially rebellious sections of Irish society."[19]
With the move to Ireland cancelled, the division was immediately dispatched around the country. The South Lancashire Brigade went to bolster defences around the Firth of Forth, Scotland; the Liverpool Brigade was assigned to Central Force and moved to Canterbury, Kent, and other elements of the division went to Oxfordshire. The men in England were used to guard vulnerable points, including railway lines, bridges, and tunnels.[20] With popular enthusiasm for the war high, the division's regimental depots were flooded with potential recruits. The divisional historian, James Ogden Coop, wrote, "every existing vacancy was filled and could have been filled ten times over".[21] Some of these recruits were used to bring the East Lancashire Division up to strength.[22] The dispersion of the division impacted training, which for some units was impossible to undertake.[23] Following the outbreak of the war, territorials were invited to volunteer for overseas service and "every unit in the division volunteered".[21] On 13 August 1914, Secretary of State for War Lord Kitchener signalled a willingness to deploy overseas those territorial units in which 80 per cent of the men (reduced to 60 per cent at the end of the month) volunteered.[24] Two days later, the division was ordered to separate those who had volunteered from those who had not. The latter were to be used to form reserve units. On 31 August, these reserve formations were used to found the 2nd West Lancashire Division, which was initially based at the West Lancashire Division's peacetime barracks and depots.[25]
The West Lancashire Division went through a succession of general officers commanding (GOC), before Major-General John Forster was given command on 3 September 1914.[26][27][28] Due to the casualties suffered by the British Expeditionary Force (BEF) during the opening months of fighting on the Western Front, the division's volunteers were used as reinforcements. Between October 1914 and May 1915, the division was steadily drained; companies of engineers, artillery, medical personnel and battalions of infantry were removed from the division to reinforce other divisions.[26] The Commander-in-Chief, Home Army, General Ian Hamilton questioned the wisdom of using the division this way, as he believed the men were "'fully 20% behind the rest' in efficiency and training".[29] However, he believed the deployment of intact battalions would not effect their esprit de corps, as he perceived there being a loyalty greater to the battalion than the division.[22] As battalions departed, they were replaced by reserve units from the 2nd West Lancashire Division. After the North Lancashire Brigade, the division's last remaining infantry formation of volunteers, transferred to the 51st (Highland) Division in April 1915, the remainder of the division were amalgamated with 2nd West Lancashire Division, which now based around Canterbury. The divisional artillery was sent to France in October, and attached to the 2nd Canadian Division.[25][30]
In November 1915, the Army Council authorised the reformation of the West Lancashire Division in France. The division's former artillery units were ordered to move to Saint-Omer in mid-December. Starting 3 January 1916, the various formations assembled near Hallencourt. On 27 January 1916, the reformation of the division was complete. With these experienced troops, no longer completely made up of the men who had left the division in 1915 due to casualties and new drafts, the division was reformed as the 55th (West Lancashire) Division, and Major-General Hugh Jeudwine was given command.[31] By the end of March, the division was still 3,000 men under establishment.[32] The infantry of the division comprised: the 164th Brigade, consisting of the 1/4th Battalion, King's Own (Royal Lancaster Regiment) (1/4KORL), the 1/4th Battalion, Loyal North Lancashire Regiment (1/4LR), the 2/5th Battalion, Lancashire Fusiliers (2/5LF) and the 1/8th (Irish) Battalion, King's (Liverpool Regiment) (Liverpool Irish); the 165th Brigade consisted of the 1/5th Battalion, King's (Liverpool Regiment) (1/5KR), the 1/6KR, the 1/7KR, and the 1/9KR; and the 166th Brigade consisted of the 1/10th (Scottish) Battalion, King's (Liverpool Regiment) (Liverpool Scottish), the 1/5th Battalion, the South Lancashire Regiment (1/5SL), the 1/5th Battalion, King's Own (Royal Lancaster Regiment) (1/5KORL) and the 1/5th Battalion, Loyal North Lancashire Regiment (1/5LR).[33] During the year, Jeudwine adopted the Red Rose of Lancaster as the divisional emblem to foster county pride in the division.[3]
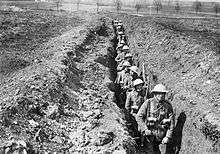
First trench tour
On 16 February 1916, the division took over a sector of the front line between Brétencourt and Wailly, near Arras, relieving the French 88th Division. They held this area until July, carrying out several trench raids.[34] The first was launched by the Liverpool Irish on 17 April. Attacking at night, the battalion inflicted significant damage and 56 casualties for the loss of Second Lieutenant Edward Felix Baxter.[35] For his actions during the raid, Baxter was awarded the Victoria Cross (VC), the highest gallantry award available to British military personnel.[36] A further VC was awarded, to Private Arthur Procter, in the aftermath of a raid on the night of 3/4 June.[37][38]
Another large raid was launched on 28 June, this time during the day. Elements of six battalions crossed no man's land behind a smokescreen. A shift in the wind dispersed the smoke and the raiders came under heavy German fire. Two of the attacking parties were repelled while the other four entered the German trenches and inflicted casualties before returning.[39] Private James Hutchinson of the 2/5LF earned the VC for his actions during this raid.[40][41] Losses for this raid are not reported. On 25 July, the division was relieved by the 11th (Northern) Division. During this period in the trenches the division suffered 1,110 casualties.[lower-alpha 1][43]
Battle of the Somme
_Division_positions_at_Guillemont.jpg)
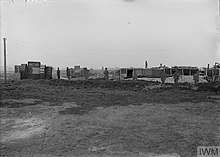
The division moved south to participate in the Battle of the Somme, which began on 1 July. It was given the objective of capturing the village of Guillemont and the nearby German trenches. The German defenders, dug in at the village and its environs, had already repulsed two large attacks. These attacks, and those launched by the division, formed the prelude to the Battle of Guillemont.[44] In August, the division fought three actions in this effort. The attacks were unsuccessful, and the division suffered 4,126 casualties.[45][46][47] Two men of the division, Second Lieutenant Gabriel Coury and Captain Noel Godfrey Chavasse, were awarded VCs for their actions during the fighting.[48]
After a period out of the line resting, the division returned to the front line during the night 4/5 September, relieving the 24th Division near Delville Wood and took part in the Battle of Ginchy on 9 September with mixed results. The overall British effort resulted in the capture of the village the next day.[49][50] An attack was launched on 11 September to improve the local position, but failed. Between 10 and 12 September, the division was relieved by the New Zealand Division.[51] The division returned to the front, on 17 September, relieving the 41st Division.[30] On 25 September, the division took part in the Battle of Morval, a general offensive launched by the Fourth Army and attacked north-west of Gueudecourt.[52] During two days, the division overran several German positions and repulsed a counter-attack. The overall Fourth Army effort, however, failed to capture the village. On 28 September, the division was relieved and transferred north to the Ypres Salient.[53]
Battle of Passchendaele
_Division_during_the_Battle_of_Pilckem_Ridge.jpg)
The division re-entered the front line in October 1916, manning a section of the Ypres Salient. It rested, re-equipped, and limited itself to raiding.[54] Towards the end of the year, in line with the British Army's evolving infantry doctrine, Jeudwine "recognized that many of his soldiers had held responsible positions in civilian life that required independent thought" and "by devolving decision-making down the chain of command he was able to harness their skills and experience to enhance tactical performance on the battlefield".[55] In June 1917, Jeudwine authorised the publishing of the divisional magazine Sub Rosa (Under the rose). This was a further effort to foster a link between county pride and the division; the magazine contained poetry based on Lancashire history, county tales, and cartoons.[56]
By July, the division was part of Fifth Army, and assigned to the opening assault (known as of the Battle of Pilckem Ridge) of the Third Battle of Ypres (also known as the Battle of Passchendaele).[57] The division's objective was advance through to the third line of German trenches opposing them.[58] In preparation, an intensive artillery barrage was fired. At 03:50 on 31 July, the attack began. Supported by artillery and at least one Mark IV tank, the attack overran the German first and second line positions. By 10:00, the division was advancing towards their final objective. The third line positions were captured, along with five German 77 mm (3 in) gun batteries.[59] German counter-attacks during the afternoon forced the division to abandon the captured third line positions by the end of the day.[60] For their actions on 31 July, Lieutenant-Colonel Bertram Best-Dunkley and Lance Sergeant Tom Mayson were awarded the VC.[61] During the next two days, the division consolidated the ground seized. On 2 August, the Germans began a counter-attack to push back the 55th. The attack was repulsed, during which Chavasse earned a second VC. After the fighting died down, the division was relieved.[60][62] During the battle, the division suffered 3,552 casualties and took 600 German prisoners.[60]
The 55th was given a period of rest, during which it received reinforcements and conducted training. The division was visited by Field Marshal Douglas Haig, commander of the BEF. On 12 September, the division returned to the same sector of the front, with orders to take the final objective that had eluded them on 31 July. This included an important ridge with two rises known as Hill 35 and Hill 37, as well as Schuler Farm, a strong point. In the division's absence, two abortive attacks had been made. The division moved during the night of 19/20 September and manned the front line trenches and the water-logged shell holes that dotted the area. While a 24-hour bombardment hit the German positions, indicating an imminent assault, German prisoners reported the attack was anticipated having spotted tape the British had laid to aid the division in moving into the correct area.[63][30]
At 05:40 on 20 September, the Battle of the Menin Road Ridge began.[30] During the day, the division captured both hills and fought off counter-attacks.[64] Schuler Farm fell the following day. During the afternoon of 21 September, the Germans launched a major counter-attack, aiming to retake all lost ground. The effort failed. Coop called the German losses in this battle "appalling", while divisional losses amounted to 2,730.[65]
The 55th Division was relieved during the night of 22/34 September by the 39th Division, ending its role in the battle. The division moved south towards Cambrai, where it joined VII Corps in the Third Army.[66] The historian Helen McCartney wrote that by the end of this period, "the 55th Division was described as 'a good fighting division, possessing the right spirit' and a 'first rate division' by its army and corps commanders in their reports to GHQ".[55]
Battle of Cambrai
The division took over 8,000 yards (4.5 mi; 7.3 km) of the frontline in front of the village of Épehy.[67] Rather than a continuous trench line, the division occupied a series of fortified posts, each capable of holding a platoon, that were connected by communication trenches to facilitate movement.[68] On 18 November, following a heavy bombardment, a 200-strong German raiding party entered the division's trenches in three places.[69] During the raid, 40 members of the division were captured.[70] Coop stated it was believed that the Germans obtained information about the division's upcoming attack from these prisoners.[69] The historian Bryan Cooper, however, wrote that the men provided no information. Instead, six prisoners from the 36th (Ulster) Division provided intelligence to the German 184th Infantry Regiment.[70] The division was assigned a supporting role to the Battle of Cambrai, tasked with preventing German forces from moving north to reinforce their comrades against the main British effort. This would be accomplished by assaulting two German strongpoints: Gillemont Farm, and a position known as the "Knoll". The assault was to be conducted by the 164th Brigade.[71][72] As a consequence of the acquired intelligence, the Germans abandoned their frontline trenches and reinforced their second line positions. In addition, new, deep, narrow trenches were dug east of Gillemont Farm, where counter-attacking forces were massed, and from where they could launch rifle grenades upon the attacking force.[73]
On 20 November, the artillery bombarded the German positions. A smokescreen was deployed on one flank to cover attacking forces, thermite rounds were used to silence German machine gun positions, and 1,320 gas shells were fired into other German positions. The division also utilised deception measures that included dummies and a mock tank, to attract German fire away from the attack. Behind creeping barrages two attacks were launched, one towards the Knoll and the second towards Gillemont Farm. Back and forth fighting lasted throughout the morning at both positions. By 13:00, German counter-attacks had retaken both positions and fighting ceased for the day, with the exception of bombardments. During the night, patrols were dispatched without incident. The following morning, a ten-minute bombardment of the German positions took place at 05:00, followed by a three-minute hurricane bombardment at 06:30. A creeping barrage was then laid on, to simulate a British attack that resulted in the Germans manning their positions. These efforts aided in keeping the Germans from being redeployed. This ended the division's effort in support of the battle, which had resulted in it suffering around 600 casualties.[74]
Regular nightly patrols followed thereafter. On 28 November, German artillery fire increased on the division's positions. This was judged to be additional German batteries registering their guns. This coincided with low-flying reconnaissance flights by the Luftstreitkräfte and a reported build-up of German forces behind their lines. Jeudwine judged this to be an indication that the division was about to be attacked, reported this up the chain of command, and ordered an artillery bombardment to commence on the morning of 29 November.[75] Jeudwine's judgement was correct, the German 2nd Army intended to use seven divisions to retake the territory lost to the British during the fighting at Cambrai.[76] The following day, the division was ordered to take over part of the front held by 20th (Light) Division, resulting in the division being responsible for 13,000 yards (7.4 mi) of the front line.[77] The 166th Brigade held the left (from north to south: the 1/5SL, the 1/5LF, the Liverpool Scottish; the 1/5KORL in reserve), and the 165th Brigade on the right flank (from north to south: the 1/6KR, the 1/5KR, the 1/7KR; the 1/9KR in reserve).[69]
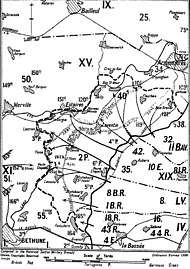
_Division_at_Cambrai_before_and_after_German_attack_on_30_November_1917.jpg)
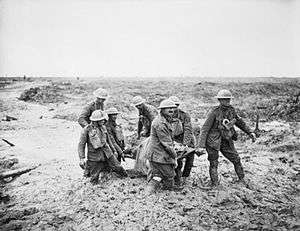
At 07:00 on 30 November, the German counter-attack began with a heavy barrage across the entire divisional front. An hour later, German machine guns opened fire on divisional positions, supported by aerial attacks. On the division's left, the Germans broke through and were able to use this to outflank the 55th Division's positions.[78] The 1/5SL came under heavy attack, but were initially able to hold their ground. However, they were outflanked, surrounded, and were forced to surrender. The rest of the 166th Brigade were heavily engaged, but despite their fierce resistance slowing the German advance, they were unable to stop the Germans from penetrating the front to a depth of 800 yards (730 m). Front line troops, despite many casualties, were able to fall back. Some were able to launch minor counter-attacks, which denied high ground to the Germans. In one sector, a composite group of the 1/5KORL, the 1/5KR, and the Liverpool Scottish were cut off but held their position until 05:00 the next morning when they fought their way back to the main divisional positions. The 166th Brigade, reinforced with elements of the 164th Brigade which had been held in reserve, was ordered to dig new trench lines and lay wire in front of Épehy, to deny the village to the Germans.[79]
The 165th Brigade also came under heavy attack, and its battalions had varied experiences. The 1/5KR threw back the German attack on their front, the 1/7KR stalled the assault in their sector, and despite having their lines penetrated the 1/6KR were able to launch counter-attacks to retake their lost positions. Much heavy back and forth fighting took place throughout the afternoon, while VII Corps organised assets for a counter-attack.[80] During the fighting, German infantry advanced to within 300 yards (270 m) of Sergeant Cyril Edward Gourley's howitzer battery of the 276th Brigade Royal Field Artillery (RFA) of the divisional artillery, and snipers infiltrated behind it. Despite this, he managed to keep one gun in action from 10:30 until dark, firing over open sights at German troops. Under constant fire, he held the Germans back in his area and destroyed one machine-gun. His actions resulted in the battery being saved and it was able to be withdrawn after nightfall. His actions earned him the VC.[81][82] The historian A.J. Smithers wrote "the 55th fought off all assaults during the day".[83]
Later in the day, a VII Corps counter-attack allowed the front to be held and stemmed the German attack.[84] In the following days, the division was withdrawn from the frontline to the Flamicourt area to be rested.[85] Prior to leaving, Lieutenant-General Thomas Snow (VII Corps) wrote that he
...cannot allow the 55th Division to leave ... without expressing ... his satisfaction at the way they fought and worked during the recent operations. It is not at present quite clear what happened on the left of the Division, but, from the enquiries made ..., he knows that ... in spite of the heavy losses incurred, [the 30th] was a day which will always reflect credit on the 55th Division.[86]
A casualty breakdown for 30 November is not available; for the period 20 November to 8 December, the division suffered 3,259 casualties.[87]
Cambrai court of enquiry
The division had been pushed back 2,000 yards (1.8 km; 1.1 mi) and while the line outside of Épehy was not broken, the loss of terrain was a cause of concern for the Army. McCartney wrote "this scale of loss could not be ignored, and a Court of Enquiry was convened to investigate the causes of the collapse of a previously 'first rate fighting division' ". The enquiry admitted that the Germans were able to achieve surprise due a thick mist and that the division's position had become untenable due to its having been forced to remove artillery to bolster other units. The enquiry was critical of the division's lack of defence in depth and the training of the men.[88] Tim Travers wrote that the reasons for the success of the German counter-attack "are not hard to find, and they principally relate to command failures on the part of GHQ and Third Army, who did not anticipate the attack, believing the Germans not to be capable of a major effort". Jeudwine warned of the attack but VII Corps failed to co-ordinate their defence with flanking units. Travers wrote "when the warnings of the attack came from 55 Division, these warnings ran into greater and greater resistance the higher they went. Hence the divisional level was caught in the inability of the corps and army structures to communicate with each other". The use of infiltration tactics by the Germans was also ignored.[89] Smithers wrote that the enquiry blamed junior officers and below, holding "no officer of field rank or above ... to blame for anything".[90] Smithers mused "one cannot wonder at the contempt this document excited once its contents became known" and wrote that Louis Oldfield [a senior officer within the 51st (Highland) Division] "probably spoke for everybody ..: 'The result of the Cambrai enquiry is very misleading and discreditable. Someone ought to be kicked'".[91]
Early 1918
.jpg)
After Cambrai, the division was assigned to the First Army, and moved to the Bomy area for rest and training. In anticipation of a German attack, the 1/4SL (the divisional pioneers) and Royal Engineer (RE) troops fortified the defences in the Givenchy–Festubert sector.[92] By 1918, the number of front line infantry within the British Army in France had decreased due to casualties and a lack of eligible replacements, leading to a manpower crisis. To consolidate manpower and to increase the ratio of machine guns and artillery support available to the infantry, the number of battalions in a division was reduced from twelve to nine.[93][94] This had the effect of reducing the establishment of a division from 18,825 men to 16,035.[95] An attempt was made to consolidate battalions from the same regiment within the same brigade.[96] The Liverpool Irish (164th Brigade), the 1/9KR (165th Brigade), and the 1/5LR (166th Brigade) were transferred to the 57th (2nd West Lancashire) Division to be merged with second-line units.[33][92][97] The artillery was also reorganised: the third medium trench mortar battery was divided between the other two, and the heavy trench mortar battery was transferred to corps artillery on 29 January.[33]
On 15 February, the division returned to the frontline. It replaced the 42nd (East Lancashire) Division northeast of Festubert. The first skirmish followed two days later, when a 30-strong German party attempted to raid a sector of the line. This attack was repulsed. A further raid was launched on 7 March, which was also driven off, but not before the 1/5SL suffered 43 casualties.[98] The same day, a further divisional reorganisation took place. The brigade and divisional machine gun companies were consolidated, with the formation of the divisional machine gun battalion.[33][99]
.jpg)
In early March, military intelligence had established that the Germans had vastly increased their artillery presence in the area, and it was believed their attack would fall on the Portuguese Expeditionary Corps, on the division's left. The 55th Division's reserves were tasked with reinforcing the Portuguese in event of an attack. On 18 March, a raiding party from the 1/5KR found the German trenches deserted; a second raid, on 25 March, penetrated into the reserve line, taking nine prisoners and captured a machine gun while suffering a few wounded in return.[100]
On 21 March, Germany launched the opening salvo of their Spring Offensive, aimed to deliver a single, decisive, war-winning blow (a vernichtungsschlacht (battle of annihilation)) initially in the Saint-Quentin area. The intent was to inflict such a defeat upon the British Armies that the country would abandon the war, which in turn would force the French to sue for peace. During the final days of March and the opening of April, the division was aware that the Germans were preparing a major assault. Defensive preparations were undertaken, including a reorganisation of the frontline and artillery barrages of German positions that included firing 500 gas shells. Nightly patrols were also conducted, with the men able to continually enter the German frontline without encountering opposition.[101] On 8 April, the 166th Brigade was ordered to relieve the Portuguese brigade on the left of the division; the handover was scheduled the following day.[102] At this time, the 164th Brigade held positions on the right of the division between the La Bassée Canal and a point north of Givenchy (the 1/7KR on the right, the 1/5KR on the left, and the 1/6KR in both support and reserve positions); from which the 165th Brigade held the line north to Festubert (the 1/4KORL on the right, the 1/4LR on the left, with the 2/5LF in support).[103] Coop described the infantry as being tasked with "hold[ing] their posts to the last, no matter whether outflanked or surrounded" and with launching "immediate local counter-attack[s]", which had been rehearsed in training exercises.[104]
Defence of Givenchy
When the opening attack of the Spring Offensive did not achieve the desired result, the Germans shifted their effort north (to the Ypres sector) to immediately strike again.[105] At 04:15 on 9 April, the German bombardment marking the beginning of Operation Georgette, began in the divisional sector. The engagement in the southern part of the Allied line became known as the Battle of Estaires.[106] The German bombardment, using the greatest concentration of German guns during the war, shelled the frontline and transportation routes in the divisional rear as far back as Locon. It was believed that the Germans had launched a large-scale raid upon the Portuguese, and the 166th Brigade was ordered to move and reinforce them. Rather than a raid, the Portuguese division had collapsed under the weight of a full-scale attack and resulted in the 55th's flank being exposed.[107][108]
At 09:00, the German 4th Ersatz, 43rd Reserve, and 18th Reserve divisions launched an attack upon the 55th Division's 4,000-yard (3,700 m) frontline.[109][110] The German divisions had circulated orders that stated the "English 55th Division", after battles on the Somme, Flanders, and Cambrai, "was described by prisoners ... as a Division ... that is below the average quality."[111] Due to mist, visibility was limited to 30 yards (27 metres), hindering the British ability to repulse the attack. German infantry pushed through the frontline between strongpoints held by the 164th Brigade and within half an hour were assaulting the 1/4LR battalion headquarters. The bypassed British frontline positions, now surrounded, held out, impeding the German efforts. Local counter-attacks resulted in the reoccupation of the majority of territory lost by early afternoon, with forward posts retaken at dusk. By the end of the day, the brigade had reclaimed its entire sector.[112] Second Lieutenant John Schofield earned the VC for his actions during the brigade's fighting.[113]
_Division_positions_at_midnight_9_April_1918.jpg)
At 09:50, the Germans attacked the 165th Brigade, having moved around their flank after the defeat of the Portuguese. The Germans pushed through the brigade's forward positions, but due to the resistance of bypassed garrisons, their attack was disrupted. The German attack only partially broke through the brigade's main line of resistance in one place, and a local counter-attack quickly restored the position.[114] Repeated German attacks were launched upon the brigade, reinforced with several infantry companies from the 166th Brigade, throughout the afternoon, but were unable to make any gains.[115] For his actions fighting with the brigade, Second Lieutenant Joseph Henry Collin was posthumously awarded the VC.[116]
Under artillery fire all morning, and having to dispatch troops to the division's other brigades, the 166th Brigade had moved into defensive positions on the flank of the 165th Brigade by early afternoon. It was then reinforced by elements of the divisional pioneer battalion and RE companies. The 51st (Highland) Division's 154th Brigade was attached to the division and took defensive positions around Locon, with its 1/4th Battalion, Seaforth Highlanders moved forward to reinforce the 166th Brigade.[117] During the day, the Germans made several unsuccessful efforts to breach the 166th Brigade's positions.[118] Historian Don Farr wrote that the division's efforts, in conjunction with other divisions in the area, had forced major delays on the German assault plan, "their plan had called for them to be across the River Lys along the whole length of their assault" by the end of the day, instead they had only made minor gains.[119]
Before dawn on 10 April, the 3rd Division's 9th Brigade and 42nd Brigade Royal Field Artillery were attached to the division. The artillery were moved to support the 166th Brigade (minus two batteries attached to the 51st Division for the day). One battalion of the 9th Brigade was placed in divisional reserve, and the remaining two attached to the 164th and 165th Brigades.[120] The German attacks resumed at 07:40, with a strong infantry attack under the cover of an intense artillery barrage. Despite fierce fighting throughout the day, the German attacks failed.[121] The last German attack of that day, in the evening, managed to make a temporary lodgement before being repulsed following local counter-attacks.[122] Coop described the evening shelling, with defensive positions being "subjected to a terrific bombardment with shells of heavy calibre ... [that] were practically obliterated", but despite this were still held by the division.[123]
– Douglas Haig, message to the troops on 11 April in response to Georgette.[124]
During 11 April, both sides heavily bombarded one another, and two major German infantry attacks were launched by elements of four divisions – the 4th Ersatz and the 18th and 43rd Reserve Divisions, reinforced by the 44th Reserve Division. Despite back and forth fighting, the division held its positions.[125] At midnight, 12–13 April, an small ad hoc launched a counter-attack and recaptured a fortified position that had preciously been lost.[126] A German counter-attack was repulsed, which marked the end of major fighting although artillery bombardments were maintained.[127] This was the result of the German commanders shifting the focus of their attack further north, after failing to breach the British defences in this sector.[108] Between 14 and 17 April, the division was relieved by the 1st and 3rd Divisions, and moved to the Auchel area for rest; the divisional artillery remained on the front in support.[128][129] Divisional losses were between 3,119 and 3,871.[130][131] German losses are reported to have been heavy, with almost 1,000 prisoners being taken by the division along with the capture of 70 machine guns.[130]
.jpg)
Coop wrote "it was afterwards publicly stated by an officer of the German General Staff that the stand made by the Division on 9 April and the days which followed marked the final ruination of the supreme German effort of 1918".[130] The historian David T. Zabecki wrote that Givenchy was "one of the most impressive defensive battles of the war", where the division "stubbornly held on and never gave way" that "diverted [German] resources and combat power away from the main effort".[132] After his experience at Ypres, Jeudwine contributed his own ideas on defensive tactics to an unpublished army pamphlet in December 1917. McCartney wrote "the ideas developed there contributed directly to the success of the stand of the 55th Division at Givenchy" and "the plans, sketches and narrative of the Battle of Givenchy were subsequently circulated to other divisions as an example of good defensive practice". McCartney concluded the division "could be said to have helped indirectly to shape the tactical thinking of the British army".[133]
Local attacks in the Givenchy sector
.jpg)
On 21 April the Liverpool Scottish battalion was brought up to strength by the arrival of the remnants of its sister battalion from the 57th Division. The same day, the 55th was visited by French Minister of War Georges Clemenceau.[134] Between 21 and 23 April, the division relieved the 1st Division and returned to their prior sector of the frontline. On 24 April, the Liverpool Scottish (166th Brigade) launched a counter-attack to retake Route A Keep, which had been lost while the division had been out of the line.[134][135] On 25 April, two raiding parties moved forward to reoccupy previously held forward posts, but were repulsed by the Germans. Further small-scale attacks were launched throughout the night and into the early hours of 26 April, supported by artillery. These attacks were also repulsed, but Coop reported that they inflicted heavy losses. At 14:20, under the cover of an artillery barrage, the division attacked with two companies to retake these positions. One company succeeded, but the other failed due to the artillery missing the intended objective. Both companies withdrew amid fierce fighting, capturing 30 Germans.[136] For his actions during this attack, Lance-Corporal James Hewitson of the 1/4KORL was awarded the VC.[137][138]
On 2 May, German air activity increased. Reports from prisoners and deserters claimed that a German attack would occur around 9 May. As a result, the divisional artillery increased its shelling of German positions, blowing up an ammunition dump on 8 May and destroying a church used as an observation post the next. After 15 May, it was realised the Germans would not attack. Coop states the Germans suggested this was the result of the Spanish flu. The rest of the month remained quiet. Between 4 and 5 June, the Germans bombarded Beuvry, Givenchy, and Labourse with Yellow Cross gas shells. Prisoners taken around this time suggested an imminent attack, but it did not come. On 8 June, a raiding party form the 2/5LF attacked forward German positions to gather intelligence, but was repulsed. Afterwards, with the exception of sporadic raiding, the sector remained quiet until August.[139]
.jpg)
At 07:20 on 24 August, the 164th Brigade launched a new attack to retake the forward positions that it had failed to recapture in April. Within 40 minutes, the objectives had been taken and the front pushed back 200 yards (180 metres). The brigade lost 103 casualties, and took 44 prisoners. Two minor counter-attacks were repulsed, and the Germans bombarded the captured positions, including with gas shells.[140] Four days later, the 166th occupied additional positions having found them deserted by the Germans.[141]
To the south, the Allied armies launched the Battle of Amiens, which marked the start of the Hundred Days Offensive, the culminating offensive of the war.[142] The Germans in the division's sector began to withdraw, and the 55th Division was ordered to prepare for a rapid pursuit in the event of a full-scale retreat, without worrying about maintaining an unbroken line. Nevertheless, throughout September back-and-forth fighting, including increasingly brutal hand-to-hand combat, took place over the same contested ground as German resistance continued.[143]
In anticipation of a German retreat, I Corps ordered a general advance for the morning of 30 September. After 24-hours of artillery fire, the 1/4LR (166th Brigade) launched a two-company attack. Initially successful and having taken 48 prisoners, a counter-attack pushed them back to their start line. The battalion made a second attempt on 1 October, and this time held its objective. With these gains, the divisional mainline had moved forward an estimated 4,000 yards (3,700 metres) in the left sector and 2,500 yd (2,300 m) in the right since the beginning of September. During the month, the division captured 308 prisoners and 17 machine guns.[144][145]
Advance into Belgium
.jpg)
In anticipation of a German retreat, cavalry, RE, machine-gun, and medical support units were attached to the two brigades in the frontline, a practise which continued for the rest of the campaign. In addition, personnel from RE tunneling companies were attached in order to investigate and disarm booby traps.[146] Following the capture of a German officer who revealed that a German withdrawal to the Canal de la Deûle had begun, the 164th and 166th Brigades advanced on 2 October. The advance of neighbouring divisions was mainly uncontested, but the 55th was held up by German resistance at La Bassée for much of 2 October. By the end of 4 October, over 5 miles (8 kilometres) had been covered and the division was 500 yards (460 metres) from the canal.[147][145]
The Germans were largely dug-in on the east side of the canal, supported by large numbers of machine-guns. They had destroyed most bridges, and had begun to flood the low-ground to the west. The division did not assault, and instead bombarded the German positions. The only infantry action during this period occurred when a company from the Liverpool Scottish attacked several pillboxes and the railway embankment near Don Station, on the west side of the canal, encountering initial success. They suffered heavy losses when a German counter-attack erased the gains and captured most of two platoons.[148]
On 8 October, the division was transferred to III Corps of Fifth Army when the latter took over the sector at the junction of I and XI Corps.[149] The area around Don Station was raided on 14 October, and an attempt to force the canal that night was repulsed. Patrols were sent out again the following morning, following reports of the Germans withdrawing from the canal in front of the divisions on either side of the 55th, but found the Germans still present in strength. The next day, the 164th Brigade fought against determined resistance to clear German positions on the west side of the Canal, and the division started crossing the canal that night.[150][151]
With the canal crossed, the division advanced, liberating several villages and crossing the River Marque on 18 October after overcoming strong resistance on the line of the river. By the end of the next day, they were close to the Belgian border, and crossed it on 20 October.[152][153] That day, the 2/5LF captured a divisional ammunition column at Froidmon, southwest of Tournai.[154] The advance continued until 22 October, when heavy resistance was met on the outskirts of Tournai. That evening, the 1/4LR (164th Brigade) seized this German defensive position, but lost it during a counter-attack the next day. This was seen as a larger effort by the Germans to maintain their positions west of Tournai. As a result, the division formed up and started taking defensive positions.[155] On 25 October, a small attack made gains that were subsequently lost following a German counter-attack. No major action took place for the rest of the month, activity being limited to raiding and artillery fire from both sides. On 8 November, patrols captured prisoners who stated that the Germans had withdrawn to the east bank of the Scheldt. As a result, the division advanced largely unopposed to take up positions on the west bank, with the 1/6KR entering the western half of Tournai to the jubilation of its inhabitants. During the night, the division started crossing the river.[156][157] Despite sporadic fighting, the division continued to advance, captured Ath, and advanced 7 miles (11 km) by 13:30 on 11 November, when orders were received by the leading troops that the Armistice had taken effect. In total the division had advanced over 50 miles (80 km) in the 80 days of the general advance.[158] From 27 September to the armistice, the division suffered 180 casualties.[159]
Epilogue
_Division%2C_January_1919_(Q_3502).jpg)
The division received orders on 15 November to advance into Germany with the Second Army, but six days later the orders were rescinded and the division was transferred to the Fifth Army. During the second half of the month, the division rebuilt railways and roads around Leuze-en-Hainaut. A comrades' association for the veterans of the division was established in early December. Reviewed by George V on 7 December, it relocated to Brussels in midmonth. The personnel of the division filled the time with lectures, educational courses, and athletic competitions.[30][160] During January 1919, the 55th was reviewed by King Albert I of Belgium and sent representatives to a Brussels ceremonial parade, while its numbers were steadily reduced by demobilisation. Jeudwine departed on 15 March to command an Army of Occupation division, and by the end of April the division numbered 158 officers and 2,192 men.[30] The division was disbanded shortly afterwards, although not all personnel were demobilised. For example, the Liverpool Scottish had a large number of men not eligible for immediate demobilisation. They were sent to Antwerp, with the Army of Occupation, to maintain a receiving camp for cadres returning to England via Antwerp for demobilisation. They remained there until demobilised at the completion of their task in November.[161][162]
Between January 1916 and November 1918, 6,520 officers and men of the division were killed, 24,294 wounded, and 4,887 reported missing, more than half of the total of 63,923 officers and men who served with the division during this period.[163] For acts of valour, eleven soldiers were (in some cases posthumously) awarded the VC, one of whom, Chavasse, gained a second Victoria Cross.[164] In addition, the following awards (in several cases, multiple times) were bestowed: 80 Distinguished Service Orders, 427 Military Crosses, 200 Distinguished Conduct Medals, 1,649 Military Medals, and 70 Meritorious Service Medals.[163]
Battle insignia
The practise of wearing battalion specific insignia (often called battle patches) in the BEF began in mid-1915, with the arrival of units of Kitchener's Armies, and became widespread after the Battle of the Somme.[165] The patches shown were adopted on 30 March 1916, and were worn on the back below the collar. The division sign was worn on the sleeves when introduced in May 1917. The division was unusual in extending battle patches to the engineers and artillery.[166]
 | 164th Brigade, from left to right, top row: the 1/4KORL, the Liverpool Irish, the 2/5LF, the 1/4LR. Bottom row: the 164th Machine Gun Company, the 164th Trench Mortar Battery.[166] |
 | 165th Brigade, from left to right, top row: the 1/5KR, the 1/6KR, the 1/7KR, the 1/9KR. Bottom row: the 165th Machine Gun Company, the 165th Trench Mortar Battery.[166] |
 | 166th Brigade, from left to right, top row: the 1/5KORL, the Liverpool Scottish, the 1/5SL, the 1/5LR. Bottom row: the 166th Machine Gun Company, the 166th Trench Mortar Battery.[166] |
| the 429th Field Company RE, the 422nd Field Company RE, the 423rd Field Company RE, the 1/4SL.[166] | |
 | the 275th Brigade RFA, the 276th Brigade RFA, the 55th Divisional Ammunition Column.[166] |
Inter-war period
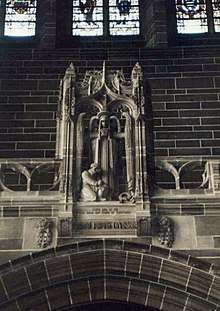
In September 1919, the division's Comrades Association decided that two memorials would be erected: one in Liverpool; and the second in Givenchy-lès-la-Bassée. The memorial in France was constructed on land near the town's church and unveiled on 15 May 1921. The ceremony included an honour guard of division veterans, including Jeudwine, and guests including the Duchess of Sutherland, the Mayor of Liverpool, Marshal of France Joseph Joffre, and the mayors of Givenchy and other nearby towns.[168] The second (pictured) is a sandstone sculpture by Walter Gilbert that was installed in Liverpool Cathedral.[167]
The division began reforming as part of Western Command in Lancashire during April 1920.[30] In 1921, the TF was reconstituted as the Territorial Army (TA) following the passage of the Territorial Army and Militia Act 1921.[169][lower-alpha 2] As part of the TA, the division continued to be based throughout Lancashire, primarily Liverpool, but at various times with units located in Chester, Lancaster, Lichfield, Seaforth, Southport, and Warrington.[174] On 19 July 1924, the division was once again reviewed by George V during a visit to Liverpool.[175] During the inter-war period, the TA were only permitted to recruit up to 60 per cent of their established strength. Due to chronic underfunding, the lack of a pressing national threat, and a diminished level of prestige of serving in the TA, it was rare for units to even reach this level of manpower. By the 1930s, this resulted in the TA having limited access to modern equipment, under-trained men, and officers with inadequate experience in command.[176]
Motor division
The development of British military doctrine during the inter-war period resulted in three types of division by the end of the 1930s: the infantry division; the mobile division (later called the armoured division); and the motor division. Historian David French wrote "the main role of the infantry ... was to break into the enemy's defensive position." This would then be exploited by the mobile division, followed by the motor divisions that would "carry out the rapid consolidation of the ground captured by the mobile divisions" therefore "transform[ing] the 'break-in' into a 'break-through'."[177] French wrote that the motor division "matched that of the German army's motorised and light divisions. But there the similarities ended." German motorised divisions contained three brigades and were as fully equipped as a regular infantry division, while their smaller light divisions contained a tank battalion. The British motor division, while being fully motorised and capable of transporting all their infantry, was "otherwise much weaker than normal infantry divisions" or their German counterparts as it was made up of only two brigades, had two artillery regiments as opposed to an infantry division's three, and contained no tanks.[178]
In 1938, the army decided to create six motor divisions from TA units. Only three infantry divisions were converted prior to the war, which included the 55th (West Lancashire).[178][179][lower-alpha 3] The reform started the process of removing infantry and artillery elements from the division.[178] Many of the division's battalions were converted to new roles, and transferred to other branches of the army. The 6th Liverpool Rifles were retrained and transferred to the RE becoming the 38th (The King's Regiment) Anti-Aircraft Battalion, RE; the 5th King's Own Royal Regiment (Lancaster) was converted to artillery, becoming the 56th (King's Own) Anti-Tank Regiment, Royal Artillery; the 7th King's Regiment (Liverpool) became the 40th (The King's) Royal Tank Regiment.[181][182] The division retained three brigades until March 1939, when the 164th Brigade was disbanded, bringing the division into line with the intention of the new organisation. The division now comprised the 165th (Liverpool) and the 166th (South Lancashire and Cheshire) Infantry Brigades.[183][184]
Rearmament, 1930s
Throughout the 1930s, tensions built between Germany and the United Kingdom and its allies.[185] During late 1937 and 1938, German demands for the annexation of Sudetenland in Czechoslovakia led to an international crisis. This was resolved in September by the Munich Agreement, which accepted that the Germans would annexe the Sudetenland.[186] On 15 March 1939, Germany breached the terms of the agreement by invading and occupying the remnants of the Czech state.[187] On 29 March, the British Secretary of State for War Leslie Hore-Belisha announced plans to increase the TA from 130,000 men to 340,000, doubling the number of divisions.[188]
The plan was for existing TA divisions, referred to as the first-line, to recruit over their establishments, aided by an increase in pay for territorials, the removal of restrictions on promotion which had hindered recruiting, the construction of better-quality barracks, and an increase in supper rations. The units would then each form a new division, referred to as the second-line, from cadres.[188][189] This process was dubbed "duplicating". The 55th provided cadres to create the second line duplicate formation which became the 59th (Staffordshire) Motor Division. Despite the intention for the army to grow, the programme was complicated by a lack of central guidance on the expansion and duplication process and a lack of facilities, equipment and instructors.[188][190] It had been envisioned by the War Office that the duplicating process and recruiting the required numbers of men would take no more than six months.[190][191] The process varied widely between the TA divisions. Some were ready in weeks while others had made little progress by the time the Second World War began.[190][191] In April, limited conscription was introduced. At that time 34,500 men, all aged 20, were conscripted into the regular army, initially to be trained for six months before being deployed to the forming second line units.[192][193]
Second World War
Home defence
By the outbreak of the war, the 55th Division had reformed the 164th Brigade. On 4 September it established the second line duplicate of the 166th Brigade, the 177th.[194] On 15 September, the 166th Infantry Brigade (renamed the 176th Infantry Brigade) and the 177th Brigade were transferred to the 59th (Staffordshire) Motor Division.[195] This left the 55th Division with the 164th Brigade (with the 9th Battalion, King's Regiment (Liverpool), the 1/4th Battalion, South Lancashire Regiment, and the 2/4th Battalion, South Lancashire Regiment), and the 165th Brigade (with the 5th Battalion, King's Regiment (Liverpool), and the 1st and the 2nd Battalions, Liverpool Scottish (Queen's Own Cameron Highlanders)).[196] The division's GOC was Major-General Vivian Majendie, who had been in command since 1938.[197] The division was assigned to Western Command, and its initial duties included deploying guards to the docks at Birkenhead, the Port of Liverpool, and the naval defences at Crosby, while also assisting the civilian authorities during air raids.[198][199] On 6 September, the division fired its first shots of the war. Divisional anti-aircraft and machine guns fired on three aircraft flying low over the River Mersey. The shots missed, and the aircraft were later determined to be Royal Air Force Handley Page Hampdens.[200]
It was envisioned that the TA divisions each be deployed intact to reinforce the British Expeditionary Force (BEF) in France as equipment became available, with all 26 TA divisions deployed by the end of the first year of the war.[201] However, in October 1939, the Commander-in-Chief, Home Forces, General Walter Kirke, was tasked with drawing up a plan, codenamed Julius Caesar, to defend the United Kingdom from a German invasion.[lower-alpha 4] As a result, the division was assigned to Home Forces' reserve. It was transferred to Northern Command and moved to Charnwood Forest in Leicestershire. Here the division furthered its training, while also being able to act as a counter-attack force for Julius Caesar, in case of a German invasion between the Humber and The Wash.[198][203] Additional duties included the protection of RAF Finningley.[204]
In January 1940, the division was used to obtain drafts for formations overseas as well as volunteers to man anti-aircraft guns on small ships.[204] In March, the division was relieved as a reserve formation. It was assigned to Eastern Command the following month, and transferred to defend the coastline of Suffolk and then Essex. These moves was part of a larger effort by Kirke to reinforce the defences in the East of England, which he believed was in imminent danger of invasion as a result of the German operations on mainland Europe.[198][205] Other than coastal defence, the division was also responsible for providing mobile detachments to hunt down any German airborne landings, guard Ipswich Airport, and construct roadblocks inland from potential invasion beaches.[206] In April, following the start of the Norwegian campaign, the division organised No. 4 Independent Company, which departed for Norway on 7 May 1940. Following the conclusion of that campaign, many of the men of the company joined the Commandos.[207] As a result of the German victory in the Battle of France and the return of the BEF following the Dunkirk evacuation, the division was not deployed overseas per the original TA deployment timeline.[198][208]
The British Army began implementing lessons learnt from the campaign in France in mid-1940. This included a decision to base the standard division around three brigades, and the abandonment of the motor division concept. This process involved the break up of four-second-line territorial divisions to reinforce depleted formations and aid in transforming the Army's five motor divisions, each made up of two brigades, into infantry divisions made up of three brigades.[209][210][211] As part of this process, on 23 June, the 66th Infantry Division was disbanded. This freed up the 199th Infantry Brigade and an artillery regiment to be transferred to the 55th Division, which became the 55th (West Lancashire) Infantry Division.[212][lower-alpha 5] General Edmund Ironside replaced Kirke, who believed the division (along with the others which had remained in the UK) to be insufficiently trained, equipped, and unable to undertake offensive operations. It was therefore assigned a static coastal defence role in Essex, while leaving enough troops available to deal with any German paratrooper landings that may occur in its area.[217] Duties also included the digging and improving of defensive positions, and ongoing training.[218] On paper, an infantry division was to have seventy-two 25-pounder field guns. On 31 May, the division had eight such modern guns in addition to four First World War-vintage 18-pounder field guns, and eight 4.5 in (110 mm) howitzers of similar vintage. The division had only two anti-tank guns, against a nominal establishment of 48, and only 47 of the required 307 Boys anti-tank rifles.[219][220] General Alan Brooke, who replaced Ironside, reviewed the division on 1 August and stated the 55th "should be quite good with a bit of training."[221]
The division remained in Essex until 1941, when it was replaced by the Essex County Division. The 55th moved south to defend the Sussex coast.[198][222] The division improved the beach defences in its sector, as well as constructing and expanding defences to the rear of potential landing zones. With the arrival of increased levels of ammunition, the men of the division were able to considerably increase their proficiency in the use of small arms and mortars.[223] On 1 June 1941, Major-General William Duthie Morgan replaced Majendie as GOC.[179] In July, the division was relieved from coastal defence. It relocated to Aldershot to act as a reserve formation, and increased the tempo of training.[224] Morgan maintained his position until October, when he was wounded during a training exercise, and was replaced by Major-General Frederick Morgan.[179][225] During the final months of 1941, the division started to provide drafts of men to other formations.[224] This was followed by the division being placed on the lower establishment in January 1942.[lower-alpha 6] In December 1941, the division relocated to Yorkshire and was reassigned to Northern Command. The division was spread out with troops based in the East Riding of Yorkshire and North Yorkshire, with the intention it would counter-attack any German landings along the coast or at nearby airfields. The 165th Brigade also spent some time at Catterick Garrison.[228][229] The division spent the majority of the time training, from the battalion to the brigade level. The division relocated to Devon in January 1943, and was assigned to the South West District. The division's role was to counter any raids conducted by German forces along the coast. The division also continued training, provided guards for vulnerable points, and rendered assistance to nearby civilian authorities as needed after air raids.[198][230] In June, the division lost five men killed following a German bombing raid.[231] In December 1943, the division received drafts from anti-aircraft regiments. These men were then given a ten-week training course to make them viable drafts for infantry units.[232] In December 1943, the division went to Northern Ireland, under the command of British Troops Northern Ireland. In Ulster, the division aided farmers, helped train elements of the reforming Belgian Army, and trained with newly arrived American troops.[198][233][234] The division continued to provide men to other formations through 1944.[224]
Wind down and deception
In May 1944, the 55th was raised to higher establishment.[198] However, the division did not increase in size; in 1944, the war establishment (the paper strength) of a higher establishment infantry division was 18,347 men.[235] The 55th and the 38th (Welsh), the 45th, the 47th (London), and the 61st Infantry Divisions had a combined total of 17,845 men.[236] The division would remain within the United Kingdom and be drained of manpower to a point that it was all but disbanded, and then maintained as a deception formation.[237][238] Of these 17,845 men, around 13,000 were available as replacements for the 21st Army Group fighting in France.[239] The remaining 4,800 men were considered ineligible at that time for service abroad for a variety of reasons, including a lack of training or being medically unfit. Over the following six months, up to 75 per cent of these men would be deployed to reinforce 21st Army Group following the completion of their training and certification of fitness.[236] For example, the Liverpool Scottish were used as a training formation and a source of reinforcements for other Scottish regiments.[240] Entire units were stripped from the division and deployed abroad; the 2nd Loyal Regiment (North Lancashire) (previously 10th Battalion of the Loyal Regiment) was transferred to Italy.[241]
While the 199th Brigade remained part of the division, it was attached to Northern Ireland District in July 1944. The same month, the division, minus the 199th Brigade, returned to the mainland and moved to southern Wales. The 199th Brigade, renumbered the 166th Brigade, physically rejoined the division in June 1945.[242][234]
The division's actual and notional moves were deliberately leaked by double agents as part of the Fortitude North deception, the effort to make the Germans believe that the notional 250,000-strong Fourth Army, based in Scotland, would assault Norway.[243][244][245] The division was assigned to the fictional II Corps, which was "preparing to assault Stavanger".[246] The division participated in this deception effort by maintaining wireless signals suggesting it was moving around the United Kingdom as part of Fourth Army, while in fact remaining in Northern Ireland. The ruse of an attack on Norway was maintained through July, with the plan coming to an official end in September.[247] Historian Mary Barbier wrote "the evidence seems to indicate that [Fortitude North] was only partially successful" and "a heated debate has erupted over whether or not [the operation] was a success."[248][lower-alpha 7]
The division then joined the Fourth Army's notional move south from Scotland to England, becoming part of Fortitude South to convince the Germans that the Normandy landings were a feint and the main Allied invasion would take place in the Pas-de-Calais with a force of 500,000 men.[249] The deception aimed to persuade the Germans not to move the 18 divisions of the 15th Army from the Pas-de-Calais to Normandy.[250][251] The division also provided the signal and headquarters staff to create the phantom 55th US Infantry Division.[252] Gerhard Weinberg wrote that the Germans readily believed in the threat to the Pas de Calais and "it was only at the end of July" that they realised a second assault was not coming; "by that time, it was too late to move reinforcements".[253] Nevertheless, Barbier concludes "that the importance of the deception has been overrated".[254][lower-alpha 8] The 15th Army was largely immobile, not combat-ready and that despite the deception, numerous German divisions, including the 1st SS Panzer Division in reserve behind the 15th Army, were transferred to Normandy; the Germans had realised as early as May that the threat to Normandy was real. While the Germans believed the deception due to "preconceived ideas about the importance of the Pas De Calais", the Allied staff had overestimated the effectiveness of the deception in causing the inaction of the 15th Army, because they held a "preconceived notion of what FORTITUDE would accomplish".[255]
In the aftermath of the war, the British army demobilised.[256] The TA was reformed in 1947 on a much smaller scale of eight divisions that did not include the 55th West Lancashire.[257][lower-alpha 9] In 1947, the division's insignia was temporarily adopted by the 87th Army Group Royal Artillery, which was based in Liverpool and was made up primarily of units from West Lancashire, creating a connection with the division.[1]
General officers commanding
| Appointed | General officer commanding |
|---|---|
| 1 April 1908 | Major-General Edward Thompson Dickson[258][259] |
| 6 July 1909 | Major-General Edward Cecil Bethune[260] |
| 3 June 1912 | Major-General Walter Lindsay[261][28] |
| 5 August 1914 | Major-General Frederick Hammersley[28][262] |
| 3 September 1914 | Major-General John Burton Forster[27][28] |
| 3 January 1916 | Major-General Sir Hugh Jeudwine[28] |
| 29 May 1919 | Major-General Sir Reginald Barnes[263][264] |
| 1 April 1921 | Major-General Sir Lothian Nicholson[265][266] |
| 1 April 1925 | Major-General Hugo de Pree[267] |
| 16 July 1926 | Major-General Basil Hitchcock[268][269] |
| 14 September 1928 | Major-General Harold Higginson[269] |
| 14 September 1932 | Major-General George Alexander Weir[270] |
| 1 January 1934 | Major-General James Cooke-Collis[271] |
| 5 December 1935 | Major-General Ernest Lewin[272] |
| 1 June 1938 | Major-General Vivian Majendie[197] |
| 1 June 1941 | Major-General William Duthie Morgan[179] |
| 13 October 1941 | Brigadier Rupert Brett (Acting GOC)[179] |
| 30 October 1941 | Major-General Frederick Morgan[179] |
| 14 May 1942 | Major-General Hugh Hibbert[179] |
| 15 August 1943 | Major-General Walter Clutterbuck[179][273] |
| 13 July 1944 | Major-General Horatio Berney-Ficklin[179] |
Order of battle
| West Lancashire Division (1910)[274] | |
|---|---|
|
North Lancashire Brigade
Liverpool Brigade
South Lancashire Brigade
Divisional Troops
| |
| West Lancashire Division (August 1914)[33][275][276] | |
|---|---|
|
North Lancashire Brigade (transferred to 51st (Highland) Division April 1915, became 154th Brigade)[33]
Liverpool Brigade (broken up after battalions sent to France)[33]
South Lancashire Brigade (broken up after battalions sent to France)[33]
Divisional Troops
| |
| 55th (West Lancashire) Division (1916–1918)[33][280] | |
|---|---|
|
164th (North Lancashire) Brigade
165th (Liverpool) Brigade
166th (South Lancashire) Brigade
Divisional Mounted Troops
Divisional Artillery[33]
Divisional Engineers
Divisional Pioneers
Divisional Machine Guns
Divisional Medical Services
Divisional Transport
| |
| 55th (West Lancashire) Division (January 1937)[282] | |
|---|---|
|
164th (North Lancashire) Infantry Brigade
165th (Liverpool) Infantry Brigade
166th (South Lancashire and Cheshire) Infantry Brigade
Divisional Troops
| |
| 55th (West Lancashire) Motor Division (September 1939 – June 1940)[237] | |
|---|---|
|
164th Infantry Brigade[283]
165th Infantry Brigade[284]
Divisional Troops
| |
| 55th (West Lancashire) Infantry Division (June 1940 onwards)[237] | |
|---|---|
|
164th Infantry Brigade (until 17 June 1945)[283]
165th Infantry Brigade[284]
199th Infantry Brigade (renamed 166th Infantry Brigade on 15 August 1944)[285]
Divisional Troops
| |
See also
- Altcar Training Camp, a training facility that was used by the division.
- British Army Order of Battle (September 1939)
- Clement Attlee, British Prime Minister, who fought with the division during 1918
- Everton Road drill hall, Liverpool
- List of British divisions in World War I
- List of British divisions in World War II
Footnotes
- For comparison, the average casualty rate for British battalions during the First World War was 100 casualties per month.[42]
- The TA was the reserve of the British regular army made up of part-time volunteers. Its intended role was the sole method of expanding the size of the British Armed Forces (comparable to the creation of Kitchener's Army during the First World War). First-line territorial formations would create a second-line division using a cadre of trained personnel and, if needed, a third division would be created. All TA recruits were required to take the general service obligation: if the British Government decided, territorial soldiers could be deployed overseas for combat (This avoided the complications of the First World War-era TF, whose members were not required to leave Britain unless they volunteered for overseas service, until the Military Service Act 1916.).[170][171][172][173]
- The other two were the 1st London and 50th (Northumbrian) divisions.[180]
- Julius was the codeword to bring troops to a state of readiness within eight hours. The codeword Caesar meant an invasion was imminent, and units were to be readied for immediate action. Kirke's plan assumed that the Germans would use 4,000 paratroopers, followed by 15,000 troops landed via civilian aircraft once airfields had been secured (Germany only actually had 6,000 such troops), and at least one division of 15,000 troops to be used in an amphibious assault.[202]
- The other brigades of 66th Division were transferred to the 1st London and 59th (Staffordshire) divisions to complete their transition to infantry formations.[213] 12th (Eastern) Infantry Division was disbanded on 11 July 1940, with its brigades allocated to 1st London and 2nd London Motor Divisions as part of their transition to infantry formations.[214] 23rd (Northumbrian) Division was broken up on 30 June, with one brigade being transferred to 50th (Northumberland) Motor Division.[215] On 7 August, the 51st (Highland) Infantry Division was re-created by the re-designation of its second-line duplicate, the 9th (Highland) Infantry Division.[216]
- During the war, divisions of the British Army were organised as either higher or lower establishment formations. The former were intended for deployment overseas and combat, whereas the latter had been strictly detailed for home defence in a static role.[226][227]
- Barbier discussed the opposing arguments. Those in favour of the success of the operation have highlighted that German troop levels in Norway stayed relatively the same, and none were transferred to Normandy. Opponents have pointed out that troops were transferred from Norway, albeit to the Eastern Front. The troop levels in Norway could also have several explanations: the Germans did not realize there was sufficient forces based in Scotland to carry out an invasion, the deception plan played into the German understanding of how important Norway was, and the levels could have remained the same as a way to guard the German northern flank and protect Finnish nickel ore shipments. The former two points have been used to highlight the success of the operation. Detractors have also noted that the Germans were "more interested in radio traffic that originated in the Soviet Union than that from Scotland".[248]
- The 15th Army was made up of seven static divisions trained for defensive operations, and supplemented with two Luftwaffe Field Divisions. The army lacked equipment, transport and was under-trained.[254]
- The 49th (West Riding) and 56th (London) Armoured Divisions and the 42nd (Lancashire), 43rd (Wessex), 44th (Home Counties), 50th (Northumbrian), 51st/52nd (Scottish), and 53rd (Welsh) infantry divisions.[257]
Citations
- "Badge, formation, 55th (West Lancashire) Infantry Division & 87th Army Group RA (Field) (TA)". Imperial War Museum. Archived from the original on 25 December 2018. Retrieved 24 December 2018.
- Chappell 1987, p. 36.
- McCartney 2005, pp. 81–82.
- Chappell 1986, p. 35.
- Perry 1988, pp. 4–6.
- Perry 1988, p. 6; Hall 1910, p. 210.
- Perry 1988, p. 6; Beckett 1991, p. 215; Hall 2011, p. 20.
- WW 1910, p. 527; Hart 1910, pp. 108–109; Becke 1989a, p. 138.
- Coop 1919, p. 19.
- Conrad, Mark (1996). "The British Army, 1914". Retrieved 27 February 2015.
- Westlake, Ray (2011). The Territorials, 1908–1914: A Guide for Military and Family Historians. Pen & Sword. ISBN 978-1848843608.
- Coop 1919, pp. 19–20.
- Langlois 1910, pp. 38–42.
- Langlois 1910, pp. 38–43, 67.
- Langlois 1910, p. 67.
- Beckett 1991, p. 222.
- Mitchinson 2008, p. 217.
- Becke 1989a, pp. 138–139; Mitchinson 2005, pp. 8, 58; Mitchinson 2008, pp. 183–184.
- Mitchinson 2008, pp. 183–184.
- Mitchinson 2005, p. 58; Mitchinson 2008, p. 214; Mitchinson 2014, p. 67.
- Coop 1919, p. 21.
- Mitchinson 2008, p. 214.
- Mitchinson 2014, p. 67.
- Beckett 2008, pp. 53–54.
- Becke 1989b, p. 6.
- Coop 1919, p. 22.
- "No. 28895". The London Gazette (Supplement). 8 September 1914. p. 7176.
- Becke 1989a, p. 133.
- Mitchinson 2014, p. 79.
- Becke 1989a, pp. 138–139.
- Coop 1919, p. 23; Becke 1989a, pp. 133, 138–139; Mitchinson 2014, p. 189.
- Mitchinson 2014, p. 189.
- Becke 1989a, pp. 136–137.
- Coop 1919, p. 25.
- Coop 1919, pp. 25–27.
- "No. 29765". The London Gazette (Supplement). 26 September 1916. p. 9417.
- Coop 1919, pp. 168–169.
- "No. 29695". The London Gazette (Supplement). 4 August 1916. p. 7744.
- Coop 1919, pp. 26–27.
- Coop 1919, p. 169.
- "No. 29740". The London Gazette (Supplement). 8 September 1916. p. 8870.
- Bond 2014, p. 72.
- Coop 1919, pp. 29–30.
- Coop 1919, pp. 29–31; Wyrall 2012, p. 300.
- Coop 1919, pp. 31–36.
- Wyrall 2012, pp. 303–305, 309, 311-312.
- Miles 1992, pp. 166, 184.
- "No. 29802". The London Gazette (Supplement). 26 October 1916. p. 10394. and "No. 29802". The London Gazette (Supplement). 24 October 1916. p. 10394.
- Coop 1919, pp. 37, 40.
- Miles 1992, p. 274.
- Coop 1919, p. 40.
- Coop 1919, p. 41.
- Coop 1919, pp. 42–44.
- Coop 1919, p. 46.
- McCartney 2005, p. 223.
- McCartney 2005, p. 83.
- Coop 1919, pp. 46–48; Becke 1989a, pp. 138–139.
- Coop 1919, pp. 46–48.
- Coop 1919, pp. 49–52.
- Coop 1919, pp. 53–54.
- "No. 30272". The London Gazette (Supplement). 4 September 1917. p. 9259. and "No. 30284". The London Gazette (Supplement). 14 September 1917. p. 9533.
- "No. 30284". The London Gazette (Supplement). 14 September 1917. p. 9531.
- Coop 1919, pp. 55–56.
- Coop 1919, pp. 55–60.
- Coop 1919, pp. 60–64.
- Becke 1989a, pp. 138–139; Coop 1919, pp. 60–64.
- Coop 1919, p. 65.
- Coop 1919, pp. 65, 74.
- Coop 1919, p. 74.
- Cooper 1967, p. 88.
- Coop 1919, pp. 66–67.
- Cowper 1957, p. 188.
- Coop 1919, p. 71.
- Coop 1919, pp. 66–71.
- Coop 1919, p. 72.
- Sheldon 2009, p. 208.
- Coop 1919, p. 73.
- Coop 1919, pp. 74–75.
- Coop 1919, pp. 76–78.
- Coop 1919, pp. 79–82.
- Coop 1919, pp. 173–174.
- "No. 30523". The London Gazette (Supplement). 13 February 1918. pp. 2004–2005.
- Smithers 1992, p. 161.
- Sheldon 2009, pp. 273–297.
- Coop 1919, p. 83.
- Coop 1919, pp. 83–84.
- Miles 1992, p. 382.
- McCartney 2005, p. 228.
- Travers 1992, pp. 30–31.
- Smithers 1992, p. 171.
- Smithers 1992, p. 173.
- Coop 1919, p. 85.
- Perry 1988, pp. 26–28.
- Morrow 2005, p. 239.
- Perry 1988, p. 26.
- Perry 1988, pp. 28–29.
- Becke 2007, p. 3: In attached corrigenda sheet
- Coop 1919, p. 87.
- Coop 1919, p. 88.
- Coop 1919, pp. 88–89.
- Coop 1919, p. 89.
- Edmonds 2009, p. 148.
- Coop 1919, p. 90.
- Coop 1919, p. 91.
- Tucker & Roberts 2005, pp. 716–718, 727.
- James 1990, p. 29.
- Coop 1919, p. 92.
- Tucker & Roberts 2005, p. 727.
- Coop 1919, pp. 92–94, 108.
- Edmonds 2009, pp. 162, 164, 169.
- Coop 1919, p. 108.
- Coop 1919, pp. 92–94.
- "No. 30770". The London Gazette (Supplement). 25 June 1918. p. 7618.
- Coop 1919, p. 94.
- Coop 1919, pp. 95–96.
- Coop 1919, pp. 174–175.
- Coop 1919, pp. 96–97.
- Coop 1919, p. 98.
- Farr 2007, p. 185.
- Coop 1919, p. 100.
- Edmonds 2009, p. 194.
- Coop 1919, pp. 101–102.
- Coop 1919, p. 102.
- Tucker & Roberts 2005, pp. 727, 1530.
- Edmonds 2009, pp. 222, 257.
- Edmonds 2009, p. 285.
- Coop 1919, pp. 104–105.
- Coop 1919, p. 105.
- Edmonds 2009, p. 357.
- Coop 1919, p. 106.
- Edmonds 2009, p. 493.
- Zabecki 2006, p. 204.
- McCartney 2005, p. 152.
- Coop 1919, p. 116.
- Edmonds 2009, p. 371.
- Coop 1919, pp. 116–118.
- Coop 1919, p. 175.
- "No. 31340". The London Gazette. 15 May 1919. p. 6084.
- Coop 1919, pp. 119–120.
- Coop 1919, pp. 125–127.
- Coop 1919, p. 127.
- Tucker & Roberts 2005, pp. 96–98.
- Coop 1919, pp. 127–135.
- Coop 1919, pp. 134–136.
- Edmonds & Maxwell-Hyslop 2009, pp. 125–126.
- Coop 1919, pp. 136–139.
- Coop 1919, pp. 139–140.
- Coop 1919, pp. 139–141.
- Edmonds & Maxwell-Hyslop 2009, p. 128.
- Coop 1919, pp. 142–144.
- Edmonds & Maxwell-Hyslop 2009, p. 408.
- Coop 1919, pp. 143–147.
- Edmonds & Maxwell-Hyslop 2009, p. 412.
- Edmonds & Maxwell-Hyslop 2009, p. 417.
- Coop 1919, pp. 147–148.
- Coop 1919, pp. 148–153.
- Edmonds & Maxwell-Hyslop 2009, pp. 538, 541.
- Coop 1919, pp. 154–159.
- Edmonds & Maxwell-Hyslop 2009, p. 561.
- Coop 1919, pp. 160, 164.
- McGilchrist 2005, pp. 251–252, 254–255.
- Lord & Watson 2003, p. 171.
- Coop 1919, pp. 167–168.
- Coop 1919, pp. 170–172.
- Chappell 1986, pp. 5–6.
- Hibbard & Gibbs 2016, pp. 55–56.
- "55th West Lancashire Division". Imperial War Museum. Archived from the original on 23 January 2018. Retrieved 31 August 2019.
- Tomaselli 2016, pp. 216–217.
- Messenger 1994, pp. 41–42.
- Allport 2015, p. 323.
- French 2001, p. 53.
- Perry 1988, pp. 41–42.
- Simkins 2007, pp. 43–46.
- "War Office, Monthly Army List, January 1937". National Library of Scotland. p. 52. Retrieved 15 December 2019. and "War Office, Monthly Army List, January 1938". National Library of Scotland. p. 56. Retrieved 15 December 2019.
- Cowper 1957, p. 261.
- French 2001, pp. 53–54.
- French 2001, pp. 37–41.
- French 2001, p. 41.
- Joslen 2003, p. 90.
- Joslen 2003, pp. 37, 81, 90.
- Hogan 2015, Chapter 2: Regiments.
- Litchfield 1992, pp. 124–125.
- "War Office, Monthly Army List, February 1939". National Library of Scotland. p. 58. Archived from the original on 25 December 2018. Retrieved 24 December 2018.
- "War Office, Monthly Army List, March 1939". National Library of Scotland. p. 58. Archived from the original on 25 December 2018. Retrieved 24 December 2018.
- Bell 1997, pp. 3–4.
- Bell 1997, pp. 258–275, 277–278.
- Bell 1997, p. 281.
- Gibbs 1976, p. 518.
- Messenger 1994, p. 47.
- Perry 1988, p. 48.
- Levy 2006, p. 66.
- Messenger 1994, p. 49.
- French 2001, p. 64.
- Joslen 2003, pp. 352, 356.
- Joslen 2003, pp. 354–356.
- Joslen 2003, pp. 352–353.
- "No. 34517". The London Gazette (Supplement). 7 June 1938. p. 3639.
- Joslen 2003, p. 91.
- Queen's Own Cameron Highlanders 1952, pp. 178–179, 188.
- Queen's Own Cameron Highlanders 1952, p. 189.
- Gibbs 1976, pp. 455, 507, 514–515.
- Newbold 1988, p. 40.
- Newbold 1988, pp. 43, 48–49.
- Queen's Own Cameron Highlanders 1952, p. 179.
- Newbold 1988, pp. 69, 73, 101, 121–122.
- Queen's Own Cameron Highlanders 1952, pp. 190–191.
- Queen's Own Cameron Highlanders 1952, pp. 179, 190.
- Fraser 1999, pp. 72–77.
- Joslen 2003, pp. 37, 41, 61, 90.
- French 2001, pp. 189–191.
- Perry 1988, p. 54.
- Joslen 2003, pp. 90, 97.
- Joslen 2003, pp. 62, 93, 97, 361–363.
- Joslen 2003, pp. 56, 282–286.
- Joslen 2003, pp. 62, 81.
- Joslen 2003, p. 55.
- Newbold 1988, pp. 147–148.
- Queen's Own Cameron Highlanders 1952, pp. 179–180.
- Fraser 1999, pp. 83–85.
- Collier 1957, p. 125.
- Alanbrooke 2001, p. 97.
- Collier 1957, p. 229.
- Queen's Own Cameron Highlanders 1952, p. 180.
- Queen's Own Cameron Highlanders 1952, p. 181.
- Alanbrooke 2001, p. 190.
- Perry 1988, p. 65.
- French 2001, p. 188.
- Collier 1957, p. 293.
- Queen's Own Cameron Highlanders 1952, pp. 181, 193.
- Queen's Own Cameron Highlanders 1952, pp. 181–185.
- Queen's Own Cameron Highlanders 1952, p. 183.
- Queen's Own Cameron Highlanders 1952, p. 185.
- Molesworth 1951, p. 92.
- Queen's Own Cameron Highlanders 1952, p. 186.
- Joslen 2003, pp. 130–131.
- Hart 2007, pp. 48–51.
- Joslen 2003, pp. 90–91.
- Holt 2004, p. 922.
- Hart 2007, p. 52.
- "The Second World War". Liverpool Scottish Museum Archive. Archived from the original on 25 December 2018. Retrieved 24 December 2018.
- Downham, John. "The Regiments in World War II". The Duke of Lancaster's Regiment: Lancashire Infantry Museum. Archived from the original on 15 August 2018. Retrieved 24 December 2018.
- Joslen 2003, pp. 91, 363.
- Crowdy 2008, pp. 323, 232.
- Levine 2014, p. 732.
- Hesketh 2000, p. 220.
- Holt 2004, p. 556.
- Barbier 2007a, pp. 122, 125.
- Barbier 2007a, pp. 184–185.
- Barbier 2007a, p. 132.
- Barbier 2007a, p. 172.
- Zabecki 1999, p. 1485.
- Barbier 2007a, p. 48.
- Weinberg 1994, pp. 681–682.
- Barbier 2007b, p. 180.
- Barbier 2007b, pp. 180–181.
- Allport 2009, pp. 26, 43.
- Messenger 1994, p. 157.
- "No. 28126". The London Gazette. 7 April 1908. p. 2672.
- WW 1910, p. 527.
- "No. 28269". The London Gazette. 9 July 1909. p. 5282.
- "No. 28615". The London Gazette. 7 June 1912. p. 4135.
- "No. 28921". The London Gazette (Supplement). 29 September 1914. p. 7787.
- "No. 31417". The London Gazette (Supplement). 24 June 1919. p. 8014.
- Dawnay & Headlam 1921, p. 444.
- "No. 32274". The London Gazette (Supplement). 29 March 1921. p. 2546.
- Dawnay & Headlam 1922, p. 420.
- "No. 33036". The London Gazette. 7 April 1925. p. 2371.
- "No. 33185". The London Gazette. 23 July 1926. p. 4870.
- "No. 33424". The London Gazette. 25 September 1928. p. 6218.
- "No. 33865". The London Gazette. 20 September 1932. p. 5956.
- "No. 34011". The London Gazette. 2 January 1934. p. 56.
- "No. 34242". The London Gazette. 14 January 1936. p. 309.
- Smart 2005, p. 65.
- Hart 1910, pp. 108–109.
- Coop 1919, pp. 20–21.
- "War Office, Monthly Army List, August 1914". National Library of Scotland. pp. 56–57. Archived from the original on 4 February 2019.
- Becke 1989b, p. 3.
- 359 MR 1959, p. 45.
- Becke 1989a, p. 135.
- Coop 1919, pp. 11–17, 20–24.
- Young 2000, Annex Q.
- "War Office, Monthly Army List, January 1937". National Library of Scotland. p. 52. Archived from the original on 31 August 2019.
- Joslen 2003, p. 352.
- Joslen 2003, p. 353.
- Joslen 2003, p. 363.
References
- Alanbrooke, Field Marshal Lord (2001) [1957]. Danchev, Alex & Todman, Daniel (eds.). War Diaries 1939–1945. Berkeley and Los Angeles: University of California Press. ISBN 978-0-520-23301-0.
- Allport, Alan (2009). Demobbed: Coming Home After the Second World War. New Haven: Yale University Press. ISBN 978-0-300-14043-9.
- Allport, Alan (2015). Browned Off and Bloody-minded: The British Soldier Goes to War 1939–1945. New Haven: Yale University Press. ISBN 978-0-300-17075-7.
- Barbier, Mary Kathryn (2007a). D-day Deception: Operation Fortitude and the Normandy Invasion. London and Westport: Praeger. ISBN 978-0-275-99479-2.
- Barbier, Mary Kathryn (2007b) [2006]. "Deception and the Planning of D-Day". In Buckley, John (ed.). The Normandy Campaign 1944: Sixty Years On. London and New York: Routledge. pp. 170–184. ISBN 978-0-415-44942-7.
- Becke, A. F. (1989a) [1935]. Order of Battle of Divisions Part 2A. The Territorial Force Mounted Divisions and the 1st-Line Territorial Force Divisions (42–56). Malpas: Ray Westlake – Military Books. ISBN 1-871167-12-4.
- Becke, A. F. (1989b) [1937]. Order of Battle of Divisions Part 2B. The 2nd-Line Territorial Force Divisions (57th–69th), with the Home-Service Divisions (71st–73rd) and 74th and 75th Divisions. Malpas: Ray Westlake – Military Books. ISBN 1-871167-00-0.
- Becke, A. F. (2007) [1939]. Order of Battle of Divisions Part 3B. New Army Divisions (30–41) and 63rd (R.N.) Division. Uckfield: Naval & Military Press. ISBN 978-1-847347-41-1.
- Beckett, Ian Frederick William (1991). The Amateur Military Tradition, 1558–1945. Manchester: Manchester University Press. ISBN 978-0-719-02912-7.
- Beckett, Ian Frederick William (2008). Territorials: A Century of Service. Plymouth: DRA Publishing. ISBN 978-0-955-78131-5.
- Bell, P. M. H. (1997). The Origins of the Second World War in Europe (2nd ed.). London: Pearson. ISBN 978-0-582-30470-3.
- Bond, Brian (2014). Britain's Two World Wars Against Germany: Myth, Memory and the Distortions of Hindsight. Cambridge: Cambridge University Press. ISBN 978-1-107-65913-1.
- Chappell, Mike (1986). British Battle Insignia 1914-18. Men-At-Arms. Oxford: Osprey Publishing. ISBN 978-0-850-45727-8.
- Chappell, Mike (1987). British Battle Insignia 1939–1940. Men-At-Arms. II. Oxford: Osprey. ISBN 978-0-85045-739-1.
- Collier, Basil (1957). Butler, J. R. M. (ed.). The Defence of the United Kingdom. History of the Second World War, United Kingdom Military Series. London: HMSO. OCLC 375046.
- Coop, J. O. (1919). The Story of the 55th (West Lancashire) Division. Liverpool: Liverpool Daily Post. Retrieved 2 December 2014.
- Cooper, Bryan (1967). The Ironclads of Cambrai. London: Souvenir Press. OCLC 492736339.
- Cowper, Julia Margaret (1957). The King's Own: The Story of a Royal Regiment: 1914–1950. III. Aldershot: Gale & Polden. OCLC 316399592.
- Crowdy, Terry (2008). Deceiving Hitler: Double-Cross and Deception in World War II. Oxford: Osprey. ISBN 978-1-846-03135-9.
- Dawnay, G. P.; Headlam, Cuthbert, eds. (1921). The Army Quarterly. I. London: West of England Press. OCLC 820579535.
- Dawnay, G. P.; Headlam, Cuthbert, eds. (1922). The Army Quarterly. IV. London: West of England Press. OCLC 7295943.
- Edmonds, J. E. (2009) [1937]. Military Operations: France and Belgium, 1918: March–April: Continuation of the German Offensives [accompanying Map Case] (A. F. Becke). History of the Great War based on Official Documents by Direction of the Committee of Imperial Defence. II. Uckfield: Naval and Military Press. ISBN 978-1-845-74726-8.
- Edmonds, J. E.; Maxwell-Hyslop, Lieutenant-General Robert (2009) [1947]. Military Operations: France and Belgium, 1918: 26 September – 11 November: The Advance to Victory. History of the Great War based on Official Documents by Direction of the Committee of Imperial Defence. V. Uckfield: Naval & Military Press. ISBN 9781845747299.
- Farr, Don (2007). The Silent General: Horne of the First Army. Solihull: Helion & Company. ISBN 978-1-874622-99-4.
- Fraser, David (1999) [1983]. And We Shall Shock Them: The British Army in the Second World War. London: Cassell Military. ISBN 978-0-304-35233-3.
- French, David (2001) [2000]. Raising Churchill's Army: The British Army and the War Against Germany 1919–1945. Oxford: Oxford University Press. ISBN 978-0-19-924630-4.
- Gibbs, N. H. (1976). Grand Strategy. History of the Second World War. I. London: HMSO. ISBN 978-0-11-630181-9.
- Hall, Brian (2011) [1997]. Aspects of Birmingham: Discovering Local History. Barnsley: Pen & Sword Books. ISBN 978-1-84884-422-3.
- Hall, Hammond (1910). Hazell's Annual for 1910. London: Hazell, Watson and Viney. OCLC 163066551.
- Hart, Fitzroy, ed. (1910). Hart's Annual Army List: Special Reserve List, and Territorial Force List, for 1910. London: John Murray. OCLC 46781398.
- Hart, Stephen Ashley (2007) [2000]. Colossal Cracks: Montgomery's 21st Army Group in Northwest Europe, 1944–45. Mechanicsburg: Stackpole Books. ISBN 978-0-8117-3383-0.
- Hesketh, Roger (2000). Fortitude: The D-Day Deception Campaign. Woodstock: Overlook Hardcover. ISBN 978-1-58567-075-8.
- Hibbard, Mike; Gibbs, Gary (2016). Infantry Divisions, Identification Schemes 1917 (1 ed.). Wokingham: The Military History Society.
- History of the 359 (4th West Lancs.) Medium Regiment R.A. (T.A.) 1859–1959. Liverpool: 359 Medium Regiment. 1959. OCLC 17071676.
- Hogan, Anthony (2015). Merseyside at War. Stroud: Amberley Publishing. ISBN 978-1-445-63774-7.
- Holt, Thaddeus (2004). The Deceivers: Allied Military Deception in the Second World War. New York: Scribner. ISBN 978-0-743-25042-9.
- James, E. A. (1990) [1924]. A Record of the Battles and Engagements of the British Armies in France and Flanders 1914–1918 (PDF) (London Stamp Exchange ed.). Aldershot: Gale & Polden. ISBN 978-0-948-13018-2.
- Joslen, H. F. (2003) [1990]. Orders of Battle: Second World War, 1939–1945. Uckfield: Naval and Military Press. ISBN 978-1-84342-474-1.
- Langlois, Hippolyte (1910). The British Army in a European War. Translated by Atkinson, Charles Francis. London: Hugh Rees. OCLC 12993116.
- Levine, Timothy R., ed. (2014). Encyclopedia of Deception. Thousand Oaks: Sage. ISBN 978-1-452-25877-5.
- Levy, James P. (2006). Appeasement and Rearmament: Britain, 1936–1939. Lanham: Rowman & Littlefield. ISBN 978-0-7425-4537-3.
- Litchfield, Norman E.H. (1992). The Territorial Artillery 1908–1988: Their Lineage, Uniforms and Badges. Derby: Sherwood Press. ISBN 978-0-950-82052-1.
- Lord, Cliff; Watson, Graham (2003). The Royal Corps of Signals: Unit Histories of the Corps (1920–2001) and its Antecedents. West Midlands: Helion. ISBN 978-1-874622-07-9.
- Mitchinson, K. W. (2005). Defending Albion: Britain's Home Army 1908–1919. London: Palgrave Macmillan. ISBN 978-1-40393-825-1.
- Mitchinson, K. W. (2008). England's Last Hope: The Territorial Force, 1908–1914. London: Palgrave Macmillan. ISBN 978-0-23057-454-0.
- Mitchinson, K. W. (2014). The Territorial Force at War, 1914–1916. London: Palgrave Macmillan. ISBN 978-1-137-45159-0.
- McCartney, Helen B. (2005). Citizen Soldiers: The Liverpool Territorials in the First World War. Cambridge: Cambridge University Press. ISBN 978-0-52118-777-0.
- McGilchrist, Archibald M. (2005) [1930]. Liverpool Scottish 1900–1919. Uckfield: Naval & Military Press Ltd. ISBN 978-1-845-74093-1.
- Messenger, Charles (1994). For Love of Regiment 1915–1994. A History of British Infantry. II. London: Pen & Sword Books. ISBN 978-0-85052-422-2.
- Miles, W. (1992) [1938]. Military Operations France and Belgium, 1916: 2nd July 1916 to the End of the Battles of the Somme. History of the Great War Based on Official Documents by Direction of the Historical Section of the Committee of Imperial Defence. II (Imperial War Museum and Battery Press ed.). London: Macmillan. ISBN 978-0-901627-76-6.
- Molesworth, George Noble (1951). The History of the Somerset Light Infantry (Prince Albert's), 1919–1945. Taunton: Regimental Committee, Somerset Light Infantry. OCLC 13508675.
- Morrow, John Howard (2005). The Great War: An Imperial History. Abingdon: Routledge. ISBN 978-0-415-20440-8.
- Newbold, David John (1988). British Planning And Preparations To Resist Invasion on Land, September 1939 – September 1940 (PhD thesis). London: King's College London. OCLC 556820697.
- Perry, Frederick William (1988). The Commonwealth Armies: Manpower and Organisation in Two World Wars. War, Armed Forces and Society. Manchester: Manchester University Press. ISBN 978-0-71902-595-2.
- Queen's Own Cameron Highlanders (1952). Historical Records of the Queen's Own Cameron Highlanders. VI. Edinburgh and London: William Blackwood and Sons. OCLC 222265108.
- Sheldon, J. (2009). The German Army at Cambrai. Barnsley: Pen & Sword. ISBN 978-1-84415-944-4.
- Simkins, Peter (2007) [1988]. Kitchener's Army: The Raising of the New Armies 1914–1916. Barnsley: Pen & Sword Military. ISBN 978-1-84415-585-9.
- Smart, Nick (2005). Biographical Dictionary of British Generals of the Second World War. Barnsley: Pen & Sword. ISBN 1-84415-049-6.
- Smithers, A. J. (1992). Cambrai: The First Great Tank Battle. London: Leo Cooper. ISBN 978-0-85052-268-6.
- Tomaselli, Phil (2016). Givenchy in the Great War: A Village on the Front Line 1914–1918. Barnsley: Pen & Sword Military. ISBN 978-1-47382-550-5.
- Travers, Tim (1992). How the War Was Won: Command and Technology in the British Army on the Western Front, 1917–1918. London: Routledge. ISBN 978-0-20341-741-6.
- Tucker, Spencer C. & Roberts, Priscilla (2005). The Encyclopedia of World War I: A Political, Social and Military History. Santa Barbara: ABC-CLIO. ISBN 978-1-85109-420-2.
- Weinberg, Gerhard L. (1994). A World at Arms: A Global History of World War II. Cambridge: Cambridge University Press. ISBN 978-0-521-44317-3. Retrieved 8 September 2019.
- Who's Who. London: A & C Black. 1910. OCLC 866511400.
- Wyrall, Everard (2012) [1928]. History of the King's Regiment (Liverpool) 1914–1919. II. Luton: Andrews UK. ISBN 978-1-78150-795-7.
- Young, Lieutenant-Colonel Michael (2000). Army Service Corps 1902–1918. Barnsley: Pen & Sword. ISBN 0-85052-730-9.
- Zabecki, David T., ed. (1999). World War II in Europe: An Encyclopedia. Military History of the United States. New York: Routledge. ISBN 978-0-824-07029-8.
- Zabecki, David T. (2006). The German 1918 Offensives: A Case Study in The Operational Level of War. Oxon: Routledge. ISBN 978-0-415-3-5600-8.
Further reading
- Gregson, Adrian (2018). From Docks and Sand: Southport and Bootle's Battalion, the 7th King's Liverpool Regiment, in the First World War. Solihull: Helion. ISBN 978-1-91151-216-5.
- Knight, Paul (2016). Liverpool Territorials in the Great War. Barnsley: Pen & Sword. ISBN 978-1-473-83404-0.
- Knight, Paul (2019). Lessons from the Mud: 55th (West Lancashire) Division at the Third Battle of Ypres. Warwick: Helion. ISBN 978-1-912-39005-2.
- Shannon, Kevin (2015). The Lion and the Rose: The 4th Battalion The King's Own Royal Lancaster Regiment 1914–1919. Stroud: Fonthill Media. ISBN 978-1-781-55438-8.
- Shannon, Kevin (2017). The Lion and the Rose: The 1/5th Battalion the King's Own Royal Lancaster Regiment 1914–1919. II. Stroud: Fonthill Media. ISBN 978-1-781-55555-2.
- Shannon, Kevin (2019). The Liverpool Rifles: A Biography of the 1/6th Battalion King's Liverpool Regiment in the First World War. Stroud: Fonthill Media. ISBN 978-1-781-55701-3.