Operation Source
Operation Source was a series of attacks to neutralise the heavy German warships – Tirpitz, Scharnhorst and Lützow – based in northern Norway, using X-class midget submarines.
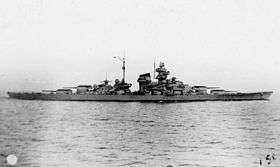
The attacks took place in September 1943 at Kaa Fiord and succeeded in keeping Tirpitz out of action for at least six months. The concept for the attack was developed by Commander Cromwell-Varley, with support of Max Horton, Flag Officer Submarines, and Prime Minister Winston Churchill.[2]
The operation was directed from HMS Varbel, located in Port Bannatyne on the Isle of Bute. Varbel (named after Commanders Varley and Bell, designers of the X-Craft prototype) was the on-shore headquarters for the 12th Submarine Flotilla (midget submarines). It had been a luxury 88-bedroom hotel (the Kyles Hydropathic Hotel) requisitioned by the Admiralty to serve as the Flotilla’s headquarters. All X-craft training, and preparation for X-craft attacks (including that on Tirpitz), was co-ordinated from Varbel.[3]
Intelligence contributing to the attack on Tirpitz was collected and sent to the RN by the Norwegian resistance, especially brothers Torbjørn Johansen and Einar Johansen.
Attack
Six X-craft were used. X5, X6 and X7 were allocated the battleship Tirpitz, in Kåfjord. X9 and X10 were to attack the battleship Scharnhorst, also in Kåfjord. X8 was to attack the heavy cruiser Lützow in Langfjord. The submersibles were towed to the area by conventional submarines (HMS Truculent (X6)[4] Syrtis (X9),[5] Sea Nymph (X8),[6] Thrasher (X5),[7] Stubborn (X7),[6] and Sceptre (X10)[6]) and manned by passage crews on the way. Close to the target, the operation crews would take over. X9, while commanded by S-Lt E Kearon of the passage crew[8] and probably trimmed heavily by the bow in the heavy sea for the tow, was lost with all hands on the passage when her tow parted and she suffered an abrupt plunge due to her bow-down trim.[6] X8 (passage crew commanded by Lt. Jack Smart) developed serious leaks in her side-mounted demolition charges, which had to be jettisoned; these exploded, leaving her so damaged she had to be scuttled.[6] The remaining X-craft began their run in on 20 September and the attacks took place on 22 September 1943.
Scharnhorst was engaged in exercises at the time, and hence was not at her normal mooring, X10's attack was abandoned, although this was due to mechanical and navigation problems, and the submarine returned to rendezvous with her 'tug' submarine and was taken back to Scotland.

X5, commanded by Lieutenant Henty-Creer, disappeared with her crew during Source. She is believed to have been sunk by a direct hit from one of Tirpitz's 105 mm (4.1 in) guns before placing demolition charges. There was a possibility X5 had also successfully planted side charges before being destroyed, but this was never conclusively proven.[9][10] An expedition jointly run by the late Carl Spencer (Britannic 2003) and Bill Smith (Bluebird Project) and the Royal Navy using the mine hunters HMS Quorn and HMS Blyth in 2006 mapped the north and south anchorages used by Tirpitz and proved charge was well inside the net enclosure of the north anchorage and therefore most likely from X6. [11]
X6 and X7 managed to drop their charges under Tirpitz, but were unable to escape as they were observed and attacked. Both were abandoned and six crewmen captured.[12]
Tirpitz was heavily damaged. While not in danger of sinking, she took on over 1,400 tons[13] of water and suffered significant mechanical damage.[13] The first mine exploded abreast of turret Caesar, and the second mine detonated 45 to 55 m (148 to 180 ft) off the port bow.[14] A fuel oil tank was ruptured, shell plating was torn, a large indentation was made in the bottom of the ship, and bulkheads in the double bottom buckled. Some 1,430 t (1,410 long tons) of water flooded the ship in fuel tanks and void spaces in the double bottom of the port side, which caused a list of one to two degrees, which was balanced by counter-flooding on the starboard side. The flooding damaged all of the turbo-generators in generator room No. 2, and all apart from one generator in generator room No. 1 were disabled by broken steam lines or severed power cables. Turret Dora was thrown from its bearings and could not be rotated; this was particularly significant, as there were no heavy-lift cranes in Norway powerful enough to lift the turret and place it back on its bearings.[15] The ship's two Arado Ar 196 floatplanes were thrown by the explosive concussion and completely destroyed. Repairs were conducted by the repair ship Neumark; historians William Garzke and Robert Dulin remarked that the successful repair effort was "one of the most notable feats of naval engineering during the Second World War."[16] Repairs lasted until 2 April 1944; full speed trials were scheduled for the following day in Altafjord.[17] On 12 November 1944, the ship was destroyed by Avro Lancaster bombers.[18]
For this action, the commanders of the craft, Lieutenant Donald Cameron (X6) and Lieutenant Basil Place (X7), were awarded the Victoria Cross, whilst Robert Aitken, Richard Haddon Kendall, and John Thornton Lorimer received the Distinguished Service Order and Edmund Goddard the Conspicuous Gallantry Medal.[19] The commander of X8, John Elliott Smart, was appointed a Member of the Order of the British Empire (MBE).[20] Henty-Creer of X5 was not decorated, but was mentioned in dispatches.[21]
X-craft and crews

- X-5: unofficially named Platypus,[22] commanded by Lt. Henty Henty-Creer,[6] crew S-Lt Nelson, Midshipman Malcolm, and ERA Mortiboys; passage crew Lt Terry-Lloyd (commanding), LS Element, Stoker Garrity.[5] Henty-Creer, Nelson, Malcolm, and Mortiboys were killed in the attack, though X-5's exact fate is unknown.[5]
- X-6: named Piker II,[6] commanded by Lt Donald Cameron, crew Lt J. T. Lorimer, S-Lt. R. Kendall, and ERA Goddard; passage crew Lt Wilson (commanding), LS McGregor, Stoker Oxley.[6] Cameron earned a Victoria Cross (VC), Lorimer and Kendall the Distinguished Service Order (DSO), Goddard a Conspicuous Gallantry Medal (CGM).[6]
- X-7: unofficially named Pdinichthys,[23] commanded by Lt Basil Place, crew S-Lt Aitken, Lt Whittam, and ERA Whiteley; passage crew Lt Philip (commanding), LS J. J. Magennis, Stoker Luck.[6] (Place also earned a VC, Aitken the DSO, while Philip was appointed a Member of the Order of the British Empire (MBE); Whittam and Whiteley were killed.[24])
- X-8: commanded by Lt McFarlane, Royal Australian Navy[6] (Smart was passage crew commander.)
- X-9: commanded by Lt Martin, RN,[6] commanded by S-Lt E Kearon (passage crew) when it foundered on 16 September 1943[8]
- X-10: unofficially named Excalibur,[25] commanded by Lt Hudspeth, Royal Australian Naval Volunteer Reserve[6]
In popular culture
- The operation was later portrayed in the 1955 war film Above Us the Waves, featuring John Mills, which was based on both Operation "Source" and the earlier "Chariot" human torpedo attacks on Tirpitz.
- The 1969 war film Submarine X-1 is loosely based on Operation "Source".
- The Operation is featured in the 2003 video game Hidden & Dangerous 2 as a campaign mission.
See also
Footnotes
- Notes
- ↑ The CO of X5, Henty Henty-Creer was an Australian commissioned in the RNVR and five members of the Royal Australian Navy were among the crew of the British midget submarines involved. Worledge, Ray. 2012 Australians in Midget Submarines. (Access date: 24 March 2012.)
- ↑ "Lost heroes of the 'Tirpitz'". BBC. BBC. 17 February 2011. Retrieved 21 August 2018.
- ↑ Bute at War
- ↑ Grove, Eric. Sea Battles in Close-up: World War 2, Volume 2 (Shepperton, Surrey: Ian Allan, 1993), pp.124.
- 1 2 3 Grove, p.124.
- 1 2 3 4 5 6 7 8 9 10 11 12 13 Grove, p.127.
- ↑ Grove, pp.124 & 127.
- 1 2 Supplement to The London Gazette, p.996 of the article or p.4 of PDF file
- ↑ Suicide Squads: The Men and Machines of World War II Special Operations. 25 June 2015. ISBN 1840650826.
- ↑ "Lost heroes of the 'Tirpitz'". BBC History. BBC. 17 February 2011. Retrieved 21 August 2018.
- ↑ Her sprenges bomba som skulle senke «Tirpitz»
- ↑ "World War II's X men, crews of the dangerous X class midget submarines". History Online. History Online. March 11, 2018. Retrieved August 21, 2018.
- 1 2 Grove, p.131.
- ↑ Garzke & Dulin, p. 259.
- ↑ Garzke & Dulin, pp. 259–261.
- ↑ Garzke & Dulin, p. 262.
- ↑ Garzke & Dulin, p. 264.
- ↑ "World War II's X men, crews of the dangerous X class midget submarines". History Online. History Online. March 11, 2018. Retrieved August 21, 2018.
- ↑ "No. 36390". The London Gazette (Supplement). 10 September 1943. pp. 901–902.
- ↑ "No. 36295". The London Gazette (Supplement). 17 December 1943. pp. 5539–5540.
- ↑ "Lost heroes of the 'Tirpitz'". BBC History. BBC. 17 February 2011. Retrieved 21 August 2018.
- ↑ Grove, pp. 124 & 128.
- ↑ Grove, pp. 127 & 128.
- ↑ Magennis later earned a VC in the midget submarine attack on Takao. Grove, p. 127.
- ↑ Grove, p. 128.