Action off Lerwick
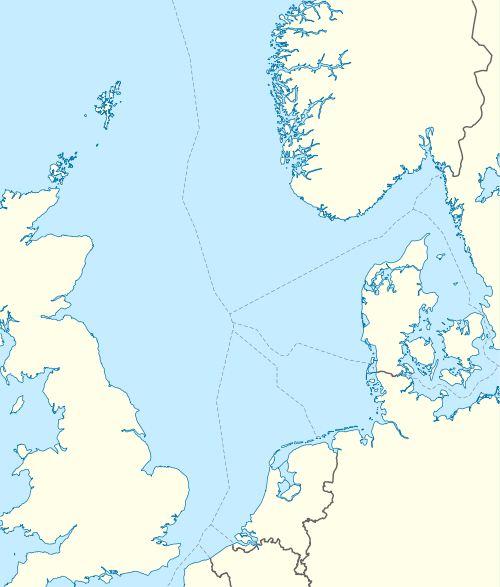
The Action off Lerwick (/ˈlɛrɪk/, "Lerrick") was a naval engagement on 17 October 1917 fought in the North Sea during the First World War. The German light, minelaying cruisers SMS Brummer and Bremse attacked a westbound convoy of twelve colliers and their escorts. The two escorting destroyers and nine neutral Scandinavian ships were sunk off Shetland, Scotland. Admiralty code breakers had uncovered the call signs of Bremse and Brummer and by direction finding knew that they had sailed from Wilhelmshaven to Lister Tief (Lister Deep) north of Sylt but an operation as far north as the Scandinavian collier route was not anticipated.

Both of the British destroyer commanders were commended for their bravery, though some members of the Admiralty felt that by leaving the convoy to engage a superior enemy force, they had left the merchant steamers open to attack. Other British ships did not receive reports of the attack until late afternoon and were not in a position to intercept; the German cruisers safely returned to port. The British called the attack on neutral vessels and giving no time for the crews to abandon ship as an outrage and the Germans denied allegations that their ships had fired on survivors in the water.
Background
Net mine barrage
The Admiralty anticipated that several U-boats would return to Germany via the North Sea in early October 1917 and planned to attack them with a larger force than that used in a similar operation in July. On passage through the North Sea, U-boats sailed between two minefields to the east of the Dogger Bank and the Outer Silver Pit, a funnel 315 mi (507 km; 274 nmi) long, 85 mi (137 km; 74 nmi) wide at the north end, narrowing to 45 mi (72 km; 39 nmi) at the southern end. A ten-day period of observation was planned and a barrage of underwater mine nets was to be laid at the narrow end of the funnel. At the north end, four submarines mounted a standing patrol; further south, two destroyer leaders, fourteen destroyers and a yacht patrolled between the latitudes of the Moray Firth and the Firth of Forth.[1]
The mine nets of net drifter fishing boats were to be placed at the northern part of the next section between the Firth of Forth and Flamborough Head and watched by four destroyers and sixteen trawlers, the commander of that section sailing in a yacht, HMY Goissa. The southernmost end of the funnel where U-boats had to skirt British minefields on the Dogger Bank was to be patrolled by Harwich Force. The operation consisted of 24 trawlers, 42 net drifters, 21 destroyers, a flotilla leader and four submarines. To maintain the standing patrols required between 15 destroyers and flotilla leaders and 29 (in early October) and 18 destroyers of Harwich Force participated. To keep U-boats submerged, patrols on the northern sections began on 27 September.[2]
Stormy weather forced the destroyers in the middle section back to port three times and twice to abandon their patrol likes to ride out the storms. The submarines, patrol ships and net barrage boats saw nothing of note during the operation but the net drifters reported nine underwater explosions as the nets were being strung out. The explosions were taken to be premature explosions of mines being caught in the nets. As dark fell more explosions were heard and two green rockets were spotted at the east end of the net line and more explosions were heard. On 3 October, hydrophones detected a submarine at the west end of the nest, an explosion and then silence. Other boats' hydrophone sets gave similar indications.[3]
Until 9 October, nothing more was heard until HMS Tancred, an R-class destroyer, was attacked north of the net barrage and gave the alarm. Before the U-boat was expected to reach the nets, another was seen and attacked, then a U-boat engine was heard clearly and a depth charge was dropped. By now the nets and mines were so damaged by the stormy weather as to be ineffective and on 10 October the operation was terminated. The Director of Naval Intelligence reported a month later that three U-boats had been destroyed close to the mine trap and German sources later confirmed that U-50, U-66 and U-106 had been sunk.[3]
Coast and river mining
After the success of the mine trap at the beginning of October and the mines laid across the Heligoland Bight, U-boats had begun to use the Kattegat into the Baltic Sea for outbound and return journeys. German minesweepers were constantly busy clearing mines and German battleships were supporting the minesweepers. The British devised a plan to lay mines close to the German coast and river mouths while the High Seas Fleet was operating in the Baltic. While the arrangements were being made, four light cruisers, twelve destroyers and a destroyer leader were ordered to attack the German minesweepers operating in the German Bight. As soon as the preliminary operation was ready, the Admiralty ordered the operation to be postponed and all light cruisers and twelve destroyers were to prepare to sail to intercept a German surface force believed to be in the North Sea. The Admiralty code breakers of Room 40 had uncovered the call signs of Bremse and Brummer and by direction finding knew that they had sailed from Wilhelmshaven in the Jade Bay to Lister Tief (Lister Deep) north of Sylt; an operation as far north as the Scandinavian collier route was discounted.[4]
In the absence of intelligence of German intentions, Admiral David Beatty, the commander of the Grand Fleet, was constrained to scour the North Sea. Six light cruisers from Rosyth with six destroyers were ordered to the Bovbierg Light by 6:00 a.m. on 16 October, to patrol a line south-west from Denmark towards the Horns Reef channel about 10 mi (8.7 nmi; 16 km) offshore. A light cruiser squadron from Scapa Flow accompanied by five destroyers was to be off Jaederens Point in south-western Norway by 4:00 a.m. to observe a line from the point to Hanstholm in north Denmark across the west end of the Skagerrak. Two more light cruiser squadrons each with five or six destroyers were sent to patrol lines in the central North Sea by midday on 16 October. After notice from the Admiralty that Zeppelins would be reconnoitring on the same day, Beatty ordered HMS Furious an aircraft-carrying battlecruiser to conduct a sweep eastwards from just north of Middlesbrough.[5]
Prelude
The Scandinavian Convoy

In April 1917, the British began shipping coal north from the Humber Estuary to Lerwick in the Shetland Islands and then across the North Sea to Norway. The quota of 250,000 long tons (254,012 t) required daily convoys from Lerwick, most being neutral ships, usually escorted by two British destroyers from eight detached from the Grand Fleet, supported by several armed trawlers.[6][lower-alpha 1] To 1 July, 351 ships made the eastbound journey from Lerwick and 385 the voyage westwards from Norway, an average of 368 round trips a month for the loss of twenty ships. In July, ten ships were sunk by the attacks of SM U-67, SM U-60 SM U-94, SM U-52 and SM UC-55, from 454, a loss of 2.2 per cent.
Seven depth charge attacks were made by escort ships to no effect and HMS Itchen was torpedoed while escorting colliers northwards to Lerwick. In anticipation of the added difficulty of escorting colliers in the autumn, winter and spring, several cruisers were sent to the Humber.[8] The Scandinavian convoys had been a considerable success but had to sail in waters where they were vulnerable to German surface vessels for most of the journey. The return voyage began in Bergen in Norway, a neutral port where sailings could be observed by Germans and the use of neutral ships made it impossible to keep convoy procedures secret.[9]
15 October convoy
Escorting the Scandinavian Convoy which departed Lerwick on 15 October were the destroyers HMS Mary Rose (Lieutenant Commander Charles Fox, escort leader) and Strongbow (Lieutenant Commander Edward Brooke) along with two naval trawlers, HMS Elise and P. Fannon. The destroyers were armed with three 4 in (100 mm) guns, three 2-pounders and two 21 in (530 mm) torpedo tubes each. Around noon on 16 October Mary Rose left the convoy to join the next convoy west assembling at Bergen as Stongbow saw to the dispersal of the eastbound colliers to their destinations. Mary Rose departed from Bergen with the twelve ships of the westbound convoy on the afternoon of 16 October. Mary Rose sailed beyond the convoy and after dark, when Strongbow made rendezvous, the destroyers were unable to communicate. Strongbow sailed on the port side of the convoy, which was spread out to the north and north-west. The night of 16/17 October passed quietly and by 6:00 a.m. on 17 October, half an hour after dawn. Mary Rose was still ahead of the convoy. There was a fresh breeze [17–21 kn (20–24 mph; 31–39 km/h)] blowing from the south-west raising a heavy swell but visibility was good. Neither destroyer commander had been informed of the sailing of a German surface force, the steps taken to intercept them or that an alarm covering the North Sea had been in force for two days.[10]
German sortie
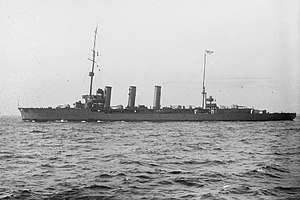
U-boat reports gave the impression that much shipping was moving between Lerwick and Bergen in Norway and the commander of the High Seas Fleet (Hochseeflotte) Admiral Reinhard Scheer ordered an attack by surface ships. German bases to the south of the route made a surprise attack at the east end of the convoy route feasible; that the short days and stormy weather in the autumn and winter increased the possibility that a sortie could go unobserved was as obvious to the Imperial German Navy (Kaiserliche Marine) as to the British.[11] By forcing the British to reinforce the convoy escorts of the Scandinavian Convoy a surface ship attack could help the wider U-boat campaign.[12] The new, fast, minelaying light cruisers Brummer and Bremse with a speed of 34 kn (39 mph; 63 km/h), each armed with four 5.9 in (150 mm) naval guns and two 3.5 in (89 mm) (22-pounder) anti-aircraft guns were chosen for an operation against the Scandinavian Convoy, the German ships being disguised to look like British C-class cruisers.[13] Brummer and Bremse kept wireless silence and Brummer had a wireless interception team on board to jam British signals.[14] On 17 October, a westbound convoy of two British, one Belgian, and nine Scandinavian ships was 65 mi (56 nmi; 105 km) off Lerwick.[15]
Action
Soon after 6:00 a.m., lookouts on Strongbow spotted two unusual vessels approaching at a distance of over 4,000 yd (2.0 nmi; 3.7 km) converging on the destroyer. Three challenges were signalled to the ships and the third challenge received an erroneous reply and Brooke called the ship to action stations. When the range was down to within 3,000 yd (1.5 nmi; 2.7 km) and before the crew could reach action stations, the German ships opened fire with their 5.9 in (150 mm) guns. The first German salvoes at Strongbow cut the main steam pipe and many members of the crew below decks were scalded to death; Brooke was wounded and the ship was left dead in the water, with its decks covered with casualties. Other hits knocked out the wireless before the signaller could raise the alarm. Mary Rose also sent a wireless signal as it closed with the German ships and another station asked for the signal to be repeated but Brummer jammed the signal. The German ships jammed every subsequent attempt by the British to transmit a distress call.[16]
Brooke ensured that the code books and confidential papers had been jettisoned then ordered the ship to be scuttled; the survivors took to the water in a Carley float at about 7:30 a.m. The German cruisers inflicted more damage on Strongbow while Elise was manoeuvring to rescue the crew and the ship sank at about 9:30 a.m.[17][18] Fox heard the gunfire astern, assumed that a U-boat had attacked the convoy and turned towards it, with enough time to go to action stations, hampered by not being able to use the torpedoes and guns at the same time because the range and deflection transmitters were not working. Fox soon saw the German cruisers and attacked at high speed, opening fire at about 6:20 a.m. from a range of 6,000 to 7,000 yd (3.0 to 3.5 nmi; 3.4 to 4.0 mi; 5.5 to 6.4 km).[19] The nearest German ship replied with erratic fire but at 2,000 yd (0.99 nmi; 1.1 mi; 1.8 km) as Fox changed course, the Germans ships hit Mary Rose and at about 7:00 a.m. Fox gave the order "abandon ship", eight men getting away on a Carley float. The German ships then attacked the convoy, P. Fannon and the three British ships escaped but the nine Scandinavian ships were sunk. Elise escaped and returned when the coast was clear to rescue survivors, including 45 men from the crew of Crossbow.[19][lower-alpha 2] The German ships returned to base without casualties or damage. Other British naval forces in the area did not receive news of the engagement until almost 4:00 p.m., too late to intercept Brummer and Bremse.[12][20]
Aftermath
Analysis
The event was regarded as an outrage by the Allies who protested that the attack on neutral ships was illegal and that the Germans gave the crews of the merchant vessels no time to evacuate, thus resulting in a large loss of civilian lives. Both of the British destroyer commanders received credit for bravery though some members of the Admiralty felt that by leaving the convoy to engage a superior enemy force, they had left the merchant steamers open to attack.[16]
Casualties
About 250 Allied and Scandinavian sailors were killed and at least fifty others were wounded. Fox died along with about seventy others from Mary Rose, only two officers and eight men surviving. Strongbow lost half of her complement; four officers and 44 men being rescued. The German ships were accused of shelling survivors in the water but they denied the accusation.[12][20]
Orders of battle
Royal Navy
Data taken from Newbolt (2003) unless indicated[7]
- Mary Rose, destroyer (flagship)
- Strongbow, destroyer
- Elise, naval trawler
- P. Fannon, naval trawler
Kaiserliche Marine
Data taken from Marder (1969) unless indicated[12]
- Bremse, minelaying light cruiser (flagship)
- Brummer, minelaying light cruiser
Notes
Footnotes
- Newbolt 2003, pp. 145–146.
- Newbolt 2003, p. 146.
- Newbolt 2003, pp. 148–149.
- Marder 1969, p. 295.
- Newbolt 2003, pp. 149–150.
- Massie 2003, p. 747; Newbolt 2003, p. 152.
- Newbolt 2003, p. 152.
- NSM 1933, pp. 270–271.
- Marder 1969, pp. 293–294.
- Newbolt 2003, pp. 152–153.
- Massie 2003, p. 747.
- Marder 1969, p. 294.
- Marder 1969, pp. 294–295.
- O'Hara, Dickson & Worth 2013, p. 90.
- Newbolt 2003, p. 153.
- Marder 1969, p. 297.
- Marder 1969, p. 296.
- Newbolt 2003, pp. 153–154.
- Newbolt 2003, p. 154.
- Newbolt 2003, pp. 155, 157.
References
- Marder, A. J. (1969). From the Dreadnought to Scapa Flow: The Royal Navy in the Fisher Era, 1904–1919: 1917, Year of Crisis. IV. London: Oxford University Press. OCLC 1072069754.
- Massie, Robert K. (2003). Castles of Steel: Britain, Germany and the Winning of the Great War at Sea. London: Pimlico. ISBN 978-1-84413-411-3.
- Naval Staff Monograph (Historical) Home Waters Part VIII December 1916 – April 1917 (PDF). XVIII (online ed.). 1933. OCLC 816504329. Retrieved 16 May 2020 – via www navy gov au.
- Newbolt, H. J. (2003) [1931]. Naval Operations (with accompanying map case). History of the Great War Based on Official Documents by Direction of the Historical Section of the Committee of Imperial Defence. V (facs. repr. Naval & Military Press and Imperial War Museum ed.). London: Longmans, Green & Co. ISBN 978-1-84342-493-2. Retrieved 16 May 2020 – via Archive Foundation.
- O'Hara, V.; Dickson, W. David; Worth, R., eds. (2013). To Crown the Waves: The Great Navies of the First World War. Annapolis, MD: Naval Institute Press. ISBN 978-1-61251-269-3.
Further reading
- Fayle, C. Ernest (1924). Seaborne Trade: The Period of Unrestricted Submarine Warfare, with a Map and Statistical Diagrams. History of the Great War Based on Official Documents by Direction of the Historical Section of the Committee of Imperial Defence. III. New York: Longmans Green & Co. p. 187. OCLC 310597113. Retrieved 28 June 2020 – via Archive Foundation.
- Halpern, P. G. (1995). A Naval History of World War I. Annapolis: Naval Institute Press. ISBN 1-55750-352-4.
- Scheer, R. (1920). Germany's High Sea Fleet in the World War. London: Cassell. pp. 310–311. OCLC 495246260. Retrieved 28 June 2020 – via Archive Foundation.