Battle of Kosturino
| Battle of Kosturino | |||||||
|---|---|---|---|---|---|---|---|
| Part of Balkans Theatre of World War I | |||||||
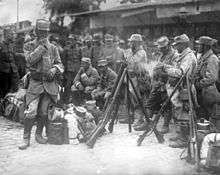 French soldiers resting in Thessaloniki, 1915 | |||||||
| |||||||
| Belligerents | |||||||
|
|
| ||||||
| Commanders and leaders | |||||||
|
|
| ||||||
| Units involved | |||||||
|
2nd Bulgarian Army 11th Bulgarian Division |
10th (Irish) Division 156th French Division | ||||||
| Strength | |||||||
| 1 Army | 2 Divisions | ||||||
| Casualties and losses | |||||||
|
|
386 (WIA) 724 MIA | ||||||
The Battle of Kosturino was a World War I battle, fought between 6 and 12 December 1915. The battle was fought in the initial stage of the Macedonian campaign, in the Balkans Theatre. On December 6, a Bulgarian troops attacked the French and British-held trenches in Kosturino, at the time part of the Kingdom of Serbia (present day Republic of Macedonia). The offensive was at first held in check, however on December 8, Bulgaria managed to infiltrate the Memesli ravine. Bulgaria then seized Crete Simonet, thus threatening to outflank the Allies. The Entente defeat at Kosturino led to the complete withdrawal of Allied forces from Serbia, thus enabling the Central Powers to build the Berlin to Constantinople rail line. The Allies in the meantime concentrated on solidifying their defenses in Greece.
Prelude
The 28 June 1914, assassination of Austro-Hungarian heir presumptive Archduke Franz Ferdinand precipitated Austria-Hungary's declaration of war against Serbia. The conflict quickly attracted the involvement of all major European countries, pitting the Central Powers against the Entente coalition and starting World War I. After the entry of the Ottoman Empire into the war on the side of the Central Powers (November 1914), the decisive factor in the Balkans became the attitude of Bulgaria. Bulgaria occupied a strategically important position on the Serbian flank and its intervention on either side of the belligerents would be decisive. Bulgaria and Serbia had fought each other twice in the previous thirty years: in the Serbo-Bulgarian War of 1885 and in the Second Balkan War of 1913. Bulgaria had suffered defeat in 1913 and the Bulgarian government and people generally felt that Serbia had stolen land which rightfully belonged to Bulgaria. While the Allies could only offer Bulgaria small territorial concessions from Serbia and neutral Greece, the Central Powers' promises appeared far more enticing, as they offered to cede most of the land which Bulgaria claimed. With the Allied defeats at the Battle of Gallipoli (April 1915 to January 1916) and the Russian defeat at Gorlice-Tarnów (May to September 1915) demonstrating the Central Powers' strength, King Ferdinand signed a treaty with Germany and on September 21, 1915 Bulgaria began mobilizing for war.[1][2][3][4]
After the victory of the Serbian army in the Battle of Kolubara in December 1914, the Serbian front saw a lull until the early autumn of 1915. Under the command of Field Marshal August von Mackensen, the Austro-Hungarian Balkan Army, the German 11th Army and river flotillas on the Danube and the Sava began an offensive on 6 October 1915, the largest offensive against Serbia. By September 1915, despite the extreme sacrifice of the Serbian army, the Austro-Hungarian Balkan Army, having crossed the rivers Sava and Drina and the German 11th Army after crossing the Danube, occupied Belgrade, Smederevo, Požarevac and Golubac, creating a wide bridgehead south of the Sava and Danube rivers, and forcing Serbian forces to withdraw to southern Serbia. On 15 October 1915, two Bulgarian armies attacked, overrunning Serbian units, penetrating into the valley of the South Morava river near Vranje up to 22 October 1915. The Bulgarian forces occupied Kumanovo, Štip, and Skopje, and prevented the withdrawal of the Serbian army to the Greek border and Salonika.[5]
For a year, the Allies had repeatedly promised to send serious military forces to Serbia, while nothing had materialized. But with Bulgaria's mobilization to its south, the situation for Serbia became desperate. The developments finally forced the French and the British to decide upon sending a small expedition force of two divisions to help Serbia, but even these arrived too late in the Greek port of Salonika to have any impact in the operations. The main reason for the delay was the lack of available Allied forces due to the critical situation in the Western Front. The Entente used Greek neutrality as an excuse, although they could have used the Albanian coast for a rapid deployment of reinforcements and equipment during the first 14 months of the war. (As the Serbian Marshal Putnik had suggested, the Montenegrin army gave adequate cover to the Albanian coast from the north—at a safe distance from any Bulgarian advance in the south in the event of a Bulgarian intervention.) The Entente also delayed due to protracted secret negotiations aiming at bringing Bulgaria into the Allied camp, which event would have alleviated Serbia's need for Franco-British help.[6]
In the event the lack of Allied support sealed the fate of the Serbian Army. Against Serbia the Central Powers marshaled the Bulgarian Army, a German Army, and an Austro-Hungarian Army, all under the command of Field Marshal Mackensen. The Germans and Austro-Hungarians began their attack on October 7 with a massive artillery barrage, followed by attacks across the rivers. Then, on the 11th, the Bulgarian Army attacked from two directions, one from the north of Bulgaria towards Niš, the other from the south towards Skopje. The Bulgarian Army rapidly broke through the weaker Serbian forces which tried to block its advance. With the Bulgarian breakthrough, the Serbian position became hopeless; their main army in the north faced either encirclement and enforced surrender, or retreat.[7]
Marshal Putnik ordered a full Serbian retreat, southwards and westwards through Montenegro and into Albania. The Serbs faced great difficulties: terrible weather, poor roads and the need for the army to help the tens of thousands of civilians who retreated with them. Only c. 125,000 Serbian soldiers reached the Adriatic coast and embarked on Italian transport ships that carried the army to Corfu and other Greek islands before it traveled on to Thessaloniki. Marshal Putnik had to be carried during the whole retreat; he died just over a year later in a French hospital.[7]
The French and British divisions marched north from Thessaloniki in October 1915 under the joint command of French General Maurice Sarrail, and British General Bryan Mahon. On 20 October, the French divisions reached Krivolak on the Vardar river, while the British occupied the strategically important area between the Kosturino Pass, Vardar and lake Doiran. This advance aided the retreating Serbian Army, as the Bulgarians had to concentrate larger forces on their southern flank to deal with a possible invasion into their territory. The French command then became aware of the Bulgarian presence in the Babuna Pass between Veles and Bitola, and attempted to reach a group of Serbian soldiers located to north west of the pass. This led to the Battle of Krivolak which lasted between 5 and 19 November 1915. The French slowed down the Bulgarian advance, thus enabling the bulk of the Serbians to escape; however, Bulgaria retained the dominant mount Arkhangel west of Gradsko, forcing Sarrail to initiate a retreat towards Thessaloniki.[8][9][10]
The British forces had in the meantime only encountered small bands of Bulgarian deserters, who informed them that the Second Bulgarian Army under General Georgi Todorov had been reinforced at Strumica. On 26 November 1915, a combination of high wind, rain and snow rendered the already steep terrain impassable. The downpour continued until 3 December, soaking the soldiers to the skin and destroying their greatcoats. A total of 23 officers and 1,663 soldiers had to be evacuated back to Salonika due to frostbite and exhaustion, depleting the 10th Irish Division. The division's efficiency was further lowered by the fact that a considerable number of its soldiers were recently arrived and unassimilated drafts pulled together from various parts of the British army. On the same day the French forces that were previously in touch with the British at the Kajali ravine began their evacuation, dangerously exposing the left flank of the 10th Irish Division. Expecting Greece to remain inert, Bulgaria was now able to launch a fresh offensive with its 120 battalions against the 50 that the Allies had in their disposal. On the morning of 4 December, the Bulgarians built trestle bridges across the Crna river, rapidly occupying Bitola.[11][12]
Battle
On 4 December 1915, Bulgaria commenced an artillery barrage on British positions along the Kosturino ridge, the artillery preparation continued until 6 December when it was augmented. The bombardment reached its peak at 2:30 p.m., while concentrating on the Rocky Peak position south of Ormanli which was held by the Connaught Rangers. Half an hour later small bands of Bulgarian troops attempted to make their way down the ridge in front of the British trench, before being stopped at 60 yards (55 m) from the wire. Rocky Peak was briefly overrun by the Bulgarians before the Royal Irish Fusiliers drove them back in hand-to-hand fighting. At dusk the Rocky Peak was reinforced by half a company and a single machine gun, the 6th Royal Dublin Fusiliers were transferred to Kajali with three additional companies heading towards Hasanli.[13]
Before the dawn of 7 December, the Bulgarians utilized the heavy fog that covered the battlefield, sneaking up to Rocky Peak and engaging their adversaries with bayonets. Unable to distinguish the similar uniforms the defenders fought their way back the slope. A machine gun was quickly brought up upon the peak, targeting the 30th British Brigade to the south–east with the support of mountain artillery. Between 9 and 10:00 a.m., the Connaught Rangers repulsed an infantry charge on their position, a parallel attack on the French portion of the front was also held in check. At 2:00 p.m., four Hampshire companies fell back to Crete Simonet after coming under enfilade fire. A follow up assault on the Connaught Rangers dislodged them from their trenches, and forced them to rally up in Dedeli along with the Hampshires. To the left the Royal Munster Fusiliers held their ground, however upon receiving news of the Connaught Rangers' retreat also retired to Dedeli. The 31st British Brigade abandoned Prsten for high ground in Tatarli. Upon General Mahon's request the 65th British Brigade was dispatched to Dojran, French General Maurice Bailloud also provided a mountain battery and two battalions that were sent to Tatarli. At the same time the French rear guard was engaged in skirmishes on both banks of the Vardar river while retreating towards Furka.[14]
On the morning of 8 December, French mountain artillery broke up a Bulgarian attack on the junction between the 156th French Division and the British positions. At 11:00 a.m., Bulgaria resumed its assault on Crete Rivet in front of Crete Simonet, two subsequent attacks were fended off, however the three companies holding the position had to withdraw after losing 64 men. At 3:30 p.m., the British command received a report indicating that Bulgarian troops had infiltrated the Memesli ravine, in an attempt to strike the right flank of the 31st British Brigade, while also seeping through between the 5th and 6th Royal Inniskilling Fusiliers in the center. The 31st and 30th British Brigades were immediately ordered to fall back to Causli and Dedeli respectively. At 5:45 p.m., the Bulgarian army overtook Crete Simonet seizing 10 artillery pieces and celebrating their victory by blowing bugles and launching flares. At 2:00 a.m. on 9 December, the 156th French Division plodded to Bajimia after repulsing a Bulgarian attack that left 400 Bulgarians dead, no fighting took place during the rest of the day. On 10 December, minor clashes continued as Bulgarian raiding parties harassed the retreating Allies.[15][16]
At 1:00 p.m. on 11 December, the 11th Bulgarian Division seized Bogdanci, cutting the local telephone line and capturing an ammunition depot. The Allies had now selected the Doiran train station as their new target, in preparation of a complete evacuation towards Salonika. However the 9th King's Own Royal Regiment remained isolated from the rest of Allies, only beginning its withdrawal at 12:45 a.m. on 12 December. An hour later the regiment encountered a battalion of soldiers resting by the roadside, belatedly realising that they belonged to the enemy. The resulting bayonet charge led to the death or capture of 122 British soldiers. By the evening of the same day the evacuation of the Entente troops into Greece had been complete, with the 10th British and the 57th,122nd and 156th French Divisions crossing the border. Greek border guards assured the Allies that they would oppose any Bulgarian attempt to cross the frontier. An Allied spy later confirmed that Bulgaria had no intent of breaching the border, instead halting 2 kilometres (1.2 mi) from it.[17] [18]
The battle at Kosturino and the subsequent evacuation of the Allies resulted in 1,209 British casualties, including 99 killed,386 wounded, 724 missing and 10 artillery pieces. French casualties amounted to 1,804 killed, wounded or missing, as well as 12 machine guns and 36 ammunition wagons. The number of Bulgarian losses during the battle are estimated to vastly greater than that of the Allies, with at least 400 falling dead on 9 December.[19] [20]
Aftermath
Thus there resulted a clear, albeit incomplete victory for the Central Powers. As a consequence they opened the railway line from Berlin to Constantinople, allowing Germany to prop up its weaker partner, the Ottoman Empire. Despite the Central Powers' victory, the Allies managed to save a part of the Serbian Army, which although battered, seriously reduced and almost unarmed, escaped total destruction and after reorganizing resumed operations six months later. And most damagingly for the Central Powers, the Allies—using the moral excuse of saving the Serbian Army—managed to replace the impossible Serbian front with a viable one established in Macedonia (albeit by violating the territory of an officially neutral country); a front which would prove key to their final victory three years later. The Allies were able to concentrate on fortifying the so-called Entrenched Camp, in preparation for a large scale Bulgarian invasion of Greece and an impending assault on Salonika.[21]
Following the failure of the August Offensive, the Gallipoli Campaign drifted. Ottoman success began to affect public opinion in the United Kingdom, with news discrediting Ian Standish Monteith Hamilton's performance being smuggled out by journalists like Keith Murdoch and Ellis Ashmead-Bartlett.[22] Disaffected senior officers such as General Stopford also contributed to the overall air of gloom. The prospect of evacuation was raised on 11 October 1915 but Hamilton resisted the suggestion, fearing the damage to British prestige. He was dismissed as commander shortly afterwards and replaced by Lieutenant General Sir Charles Monro.[23] Autumn and winter brought relief from the heat but also led to gales, blizzards and flooding, resulting in men drowning and freezing to death, while thousands suffered frostbite.[24] After consulting with the commanders of VIII Corps at Helles,[25] IX Corps at Suvla,[26] and Anzac, Sir Herbert Kitchener agreed with Monro and passed his recommendation to the British Cabinet, who confirmed the decision to evacuate in early December.[27] Suvla and Anzac were to be evacuated in late December, the last troops leaving before dawn on 20 December 1915. Troop numbers had been slowly reduced since 7 December 1915 and ruses, such as William Scurry's self-firing rifle,[28] which had been rigged to fire by water dripped into a pan attached to the trigger, were used to disguise the Allied departure. At Anzac Cove troops maintained silence for an hour or more, until curious Ottoman troops ventured to inspect the trenches, whereupon the Anzacs opened fire.[29] The final British troops departed from Lancashire Landing around 04:00 on 8 January 1916.[30] The Newfoundland Regiment was chosen to be a part of the rearguard, finally withdrawing from Gallipoli on 9 January 1916.[31]
See also
Notes
- Citations
- ↑ Falls 1933, pp. 1–22.
- ↑ Albertini 1953, p. 36.
- ↑ Fischer 1967, p. 73.
- ↑ Willmott 2003, pp. 11–15.
- ↑ Falls 1933, pp. 22–39.
- ↑ Falls 1933, pp. 31–32, 42–50.
- 1 2 Falls 1933, pp. 33–37.
- ↑ Falls 1933, pp. 57–63.
- ↑ Villari 1922, pp. 25–27.
- ↑ Gordon-Smith 1920, pp. 230–233.
- ↑ Villari 1922, pp. 27–29.
- ↑ Falls 1933, pp. 64–68.
- ↑ Falls 1933, pp. 68–69.
- ↑ Falls 1933, pp. 69–71, 74.
- ↑ Falls 1933, pp. 71–75.
- ↑ Korsun 1939, pp. 55.
- ↑ Falls 1933, pp. 75–79.
- ↑ Korsun 1939, pp. 54–56.
- ↑ Falls 1933, pp. 81–82.
- ↑ Bernede 1998, pp. 46–47.
- ↑ Falls 1933, pp. 85–103.
- ↑ Wahlert 2008, p. 26.
- ↑ Broadbent 2005, pp. 244–245.
- ↑ Carlyon 2001, p. 515.
- ↑ Broadbent 2005, p. 188.
- ↑ Broadbent 2005, p. 191.
- ↑ Broadbent 2005, p. 254.
- ↑ Broadbent 2005, p. 260.
- ↑ Travers 2001, p. 208.
- ↑ Broadbent 2005, p. 266.
- ↑ Nicholson 2007, p. 480.
References
- Albertini, Luigi (1953). Origins of the War of 1914. II. Oxford: Oxford University Press. OCLC 168712.
- Bernede, Alain (1998). "The Gardeners of Salonika: The Lines of Communication and the Logistics of the French Army of the East, October 1915–November 1918". War & Society. Taylor & Francis. 16 (1): 43–59. doi:10.1179/072924798791201129. Retrieved 8 May 2016.
- Broadbent, Harvey (2005). Gallipoli: The Fatal Shore. Camberwell, Victoria: Viking/Penguin. ISBN 0-670-04085-1.
- Carlyon, Les (2001). Gallipoli. Sydney: Pan Macmillan. ISBN 0-7329-1089-7.
- Falls, C. (1996) [1933]. Military Operations Macedonia: From the Outbreak of War to the Spring of 1917. History of the Great War Based on Official Documents by Direction of the Historical Section of the Committee of Imperial Defence. I (Imperial War Museum and Battery Press ed.). London: HMSO. ISBN 0-89839-242-X.
- Fischer, Fritz (1967). Germany’s Aims in the First World War. New York: W.W. Norton. ISBN 978-0-393-09798-6.
- Gordon-Smith, Gordon (1920). From Serbia to Jugoslavia; Serbia's Victories, Reverses and Final Triumph, 1914–1918. New York: G.P. Putnam’s Sons. ISBN 978-5519466608. Retrieved 13 April 2016.
- Nicholson, Gerald W. L. (2007). The Fighting Newfoundlander. Carleton Library Series. 209. McGill-Queen's University Press. ISBN 0-7735-3206-4.
- Korsun, Nikolay (1939). Балканский фронт мировой войны 1914–1918 гг [Balkan Front of the World War 1914–1918] (in Russian). Moscow: Boenizdat. OCLC 7970969.
- Travers, Tim (2001). Gallipoli 1915. Stroud: Tempus. ISBN 0-7524-2551-X.
- Villari, Luigi (1922). The Macedonian Campaign. London: T. Fisher Unwin. OCLC 6388448. Retrieved 13 September 2015.
- Wahlert, Glenn (2008). Exploring Gallipoli: An Australian Army Battlefield Guide. Australian Army Campaign Series. 4. Canberra: Army History Unit. ISBN 978-0-9804753-5-7.
- Willmott, H.P. (2003). World War I. New York: Dorling Kindersley. ISBN 0-7894-9627-5. OCLC 52541937.