18th Infantry Division (United Kingdom)
| 18th Infantry Division | |
|---|---|
 Mike Chappell comments that "the map-reading conventional sign for a windmill—an apt device for an East Anglian formation" was only worn on uniforms in Britain.[1] | |
| Active | 30 September 1939 – 15 February 1942[2] |
| Branch |
|
| Type | Infantry |
| Role | Infantry |
| Size |
War establishment strength: 17,298 men[lower-alpha 1] |
| Engagements |
Battle of Muar Battle of Singapore |
| Commanders | |
| Notable commanders |
Bernard Paget Merton Beckwith-Smith |
The 18th Infantry Division was an infantry division of the British Army which fought briefly in the Malayan Campaign of the Second World War. In March 1939 following the re-emergence of Germany, and the German occupation of Czechoslovakia, the British army increased the number of divisions within the Territorial Army (TA) by duplicating existing units. The 18th Infantry Division was formed in September 1939, as a second-line duplicate of the 54th (East Anglian) Infantry Division, from men from the East Anglian counties of Norfolk, Suffolk and Cambridgeshire, as well as Essex.
During 1939 through to 1941, the division remained based in Britain undergoing training and being moved to various parts of the country. Its varied duties included an anti-invasion role in East Anglia, training in Scotland, redeployment to the North West, and aiding in the unloading of merchant ships during the Liverpool Blitz. Towards the end of 1941, the British Government sought to reinforce the British Army's presence in North Africa to show the Dominions that the United Kingdom was doing its fair share of the fighting in the Middle East, and to reinforce the planned upcoming offensive code-named Operation Crusader. The division left Britain during October, bound for Canada. This was the result of a lack of British shipping, which led the United Kingdom to secure a transport deal with the then still neutral United States. After the division arrived in Nova Scotia, they switched to American ships and left Canada bound for Egypt.
By December, the convoy had reached South Africa and was preparing for the final stretch of its journey when news of the Japanese entry into the war (via simultaneous attacks on the American naval base at Pearl Harbor and the invasion of the British colony of Malaya) was received. This resulted in most of the 18th Infantry Division being diverted to India to reinforce British forces facing the Japanese. The division's 53rd Brigade was sent straight to Singapore, before being deployed north into Johore and becoming embroiled in the Battle of Muar. After several short engagements with Japanese forces, the brigade was withdrawn to Singapore Island. The rest of the division arrived shortly after and took part in the short Battle of Singapore. Initially deployed to the northeast part of the island, the division remained largely inactive while the Japanese attacked the northwest sector of the island. Following the Japanese beachhead being established, the division was broken up and deployed piecemeal into the battle. One battalion was assigned to a different formation, while several units formed two battlegroups and were deployed into the fight. Following the initial engagements, the division was regrouped for the final stand in the city of Singapore and repulsed several Japanese attacks. The division, along with the rest of the garrison, surrendered to the Japanese on 15 February 1942 and was not reformed. Due to the conditions of their captivity, over one-third of division's personnel died during their confinement, including the divisional commander Major-General Merton Beckwith-Smith.
Background
In the 1930s, tensions increased between Germany and the United Kingdom and its allies.[5] During late 1937 and throughout 1938, German demands for the annexation of Czechoslovakia's Sudetenland led to an international crisis. In an attempt to avoid war, Britain's Prime Minister Neville Chamberlain met with German Chancellor Adolf Hitler in September and brokered the Munich Agreement. The agreement averted immediate war and allowed Germany to annexe the Sudetenland.[6] Chamberlain had intended the agreement to lead to further peaceful resolution of issues, but relations between both countries soon deteriorated.[7] On 15 March 1939, Germany breached the terms of the agreement by invading and occupying the remaining provinces of Bohemia and Moravia.[8]
In response, on 29 March, the British Secretary of State for War Leslie Hore-Belisha announced plans to increase the Territorial Army (TA) from 130,000 men to 340,000 and in so doing double the number of TA divisions.[9][lower-alpha 2] The plan of action was for the existing units to recruit over their allowed establishments (aided by an increase in pay for Territorials, the removal of restrictions on promotion that had been a major hindrance to recruiting during the preceding years, the construction of better quality barracks and an increase in suppertime rations) and then form second-line divisions from small cadres that could be built upon.[9][14] As a result, the 18th Infantry Division was to be created as a second-line unit, a duplicate of the first line 54th (East Anglian) Infantry Division.[15] In April, limited conscription was introduced. This resulted in 34,500 militiamen, all aged 20, being conscripted into the regular army, initially to be trained for six months before being deployed to the forming second-line units.[15][16] Despite the intention for the army to grow, the programme was complicated by a lack of central guidance on the expansion and duplication process and issues regarding the lack of facilities, equipment and instructors.[9][17]
Formation and home defence
It was envisioned that the duplicating process and recruiting the required numbers of men would take no more than six months. Some TA divisions had made little progress by the time the Second World War began; others were able to complete this work within a matter of weeks.[17][18] The 18th Infantry Division became active on 30 September 1939; its constituent units had already formed and had been administered by the parent 54th (East Anglian) Infantry Division. The 18th Division was composed of the 53rd, 54th and 55th Infantry Brigades as well supporting divisional troops. The division's first General Officer Commanding (GOC) was Major-General Thomas Dalby, who had been brought out of retirement.[19][20] The division was formed from men from the East Anglian counties of Norfolk, Suffolk and Cambridgeshire, as well as the county of Essex. The Imperial War Museums comment that the division insignia of "windmill sails" denotes "the association of the Division with East Anglia".[21]
On 30 November 1939, Major-General Bernard Paget assumed command, replacing Dalby who returned to retirement.[2][22] The division was initially assigned to Eastern Command and by early 1940 was based in Norfolk.[2][23] The opening months of the war allowed little time to train, and the division was occupied with guarding airfields and other key points.[24] By summer, the division was under the command of II Corps and was spread throughout Cambridgeshire, Norfolk and Suffolk.[2][25][26] On 20 April, Paget left the division temporarily and Brigadier Edward Backhouse took his place.[2] Paget was deployed to Norway, where he commanded Sickleforce (15th and 148th Infantry Brigades) during the Norwegian Campaign following their landing at Åndalsnes.[27] With the unsuccessful conclusion of that campaign, Paget returned briefly to the division on 14 May 1940.[2][28] However, on 27 May, he became the Chief of the General Staff, Home Forces and was replaced by Brigadier Geoffrey Franklyn on a temporary basis.[2][29]
The war deployment of the TA envisioned it being used piecemeal, as equipment became available, to reinforce the British Expeditionary Force (BEF) already dispatched to Europe. The TA would join regular army divisions in waves, as TA divisions completed their training, with the final divisions being deployed a year after the outbreak of war.[30] The division did not leave Britain as the BEF was evacuated from France during the Dunkirk evacuation from May to June 1940.[31][32] The evacuation had resulted in the abandonment of much of the BEF's heavy equipment, leaving the troops in Britain sparsely equipped. Priority for new equipment was given to a handful of formations that would launch the riposte to any German landings, which factored into the 18th Division having very little of its required equipment. On paper, an infantry division was to have seventy-two 25-pounder field guns. On 31 May 1940, the 18th Division was only equipped with four First World War vintage 18-pounder field guns and eight 4.5-inch howitzers. In addition, the division had no anti-tank guns against a nominal establishment of 48, and only 47 of the required 307 Boys anti-tank rifles.[33][34]
During the summer, the division went through several changes of command. Major-General Thomas Eastwood took command on 1 June, before leaving to become the Chief of Staff of the Second BEF under the command of Lieutenant-General Alan Brooke.[2][35] On 9 June, Major-General Lionel Finch (previously, the Director of Recruiting and Organization and then the Deputy Adjutant-General to the Forces[36][37]) took command before being replaced by Major-General Merton Beckwith-Smith (who had commanded the 1st Guards Brigade during the Battle of France) on 14 July 1940. He remained with the division for the remainder of its existence.[2][38]
The division was then assigned to an anti-invasion role in East Anglia, but numerous training exercises were held in Scotland, Wales and other parts of England.[24][26] In the autumn of 1940, the division moved permanently to Scotland. Divisional headquarters was established at Melrose, with the troops spread out across the Scottish Borders, from the border with Dumfries to Duns. Further divisional exercises were carried out, with the division facing contingents of exiled Belgians, Czechs, Norwegians, and Poles.[39] At this point, unfounded rumours circulated that the division was soon to be deployed overseas.[40]
In April 1941, the division was assigned to Western Command and moved to North West England and the West Midlands, replacing the 38th (Welsh) Infantry Division.[2][41] The division was spread out in the area between Liverpool, Manchester and Birmingham, with divisional headquarters established at Ribbesford House near Bewdley.[40] During the Liverpool Blitz, several hundred men were deployed to the city for several weeks to help with the unloading of cargo ships. This deployment also saw the division's first casualties of the war due to the German bombing.[42] On 18 July, Brooke (now Commander-in-Chief, Home Forces) inspected elements of the division based in Crewe.[43]
Overseas service
Transfer to Middle East
During 1940, Winston Churchill (now Prime Minister, having succeeded Chamberlain) had grown concerned about the expansion of British supply services in Egypt under Middle East Command compared to the number of fighting men, and pushed for the dispatch of additional fighting formations.[44][lower-alpha 3] This had been a source of friction with General Archibald Wavell and with his replacement General Claude Auchinleck, who wanted rear area personnel and replacements for fighting formations, rather than new divisions. Churchill was adamant that additional complete British fighting formations be dispatched, not replacements or administration forces, "to give the Dominions no cause to feel that the bulk of the fighting was done by their troops".[46] On 1 September 1941, Churchill contacted the neutral President of the United States Franklin D. Roosevelt and requested shipping to transport two infantry divisions from Britain to the Middle East. Roosevelt responded that only enough shipping could be provided for one division and agreed on the condition that the ships sailed from Halifax, Nova Scotia. On 28 October, the 18th Infantry Division left Liverpool onboard the heavily escorted convoy CT.5, bound for Nova Scotia. Three days later, an American escorted convoy left Halifax containing six cargo ships provided to the British via the American Lend-Lease program. The two convoys met mid-ocean on 2 November and exchanged escort groups; the British ships and lend-lease cargo ships heading for the United Kingdom, while the now American-escorted convoy CT.5 continued to Nova Scotia. The division arrived in Halifax on 7 November, and transferred to the waiting American ships of convoy WS.12X over the following days. The British ships were able to return home, and convoy WS.12X departed Halifax on 10 November destined for the Middle East.[2][46][47][48]
Diversion to Far East
During the night of 7/8 December 1941, one hour prior to the attack on Pearl Harbor, the Empire of Japan began the Invasion of Malaya.[49] Four hours after the strike on Pearl Harbor, the Battle of Hong Kong was launched.[50] The immediate British response was to order various units to be diverted to the Far East, but none already based in the Middle East were to be withdrawn for the moment. As the convoy of the 18th Infantry Division had only reached the Cape of Good Hope when Japan entered the war, it was diverted to the Far East on 9 December. Rather than reinforce Middle East Command's Operation Crusader as planned, the division was now bound for India.[47][51][52] Lionel Wigmore, the Australian official historian of the Malayan Campaign, wrote that the redeployment of the division (rather than it being used to reinforce Crusader and the success that was hoped for) reflected that "...the security of Singapore and maintenance of Indian Ocean communications were second in importance only to the security of the United Kingdom ...".[53]
The majority of the division arrived at Bombay on 27 December.[47][54] However, the 53rd Infantry Brigade stopped for a week at Mombasa, Kenya and was diverted on 23 December for Malaya. The brigade, travelling on the USS Mount Vernon with the 135th Field Regiment, Royal Artillery and the 287th Field Company, Royal Engineers, arrived at Singapore on 13 January 1941, albeit without artillery pieces or transport.[47][55][56] While the rest of the division was under direct War Office control, the 53rd Brigade was temporarily detached and assigned to Malaya Command.[57] Their equipment, scheduled to arrive on a later convoy, was made up from local sources. It was hoped that the brigade could be put on the line immediately and relieve the 22nd Australian Brigade, but the men of the brigade were not considered fit for immediate action following 11 weeks at sea.[58] By the time the brigade arrived, the Japanese had pushed Allied forces south through Malaya. On 11 January, Kuala Lumpur had fallen and soon after Japanese forces had reached Johor, the southern-most state of Malaya.[59]
53rd Brigade: Malaya
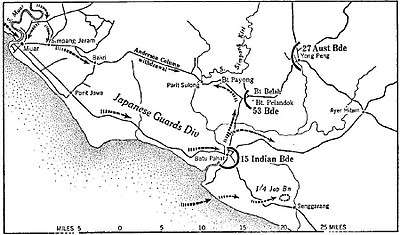
On 17 January, despite reservations about the state of the brigade's fitness, a brigade group based on the 53rd Brigade (under the command of Brigadier Cecil Duke) had arrived in the Ayer Hitam area of Johor and elements were attached to the 11th Indian Infantry Division in III Indian Corps to reinforce the defences from Batu Pahat to Yong Peng. The 6th Battalion, Royal Norfolk Regiment (6RNR) was deployed around 10 miles (16 km) to the west to defend a tactically important defile and causeway between Bukit Pelandok (south of the pass) and Bukit Belah (to the north). The 2nd Battalion, Cambridgeshire Regiment (2CR) relieved the garrison at Batu Pahat, around 15 miles (24 km) southwest of Ayer Hitam. Both battalions were also assigned to patrolling the roads against Japanese infiltration.[60] Japanese patrols were soon encountered by 2CR southwest of Batu Pahat; the 6RNR near Bukit Pelandok was attacked from the air.[61] The 5th Battalion, Royal Norfolk Regiment (5RNR) was allocated to Westforce (an ad hoc multi-national force assembled under the command of Australian Major-General Gordon Bennett) to relieve the 2/19th Australian Battalion at Jemaluang.[59][62] Several Australian officers were to remain behind and aid the 5RNR in taking over their positions and one said:
They were a fine body of men but almost dazed by the position in which they found themselves. Their training had been for open warfare and not the very close warfare of the Malayan countryside. They demonstrated the unreality of their approach to the situation by lighting up all the buildings in the area, [and] stringing their transport along highly vulnerable and prominent crossroads....
— Unnamed Australian officer[62]
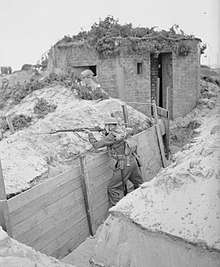
The battalion had not completed its move, when on 19 January the troops were ordered to Ayer Hitam.[63] The defile had become a crucial position in the British attempt to delay the Japanese advance and prevent them from cutting off the 45th Indian Infantry Brigade. The 6RNR was to be reinforced by the depleted 3rd Battalion, 16th Punjab Regiment (3/16PR) and the untried 2nd Battalion, Loyal Regiment (North Lancashire) (2LR) from the 9th Indian Division as the 45th Indian Infantry Brigade retired through the 53rd Infantry Brigade positions to an area west of Yong Peng and Westforce withdrew to Labis.[63] At 13:30 on 19 January, elements of the I/5th Japanese Battalion Imperial Guards Division surprised a 6RNR company in Bukit Pelandok and occupied the lower slopes of Bukit Belah, commanding the Bakri road. Another 6RNR company managed to hold on at the northern slope of Bukit Belah and later took over the peak, unknown to battalion headquarters.[64] At 05:00 on 20 January, the 3/16PR was to counter-attack and recapture Bukit Belah and the northern ridge by dawn on 20 January and then the 6RNR was to attack the Japanese in Bukit Pelandok covered by fire from Bukit Belah. The Punjabi attack began at 04:00, but they were mistaken for a Japanese unit by the 6RNR company on the summit of Bukit Belah, who opened fire. The Indians managed to reach the peak, but before it could be consolidated, a Japanese attack forced the British and Indian troops off the ridge with many losses, including the Punjabis' commander. The attack on Bukit Pelandok was repulsed and the British and Indian troops were moved between the defile and causeway with the left flank covered by the 2LR.[65]
.JPG)
The delayed brigade counter-attack was ordered for dawn on 21 January, spearheaded by the 2LR, but the 6RNR and 3/16PR were incapable of attacking so soon and the 2LR had only just arrived; the attack was postponed again, but with orders to begin as soon as possible. At 20:00, Lieutenant-General Arthur Percival (GOC Malaya Command) decided that the Japanese capture of the Pelandok defile seriously endangered Westforce's line of communications. He ordered Bennett to continue to withdraw south of Labis to a line from Paloh to the Sungei Gerchang bridge on the road to Labis, and to detach a brigade as soon as possible to dig in at the Yong Peng road junction. As the 27th Australian Brigade covered Yong Peng, Percival put all troops on the Muar–Yong Peng road back under the command of Westforce at 12:30. The counter-attack by the 53rd Brigade never occurred; at 10:30 on 21 January, Major-General Billy Key (GOC 11th Indian Division) visited the brigade and learned that half his orders had not been transmitted, that the brigade had not planned an attack, and that the 2LR had been sent to dig in at the east end of the causeway. An attack could be arranged for 14:00, but more confusion occurred, and the start time was moved to 15:30. The Japanese positions gave a view of the ground east of the ridge, making surprise impossible to achieve, and more time was needed to arrange artillery support and concentrate the 2LR. The attack was postponed again to 18:00 and then to the morning of 22 January. The artillery took so long to register that there was another postponement to 09:00, but the 2LR, who had assembled under cover of night, were spotted by Japanese reconnaissance aircraft and bombed and strafed. With no prospect of surprise, and doubtful that the attack could succeed, Duke cancelled the operation and redeployed the three battalions to guard the causeway and the ground from there to the defile.[66]
At 06:30 on 22 January, 5RNR and a battalion from Batu Pahat reopened the Batu Pahat–Ayer Hitam road at Milestone 72 and a supply convoy got through to the brigade. Later, the Japanese again blocked the road. Key ordered 5RNR to reopen the road along with an attack by the 15th Indian Infantry Brigade on 23 January, but this attack failed and 5RNR was recalled. At a conference at Yong Peng, also on 23 January, Percival announced a new plan to defend a line from Jemalaung Kluang to Ayer Hitam and Batu Pahat, the 53rd Brigade reverting to the command of the 11th Division. The brigade was to retire on 23 January through the positions of the 27th Australian Brigade at Yong Peng to Ayer Hitam, when the transfer of command would occur. The 5RNR was driven by bus to Pontian Kechil, ready to travel with an ammunition convoy to Batu Pahat, next morning. The brigade began to retire from Bukit Pelandok at noon, but the Japanese attacked with tank support and the causeway bridges were blown too soon for all the British to cross. In the chaos the brigade managed to disengage, but with many casualties. With the other battalions assigned to specific duties, the 53rd Brigade was reduced to the 6RNR and 3/16PR and moved south to Benut via Skudai.[67][68] The brigade was engaged in a series of isolated fights with the Japanese along the road from Benut to Senggarang as they tried to move north to reinforce Batu Pahat.[69] Only isolated elements were able to reach Senggarang, to which the 15th Indian Infantry Brigade (including the 2CR and 5RNR) had retired. During the evening, the 15th Indian Brigade (including the 2CR and 5RNR) was ordered to break out, across country as the roads had been blocked by strong Japanese positions and retreat south.[70] During the night of 29/30 January, the 53rd Brigade was ordered to withdraw to Singapore Island; the brigade had suffered about 500 casualties.[71][72]
Singapore
Battle of Singapore
– Arthur Percival, press statement end of January.[73]
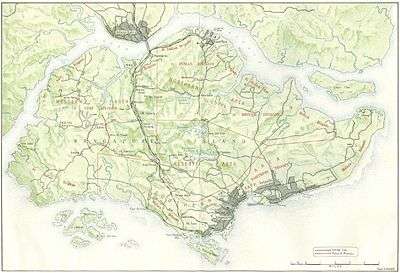
On 20 January, Wavell visited Singapore to discuss the defence of the island with Percival. During this conference, it was decided that once the 18th Infantry Division had arrived in full force, it would be allocated to the sector on the island believed to be where the Japanese would land, as it would be the strongest formation available with fresh troops. Percival believed that this would be the northeast part of the island; Wavell disagreed stating it would be the northwest section of the island (where the Australians were to be deployed). However, he did not force the issue and allowed Percival to deploy his forces as he wished. Wigmore commented that Wavell conceded the point "on the ground that [Percival] was the commander responsible for results and had long studied the problem."[74]
The majority of the 18th Infantry Division arrived in Singapore on 29 January, followed by the final elements (the machine-gun and reconnaissance battalions) on 5 February. Once the main body had landed, the 53rd Brigade returned to the division.[75] The 18th was assigned to III Indian Corps and deployed in strength along the northeast section of the coastline. Their objective, as with all other frontline forces, was to prevent the Japanese from landing or if a landing did occur, to stop the Japanese on the beaches and launch counter-attacks to destroy their beachheads.[76]
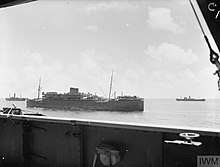
On 5 February, Japanese forces made obvious movements on the mainland opposite the 18th Division and bombarded the 18th Division positions for several days.[77] The same day, aircraft bombed the Empress of Asia; one of the four vessels that had brought the remainder of the division to Singapore. Following the attack, Percival and Bennett reviewed Allied dispositions and expressed concern that they would not be able to defend the island without reinforcements.[78]
Three days later, at 22:30 on 8 February, the Japanese began their assault on Singapore Island, landing on the northwest coast against Australian opposition.[79] The division was ordered to remain where it had been posted in case of a second landing, and took no part in the initial fighting.[80][81] After two days of fighting, Churchill cabled Wavell, "The 18th Division has a chance to make its name in history. Commanders and senior officers should die with their troops. The honour of the British Empire and of the British Army is at stake. I rely on you to show no mercy to weakness in any form." The character of Churchill's message was then relayed via Wavell to the troops.[82] During the day, by which time Percival had drawn up a provisional plan to withdraw to a smaller perimeter around the city of Singapore, the division was committed piecemeal to the defence. The 5th Battalion, Bedfordshire and Hertfordshire Regiment was taken from the division and assigned to the 1st Malaya Infantry Brigade,[80][81][83] while additional forces were used to create two ad hoc formations: Tomforce[lower-alpha 4] and Massy Force.[lower-alpha 5] The rest of the division remained in its sector.[86]
There must be no thought of sparing the troops or civil population and no mercy must be shown to weakness in any shape or form. Commanders and senior officers must lead their troops and if necessary die with them. There must be no question or thought of surrender. Every unit must fight it out to the end and in close contact with the enemy.
Please see that the above is brought to the notice of all senior officers and by them to the troops. I look to you and your men to fight to the end to prove that the fighting spirit that won our Empire still exists to enable us to defend it."– Special Order of the Day, 10 Feb 1942, by Archibald Wavell.[87]
On 11 February, Tomforce having moved to reinforce the Australians, launched a counter-attack on the captured village of Bukit Timah. The reconnaissance battalion was ordered to advance up the main road to the village, with the 4th Battalion, Royal Norfolk Regiment (4RNR) to their right and the 1/5th Battalion, Sherwood Foresters (1/5SF) (reinforced with elements of the 2/29th Australian Battalion, who had been temporarily attached to Tomforce) to their left. The reconnaissance battalion encountered strong Japanese resistance as they tried to enter the village near the railway station and could proceed no further. On their flank, the 1/5SF and the Australians advanced to within 400 yards (370 m) of the village, before being forced back. The 4RNR took control of an area of high ground overlooking the village, but could advance no further due to a strong Japanese presence in the area.[88] Meanwhile, Massy Force had assembled on the eastern side of MacRitchie Reservoir and was ordered to defend Bukit Tinggi, west of the reservoir, but Japanese forces arrived first. During the afternoon, Massy Force moved to the northern end of Bukit Timah Race Course and linked up with Tomforce who had pulled back following their failed attack on Bukit Timah.[85] Late in the day, Massy Force absorbed Tomforce and the latter ceased to exist.[89] It was later established that the Japanese 5th and 18th Divisions had occupied the area.[88]
The following day, with half the island now under Japanese control, fighting intensified. The 5th Japanese Infantry Division, supported by tanks, attacked along the entire front, including the position held by Massy Force. Elements of Massy Force were pushed back, and a Japanese tank attack penetrated deep into the British positions, before they were engaged and forced back. Following the attack, Massy Force was withdrawn 3,000 yards (2,700 m) to a position along the Adam and Farrer roads.[90] During the day, the rest of the 18th Infantry Division were finally ordered to move from their coastal positions. The 53rd Brigade and the 2/30th Australian Battalion covered the withdrawal of the 8th and 28th Indian Infantry Brigades, while the remnants of the division (along with the 11th Indian Division) were ordered to take up positions covering the Peirce and MacRitchie reservoirs.[91]
On 13 February, the entire division had moved into the final defensive perimeter established around Singapore. This position lacked any fortifications, and it was clear all hope of victory had now been lost. The division was deployed with the 54th Brigade on the left astride the road to Bukit Timah (northwest of the city), to their right was the 53rd Brigade positioned north of the Chinese cemetery, and the 55th Brigade (on the right flank) was north of the city from Thomson Road to the Adam Park Estate.[92] The Japanese attacked at numerous points along the final defensive perimeter, including several assaults on the Adam Park Estate. The 1CR fought off several attacks, including bayonet charges, inflicting over 600 casualties in the process for the loss of 165 men.[93] On 14 February, further attacks penetrated between the 53rd and 55th Brigades. Reinforcements from the 11th Indian Division were dispatched, repelled the Japanese attack and sealed the gap.[94]
Surrender, captivity and assessment
Despite the Japanese attacks, the defensive line held, but on 15 February, with supplies (food, water and ammunition) running low, all commanders agreed that counter-attacks would be fruitless. To spare the civilian population of the city further hardship, the decision was made to surrender the Allied garrison.[95] The order to surrender came as a surprise to the men and some fled, fearing the Japanese would not take prisoners, others had to be pressured into laying down their arms.[96] Some individuals, such as Harold Atcherley (an intelligence officer with the division) who was ordered off the island, were able to escape.[97] On 15 February, the division ceased to exist and its men went into Japanese captivity; the division was never reformed.[2] Over the next three years, over a third of the division's men died in Japanese captivity.[98][99] Most notably, on 11 November 1942, Beckwith-Smith succumbed to diphtheria while in captivity.[100]
In the immediate aftermath of the fighting, the division was used as a political bargaining chip (among other arguments) during a series of back and forth telegrams between Churchill and Prime Minister of Australia John Curtin, discussing the possibility of diverting Australian troops to Burma rather than being allowed to return home.[101] On 20 February, Churchill sent a telegram in which, he stated:
... your message of January 23, in which you said that the evacuation of Singapore would be 'an inexcusable betrayal'. Agreeably with your point of view, we therefore put the 18th Division ... into Singapore instead of diverting them to Burma, and ordered them to fight it out to the end. They were lost at Singapore and did not save it, whereas they could almost certainly have saved Rangoon. I take full responsibility with my colleagues on the Defence Committee for this decision; but you also bear a heavy share on account of your telegram.[101]
— Churchill
Two days later, Curtin retorted "In regard to your statement that the 18th Division was diverted from Burma to Singapore because of our message, it is pointed out that the date of the latter was January 23, whereas in your telegram of January 14 you informed me that one brigade of this division was due on January 13 and the remainder on January 27."[102]
Historian Brian Padair Farrell stated that Wavell's decision to allow the 18th Infantry Division to be deployed to Singapore was "the least blameworthy of the decisions that he made which had negative consequences—especially for the men of the 18th Division who suffered the terrible years of captivity under barbaric Japanese control." He noted that "Wavell's job was to hold Singapore" and that "no other commander in his place would have chosen differently."[103] Historian Gerhard Weinberg commented that "the constant splitting of divisions ... and the piecemeal tossing of reinforcements into battle all contributed to defeat."[104] This theme is elaborated on by Captain Henry Phillips, a former member of the division,[24][98] who wrote that the division "had been prodigally thrown to the winds" due to being ill-trained for the situation and were given no intelligence on how the Japanese were armed, dressed, or equipped. Phillips stressed "...the division was not permitted to fight as a division ... battalions were divorced from brigades and companies from battalions. Unnecessary difficulties of administration were created and the chain of command disrupted." Phillips called the battle an "unredeemed disaster" and publicly asked for the "misapplication of the 18th Division" to be scrutinised by a public inquiry, "to throw more light on the current of events contingent upon so important and so tragic an event in our military history."[98]
General officers commanding
The division had the following commanders[2]
| Appointed | General officer commanding | Notes |
|---|---|---|
| 30 September 1939 | Major-General Thomas Dalby | |
| 30 November 1939 | Major-General Bernard Paget | |
| 20 April 1940 | Brigadier Edward Backhouse | Acting |
| 14 May 1940 | Major-General Bernard Paget | |
| 27 May 1940 | Brigadier Geoffrey Franklyn | Acting |
| 1 June 1940 | Major-General Thomas Ralph Eastwood | |
| 9 June 1940 | Major-General Lionel Finch | |
| 14 July 1940 | Major-General Merton Beckwith-Smith | Captured 15 February 1942 |
Order of battle
| 18th Infantry Division | |
|---|---|
|
53rd Infantry Brigade (30 September 1939 to 23 November 1941, then 30 January 1942 up to divisional surrender)[57]
54th Infantry Brigade[105]
55th Infantry Brigade[106][83]
Divisional Troops
| |
See also
Notes
Footnotes
- ↑ This is the war establishment, the on-paper strength of an infantry division during or after 1941 but before 1944; for information on how division sizes changed over the war, see British Army during the Second World War.[3]
- ↑ The Territorial Army (TA) was a reserve of the British regular army made up of part-time volunteers. By 1939, its intended role was to be the sole method of expanding the size of the British Armed Forces (compared to the creation of Kitchener's Army during the First World War). First line territorial formations would create a second-line division using a cadre of trained personnel and if needed, a third division would also be created. All TA recruits were required to take the general service obligation meaning that, if the British Government decided, territorial soldiers could be deployed overseas for combat. (This avoided the complications with the First World War-era Territorial Force, whose members were not required to leave Britain unless they volunteered for overseas service.)[10][11][12][13]
- ↑ Middle East Command was required to establish the accommodation and logistical infrastructure needed to support a proposed 23 divisions based throughout Egypt and Palestine, the construction of roads, an increase in port facilities, the transporting of supplies and providing communications support in the Western Desert, East Africa, Greece, Crete, Syria and Lebanon, Iraq and Iran; all of which needed manpower, including specialist units such as engineers, signallers, mechanics, medical staff, troops needed to guard the large numbers of prisoners captured and other administrative forces.[45]
- ↑ The divisional reconnaissance battalion, the 4th Battalion, Royal Norfolk Regiment, the 1/5th Battalion, Sherwood Foresters and a battery of the 85th Anti-Tank Regiment, under the command of Lieutenant-Colonel Lechmere Thomas.[84]
- ↑ The 1st Battalion, Cambridgeshire Regiment (1CR), 4th Battalion, Suffolk Regiment, the Indian 5th Battalion, 11th Sikh Regiment (5/11SR), as well various other units including artillery and 18 light tanks, under the command of Brigadier Tim Massy-Beresford.[85]
Citations
- ↑ Chappell 1987, p. 22.
- 1 2 3 4 5 6 7 8 9 10 11 12 13 14 15 16 17 18 Joslen 2003, p. 60.
- ↑ Joslen 2003, pp. 130–131.
- ↑ Smith 2005, p. 266.
- ↑ Bell 1997, pp. 3–4.
- ↑ Bell 1997, pp. 258–275.
- ↑ Bell 1997, pp. 277–278.
- ↑ Bell 1997, p. 281.
- 1 2 3 Gibbs 1976, p. 518.
- ↑ Allport 2015, p. 323.
- ↑ French 2001, p. 53.
- ↑ Perry 1988, pp. 41–42.
- ↑ Simkins 2007, pp. 43–46.
- ↑ Messenger 1994, p. 47.
- 1 2 Messenger 1994, p. 49.
- ↑ French 2001, p. 64.
- 1 2 Perry 1988, p. 48.
- ↑ Levy 2006, p. 66.
- ↑ Joslen 2003, pp. 60–61.
- ↑ "No. 34680". The London Gazette (Supplement). 12 September 1939. p. 6241.
- ↑ "Badge, formation, 18th Infantry Division". Imperial War Museums. Retrieved 16 March 2015.
- ↑ "No. 34751". The London Gazette (Supplement). 12 December 1939. p. 8245.
- ↑ Collier 1957, p. 85.
- 1 2 3 Medley 1995, p. 277.
- ↑ Collier 1957, p. 219.
- 1 2 Atcherley 2012, p. 14.
- ↑ Fraser 1999, pp. 36–41.
- ↑ Fraser 1999, pp. 44–45.
- ↑ Ironside 1962, p. 406.
- ↑ Gibbs 1976, pp. 455, 507, 514–515.
- ↑ Joslen 2003, p. 66.
- ↑ Fraser 1999, pp. 72–77.
- ↑ Fraser 1999, pp. 83–85.
- ↑ Collier 1957, p. 125.
- ↑ Alanbrooke 2001, pp. 79, 738.
- ↑ "No. 34823". The London Gazette (Supplement). 2 April 1940. p. 1975.
- ↑ "No. 34877". The London Gazette (Supplement). 18 June 1940. p. 3765.
- ↑ Bull 2016, p. 36.
- ↑ Atcherley 2012, p. 17.
- 1 2 Atcherley 2012, p. 21.
- ↑ Collier 1957, pp. 219, 229.
- ↑ Atcherley 2012, pp. 23–24.
- ↑ Alanbrooke 2001, pp. 93, 172.
- ↑ Playfair et al. 2004b, p. 223.
- ↑ Playfair et al. 2004b, pp. 223–227.
- 1 2 Playfair et al. 2004b, p. 292.
- 1 2 3 4 Messenger 1994, p. 77.
- ↑ Stem 2012, pp. 61–62.
- ↑ Playfair et al. 2004a, p. 121.
- ↑ Tsang 2007, pp. 121–124.
- ↑ Playfair et al. 2004a, pp. 122–123.
- ↑ Brooke 1995, p. 22.
- ↑ Wigmore 1957, pp. 189–190.
- ↑ Joslen 2003, p. 61.
- ↑ Joslen 2003, p. 293.
- ↑ Wigmore 1957, pp. 182–183, 221.
- 1 2 Joslen 2003, pp. 60, 293.
- ↑ Wigmore 1957, p. 221.
- 1 2 Fraser 1999, p. 192.
- ↑ Wigmore 1957, pp. 225, 237.
- ↑ Wigmore 1957, p. 230.
- 1 2 Wigmore 1957, p. 226.
- 1 2 Wigmore 1957, p. 231.
- ↑ Woodburn Kirby 2004, p. 309.
- ↑ Woodburn Kirby 2004, p. 311.
- ↑ Woodburn Kirby 2004, pp. 311, 314.
- ↑ Woodburn Kirby 2004, p. 315.
- ↑ Wigmore 1957, pp. 259–261.
- ↑ Wigmore 1957, p. 261.
- ↑ Wigmore 1957, pp. 261, 265.
- ↑ Wigmore 1957, p. 273.
- ↑ Jeffreys 2013, p. 25.
- ↑ Wigmore 1957, p. 294.
- ↑ Wigmore 1957, p. 254.
- ↑ Wigmore 1957, p. 289.
- ↑ Wigmore 1957, p. 293.
- ↑ Wigmore 1957, pp. 304–305.
- ↑ Wigmore 1957, p. 304.
- ↑ Wigmore 1957, p. 309.
- 1 2 Wigmore 1957, pp. 336, 357–358.
- 1 2 Atcherley 2012, pp. 70–71.
- ↑ Wigmore 1957, pp. 341–342.
- 1 2 Medley 1995, p. 278.
- ↑ Wigmore 1957, p. 339.
- 1 2 Wigmore 1957, pp. 352–353, 358–360.
- ↑ Woodburn Kirby 2004, p. 397.
- ↑ Atcherley 2012, p. 33.
- 1 2 Wigmore 1957, pp. 339, 350–352.
- ↑ Wigmore 1957, p. 359.
- ↑ Wigmore 1957, pp. 359–360.
- ↑ Wigmore 1957, pp. 361–364.
- ↑ Wigmore 1957, pp. 369, 374.
- ↑ Connelly 2012, p. 347.
- ↑ Wigmore 1957, p. 373.
- ↑ Wigmore 1957, pp. 377–378.
- ↑ Connelly 2012, pp. 347–348.
- ↑ Atcherley 2012, p. 73 ff.
- 1 2 3 Davies 2012, p. 209.
- ↑ Bradley 1984, p. 129.
- ↑ Felton 2008, p. 134.
- 1 2 Wigmore 1957, pp. 450–451.
- ↑ Wigmore 1957, pp. 449–451.
- ↑ Farrell 2004, pp. 215–216.
- ↑ Weinberg 1994, p. 318.
- ↑ Joslen 2003, pp. 60, 294.
- ↑ Joslen 2003, pp. 60, 295.
- ↑ Smith 2005, p. 434.
References
- Alanbrooke, Field Marshal Lord (2001) [1957]. Danchev, Alex; Todman, Daniel, eds. War Diaries 1939–1945. Berkeley and Los Angeles: University of California Press. ISBN 978-0-520-23301-0.
- Allport, Alan (2015). Browned Off and Bloody-minded: The British Soldier Goes to War 1939–1945. New Haven: Yale University Press. ISBN 978-0-300-17075-7.
- Atcherley, Harold (2012). Prisoner of Japan: A Personal War Diary - Singapore, Siam and Burma 1941–1945. Cirencester, Gloucestershire: Memoirs Publishing. ISBN 978-1-90930-453-6.
- Bell, P. M. H. (1997) [1986]. The Origins of the Second World War in Europe (2nd ed.). London: Pearson. ISBN 978-0-582-30470-3.
- Bradley, James (1984) [1982]. Towards the Setting Sun: An Escape From The Thailand-Burma Railway, 1943. Wellinton, New South Wales: J. M. L. Fuller. ISBN 978-0-95901-870-7.
- Brooke, Micool (1995). Captive of the River Kwae. Bangkok: Merman Books. ISBN 978-9-748-92441-0.
- Bull, Stephen (2016). Churchill's Army: 1939–1945, The Men, Machines and Organisation. London: Bloomsbury. ISBN 978-1-844-86400-3.
- Chappell, Mike (1987). British Battle Insignia 1939–1940. Men-At-Arms. II. London: Osprey. ISBN 978-0-850-45739-1.
- Collier, Basil (1957). Butler, J. R. M., ed. The Defence of The United kingdom. History of the Second World War, United Kingdom Military Series. London: HMSO. OCLC 375046.
- Connelly, Mark (2012). "Chapter 20: The Issue of Surrender in the Malayan Campaign, 1941–2". In Afflerbach, Holger; Strachan, Hew. How Fighting Ends: A History of Surrender. Oxford: Oxford University Press. pp. 341–350. ISBN 978-0-19969-362-7.
- Davies, Peter N. (2012) [1991]. The Man Behind the Bridge: Colonel Toosey and the River Kwai. Bloomsbury Academic Collections: Japanese History. London: Bloomsbury. ISBN 978-1-78093-322-1.
- Farrell, Brian Padair (2004). "Chapter 7: The Dice Were Rather Heavily Loaded: Wavell and the Fall of Singapore". In Farrell, Brian Padair. Leadership and Responsibility in the Second World War. Montreal: McGill-Queen's University Press. pp. 182–234. ISBN 978-0-773-52731-7.
- Felton, Mark (2008). The Coolie Generals. Barnsley: Pen & Sword Military. ISBN 978-1-844-15767-9.
- Fraser, David (1999) [1983]. And We Shall Shock Them: The British Army in the Second World War. London: Cassell Military. ISBN 978-0-304-35233-3.
- French, David (2001) [2000]. Raising Churchill's Army: The British Army and the War against Germany 1919–1945. Oxford: Oxford University Press. ISBN 978-0-199-24630-4.
- Gibbs, N. H. (1976). Grand Strategy. History of the Second World War. I. London: HMSO. ISBN 978-0-116-30181-9.
- Ironside, Edmund (1962). Macleod, Roderick & Kelly, Denis, eds. The Ironside Diaries, 1937–1940. London: HMSO. OCLC 752817854.
- Jeffreys, Alan (2013). The British Army in the Far East 1941–45. Oxford: Osprey. ISBN 978-1-47280-203-3.
- Joslen, Lt-Col H.F. (2003) [1960]. Orders of Battle: Second World War, 1939–1945. Uckfield: Naval and Military Press. ISBN 978-1-84342-474-1.
- Levy, James P. (2006). Appeasement and Rearmament: Britain, 1936–1939. Lanham: Rowman & Littlefield. ISBN 978-0-742-54537-3.
- Medley, Robin (1995). Cap Badge: The Story of Four Battalions of The Bedfordshire and Hertfordshire Regiment (TA): 1939–1947. London: Leo Cooper. ISBN 978-0-85052-434-5.
- Messenger, Charles (1994). For Love of Regiment 1915–1994. A History of British Infantry. II. London: Pen & Sword Books. ISBN 978-0-850-52422-2.
- Perry, Frederick William (1988). The Commonwealth Armies: Manpower and Organisation in Two World Wars. War, Armed Forces and Society. Manchester: Manchester University Press. ISBN 978-0-7190-2595-2.
- Playfair, Major-General I. S. O.; Flynn, Captain F. C.; Molony, Brigadier C. J. C. & Gleave, Group Captain T. P. (2004a) [1960]. Butler, J. R. M., ed. The Mediterranean and Middle East: British Fortunes Reach their Lowest Ebb (September 1941 to September 1942). History of the Second World War United Kingdom Military Series. III. London: Naval & Military Press. ISBN 978-1-84574-067-2.
- Playfair, Major-General I. S. O.; Flynn, Captain F. C.; Molony, Brigadier C. J. C. & Toomer, Air Vice-Marshal S. E. (2004b) [1st. pub. HMSO 1956]. Butler, J. R. M., ed. The Mediterranean and Middle East: The Germans Come to the Help of their Ally (1941). History of the Second World War, United Kingdom Military Series. II. London: Naval & Military Press. ISBN 978-1-84574-066-5.
- Simkins, Peter (2007) [1988]. Kitchener's Army: The Raising of the New Armies 1914–1916. Barnsley: Pen & Sword Military. ISBN 978-1-844-15585-9.
- Smith, Colin (2005). Singapore Burning: Heroism and Surrender in World War II. London: Viking. ISBN 978-0-670-91341-1.
- Stem, Robert C. (2012). The US Navy and the War in Europe. Barnsley: Seaforth Publishing. ISBN 978-1-84832-082-6.
- Tsang, Steve (2007). A Modern History of Hong Kong. London: I. B. Tauris. ISBN 978-1-84511-419-0.
- Weinberg, Gerhard L. (1994). A World at Arms: A Global History of World War II. Cambridge: Cambridge University Press. ISBN 978-0-521-44317-3.
- Wigmore, Lionel (1957). The Japanese Thrust. Australia in the War of 1939–1945. Series 1 – Army. IV. Canberra: Australian War Memorial. OCLC 3134219.
- Woodburn Kirby, Major-General S. (2004) [1957]. Butler, Sir James, ed. The War against Japan: The Loss of Singapore. History of the Second World War, United Kingdom Military Series. I (facs. repr. ed.). Uckfield: Naval & Military Press. ISBN 978-1-84574-060-3.