Battle of Nashville
The Battle of Nashville was a two-day battle in the Franklin-Nashville Campaign that represented the end of large-scale fighting west of the coastal states in the American Civil War. It was fought at Nashville, Tennessee, on December 15–16, 1864, between the Confederate Army of Tennessee under Lieutenant General John Bell Hood and Union Major General George H. Thomas. In one of the largest victories achieved by the Union Army during the war, Thomas attacked and routed Hood's army, largely destroying it as an effective fighting force.

Opposing forces
Union
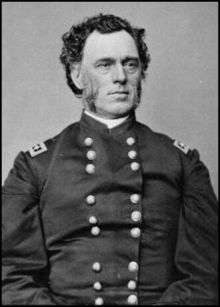
| Principal Union commanders |
|---|
|


.jpg)
The Union force (of about 55,000 men), was a conglomerate of units from several different departments provisionally attached to Maj. Gen. George H. Thomas' Department of the Cumberland or Army of the Cumberland and consisted of:[18]
- IV Corps, commanded by Maj. Gen. Thomas J. Wood, with divisions commanded by Brig. Gens. Nathan Kimball, Washington Lafayette Elliott, and Samuel Beatty;
- XXIII Corps, commanded by Maj. Gen. John M. Schofield, with divisions commanded by Maj. Gen. Darius N. Couch and Brig. Gen. Jacob D. Cox;
- "Detachment of the Army of the Tennessee" (former Right Wing, XVI Corps), commanded by Maj. Gen. Andrew J. Smith, with divisions commanded by Brig. Gens. John McArthur and Kenner Garrard and Col Jonathan B. Moore;
- Provisional Detachment (District of the Etowah), commanded by Maj. Gen. James B. Steedman, with a division (named "Provisional Division") commanded by Brig. Gen. Charles Cruft and other minor units;
- Cavalry Corps, commanded by Maj. Gen. James H. Wilson, with divisions commanded by Brig. Gen. Edward M. McCook, Edward Hatch, Richard W. Johnson, and Joseph F. Knipe.
Confederate
| Principal Confederate commanders |
|---|
|


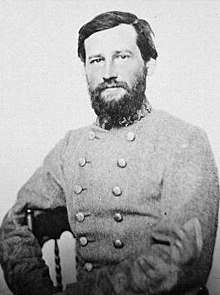

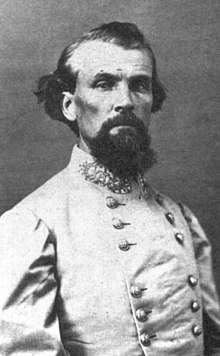
The Confederate Army of Tennessee under command of Gen. John B. Hood fielded approximately 30,000 men and consisting of 3 infantry army corps and 1 cavalry corps:[19]
- Lee's Corps, commanded by Lt. Gen. Stephen D. Lee with 3 divisions;
- Stewart's Corps, commanded by Lt. Gen. Alexander P. Stewart with 3 divisions;
- Cheatham's Corps, commanded by Maj. Gen. Benjamin F. Cheatham with 3 divisions;
- Cavalry Corps, (detached at Murfreesboro and not engaged at Nashville) commanded by Maj. Gen.Nathan B. Forrest with 3 divisions.
Thomas prepares to attack
Although Thomas's forces were much stronger, he could not ignore Hood's army. Despite the severe beating it had suffered at Franklin, Hood's Army of Tennessee presented a threat by its mere presence and ability to maneuver. Thomas knew he had to attack, but he prepared cautiously. His cavalry corps, commanded by the energetic young Brig. Gen. James H. Wilson, was poorly armed and mounted, and he did not want to proceed to a decisive battle without effective protection of his flanks. This was particularly important, since Wilson would be facing the horsemen of the formidable Forrest. Refitting the Union cavalry took time.[20]
Meanwhile, Washington fumed at the seeming procrastination. When Sherman proposed his March to the Sea, Ulysses S. Grant and Henry Halleck had objected to it on the grounds that Hood would use the opportunity to invade Tennessee. In response, Sherman airily indicated that this was exactly what he wanted and that if Hood "continues to march North, all the way to Ohio, I will supply him with rations." However, when the ever-confident Sherman disappeared into the heart of Georgia, Grant once again became concerned about an invasion of Kentucky or Ohio. Grant later said of the situation, "If I had been Hood, I would have gone to Louisville and on north until I came to Chicago." His concern doubtless reflected Abraham Lincoln's concern. Lincoln had little patience for slow generals and remarked of the situation, "This seems like the McClellan and Rosecrans strategy of do nothing and let the rebels raid the country."[21]
While pressure from Washington continued, a bitter ice storm struck Nashville on December 8, which precluded any offensive action. Sub-freezing weather continued through December 12.[22] This was explained to Grant, but when Thomas had still not moved by December 13, Grant directed that Maj. Gen. John A. Logan proceed to Nashville and assume command if, upon his arrival, Thomas had not yet initiated operations. Logan made it as far as Louisville by December 15, but on that day the Battle of Nashville had finally begun.[23] Grant himself left Petersburg on December 14 to take personal command and had only gotten as far as Washington when the battle began. He proceeded no further.[24]
Naval actions

The Confederates set up batteries at Bell's Bend on the Cumberland River below Nashville on December 2, 1864. They met with immediate success, capturing that day two Union transports carrying horses, mules and fodder. The Union naval squadron at Nashville responded on the night of December 3–4. While the bulk of the squadron engaged the upper battery, two ships, the ironclad Carondelet and the tinclad Fairplay, proceeded to the lower battery where they recaptured and brought off the two transports.[25]
The Union squadron commander, Lt. Cmdr. LeRoy Fitch was ordered to break the river blockade. On December 7 he took his two heaviest ships, the ironclad USS Carondelet and the river monitor Neosho, downstream to engage the batteries. The action was inconclusive, although the Neosho sustained considerable superficial damage. Two Neosho sailors were awarded the Medal of Honor for going out onto the shell swept deck and raising the ship's flag after it had been shot down.[26]
The Confederate batteries effectively closed the river below Nashville to supply traffic, until they finally were driven off by Union cavalry on December 15.
Battle
December 15
Actions on the Confederate right
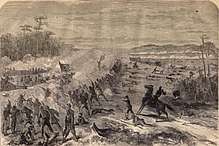
Thomas's plan was to launch a diversionary attack on the Confederate right that would distract them from the main attack on their left and perhaps cause them to divert troops from their left to their right.[27] The attacking force consisted of two brigades drawn from Steedman's Provisional Division: the First Colored Brigade, consisting of three regiments of United States Colored Troops (who had previously served as garrison troops or railroad guards), and a brigade composed of rear echelon white troops described by their commander as "new conscripts, convalescents, and bounty jumpers."[28]
The Confederate right was anchored on the west side of a deep cut on the Nashville & Chattanooga Railroad. A weak skirmish line was posted east of the tracks, and on December 14 this was supplemented by a stout four-gun lunette manned by Granbury's (Houghton's after Granbury's death at Franklin) Texas Brigade. Granbury's Lunette was well masked by trees and brush.[29]
The two Union brigades advanced and overran the skirmish line. They then came under heavy artillery fire from a Confederate battery on the west side of the railroad. When the brigades passed Granbury's Lunette, they were struck by very heavy close range enfilading fire. Both brigades retreated in some disorder, but they were reformed and continued for the rest of the day to fire on the Confederate works from the former skirmish line.[30] The attack failed in its purpose, since the Confederates were not distracted and in fact had sent brigades from both Lee's and Cheatham's Corps to bolster the threatened left flank.[31]
Actions on the Confederate left
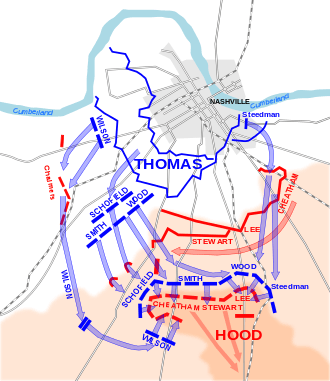
Thomas planned a huge wheeling movement that would ultimately come down on the Confederates' exposed left flank. Wilson's Cavalry Corps moved west on Charlotte Pike once an early morning fog dissipated, driving off the Confederate cavalry patrolling the area between the Confederate left and the Cumberland River. Smith's XVI Corps detachment followed, turning south after a mile or so towards the Confederate flank. The cavalrymen formed on Smith's right flank. Schofield's XXIII followed in reserve, and as the assault moved south a gap opened between Smith and Wilson which Schofield was directed to fill.[32] At about 2:30 pm, the Union attacked the five redoubts guarding the Confederate left. Four brigades, two of cavalry and two of infantry, overran Redoubt No. 4 and then Redoubt No. 5, notwithstanding the spirited resistance of the defenders of Redoubt No. 4.[33] Another of Smith's brigades captured Redoubt No. 3; however, its commander, Col. Sylvester G. Hill, was killed by Confederate artillery firing from Redoubt No. 2. He was the highest-ranking Union officer killed in the battle. Smith's troops proceeded to Redoubt No. 2, which was quickly captured.[34]
In the meantime, the IV Corps had been tasked with making a frontal assault from Granny White and Hillsboro Pikes on the left end of the Confederate line. The assault was to begin once Smith's troops began their assault on the left flank redoubts. The Confederate line was supposed to lie on Montgomery Hill on the north side of Brown's Creek. While the Confederates had originally established their line there, they had withdrawn to equally strong positions on the south side of Brown's Creek, as the original positions were exposed to artillery fire from the Nashville forts.[35] The IV Corps proceeded deliberately up Montgomery Hill, only to find that it was defended by a thin skirmish line. They stopped to reorganize, and at about the same time that Smith's Detachment was rolling up the Confederate redoubts, they advanced on the main Confederate line.[36]
Thus it happened that Redoubt No. 1, the last bastion on the Confederate left flank, was captured by troops coming from the north, south, and west.[37] Stewart's corps had been wrecked by the day's fighting and retreated to a new line of defense a mile or two to the south. Rearguard actions by reinforcements from Lee's Corps kept the retreat from becoming a rout. With the collapse of the Confederate left, Cheatham's and Lee's Corps followed to the new line.[38]
December 16
New disposition of Confederate army
The Confederates' new line was much stronger and more compact than the first day's line. It was anchored on the east on Peach Orchard Hill. The western flank ran along a line of hills leading south from Compton's Hill, which after the day's battle would be called Shy's Hill after Col. William M. Shy, the Confederate officer commanding the 20th Tennessee Infantry, who died defending it. The center followed a series of sturdy dry stack stone walls enhanced by entrenching.[39]
Hood put Lee's Corps on the right flank. With the exception of two brigades, this corps had seen no action on the previous day, and indeed had seen very little action at the bloodletting at Franklin two weeks before. Lee's line ran from the hill well into the Confederate center. Stewart's Corps, decimated by heavy casualties at Franklin and in the December 15 actions, occupied the Confederate center. Cheatham's Corps, badly hurt at Franklin, was on the Confederate left flank, which included Shy's Hill and the line of hills to its south. Rucker's cavalry brigade patrolled to the south of Cheatham's Corps.[40]
The Confederate line defenses atop Shy's Hill appeared to be quite strong, as the steep hill dominated all of the surrounding terrain. However, appearances were deceiving. First, the defenses at the crest were a salient, and were exposed to Union artillery fire from all directions except the southeast. Second, the fortifications had been built overnight by tired troops and consisted of shallow trenches with no head logs or abatis. Third, and most fateful, the trenches were constructed on the geographical crest of the hill and not on the military crest commanding the slopes, such that attacking troops could escape fire until they were almost at the crest.[41]
Thomas's plan
Thomas repeated his tactics of the previous day. An attack would be made on the Confederate right to draw Confederate troops from the left. Then Schofield's XXIII Corps would deliver a hammer blow on the left flank.
Union attack on Peach Orchard
The attacks on Peach Orchard Hill were made in much greater strength than those December 15. Two brigades from Beatty's division of Wood's IV Corps and two brigades from Steedman's Provisional Division made the attack at about 3 p.m. Concentrated musket and artillery fire from the entrenched Confederates quickly broke up the attack.[42] The trailing regiment in the 2nd Colored Brigade of Steedman's Division, the 13th United States Colored Troops, went in essentially on its own and gained the Confederate parapet, losing one of its flags and 220 officers and men in the process, about 40% of the regiment's strength.[43]
The attack on Peach Orchard Hill had the desired effect. Hood sent two of Cheatham's brigades to reinforce Lee.[44] The thin Confederate line on Shy's Hill and the surrounding heights got thinner.
Union attack on Shy's Hill
During this time Wilson's cavalry was very active on the Confederate left and rear, reaching past Granny White Pike. In response, Cheatham stretched his corps further and further to the south.[41] Thomas, who was with Schofield, directed Schofield to make an attack on the western face of Shy's Hill. Schofield, imagining that he was outnumbered and in danger of an attack on his southern flank, demurred, requested that Smith send him additional divisions. Thomas directed Smith to comply with this request. Smith sent a division, and still Schofield did nothing.[45]
Sunset was rapidly approaching, and if no attack was made before then Hood would be in a position to either strengthen his position overnight or safely retreat south.[46]
Brig. Gen. John McArthur, one of Smith's division commanders, was aware of this. He also saw that the Confederate lines were being badly battered by Union artillery, which was firing on them from nearly every direction. At about 3:30 p.m. he sent a message to Smith and Thomas that unless he were given orders to the contrary, his division was going to attack Shy's Hill and the Confederate line immediately to its east in the next five minutes.[47]
The three brigade attack began on McArthur's timetable. One brigade went up and over Shy's Hill. Because of the misplacement of the Confederate trenches, only the regiment on the east sustained significant casualties from Confederates, who were firing from the plain to its left.[48] McArthur's second brigade hit these Confederates while they were so distracted.[49] The third brigade, attacking to the east of Granny White Pike caught a large body of Confederate skirmishers outside of their lines and went into the Confederate lines with them.[50]
Confederate left flank disintegrates
The Confederate left flank suddenly disintegrated. The Confederate line was rolled up west to east. Granny White Pike had been blocked by Wilson's cavalry. The Confederates retreated to the south by the Franklin Pike and a gap in the Overton Hills through the Otter Creek bottom. A part of Lee's Corps maintained good order and covered the retreat on Franklin Pike.[51] Rucker's Confederate cavalry brigade performed the same service in a nighttime melee in the rain on Granny White Pike.[52]
Hood's retreat
On the night of December 16, what was left of Hood's army headed south towards Franklin on two roads, Franklin Pike and Granny White Pike. Rucker having blunted for the time being the Union pursuit on Granny White Pike, the main pursuit was by Union cavalry on Franklin Pike. Lee's rearguard held off the attacks.[53]
At this point, the pursuit slowed because Thomas had sent his pontoon bridge train towards Murfreesboro rather than Franklin and Columbia, and his artillery and supply trains could not cross the Harpeth River until the pontoon train arrived.[54] This did not stop Wilson's cavalry from aggressively pursuing the Confederates as they retreated to Columbia. Wilson badly hurt Carter L. Stevenson's rearguard division in actions on December 17 and 18, but was forced to stop because of the lack of supplies. Wilson's problems were compounded when Forrest and his two cavalry divisions arrived in Columbia from Murfreesboro on December 18.[55]
On December 19 the Confederate infantry and artillery crossed the Duck River at Columbia, destroying the bridges behind them.[56] Forrest took charge of the rearguard, attaching an ad hoc infantry division under Brig. Gen. Edward C. Walthall to his Cavalry Corps.[57]
Because of the misdirected pontoon train, Thomas was not able to cross the Duck River until December 23.[58] Wilson continued his vigorous pursuit, but was stymied by Forrest over the next three days in hard-fought rearguard actions at Richland Creek, Anthony's Hill, and Sugar Creek.[59] Hood was able to get his army across the Tennessee River on a pontoon bridge near Bainbridge, Alabama by December 28.[60] Thomas had asked Rear Admiral S. P. Lee, commanding the Tennessee River naval squadron, to destroy the Confederate bridge. However, low water and Confederate artillery prevented Union tinclad gunboats from interdicting the crossing.[61]
Steedman's Provisional Division was sent by rail from Nashville to Chattanooga and from there by river boat to Decatur, Alabama, to cut off Hood's retreat. His force arrived too late to interfere with the crossing. However, Steedman's cavalry under the command of Colonel William Jackson Palmer captured the Confederate pontoon train on December 30 along with a large number of supply wagons.[62]
That marked the end of the Union pursuit.
 Battle of Nashville, December 15–16, 1864 (Additional map 1)
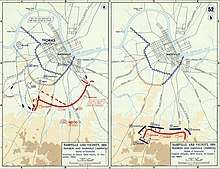 Battle of Nashville, December 15–16, 1864 (Additional map 2)
 Battle of Nashville, situation about 1300 Hours (December 15, 1864)
 Battle of Nashville, situation about 1600 Hours (December 16, 1864)
Aftermath
Casualties
Federal casualties in the battle totaled 387 killed, 2,562 wounded, and 112 missing.[63]
As only a few of the Confederate units submitted reports on the battle, Confederate casualties are difficult to determine. Thomas reported capturing 4,561 prisoners in the battle itself, with an unknown number captured during the retreat. One historian made an educated guess that 2,500 Confederates were killed and wounded at Nashville.[64]
The Army of Tennessee had gone into Middle Tennessee campaign with approximately 38,000 men, exclusive of Forrest's cavalry.[65] The Army had sustained severe casualties at Spring Hill, Franklin, and Nashville, and suffered at least 2,000 desertions in the latter part of the campaign.[65] On January 20 Hood reported an effective strength of 18,742, again exclusive of Forrest's cavalry.[66] Gen. P. G. T. Beauregard, Hood's nominal superior, advised the Confederate President on January 13 that the Army of Tennessee had fewer than 15,000 men.[67]
Reactions and effects
The Battle of Nashville marked the effective end of the Army of Tennessee. Historian David Eicher remarked, "If Hood mortally wounded his army at Franklin, he would kill it two weeks later at Nashville."[68] Although Hood blamed the entire debacle on his subordinates and the soldiers themselves, his career was over. He retreated with his army to Tupelo, Mississippi, resigned his command on January 13, 1865, and was not given another field command.[69]
Battlefield preservation
The Nashville battlefield is huge by Civil War standards, encompassing almost all of south and west Nashville. Nashvillians who live in the Green Hills, Forest Hills, Oak Hill, Lipscomb, or Brentwood neighborhoods are living on top of a battlefield.
In the earlier part of the twentieth century there was some talk of creating a National Battlefield Park in Nashville. This movement failed, due to lack of support from Nashville's civic leaders, who as Southerners were not particularly interested in commemorating a battle that was such a profound Confederate defeat.[70] As a result, much like Atlanta, most of the Nashville battlefield has been lost to development. However, the battle is memorialized and small parts of it have been preserved.
Battlefield memorials
A Battle of Nashville monument was created in 1927 by Giuseppe Moretti, who was commissioned by the Ladies Battlefield Association. Erected in the years immediately following World War I, the monument honors the soldiers of both sides and celebrated a united nation. The monument was severely damaged by a tornado in 1974, and during the 1980s interstate highway construction left the monument landlocked on a small plot of ground overlooking the massive highway interchange of I-65 and I-440.[71] In 1999 the monument was relocated to the Nashville Battlefield Park at the intersection of Granny White Pike and Clifton Lane, just north of the Confederate line on the first day of the battle.
Minnesota monuments
In 1920 the State of Minnesota erected a large monument in the Nashville National Cemetery honoring its soldiers who were buried there. Minnesota lost more men at the Battle of Nashville than in any other Civil War battle.
United States Colored Troops monument
In 2006 a group of private citizens erected a monument in the Nashville National Cemetery honoring soldiers of the United States Colored Troops buried there, many of whom fought in the Battle of Nashville.
Shy's Hill memorials
Erected by the Battle of Nashville Preservation Society, this honors the troops of both sides who fought on and around Shy's Hill. The memorial consists of three flags, an American flag, a Confederate national flag, and a Minnesota state flag (honoring the four regiments of Minnesotans who were instrumental in capturing the hill).
A marker was placed on the slope of Shy's Hill in late 2014 in honor of the contributions to the Minnesota regiments that fought in the battle.[72] It was dedicated by members of the Minnesota Civil War Commemoration Task Force and the Battle of Nashville Preservation Society on November 16, 2014.[73]
 The Battle of Nashville Monument is now located at the intersection of Granny White Pike and Clifton Lane
 The Minnesota Monument at the Nashville National Cemetery
 The monument to the United States Colored Troops at Nashville National Cemetery
 Battle of Nashville memorial atop Shy's Hill
Historic homes and buildings
- Belle Meade Plantation: A skirmish was fought on the front lawn, though the scars on the columns on the front porch previously believed to be bullet holes are actually signs of erosion of the lime stone.
- Belmont Mansion: Served as Union General Thomas Woods's headquarters. The Belmont Water Tower on the grounds of the mansion served as a signal station.
- Travellers Rest: Served as headquarters of the Army of Tennessee.
- Sunnyside: This antebellum home in the 12 South District of Nashville lay between the Union and Confederate lines. It was used as a hospital after the first day's battle. It is the headquarters of the Metropolitan Historical Commission and has not been completely restored.
- Glen Leven: This Greek Revival home on Franklin Pike was built in 1857. It was used as a hospital by the Union during and after the battle. The home and the surrounding 65 acres (26 ha) were donated by the Thompson family to the Land Trust for Tennessee in 2007. It is closed to the public except for special events.[74]
- Downtown Presbyterian Church: Served as a hospital after the battle.
- Metropolitan Board of Parks and Recreation
- Fort Negley: This large masonry fortification was built in 1862–1863 by African-Americans forcibly impressed by the Union military government. Guns placed there fired the first shots in the battle.[75] The fort is a ruin, but has been stabilized and interpreted.[76]
- Nashville City Cemetery: Union dead from the battle (and some Confederate dead) were buried in an annex to this ante-bellum cemetery.[77]
- Kelley's Point: This is a short but attractive greenway that runs from a Lowe's Super Center parking lot on Charlotte Pike at its intersection with Davidson Road to the site of a Confederate battery on the Cumberland River. The remains of earthworks are faintly visible.[78]
Privately owned but publicly accessible sites
- Granbury's Lunette. Owned by the Joseph E. Johnston Camp, Sons of Confederate Veterans. Located at 190 Polk Avenue. Played an important role in repelling the Union attack on the Confederate right on the first day of the battle. Although the lunette was partly destroyed by railroad construction in the early 1900s, what remains is very impressive.[79]
- Redoubt No. 1. Owned by the Battle of Nashville Preservation Society. Captured in the first day of the battle by troops from the IV Corps and XVI Corps. Located on Benham Avenue in Green Hills. This has been preserved and interpreted. Earthworks are clearly visible.[80]
- Redoubt No. 4. The Battle of Nashville Preservation Society has an historic easement on the remnants of this fortification, consisting of the remnants of its northern face. It is located in the Abbottsford development off of Abbott–Martin Road in Green Hills. The remainder of the redoubt, which extended to Hobbs Road, was destroyed during home construction in the 1950s.
- Shy's Hill. This is owned by the Battle of Nashville Preservation Society and is located just off of Battery Lane on Benton Smith Drive. Its fall on the second day of the battle precipitated the Confederate rout. It is well-interpreted. Earthworks on top of the hill were destroyed when a water tower (now removed) was erected in the early 1950s; Confederate trench lines on the east and south slopes are clearly visible.[81]
- Mount Olivet Cemetery. Under the direction of the Ladies' Memorial Society of Nashville, Confederates killed or mortally wounded in the battle were removed from battlefield graves and City Cemetery in 1868 and reinterred at Confederate Circle at Mount Olivet. A large monument was erected on the site in 1889.
See also
- List of National Historic Landmarks in Tennessee
- National Register of Historic Places listings in Tennessee
- Troop engagements of the American Civil War, 1864
- List of costliest American Civil War land battles
- Franklin-Nashville Campaign and Battle of Franklin
- Atlanta Campaign
- Sherman's March
Notes
- The XVI Corps was redesignated with this unusual name on December 6.
- Eicher, p. 780.
- Jordan, Thomas; Pryor, J. P. (1868). The Campaigns of Lieut.-Gen. N.B. Forrest, and of Forrest's Cavalry. Blelock & Company. p. 638.
- Kennedy, pp. 389–95.
- Kennedy, pp. 395–96; Esposito, text to map 152.
- McDonough, pp. 132–33
- Sword, pp. 274–76
- Welcher, p. 600; Sword, p. 449; Eicher, pp. 775–76
- Welcher, pp. 611; Sword, p. 448; Jacobson, p. 452.
- McPherson, p. 194.
- Welcher, p. 601; Eicher, p. 776; Niven, p. 121; McPherson, p. 195; Official Records, War of the Rebellion, Armies, vol. XLV, p. 764.
- McDonough, pp. 181–82.
- Official Records, War of the Rebellion, Armies, vol. XLV, p. 744.
- Official Records, War of the Rebellion, Armies, vol. XLV, pp. 745, 755.
- Sword, p. 281
- Official Records, War of the Rebellion, Armies, vol. XLV pp. 617–18, 746, 755.
- Sword, pp. 293–95; McPherson, p. 195; Niven, pp. 125–26; Kennedy, p. 396; Official Records, War of the Rebellion, Armies, vol XLV, p.747.
- Davis, George B.; Perry, Leslie J.; Kirkley, Joseph W., eds. (1894). The war of the rebellion:a compilation of the official records of the Union and Confederate armies. 1. XLV. Government Printing Office. pp. 90–96.
- Davis, George B.; Perry, Leslie J.; Kirkley, Joseph W., eds. (1894). The war of the rebellion:a compilation of the official records of the Union and Confederate armies. 1. XLV. Government Printing Office. pp. 664–669.
- McPherson, p. 195; Sword, p. 289; Niven, p. 123; Eicher, p. 776.
- Sword, p. 278.
- Sword, pp. 302–303
- Kennedy, p. 397; Sword, p. 312; Welcher, p. 602; Eicher, p. 776; Esposito, map 153.
- Sword, pp. 319–20
- Official Records, War of the Rebellion, Navies, Series 1, Vol. XXVI, pp. 641–43
- Official Records, War of the Rebellion, Navies, Series 1, Vol. XXVI, pp. 649–52
- Sword, p. 322
- Sword, p. 325
- Official Records, War of the Rebellion, Armies, Series 1, Vol. XLV, p. 535
- Sword, pp. 324–25; Official Records, War of the Rebellion, Armies, Series 1, Vol. XLV, Part 1 pp. 535–38
- McDonough, p. 168
- Sword, p. 320
- McDonough, pp. 184–92
- Reed, David Wilson (1903). Campaigns and Battles of the Twelfth Regiment Iowa Veteran Volunteer Infantry from Organization, September, 1861, to Muster-out, January 20, 1866. pp. 197–198.
- Sword, pp. 328–29
- McDonough, pp. 169–72
- McDonough, p. 205
- Sword, pp. 340–44
- Sword, p. 348
- McDonough, p. 210
- Official Records, War of the Rebellion, Armies, Series 1, Vol. XLV, p. 749
- McDonough, pp. 226–29
- Official Records, War of the Rebellion,! Armies, Series 1, Vol. XLV, pp. 548–49; Sword, p. 363
- Sword, p. 360.
- Sword, pp. 367 -368
- McDonough, p. 209
- Sword, p. 367
- Official Records, War of the Rebellion, Armies, Series 1, Vol. XLV, pp. 442–43
- Official Records, War of the Rebellion, Armies, Series 1, Vol. XLV, pp. 447–48
- Official Records, War of the Rebellion, Armies, Series 1, Vol. XLV, p. 461
- McDonough, pp. 257–62
- Official Records, War of the Rebellion, Armies, Series 1, Vol. XLV, p. 766
- Sword, pp. 394 -395
- Sword, p. 400
- Sword, pp. 394–401
- Sword, p. 408
- Sword, p. 407
- Sword, p. 413
- Sword, pp. 416–20
- McDonough, pp. 373–74
- Sword, p. 421
- Official Records, War of the Rebellion, Armies, Series 1, Vol. XLV, pp. 506–507
- Official Records, War of the Rebellion, Armies, Series 1, Vol. XLV, p. 105
- Sword, p. 425
- Sword, p. 426
- Official Records, War of the Rebellion, Armies, Series 1, Vol. XLV, Part 1, p. 664
- Official Records, War of the Rebellion, Armies, Series 1, Vol. XLV, Part 2, p. 780
- Eicher, p. 775
- Esposito, map 153; Niven, p. 144; Kennedy, p. 397
- [Smith, Timothy B. "Civil War Battlefield Preservation in Tennessee: A Nashville National Military Park Case Study," Tennessee Historical Quarterly, vol. LXIV (2005), 236–47]
- [McDonough, pp. 277–79]
- "150 Minnesota Civil War » BATTLE OF NASHVILLE". Archived from the original on November 12, 2014.
- "New Civil War monument honors Minnesotans who fought at Nashville". This Week in the Civil War.
- "Glen Leven Estate".
- McDonough, p. 158; Sword, p. 328
- "Fort Negley".
- "Nashville City Cemetery Association, Inc".
- "Kelley's Battery".
- "Granbury's Lunette".
- "Confederate Redoubt No. 1".
- "Shy's Hill".
- Battle of Nashville driving tour
- "Battlefield Tours".
References
- Dowd, John T. The Pillaged Grave of a Civil War Hero. Nashville, 1985.
- Eicher, David J. The Longest Night: A Military History of the Civil War. New York: Simon & Schuster, 2001. ISBN 0-684-84944-5.
- Esposito, Vincent J. West Point Atlas of American Wars. New York: Frederick A. Praeger, 1959. OCLC 5890637. The collection of maps (without explanatory text) is available online at the West Point website.
- Foote, Shelby. The Civil War: A Narrative. Vol. 3, Red River to Appomattox. New York: Random House, 1974. ISBN 0-394-74913-8.
- Jacobson, Eric A., and Richard A. Rupp. For Cause & for Country: A Study of the Affair at Spring Hill and the Battle of Franklin. Franklin, TN: O'More Publishing, 2007. ISBN 0-9717444-4-0.
- Kennedy, Frances H., ed. The Civil War Battlefield Guide. 2nd ed. Boston: Houghton Mifflin Co., 1998. ISBN 0-395-74012-6.
- McDonough, James Lee. Nashville: The Western Confederacy's Final Gamble. Knoxville: University of Tennessee Press, 2004. ISBN 1-57233-322-7.
- McPherson, James M., ed. Battle Chronicles of the Civil War: 1864. Connecticut: Grey Castle Press, 1989. ISBN 1-55905-024-1. First published in 1989 by McMillan.
- Nevin, David, and the Editors of Time-Life Books. Sherman's March: Atlanta to the Sea. Alexandria, VA: Time-Life Books, 1986. ISBN 0-8094-4812-2.
- Sword, Wiley. The Confederacy's Last Hurrah: Spring Hill, Franklin, and Nashville. Lawrence: University Press of Kansas, 1993. ISBN 0-7006-0650-5. First published with the title Embrace an Angry Wind in 1992 by HarperCollins.
- Welcher, Frank J. The Union Army, 1861–1865 Organization and Operations. Vol. 2, The Western Theater. Bloomington: Indiana University Press, 1993. ISBN 0-253-36454-X.
- National Park Service battle description
- CWSAC Report Update
Memoirs and primary sources
- War of the Rebellion, Official Records of the Union and Confederate Armies, Series 1, Vol XLV, part 1, Washington, U. S. Government Printing Office, 1894
- War of the Rebellion, Official Records of the Union and Confederate Armies, Series 1, Vol XLV, part 2, Washington, U. S. Government Printing Office, 1894)
- War of the Rebellion, Official records of the Union and Confederate Navies, Series 1, Vol XXVI, Washington, U. S. Government Printing Office, 1914
Further reading
- Grede, Robert. "The Spur & The Sash - Middle Tennessee 1865". Milwaukee: Three Towers Press, 2010. ISBN 978-159598-092-2
- Groom, Winston. Shrouds of Glory: From Atlanta to Nashville: The Last Great Campaign of the Civil War. New York: Atlantic Monthly Press, 1995. ISBN 0-87113-591-4.
- Hood, John Bell. Advance and Retreat: Personal Experiences in the United States and Confederate States Armies. Lincoln: University of Nebraska Press, 1996. ISBN 978-0-8032-7285-9. First published 1880 for the Hood Orphan Memorial Fund by G. T. Beauregard.
- Knight, James R. Hood's Tennessee Campaign: The Desperate Venture of a Desperate Man. Charleston, SC : The History Press, 2014. ISBN 9781626195974 OCLC 876350210
- McDonough, James L. The Western Confederacy's Final Gamble: From Atlanta to Franklin to Nashville. Knoxville, TN: University Of Tennessee Press, 2013. ISBN 162190010X OCLC 847833703
- Smith, Michael Thomas. The 1864 Franklin-Nashville Campaign: The Finishing Stroke. Santa Barbara, California : Praeger, an imprint of ABC-CLIO, LLC, 2014. ISBN 9780313392344 OCLC 863192050
External links
| Wikimedia Commons has media related to Battle of Nashville. |
- The Battle of Nashville: Battle Maps, histories, photos, and preservation news (Civil War Trust)
- Battle of Nashville In-Depth Academic description
- Battle of Nashville Preservation Society
- Battle of Nashville Monument
- Animated History of the Franklin-Nashville Campaign
- Travellers Rest Plantation
- Battle of Nashville Tour of Historic Homes
- General Thomas, the "sledge of Nashville"
| 1861 |
| ||||
|---|---|---|---|---|---|
| 1862 |
| ||||
| 1863 |
| ||||
| 1864 |
| ||||
| 1865 |
| ||||
| Armies | |||||
| Geography |
| ||||
| Topics | |
|---|---|
| Lists by state |
|
| Lists by insular areas | |
| Lists by associated state | |
| Other areas | |
| Related | |
| |
Municipalities and communities of Davidson County, Tennessee, United States | ||
|---|---|---|
| Cities | Davidson County map | |
| Neighborhoods | ||
| Footnotes | ‡This populated place also has portions in an adjacent county or counties | |
| Authority control |
|
|---|