Operation Black Buck

During the 1982 Falklands War, Operations Black Buck 1 to Black Buck 7 were a series of seven extremely long-range ground attack missions by Royal Air Force (RAF) Vulcan bombers of the RAF Waddington Wing, comprising aircraft from Nos 44, 50 and 101 Squadrons against Argentine positions in the Falkland Islands, of which five missions completed attacks. The objectives of all missions were to attack Port Stanley Airport and its associated defences. The raids, at almost 6,600 nautical miles (12,200 km) and 16 hours for the return journey, were the longest-ranged bombing raids in history at that time.
The Operation Black Buck raids were staged from RAF Ascension Island, close to the Equator. The Vulcan was designed for medium-range missions in Europe and lacked the range to fly to the Falklands without refuelling several times. The RAF's tanker planes were mostly converted Handley Page Victor bombers with similar range, so they too had to be refuelled in the air. A total of eleven tankers were required for two Vulcans (one primary and one reserve), a daunting logistical effort as all aircraft had to use the same runway. The Vulcans carried either twenty-one 1,000-pound (450 kg) bombs internally or two or four Shrike anti-radar missiles externally. Of the five Black Buck raids flown to completion, three were against Stanley Airfield's runway and operational facilities, while the other two were anti-radar missions using Shrike missiles against a Westinghouse AN/TPS-43 long-range 3D radar in the Port Stanley area. Shrikes hit two of the less valuable and rapidly replaced secondary fire control radars, causing some casualties among the Argentine crews. One Vulcan was nearly lost when a fuel shortage forced it to land in Brazil.
The raids did minimal damage to the runway and damage to radars was quickly repaired. A single crater was produced on the runway, rendering it impossible for the airfield to be used by fast jets. Argentine ground crew repaired the runway within twenty-four hours, to a level of quality suitable for C-130 Hercules transports. The British were aware that the runway remained in use. Dismissed in some quarters as post-war propaganda, Argentine sources originally claimed that the Vulcan raids influenced Argentina to withdraw some of their Dassault Mirage III fighter aircraft from the Southern Argentina Defence Zone to the Buenos Aires Defence Zone. This dissuasive effect was watered down when British officials made clear that there would be no strikes on air bases in Argentina. It has been suggested that the Black Buck raids were pressed home by the Royal Air Force because the British armed forces had been cut in the late seventies and the RAF may have desired a greater role in the conflict to prevent further cuts.
Background
After Argentina invaded the Falkland Islands on 2 April 1982,[1] the British government resolved to recapture them.[2] At the time, the British defence planning was focused on the Cold War.[3] The nearest airfield to the Falklands and usable for RAF operations was on Ascension Island, a British territory, with a single 10,000-foot (3,000 m) runway at Wideawake airfield, which was leased to the US. Ascension lay 3,700 nautical miles (6,900 km) from the UK and 3,300 nautical miles (6,100 km) from the Falklands.[4] The Royal Air Force (RAF) had not envisaged carrying out operations in the South Atlantic. Without aircraft able to cover the long distance, activities in the South Atlantic would be carried out by the Royal Navy and the British Army, and the RAF's role would be restricted to the Hawker Siddeley Nimrod maritime patrol aircraft and logistic support of the base at Ascension by Vickers VC10 and Lockheed C-130 Hercules transport aircraft. In March plans were set in motion within the RAF to see if it could carry out operations with Avro Vulcan bombers using aerial refuelling.[5][3]
Victor tankers
Long-range operations were entirely dependent upon the RAF's fleet of Handley Page Victor K2 tankers.[6] Originally 34 Victors had been built as bombers; 24 had subsequently been converted to tankers. One (XL513) had been lost in an accident at Marham on 28 September 1976, leaving the RAF with a force of just 23. These were the only tankers in British service in April 1982; nine VC-10s were in the process of being converted to tankers, but conversion of the first was not completed until 22 June.[7] Of these, twelve were assigned to No. 55 Squadron: XH671, XH672, XL161, XL162, XL188, XL190, XL191, XL232, XL233, XL511, XM715 and XM717. The other eleven were assigned to No. 57 Squadron: XH699, XH672, XH673, XL158, XL160, XL163, XL164, XL189, XL192, XL231 and XL512.[7]
The tanker crews were well-trained for their wartime role, as their peacetime role involved refuelling fighters scrambled in response to incursions into British airspace, usually by bombers from the Soviet Union at a rate of five per week.[6] However, long-range flights over the unfamiliar South Atlantic Ocean necessitated upgrades to the Victors' navigational equipment, notably the installation of the Delco Carousel inertial navigation system and the Omega navigation system.[8] The tankers were themselves capable of being refuelled in flight, which meant that it was possible to set up relays of aircraft.[9]
The first five Victors (XL163, XL189, XL192, XL511 and XL715) deployed to Ascension on 18 April. They were followed by four more (XH671, XL164, XL188 and XL232) the following day. Six more (XH672, XL162, XL233, XH669, XL512 and XM717) deployed by the end of the month, bringing the Victor tanker force to fourteen, since XM715 had returned to Marham on 26 April. Each was refuelled by another Victor before leaving UK airspace. While the Victors deployed to Ascension, their normal refuelling mission in the air was undertaken by United States Air Force Boeing KC-135 Stratotankers. The station commander at Marham, Group Captain J. S. B. Price became the senior RAF officer at Ascension. Wing Commander D. W. Maurice-Jones assumed command of the Victor detachment at Ascension until 22 April, when he was relieved by Wing Commander A. W. Bowman, the commander of No. 57 Squadron.[10]
Initial long-range operations by the RAF involved the use of Victor aircraft for reconnaissance of the region surrounding South Georgia Island in support of Operation Paraquet, the recapture of South Georgia. At 0400Z on 20 April, XL192, piloted by Squadron Leader J. G. Elliott, took off from Ascension, accompanied by four supporting tankers (XH671, XL163, XM715 and XL189) to supply fuel for the outbound journey. Another flight of four tankers (XL163, XL188, XL164 and XL511) supplied fuel for the return journey. Two further reconnaissance missions to the South Georgia area were carried out on 22/23 April by XL163 and on 24/25 April by XL189.[10] These missions demonstrated the capability of the Victor tanker fleet, flying out of Ascension, to support operations in the South Atlantic.[9]
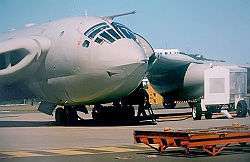
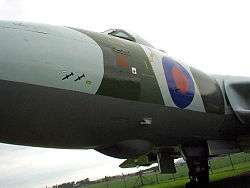
Vulcan bombers
.jpg)
The Avro Vulcan was the last of the British V bombers in operational use for bombing, but by March 1982 there were only three squadrons remaining, Nos 44, 50 and 101 Squadrons RAF. All three were scheduled to be disbanded by 1 July 1982.[11] They were based at RAF Waddington in the UK and assigned to NATO for nuclear operations; neither air-to-air refuelling nor conventional bombing had been practised for several years.[12] A request from Rear Admiral Sandy Woodward, the commander of the British aircraft carrier group heading south, on 11 April for recommendations for targets to attack in the Falkland Islands led to reconsideration of the possibility of attacks using Vulcans. Options for attacks on airfields and ports on the Argentine mainland were discarded as politically provocative and unlikely to produce worthwhile results. The Chief of the Air Staff, Air Chief Marshal Sir Michael Beetham argued that the Vulcan threat would cause the Argentineans to retain fighters in the north of Argentina.[13]
Thinking coalesced on a raid on Port Stanley Airport. Whether it was worth the effort was debated. Beetham initially proposed an attack in which a single Vulcan would drop seven 1,000-pound (450 kg) bombs. This light bomb load would keep the refuelling requirements down to a minimum. However, tests conducted at the Garvie Island bombing range indicated that seven bombs would not be enough, but a full load of twenty-one would have a 90 per cent probability of putting one crater in the runway, with a 75 per cent chance of two craters. To minimise the danger from anti-aircraft guns and surface-to-air missiles, the raids would be carried out at night, preferably in bad weather. Damage to the surrounding area, possibly including parked aircraft, would make the raid worthwhile. While the Chiefs of Staff Committee were convinced that the operation was feasible and stood a good chance of success, the civilians at the Ministry of Defence were not so certain, and there were political implications to using the base at Ascension for offensive purposes. The United States Department of State was consulted, and affirmed that it had no objection. Authority to proceed with the operation, codenamed Black Buck, was given by the War Cabinet on 27 April.[14]

The most controversial part of the plan was the involvement of Sea Harriers from Woodward's task force. One of the reasons for the use of the Vulcans was to conserve Sea Harrier resources for the air defence of the naval forces, but the plan required them to conduct a daylight photo reconnaissance sortie over the airfield for the purpose of damage assessment. If they had to be risked, then there were political advantages in using them to carry out the attack on the airport instead. Rear Admiral Derek Reffell proposed that Harriers be used to take out the airfield radars prior to the Vulcan attack in addition to conducting the post-attack photo reconnaissance. On 29 April, Woodward was informed that the Black Buck raid would occur at 0700Z, and that he was to arrange for the photo reconnaissance to take place as soon as possible afterward. Woodward signalled that if the photo reconnaissance was essential to Black Buck, then his recommendation was that Black Buck should be cancelled. The following day he was informed that Black Buck had been approved, and that the photo reconnaissance was required not just for damage assessment, but to refute Argentine allegations of indiscriminate bombing.[15]
Vulcans were selected based upon their engines; only those with the more powerful Bristol Olympus 301 engines were considered suitable.[16] Six aircraft were selected: XM391 and XM597 from No. 101 Squadron, XM598 and XM654 from No. 50 Squadron and XM607 and XM612 from No. 44 Squadron. In the event, XM654 was not used. Five crews were chosen, one each from Nos 44 and 101 Squadrons, two from No. 50 Squadron, and one from No. 9 Squadron RAF, which had recently been disbanded.[11] One of the most challenging tasks was reinstating the aerial refuelling system, which had been blocked off with filler. This involved replacing the 4-inch (100 mm) non return valves. Twenty replacements were located on a shelf at RAF Stafford.[17] The five aircraft were fitted with the Carousel inertial navigation system. AN/ALQ-101 electronic countermeasure pods from Blackburn Buccaneer aircraft at RAF Honington were fitted to the wings of the Vulcans on improvised pylons, using the attachment points originally intended for the Skybolt missile.[18] The undersides of the aircraft were painted Dark Sea Grey.[11]

While the Vulcans were capable of carrying conventional munitions, this had not been done for a long time. To carry twenty-one bombs, the Vulcan required three sets of bomb carriers, each of which held seven bombs. Their release was controlled by a panel at the navigator's station known as a 90-way that monitored the electrical connections to each bomb, and was said to provide 90 different sequences for releasing the 1,000-pound bombs. None of the Vulcans at Waddington was fitted with the bomb racks or the 90-way. A search of the supply dumps at Waddington and RAF Scampton located the 90-way panels, which were fitted and tested, but finding enough septuple bomb carriers proved harder, and at least nine were required. Someone remembered that some had been sold to a scrapyard in Newark-on-Trent, and they were retrieved from there. Locating sufficient bombs also proved difficult, and only 167 could be located. Some had cast bomb cases rather than machined ones, which was problematic as they tended to shatter, and what was required for this mission was bombs that would penetrate into the ground.[19] Training of crews in conventional bombing and in-flight refuelling was carried out from 14 to 17 April.[11]
The first two Vulcans, XM598, commanded by Squadron Leader John Reeve, and XM607, commanded by Flight Lieutenant Martin Withers, left Waddington at 0900Z on 29 April and arrived at Wideawake at 1800Z after a non-stop nine-hour flight during which they were twice refuelled by Victor tankers.[20][11] Two other Vulcans subsequently deployed to Wideawake: XM612, commanded by Squadron Leader Alastair Montgomery arrived on 14 May, and XM597, commanded by Squadron Leader Neil McDougall, which arrived on 27 May. It carried out trials with the Martel anti-radar missile before being equipped with the Shrike missile.[21][22]
Missions
Summary
| Mission | Target | Date | Primary Vulcan | Reserve Vulcan | Notes |
|---|---|---|---|---|---|
| Black Buck 1 | Port Stanley Airport runway | 30 April–1 May | XM598 (Reeve) | XM607 (Withers) | Performed; primary aircraft cabin failed to pressurise shortly after takeoff, replaced by reserve |
| Black Buck 2 | Port Stanley Airport runway | 3–4 May | XM607 (Reeve) | XM598 (Montgomery) | Performed |
| Black Buck 3 | Port Stanley Airport runway | 13 May | XM607 | XM612 | Cancelled before takeoff due to weather conditions |
| Black Buck 4 | Anti-aircraft radar | 28 May | XM597 (McDougall) | XM598 | Cancelled 5 hours into flight, due to a fault in the Victor fleet |
| Black Buck 5 | Anti-aircraft radar | 31 May | XM597 (McDougall) | XM598 (Montgomery) | Performed |
| Black Buck 6 | Anti-aircraft radar | 3 June | XM597 (McDougall) | XM598 (Montgomery) | Performed; primary aircraft forced to divert to Brazil due to a broken refuelling probe |
| Black Buck 7 | Port Stanley Airport stores and aircraft | 12 June | XM607 (Withers) | XM598 (Montgomery) | Performed |
Black Buck One

The first surprise attack on the islands, on 30 April/1 May, was aimed at the main runway at Port Stanley Airport. Carrying twenty-one 1,000-pound bombs, the bomber was to fly across the line of the runway at about 35 degrees. The bomb release system was timed to drop bombs sequentially from 10,000 feet (3,000 m), so that at least one bomb would hit the runway.[23] The Vulcan's fuel tanks could contain 9,200 imperial gallons (42,000 l) weighing 74,000 pounds (34,000 kg) in 14 pressurised bag tanks, five in each wing and four in the fuselage.[24] Based upon estimates of the Vulcan's fuel need, eleven Victor tankers, including two reserve aircraft, were assigned to refuel the single Vulcan before and after its attack on the Falklands: XH669, XH672, XL162, XL163, XL188, XL189, XL192, XL232, XL511, XL512 and XM717.[25] Two Vulcans were assigned to the mission: XM598, commanded by Reeve, was the lead with XM607, captained by Withers, as the reserve, which would return to Ascension once XM598 had successfully completed its first aerial refuelling.[11] The plan called for no less than 15 Victor sorties and 18 aerial refuellings.[25] At the time it was the longest bombing mission ever attempted.[26]
The eleven Victors and two Vulcans began taking off from Wideawake at 2350Z at one-minute intervals, with XM598 as the eleventh to lift off and XM607 the last.[11][27] With a full load of bombs and fuel, a sixth crew member and a fresh coat of paint, the Vulcans were well over their rated maximum take off weight of 204,000 pounds (93,000 kg). On the warm Ascension Island, the Bristol Olympus 301 engines had to be run at 103 per cent of their rated power in order to get the Vulcans airborne.[26] Shortly after take off, XM598 suffered a failure. A rubber seal on the captain's "Direct Vision" side window had perished. Unable to close or seal the window and pressurise the crew cabin, Reeve was forced to return to Ascension. Lacking the ability to dump fuel, and far too heavy to land, the crew were forced to remain airborne in a cold and noisy cabin. XM607 took over as the primary Vulcan. Twenty minutes later, Victor tanker XL163 returned to Ascension with a faulty refuelling hose system, and its place was taken by the reserve, XH669.[28]

In the 34 minutes between the first and second refuellings, XM607 had burned through 9,200 pounds (4,200 kg) of fuel, at the rate of 16,250 pounds (7,370 kg) per hour. All this time its weight never dropped below the theoretical maximum.[29] At the end of the second refuelling, two more tankers peeled off and returned, reducing the force to just three: XL189, flown by Squadron Leader Bob Tuxford, XH669 flown by Flight Lieutenant Steve Biglands, and Vulcan XM607.[30] As a result of the fuel demand and problems in flight with refuelling, two of the Victors had to fly further south than planned, eating into their own reserves. At the Victor's final refuelling bracket, the sortie flew into a violent thunderstorm, during which XH669's refuelling probe failed.[31]
Tuxford was supposed to return after this refuelling with 64,000 pounds (29,000 kg) of fuel while Biglands flew on with the Vulcan, but Tuxford now took Biglands' place. A quick calculation showed that XL189 did not have enough fuel to make it back to Ascension.[32] It fell to XL189 to conduct the final refuelling. XM607 received 7,000 pounds (3,200 kg) less than Withers expected. This meant that XM607 would be making the return fuelling rendezvous with 7,000 pounds (3,200 kg) in its tanks instead of 14,000 pounds (6,400 kg).[33]
Now alone, XM607 flew on to the Falklands. Withers made his approach at low level, dropping to 300 feet (91 m) before climbing to 1,000 feet (300 m) for the bomb run 40 miles (64 km) from the target.[26] Before climbing to attack height the H2S radar was successfully locked on to offset markers on the coast, and the automated bombing control system was engaged. The attack was delivered around 0700Z. Withers made the final approach at 10,000 feet (3,000 m), with an airspeed of 330 knots (610 km/h). The Vulcan's electronic countermeasures defeated the radar systems controlling the defending Skyguard anti-aircraft cannons. The twenty-one bombs were dropped individually. Once all were away, Withers put the Vulcan into a steep 60° bank to the left, subjecting the crew to a 2g turn.[34] Sea Harriers of 801 Naval Air Squadron (NAS) were held at readiness on board the aircraft carrier HMS Invincible to protect the Vulcan, but were not required as no Argentine aircraft were in the area at the time of the attack.[35] The Sea Harriers went into action shortly after the Vulcan raid. Two of the aircraft flew over Port Stanley airport to photograph the damage caused by the Vulcan.[36]
XM607 climbed away from the airfield and headed nearly due north to a planned rendezvous with a Victor some way off the Brazilian coast near Rio de Janeiro. As it passed the British Task Force it signalled the code word "superfuse" indicating a successful attack at 0746Z.[22] Its journey continued within range of the South American coast to its rendezvous with Victor XH672, flown by Squadron Leader Barry Neal. After contacting control with an update, the tanker was sent further south. To help bring the two planes together, one of Ascension's two Nimrod Maritime Reconnaissance aircraft was flown from Wideawake to the area. Without an in-flight refuelling system it was unable to loiter for long.[37] Tuxford, who had continued to maintain radio silence lest he compromise the mission, picked up the "superfuse" signal and radioed Ascension for help.[38] Victor XL511, flown by his squadron commander, Wing Commander Colin Seymour, flew out to meet them, and refuelled XL189, enabling it to return to Ascension 14 hours and 5 minutes after it had left. Meanwhile, with the help of the Nimrod, XM607 made the rendezvous with XH672, and all three aircraft returned to Ascension safely.[39] XM607 touched down at 1452Z.[22]

Northwood Headquarters received the "superfuse" message by 0830Z and the Ministry of Defence shortly thereafter. Beetham was informed by his deputy, Air Vice Marshal Kenneth Hayr an hour later.[40] The news of the bombing raid was reported on the BBC World Service before either the Vulcan or the last tanker arrived back at Ascension.[41] The bombardment is believed to have killed three Argentinean personnel at the airport and injured several more. One bomb exploded on the runway and caused a large crater which proved difficult to repair, and the other bombs caused minor damage to aircraft and equipment.[42]
Later that morning twelve 800 Naval Air Squadron Sea Harriers were dispatched from the aircraft carrier HMS Hermes to attack targets on East Falkland.[43] Nine of the aircraft struck Port Stanley Airport and dropped 27 bombs on the airfield and its defences. The bombs set a stockpile of fuel on fire and may have slightly damaged the runway.[36] One of the Sea Harriers was struck by a 20mm anti-aircraft round which damaged its fin and tailplane; the aircraft managed to return to Hermes and was quickly repaired.[44] The Argentine air defence headquarters incorrectly assessed British losses as three aircraft destroyed.[36]
The other three 800 NAS Sea Harriers attacked the airfield at Goose Green with cluster bombs shortly after the raid on Port Stanley, resulting in the destruction of a Pucará and severe damage to another two. The pilot of the destroyed aircraft and five maintenance personnel were killed. Neither of the two damaged aircraft flew again.[45] The three British aircraft did not encounter any opposition and safely returned to Hermes.[44] After the aircraft were refuelled, 800 NAS began launching Sea Harriers on combat air patrol sorties.[44] 801 NAS maintained a four aircraft combat air patrol to the east of Port Stanley throughout the operation.[35]
Withers was awarded the Distinguished Flying Cross for his part in the action,[46] and his crew—Flying Officer P. I. Taylor, Flight Lieutenant R. D. Wright, Flight Lieutenant G. C. Graham, Flight Lieutenant H. Prior and Flight Lieutenant R. J. Russell—were Mentioned in Dispatches.[47][22][48][49] Tuxford was awarded the Air Force Cross,[50] while his crew—Squadron Leader E. F. Wallis, Flight Lieutenant M. E. Beer, Flight Lieutenant J. N. Keable and Flight Lieutenant G. D. Rees—received the Queen's Commendation for Valuable Service in the Air.[38][47][49]
Black Buck Two
During the night of 3/4 May, Vulcan XM607, flown by Squadron Leader John Reeve and his crew of No 50 Squadron flew a near-identical mission to the first.[22] This time Vulcan XM598, piloted by Squadron Leader Alastair Montgomery acted as flying reserve aircraft, but was not required.[51] As with Black Buck One the approach to Port Stanley over the final 200 nautical miles (370 km; 230 mi) was made at low altitude, but with a final "pop-up" to a higher altitude, 16,000 feet (4,900 m), for the bomb run in order to avoid the now fully alert Argentine anti-aircraft defences,[22] particularly the Argentine Roland surface-to-air missiles. As a result, all the bombs missed the runway. This was not known for several days, as the weather conditions precluded photo reconnaissance missions.[52] According to Argentine sources, which also confirm impacts near the western end of the airstrip, two Argentine soldiers were wounded.[53] The cratering at the western end of the runway prevented Argentine engineers from extending it sufficiently to make it capable of accommodating high-performance combat aircraft.[26] The runway remained in use by Hercules and light transport aircraft, allowing the Argentineans to fly in critical supplies and evacuate wounded personnel.[54]
Black Buck Three
This mission, scheduled for 14 May, was scrubbed before take-off due to strong headwinds.[26] Vulcans XM607 and XM612 were respectively designated the primary and reserve aircraft.[22]
Black Buck Four
This mission with Vulcan XM597, scheduled for 28 May, was also scrubbed, but only some five hours after the Vulcan had taken off. One of the supporting Victor aircraft, which were flying refuelling operations, suffered a failure of the hose-and-drogue refuelling unit, and the flight had to be recalled. Vulcan XM598 acted as flying reserve aircraft. The mission was due to be the first using American-supplied Shrike anti-radar missiles, which were mounted on the Vulcans using improvised underwing pylons.[22] The substitution of missiles for bombs allowed the Vulcan to carry an additional 16,000 pounds (7,300 kg) of fuel in bomb bay tanks.[26]
Black Buck Five
This mission, flown by Squadron Leader Neil McDougall and his crew from No. 50 Squadron in Vulcan XM597 on 31 May. Vulcan XM598, piloted by Montgomery reprised its role as flying reserve aircraft. This was the first completed anti-radar mission equipped with Shrike missiles. The main target was a Westinghouse AN/TPS-43 long-range 3D radar that the Argentine Air Force deployed during April to guard the airspace surrounding the Falkland Islands. The attack could only succeed if the targeted radar continued transmitting until struck, so a Sea Harrier raid was staged to coincide with the attack to force the defenders to turn on the radar. At 0845Z two Shrikes were launched at it. The first missile impacted 10 to 15 yards (9.1 to 13.7 m) from the target, causing minor blast damage, but not disabling the radar. The second missile missed by a greater margin.[22][55]
Black Buck Six
This mission was also flown on 3 June by McDougall in Vulcan XM597, which was now armed with four missiles instead of two. Vulcan XM598 again acted as flying reserve aircraft, flown once again by Montgomery. McDougall loitered over the target for 40 minutes in a vain effort to engage the AN/TPS-43, which was not switched on. Finally, the crew fired two of the four Shrikes, and destroyed a Skyguard fire-control radar of the Argentine Army's 601 Anti-Aircraft Battalion, killing four radar operators.[48]
On its return flight the aircraft was forced to divert to Rio de Janeiro after its in-flight refuelling probe broke. One of the missiles it was carrying was ditched into the ocean to reduce drag, but the other remained stuck on the pylon and could not be released. Sensitive documents containing classified information were jettisoned into the sea via the crew hatch, and a "Mayday" signal was sent.[48][56] Two Northrop F-5E Tiger II fighters from 2° Esquadrão do 1° Grupo de Aviação de Caça of the Brazilian Air Force were scrambled from Santa Cruz Airfield and intercepted Vulcan XM597.[57] The aircraft was cleared to land at Galeão Airport by Brazilian authorities with less than 2,000 pounds (910 kg) of fuel remaining, not enough to complete a circuit of the airport.[48]
This was a potentially embarrassing international incident, as it revealed that the United States had supplied the British with Shrike missiles. British diplomats negotiated for the release of Vulcan XM597 and its crew, who were interned at Galeão Air Force Base. A deal was struck on 4 June under which they would be released in exchange for spare parts for Westland Lynx helicopters.[58] Brazil came under pressure from Argentina, and the United States agreed to intervene to preserve the secrets of the Shrike missile.[59] The crew and aircraft were permitted to fly to Ascension on 10 June, having been treated well by the authorities. A new refuelling probe was fitted there, and the aircraft flew back to Waddington on 13 June.[48] The remaining Shrike missile remained in Brazil.[57]
Black Buck Seven
The final Black Buck mission was flown on 12 June by XM607, captained by Withers, and with the same crew as for Black Buck One except that Flight Lieutenant Peter Standing acted as Air-to-Air Refuelling Instructor instead of Russell. Vulcan XM598 piloted by Montgomery once again acted as the reserve. This time the mission targeted Argentine troop positions and facilities around the airport instead of the runway.[48] The bombs were fused in error to explode on impact; the end of the war was in sight and the intention had been for them to explode in mid-air to destroy aircraft and stores without damaging the runway, which would soon be needed for RAF Phantom FGR.2 operations after the Falkland Islands were recaptured.[60] In the event, all 21 bombs missed the intended targets.[60] The Argentine ground forces surrendered two days later.[61]
Effect

The military effectiveness of Black Buck remains controversial, with some independent sources describing it as "minimal".[62] The runway continued to be used by Argentine C-130s until the end of the war, although after 1 May only 70 tonnes (69 long tons; 77 short tons) of supplies and 340 troops were delivered, and early flights were suspended after 4 May.[54] The British were well aware that C-130 flights continued to use the airfield and attempted to interdict these flights leading to the loss of a C-130 on 1 June.[63]
Sharkey Ward dismissed the claim that the raids led to fear of attacks on the mainland as mere propaganda:
Propaganda was, of course, used later to try to justify these missions: 'The Mirage IIIs were redrawn from Southern Argentina to Buenos Aires to add to the defences there following the Vulcan raids on the islands.' Apparently, the logic behind this statement was that if the Vulcan could hit Port Stanley, the [sic] Buenos Aires was well within range as well and was vulnerable to similar attacks. I never went along with that baloney. A lone Vulcan or two running into attack Buenos Aires without fighter support would have been shot to hell in quick time.[64]
But Argentine sources confirm claims that Black Buck was responsible for the withdrawal of Mirage IIIs from operations over the islands in order to protect the mainland. This dissuasive effect was watered down when British officials made clear that there would not be strikes on air bases in Argentina.[62][65]
Planning for the raid called for a bomb run in a 35° cut across the runway, with the aim of placing at least one bomb on the runway and possibly two.[14] The main purpose in doing so was to prevent the use of the runway by fast jets; in this respect the raid was successful as the repair to the runway was botched and subsequently there were several near accidents. The fact that the British forces could penetrate Argentine air defences and attack the airfield had the desired effect in relation to preventing fast jet usage of the Port Stanley airstrip as the Argentine military command could not risk stationing its fast jets and the infrastructure necessary to operate them on the islands if they could be destroyed on the ground, irrespective of the operational status of the runway. The Argentines left the runway covered with piles of earth during the day, leading to claims this caused British intelligence to surmise that repairs were still in progress and misleading the British as to the condition of the airfield and the success of their raids.[62]
Rowland White claimed that Vice Admiral Juan Lombardo was led to believe that Black Buck One was the prelude to a full-scale landing by the British. As a consequence, he ordered Rear Admiral Gualter Allara, the commander of the Argentine Sea Fleet, to immediately attack the British fleet. This attack took the form of a pincer movement, ARA General Belgrano to the south and ARA Veinticinco de Mayo to the north. On 2 May, General Belgrano was sunk by the submarine HMS Conqueror. Thereafter the Argentine Navy withdrew to territorial waters and played no further part in the conflict.[66]
A United States Marine Corps study concluded that:
The most critical judgement of the use of the Vulcan centres on the argument that their use was "...largely to prove [the air force] had some role to play and not to help the battle in the least." This illustrates the practice of armed services to actively seek a "piece of the action" when a conflict arises, even if their capabilities or mission are not compatible with the circumstances of the conflict. Using Black Buck as an example shows the effects of this practice can be trivial and the results not worth the effort involved.[62]
Notes
- ↑ Freedman 2005, pp. 4–11.
- ↑ Freedman 2005, pp. 15–20.
- 1 2 White 2012, p. 35.
- ↑ Freedman 2005, pp. 62–63.
- ↑ Freedman 2005, pp. 274–275.
- 1 2 White 2012, pp. 85–86.
- 1 2 Burden et al. 1986, p. 393.
- ↑ White 2012, pp. 119–121.
- 1 2 White 2012, pp. 150–157.
- 1 2 Burden et al. 1986, pp. 393–394.
- 1 2 3 4 5 6 7 Burden et al. 1986, p. 363.
- ↑ White 2012, pp. 89–90, 123–126.
- ↑ Freedman 2005, p. 275.
- 1 2 Freedman 2005, pp. 275–277.
- ↑ Freedman 2005, pp. 278–279.
- ↑ White 2012, p. 74.
- ↑ White 2012, pp. 74–75.
- ↑ White 2012, pp. 148–149.
- ↑ White 2012, pp. 126–127.
- ↑ White 2012, pp. 237–240.
- ↑ White 2012, pp. 365–366.
- 1 2 3 4 5 6 7 8 9 Burden et al. 1986, p. 365.
- ↑ White 2012, pp. 252–253.
- ↑ "XH558's Road to Restoration". Vulcan To The Sky. Retrieved 27 May 2018.
- 1 2 Burden et al. 1986, p. 394.
- 1 2 3 4 5 6 "Operation Black Buck". Royal Air Force. Archived from the original on 17 April 2017. Retrieved 20 December 2013.
- ↑ White 2012, pp. 266–267.
- ↑ White 2012, pp. 267–270.
- ↑ White 2012, p. 280.
- ↑ White 2012, p. 285.
- ↑ White 2012, pp. 291–296.
- ↑ White 2012, pp. 300–302.
- ↑ White 2012, pp. 306–311.
- ↑ White 2012, pp. 318–328.
- 1 2 Burden et al. 1986, p. 210.
- 1 2 3 Middlebrook 2009, p. 78.
- ↑ White 2012, pp. 338–341.
- 1 2 Burden et al. 1986, p. 395.
- ↑ White 2012, pp. 344–348.
- ↑ White 2012, p. 337.
- ↑ White 2012, p. 343.
- ↑ Middlebrook 2009, pp. 77–78.
- ↑ Burden et al. 1986, p. 193.
- 1 2 3 Burden et al. 1986, p. 194.
- ↑ Middlebrook 2009, p. 79.
- ↑ "No. 49134". The London Gazette (1st supplement). 8 October 1982. p. 12854.
- 1 2 White 2012, pp. 367–368.
- 1 2 3 4 5 6 Burden et al. 1986, p. 367.
- 1 2 "No. 49134". The London Gazette (1st supplement). 8 October 1982. p. 12856.
- ↑ "No. 49134". The London Gazette (1st supplement). 8 October 1982. p. 12855.
- ↑ "XM598" (PDF). RAF Museum Cosford. Archived from the original (PDF) on 25 March 2009. Retrieved 5 February 2009.
- ↑ Freedman 2005, pp. 296–297, 301.
- ↑ "Conflicto de Malvinas" (in Spanish). Fuerza Aérea Argentina. Archived from the original on 1 June 2008.
Esta misión se concretó a las 05:33 hs, sobre la BAM Malvinas, sobrevolándola con rumbo N-NE y lanzando diecisiete bombas con retardo de hasta dos horas, que impactaron a 45º de la cabecera 08, pero sin afectar la pista, aunque hiriendo levemente a dos soldados del Ejército Argentino
- 1 2 Freedman 2005, p. 421.
- ↑ Freedman 2005, p. 542.
- ↑ White, Rowland (25 January 2016). "When the RAF went to Rio". Brazil Wire. Retrieved 28 May 2018.
- 1 2 "Black Buck 6 – Uma missão de combate que acabou no Rio de Janeiro". noticiasmilitares.com.br (in Portuguese). Retrieved 26 May 2018.
- ↑ Freedman 2005, pp. 542–543.
- ↑ Taylor, Steven (22 November 2015). "Margaret Thatcher's FURY at Brazil for refusing to hand back our bombers during Falklands". Sunday Express. Retrieved 28 May 2018.
- 1 2 Freedman 2005, p. 631.
- ↑ Freedman 2005, pp. 652–653.
- 1 2 3 4 "Offensive Air Operations Of The Falklands War". GlobalSecurity.org. Retrieved 23 May 2018.
As a result of these heavy losses...it was decided to pull the Mirage III's back to the mainland to stand alert for a possible Vulcan attack."
- ↑ Ward 2000, p. 302.
- ↑ Ward 2000, pp. 247–248.
- ↑ "The Falkland Islands Conflict, 1982: Air Defense Of The Fleet". GlobalSecurity.org. Retrieved 23 May 2018.
Finally, the bombing raids caused the Argentines to fear an air attack on the mainland, causing them to retain some Mirage aircraft and Roland missiles for defence.
- ↑ White 2012, pp. 364–365.
References
- Burden, Rodney A.; Draper, Michael I.; Rough, Douglas A.; Smith, Colin R.; Wilton, David L. (1986). Falklands: The Air War. London: Arms and Armour Press. ISBN 0-85368-842-7. OCLC 159813718.
- Freedman, Lawrence (2005). The Official History of the Falklands Campaign: Volume II - War and Diplomacy. Abingdon, Oxfordshire: Routledge. ISBN 0-7146-5207-5. OCLC 249889816.
- Middlebrook, Martin (2009) [1989]. Argentine Fight for the Falklands. Barnsley, United Kingdom: Pen & Sword Military. ISBN 9781844158881.
- Ward, Sharkey (2000). Sea Harrier over the Falklands. London: Cassell and Co. ISBN 0-304-35542-9. OCLC 606040010.
- White, Rowland (2012). Vulcan 607. London: Bantam Press. ISBN 978-0-593-07126-7. OCLC 941503520.