Camera
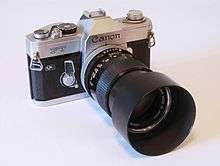

A camera is an optical instrument for recording or capturing images, which may be stored locally, transmitted to another location, or both. The images may be individual still photographs or sequences of images constituting videos or movies. The camera is a remote sensing device as it senses subjects without any contact . The word camera comes from camera obscura, which means "dark chamber" and is the Latin name of the original device for projecting an image of external reality onto a flat surface. The modern photographic camera evolved from the camera obscura. The functioning of the camera is very similar to the functioning of the human eye. The first permanent photograph was made in 1826 by Joseph Nicéphore Niépce.
Functional description
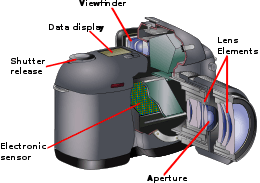
A camera works with the light of the visible spectrum or with other portions of the electromagnetic spectrum.[1] A still camera is an optical device which creates a single image of an object or scene and records it on an electronic sensor or photographic film. All cameras use the same basic design: light enters an enclosed box through a converging/convex lens and an image is recorded on a light-sensitive medium (mainly a transition metal-halide). A shutter mechanism controls the length of time that light can enter the camera.[2] Most photographic cameras have functions that allow a person to view the scene to be recorded, allow for a desired part of the scene to be in focus, and to control the exposure so that it is not too bright or too dim.[3] A display, often a liquid crystal display (LCD), permits the user to view the scene to be recorded and settings such as ISO speed, exposure, and shutter speed.[4][5]
A movie camera or a video camera operates similarly to a still camera, except it records a series of static images in rapid succession, commonly at a rate of 24 frames per second. When the images are combined and displayed in order, the illusion of motion is achieved.[6]
History
Camera obscura
The forerunner to the photographic camera was the camera obscura. Camera obscura (Latin for "dark room") is the natural phenomenon that occurs when an image of a scene at the other side of a screen (or for instance a wall) is projected through a small hole in that screen and forms an inverted image (left to right and upside down) on a surface opposite to the opening. The oldest known record of this principle is a description by Han Chinese philosopher Mozi (ca. 470 to ca. 391 BC). Mozi correctly asserted the camera obscura image is inverted because light travels inside the camera straight lines from its source.
In the 11th century, Arab physicist Ibn al-Haytham (Alhazen) wrote very influential essays about the camera obscura, including experiments with light through a small opening in a darkened room. Ibn al-Haytam's writings on optics became very influential in Europe through Latin translations, inspiring people such as Witelo, John Peckham, Roger Bacon, Leonardo Da Vinci, René Descartes and Johannes Kepler.[7]
The use of a lens in the opening of a wall or closed window shutter of a darkened room to project images used as a drawing aid has been traced back to circa 1550. Since the late 17th century, portable camera obscura devices in tents and boxes were used as a drawing aid.
Photographic camera
Before the development of the photographic camera, it had been known for hundreds of years that some substances, such as silver salts, darkened when exposed to sunlight.[8] In a series of experiments, published in 1727, the German scientist Johann Heinrich Schulze demonstrated that the darkening of the salts was due to light alone, and not influenced by heat or exposure to air.[9] The Swedish chemist Carl Wilhelm Scheele showed in 1777 that silver chloride was especially susceptible to darkening from light exposure, and that once darkened, it becomes insoluble in an ammonia solution.[9] The first person to use this chemistry to create images was Thomas Wedgwood.[8] To create images, Wedgwood placed items, such as leaves and insect wings, on ceramic pots coated with silver nitrate, and exposed the set-up to light. These images weren't permanent, however, as Wedgwood didn't employ a fixing mechanism. He ultimately failed at his goal of using the process to create fixed images created by a camera obscura.[10]
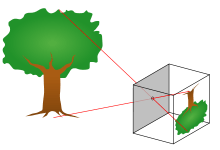 Camera obscura. Light enters a dark box through a small hole and creates an inverted image on the wall opposite the hole.[11]
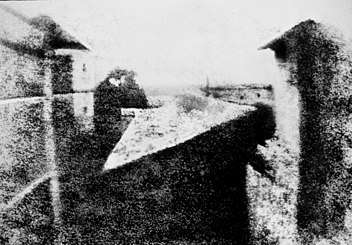 View from the Window at Le Gras (1826), the earliest surviving photograph[12]
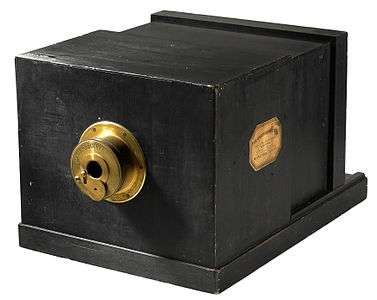 The Giroux daguerreotype camera, the first to be commercially produced[13]
The first permanent photograph of a camera image was made in 1826 by Joseph Nicéphore Niépce using a sliding wooden box camera made by Charles and Vincent Chevalier in Paris.[14] Niépce had been experimenting with ways to fix the images of a camera obscura since 1816. The photograph Niépce succeeded in creating shows the view from his window. It was made using an 8-hour exposure on pewter coated with bitumen.[15] Niépce called his process "heliography".[16] Niépce corresponded with the inventor Louis-Jacques-Mande Daguerre, and the pair entered into a partnership to improve the heliographic process. Niépce had experimented further with other chemicals, to improve contrast in his heliographs. Daguerre contributed an improved camera obscura design, but the partnership ended when Niépce died in 1833.[17] Daguerre succeeded in developing a high-contrast and extremely sharp image by exposing on a plate coated with silver iodide, and exposing this plate again to mercury vapor.[18] By 1837, he was able to fix the images with a common salt solution. He called this process Daguerreotype, and tried unsuccessfully for a couple years to commercialize it. Eventually, with help of the scientist and politician François Arago, the French government acquired Daguerre's process for public release. In exchange, pensions were provided to Daguerre as well as Niépce's son, Isidore.[19]
In the 1830s, the English scientist Henry Fox Talbot independently invented a process to fix camera images using silver salts.[20] Although dismayed that Daguerre had beaten him to the announcement of photography, on January 31, 1839 he submitted a pamphlet to the Royal Institution entitled Some Account of the Art of Photogenic Drawing, which was the first published description of photography. Within two years, Talbot developed a two-step process for creating photographs on paper, which he called calotypes. The calotyping process was the first to utilize negative prints, which reverse all values in the photograph - black shows up as white and vice versa.[21] Negative prints allow, in principle, unlimited duplicates of the positive print to be made.[22] Calotyping also introduced the ability for a printmaker to alter the resulting image through retouching.[23] Calotypes were never as popular or widespread as daguerreotypes,[24] owing mainly to the fact that the latter produced sharper details.[25] However, because daguerreotypes only produce a direct positive print, no duplicates can be made. It is the two-step negative/positive process that formed the basis for modern photography.[26]
The first photographic camera developed for commercial manufacture was a daguerreotype camera, built by Alphonse Giroux in 1839. Giroux signed a contract with Daguerre and Isidore Niépce to produce the cameras in France,[27] with each device and accessories costing 400 francs.[28] The camera was a double-box design, with a landscape lens fitted to the outer box, and a holder for a ground glass focusing screen and image plate on the inner box. By sliding the inner box, objects at various distances could be brought to as sharp a focus as desired. After a satisfactory image had been focused on the screen, the screen was replaced with a sensitized plate. A knurled wheel controlled a copper flap in front of the lens, which functioned as a shutter. The early daguerreotype cameras required long exposure times, which in 1839 could be from 5 to 30 minutes.[27][29]
After the introduction of the Giroux daguerreotype camera, other manufacturers quickly produced improved variations. Charles Chevalier, who had earlier provided Niépce with lenses, created in 1841 a double-box camera using a half-sized plate for imaging. Chevalier’s camera had a hinged bed, allowing for half of the bed to fold onto the back of the nested box. In addition to having increased portability, the camera had a faster lens, bringing exposure times down to 3 minutes, and a prism at the front of the lens, which allowed the image to be laterally correct.[30] Another French design emerged in 1841, created by Marc Antoine Gaudin. The Nouvel Appareil Gaudin camera had a metal disc with three differently-sized holes mounted on the front of the lens. Rotating to a different hole effectively provided variable f-stops, letting in different amount of light into the camera.[31] Instead of using nested boxes to focus, the Gaudin camera used nested brass tubes.[32] In Germany, Peter Friedrich Voigtländer designed an all-metal camera with a conical shape that produced circular pictures of about 3 inches in diameter. The distinguishing characteristic of the Voigtländer camera was its use of a lens designed by Joseph Petzval.[33] The f/3.5 Petzval lens was nearly 30 times faster than any other lens of the period, and was the first to be made specifically for portraiture. Its design was the most widely used for portraits until Carl Zeiss introduced the anastigmat lens in 1889.[34]
Within a decade of being introduced in America, 3 general forms of camera were in popular use: the American- or chamfered-box camera, the Robert’s-type camera or “Boston box”, and the Lewis-type camera. The American-box camera had beveled edges at the front and rear, and an opening in the rear where the formed image could be viewed on ground glass. The top of the camera had hinged doors for placing photographic plates. Inside there was one available slot for distant objects, and another slot in the back for close-ups. The lens was focused either by sliding or with a rack and pinion mechanism. The Robert’s-type cameras were similar to the American-box, except for having a knob-fronted worm gear on the front of the camera, which moved the back box for focusing. Many Robert’s-type cameras allowed focusing directly on the lens mount. The third popular daguerreotype camera in America was the Lewis-type, introduced in 1851, which utilized a bellows for focusing. The main body of the Lewis-type camera was mounted on the front box, but the rear section was slotted into the bed for easy sliding. Once focused, a set screw was tightened to hold the rear section in place.[35] Having the bellows in the middle of the body facilitated making a second, in-camera copy of the original image.[36]
Daguerreotype cameras formed images on silvered copper plates. The earliest daguerreotype cameras required several minutes to half an hour to expose images on the plates. By 1840, exposure times were reduced to just a few seconds owing to improvements in the chemical preparation and development processes, and to advances in lens design.[37] American daguerreotypists introduced manufactured plates in mass production, and plate sizes became internationally standardized: whole plate (6.5 x 8.5 inches), three-quarter plate (5.5 x 7 1/8 inches), half plate (4.5 x 5.5 inches), quarter plate (3.25 x 4.25 inches), sixth plate (2.75 x 3.25 inches), and ninth plate (2 x 2.5 inches).[38] Plates were often cut to fit cases and jewelry with circular and oval shapes. Larger plates were produced, with sizes such as 9 x 13 inches (“double-whole” plate), or 13.5 x 16.5 inches (Southworth & Hawes’ plate).[39]
The collodion wet plate process that gradually replaced the daguerreotype during the 1850s required photographers to coat and sensitize thin glass or iron plates shortly before use and expose them in the camera while still wet. Early wet plate cameras were very simple and little different from Daguerreotype cameras, but more sophisticated designs eventually appeared. The Dubroni of 1864 allowed the sensitizing and developing of the plates to be carried out inside the camera itself rather than in a separate darkroom. Other cameras were fitted with multiple lenses for photographing several small portraits on a single larger plate, useful when making cartes de visite. It was during the wet plate era that the use of bellows for focusing became widespread, making the bulkier and less easily adjusted nested box design obsolete.
For many years, exposure times were long enough that the photographer simply removed the lens cap, counted off the number of seconds (or minutes) estimated to be required by the lighting conditions, then replaced the cap. As more sensitive photographic materials became available, cameras began to incorporate mechanical shutter mechanisms that allowed very short and accurately timed exposures to be made.
The use of photographic film was pioneered by George Eastman, who started manufacturing paper film in 1885 before switching to celluloid in 1889. His first camera, which he called the "Kodak," was first offered for sale in 1888. It was a very simple box camera with a fixed-focus lens and single shutter speed, which along with its relatively low price appealed to the average consumer. The Kodak came pre-loaded with enough film for 100 exposures and needed to be sent back to the factory for processing and reloading when the roll was finished. By the end of the 19th century Eastman had expanded his lineup to several models including both box and folding cameras.
Films also made possible capture of motion (cinematography) establishing the movie industry by end of 19th century.
In photography, the single-lens reflex camera (SLR) is provided with a mirror to redirect light from the picture taking lens to the viewfinder prior to releasing the shutter for composing and focusing an image. When the shutter is released, the mirror swings up and away allowing the exposure of the photographic medium and instantly returns after the exposure. No SLR camera before 1954 had this feature, although the mirror on some early SLR cameras was entirely operated by the force exerted on the shutter release and only returned when the finger pressure was released.[40][41] The Asahiflex II, released by Japanese company Asahi (Pentax) in 1954, was the world's first SLR camera with an instant return mirror.[42]
Digital camera
The first camera using digital electronics to capture and store images was developed by Kodak engineer Steven Sasson in 1975. He used a charge-coupled device (CCD) provided by Fairchild Semiconductor, which provided only 0.01 megapixels to capture images. Sasson combined the CCD device with movie camera parts to create a digital camera that saved black and white images onto a cassette tape.[43] The images were then read from the cassette and viewed on a TV monitor.[44] Later, cassette tapes were replaced by flash memory.
In 1986, Japanese company Nikon introduced the first digital single-lens reflex (DSLR) camera, the Nikon SVC.[45][46]
The first full-frame DSLR cameras were developed in Japan from around 2000 to 2002: the MZ-D by Pentax,[47] the N Digital by Contax's Japanese R6D team,[48] and the EOS-1Ds by Canon.[49] Gradually in the 2000s, the full-frame DSLR became the dominant camera type for professional photography.
Camera phone
In 2000, Sharp introduced the world's first digital camera phone, the J-SH04 J-Phone, in Japan.[50] By the mid-2000s, higher-end cell phones had an integrated digital camera. By the beginning of the 2010s, almost all smartphones had an integrated digital camera.
Mechanics
Camera controls
In all but certain specialized cameras, the process of obtaining a usable exposure must involve the use, manually or automatically, of a few controls to ensure the photograph is clear, sharp and well illuminated. The controls usually include but are not limited to the following:
| Control | Description |
|---|---|
| Focus | The position of a viewed object or the adjustment of an optical device necessary to produce a clear image: in focus; out of focus.[51] |
| Aperture | Adjustment of the lens opening measured as f-number, which controls the amount of light passing through the lens. Aperture also has an effect on depth of field and diffraction – the higher the f-number, the smaller the opening, the less light, the greater the depth of field, and the more the diffraction blur. The focal length divided by the f-number gives the effective aperture diameter. |
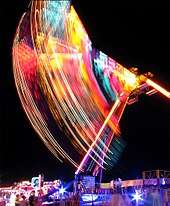
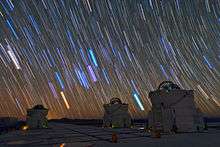
| Shutter speed | Adjustment of the speed (often expressed either as fractions of seconds or as an angle, with mechanical shutters) of the shutter to control the amount of time during which the imaging medium is exposed to light for each exposure. Shutter speed may be used to control the amount of light striking the image plane; 'faster' shutter speeds (that is, those of shorter duration) decrease both the amount of light and the amount of image blurring from motion of the subject or camera. The slower shutter speeds allow for long exposure shots that are done used to photograph images in very low light including the images of the night sky. |
| White balance | On digital cameras, electronic compensation for the color temperature associated with a given set of lighting conditions, ensuring that white light is registered as such on the imaging chip and therefore that the colors in the frame will appear natural. On mechanical, film-based cameras, this function is served by the operator's choice of film stock or with color correction filters. In addition to using white balance to register natural coloration of the image, photographers may employ white balance to aesthetic end, for example, white balancing to a blue object in order to obtain a warm color temperature. |
| Metering | Measurement of exposure so that highlights and shadows are exposed according to the photographer's wishes. Many modern cameras meter and set exposure automatically. Before automatic exposure, correct exposure was accomplished with the use of a separate light metering device or by the photographer's knowledge and experience of gauging correct settings. To translate the amount of light into a usable aperture and shutter speed, the meter needs to adjust for the sensitivity of the film or sensor to light. This is done by setting the "film speed" or ISO sensitivity into the meter. |
| Film speed | Traditionally used to "tell the camera" the film speed of the selected film on film cameras, film speed numbers are employed on modern digital cameras as an indication of the system's gain from light to numerical output and to control the automatic exposure system. Film speed is usually measured via the ISO system. The higher the film speed number the greater the film sensitivity to light, whereas with a lower number, the film is less sensitive to light. A correct combination of film speed, aperture, and shutter speed leads to an image that is neither too dark nor too light, hence it is 'correctly exposed', indicated by a centered meter. |
| Autofocus point | On some cameras, the selection of a point in the imaging frame upon which the auto-focus system will attempt to focus. Many Single-lens reflex cameras (SLR) feature multiple auto-focus points in the viewfinder. |
Many other elements of the imaging device itself may have a pronounced effect on the quality and aesthetic effect of a given photograph. Among them are:
- Focal length and type of lens (normal, long focus, wide angle, telephoto, macro, fisheye, or zoom)
- Filters placed between the subject and the light recording material, either in front of or behind the lens
- Inherent sensitivity of the medium to light intensity and color/wavelengths.
- The nature of the light recording material, for example, its resolution as measured in pixels or grains of silver halide.
Image capture
Traditional cameras capture light onto photographic plate or photographic film. Video and digital cameras use an electronic image sensor, usually a charge coupled device (CCD) or a CMOS sensor to capture images which can be transferred or stored in a memory card or other storage inside the camera for later playback or processing.
Cameras that capture many images in sequence are known as movie cameras or as ciné cameras in Europe; those designed for single images are still cameras.
However these categories overlap as still cameras are often used to capture moving images in special effects work and many modern cameras can quickly switch between still and motion recording modes.
Lens
The lens of a camera captures the light from the subject and brings it to a focus on the sensor. The design and manufacture of the lens is critical to the quality of the photograph being taken. The technological revolution in camera design in the 19th century revolutionized optical glass manufacture and lens design with great benefits for modern lens manufacture in a wide range of optical instruments from reading glasses to microscopes. Pioneers included Zeiss and Leitz.
Camera lenses are made in a wide range of focal lengths. They range from extreme wide angle, and standard, medium telephoto. Each lens is best suited to a certain type of photography. The extreme wide angle may be preferred for architecture because it has the capacity to capture a wide view of a building. The normal lens, because it often has a wide aperture, is often used for street and documentary photography. The telephoto lens is useful for sports and wildlife but it is more susceptible to camera shake.[52]
Focus

Due to the optical properties of photographic lenses, only objects within a limited range of distances from the camera will be reproduced clearly. The process of adjusting this range is known as changing the camera's focus. There are various ways of focusing a camera accurately. The simplest cameras have fixed focus and use a small aperture and wide-angle lens to ensure that everything within a certain range of distance from the lens, usually around 3 metres (10 ft) to infinity, is in reasonable focus. Fixed focus cameras are usually inexpensive types, such as single-use cameras. The camera can also have a limited focusing range or scale-focus that is indicated on the camera body. The user will guess or calculate the distance to the subject and adjust the focus accordingly. On some cameras this is indicated by symbols (head-and-shoulders; two people standing upright; one tree; mountains).
Rangefinder cameras allow the distance to objects to be measured by means of a coupled parallax unit on top of the camera, allowing the focus to be set with accuracy. Single-lens reflex cameras allow the photographer to determine the focus and composition visually using the objective lens and a moving mirror to project the image onto a ground glass or plastic micro-prism screen. Twin-lens reflex cameras use an objective lens and a focusing lens unit (usually identical to the objective lens.) in a parallel body for composition and focusing. View cameras use a ground glass screen which is removed and replaced by either a photographic plate or a reusable holder containing sheet film before exposure. Modern cameras often offer autofocus systems to focus the camera automatically by a variety of methods.[53]
Some experimental cameras, for example the planar Fourier capture array (PFCA), do not require focusing to allow them to take pictures. In conventional digital photography, lenses or mirrors map all of the light originating from a single point of an in-focus object to a single point at the sensor plane. Each pixel thus relates an independent piece of information about the far-away scene. In contrast, a PFCA does not have a lens or mirror, but each pixel has an idiosyncratic pair of diffraction gratings above it, allowing each pixel to likewise relate an independent piece of information (specifically, one component of the 2D Fourier transform) about the far-away scene. Together, complete scene information is captured and images can be reconstructed by computation.
Some cameras have post focusing. Post focusing means take the pictures first and then focusing later at the personal computer. The camera uses many tiny lenses on the sensor to capture light from every camera angle of a scene and is called plenoptics technology. A current plenoptic camera design has 40,000 lenses working together to grab the optimal picture.[54]
Exposure control
The size of the aperture and the brightness of the scene controls the amount of light that enters the camera during a period of time, and the shutter controls the length of time that the light hits the recording surface. Equivalent exposures can be made using a large aperture size with a fast shutter speed and a small aperture with a slow shutter.
Exposure and rendering
Camera controls are interrelated due to the similarities in the exposure controls. The total amount of light reaching the film plane (the 'exposure') changes with the duration of exposure, aperture of the lens, and on the effective focal length of the lens (which in variable focal length lenses, can force a change in aperture as the lens is zoomed). Changing any of these controls can alter the exposure. Many cameras may be set to adjust most or all of these controls automatically. This automatic functionality is useful for occasional photographers in many situations.
The duration of an exposure is referred to as shutter speed, often even in cameras that do not have a physical shutter, and is typically measured in fractions of a second. It is quite possible to have exposures from one up to several seconds, usually for still-life subjects, and for night scenes exposure times can be several hours. However, longer shutter speeds blur motion, and shorter shutter speeds freeze motion. Therefore, moving subjects require fast shutter speeds.[56]
The effective aperture is expressed by an f-number or f-stop (derived from focal ratio), which is proportional to the ratio of the focal length to the diameter of the aperture. Longer focal length lenses will pass less light through the same aperture diameter due to the greater distance the light has to travel; shorter focal length lenses will transmit more light through the same diameter of aperture.
The smaller the f/number, the larger the effective aperture. The present system of f/numbers to give the effective aperture of a lens was standardized by an international convention in 1963 and is referred to as the British Standard (BS-1013).[57] Other aperture measurement scales had been used through the early 20th century, including the European Scale, Intermediate settings, and the 1881 Uniform System proposed by the Royal Photographic Society, which are all now largely obsolete.[58]:30 T-stops have been used for color motion picture lenses, to account for differences in light transmission through compound lenses, are calculated as T-number = f/number x √transmittance.[58]:615
If the f-number is decreased by a factor of √2, the aperture diameter is increased by the same factor, and its area is increased by a factor of 2. The f-stops that might be found on a typical lens include 2.8, 4, 5.6, 8, 11, 16, 22, 32, where going up "one stop" (using lower f-stop numbers) doubles the amount of light reaching the film, and stopping down one stop halves the amount of light.
Image capture can be achieved through various combinations of shutter speed, aperture, and film or sensor speed. Different (but related) settings of aperture and shutter speed enable photographs to be taken under various conditions of film or sensor speed, lighting and motion of subjects or camera, and desired depth of field. A slower speed film will exhibit less "grain", and a slower speed setting on an electronic sensor will exhibit less "noise", while higher film and sensor speeds allow for a faster shutter speed, which reduces motion blur or allows the use of a smaller aperture to increase the depth of field.
For example, a wider aperture is used for lower light and a lower aperture for more light. If a subject is in motion, then a high shutter speed may be needed. A tripod can also be helpful in that it enables a slower shutter speed to be used.
For example, f/8 at 8 ms (1/125 of a second) and f/5.6 at 4 ms (1/250 of a second) yield the same amount of light. The chosen combination affects the final result. The aperture and focal length of the lens determine the depth of field, which refers to the range of distances from the lens that will be in focus. A longer lens or a wider aperture will result in "shallow" depth of field (i.e., only a small plane of the image will be in sharp focus). This is often useful for isolating subjects from backgrounds as in individual portraits or macro photography.
Conversely, a shorter lens, or a smaller aperture, will result in more of the image being in focus. This is generally more desirable when photographing landscapes or groups of people. With very small apertures, such as pinholes, a wide range of distance can be brought into focus, but sharpness is severely degraded by diffraction with such small apertures. Generally, the highest degree of "sharpness" is achieved at an aperture near the middle of a lens's range (for example, f/8 for a lens with available apertures of f/2.8 to f/16). However, as lens technology improves, lenses are becoming capable of making increasingly sharp images at wider apertures.
Image capture is only part of the image forming process. Regardless of material, some process must be employed to render the latent image captured by the camera into a viewable image. With slide film, the developed film is just mounted for projection. Print film requires the developed film negative to be printed onto photographic paper or transparency. Prior to the advent of laser jet and inkjet printers, celluloid photographic negative images had to be mounted in an enlarger which projected the image onto a sheet of light-sensitive paper for a certain length of time (usually measured in seconds or fractions of a second). This sheet then was soaked in a chemical bath of developer (to bring out the image) followed immediately by a stop bath (to neutralize the progression of development and prevent the image from changing further once exposed to normal light). After this, the paper was hung until dry enough to safely handle. This post-production process allowed the photographer to further manipulate the final image beyond what had already been captured on the negative, adjusting the length of time the image was projected by the enlarger and the duration of both chemical baths to change the image's intensity, darkness, clarity, etc. This process is still employed by both amateur and professional photographers, but the advent of digital imagery means that the vast majority of modern photographic work is captured digitally and rendered via printing processes that are no longer dependent on chemical reactions to light. Such digital images may be uploaded to an image server (e.g., a photo-sharing website), viewed on a television, or transferred to a computer or digital photo frame. Every type can then be produced as a hard copy on regular paper or photographic paper via a printer.

Prior to the rendering of a viewable image, modifications can be made using several controls. Many of these controls are similar to controls during image capture, while some are exclusive to the rendering process. Most printing controls have equivalent digital concepts, but some create different effects. For example, dodging and burning controls are different between digital and film processes. Other printing modifications include:
- Chemicals and process used during film development
- Duration of print exposure – equivalent to shutter speed
- Printing aperture – equivalent to aperture, but has no effect on depth of field
- Contrast – changing the visual properties of objects in an image to make them distinguishable from other objects and the background
- Dodging – reduces exposure of certain print areas, resulting in lighter areas
- Burning in – increases exposure of certain areas, resulting in darker areas
- Paper texture – glossy, matte, etc.
- Paper type – resin-coated (RC) or fiber-based (FB)
- Paper size
- Exposure shape – resulting prints in shapes such as circular, oval, loupe, etc.
- Toners – used to add warm or cold tones to black-and-white prints
Shutters
Although a range of different shutter devices have been used during the development of the camera only two types have been widely used and remain in use today.
The Leaf shutter or more precisely the in-lens shutter is a shutter contained within the lens structure, often close to the diaphragm consisting of a number of metal leaves which are maintained under spring tension and which are opened and then closed when the shutter is released. The exposure time is determined by the interval between opening and closing. In this shutter design, the whole film frame is exposed at one time. This makes flash synchronisation much simpler as the flash only needs to fire once the shutter is fully open. Disadvantages of such shutters are their inability to reliably produce very fast shutter speeds ( faster than 1/500th second or so) and the additional cost and weight of having to include a shutter mechanism for every lens.
The focal-plane shutter operates as close to the film plane as possible and consists of cloth curtains that are pulled across the film plane with a carefully determined gap between the two curtains (typically running horizontally) or consisting of a series of metal plates (typically moving vertically) just in front of the film plane. The focal-plane shutter is primarily associated with the single lens reflex type of cameras, since covering the film rather than blocking light passing through the lens allows the photographer to view through the lens at all times except during the exposure itself. Covering the film also facilitates removing the lens from a loaded camera (many SLRs have interchangeable lenses).
Complexities
Professional medium format SLR (single-lens-reflex) cameras (typically using 120/220 roll film) use a hybrid solution, since such a large focal-plane shutter would be difficult to make and/or may run slowly. A manually inserted blade known as a dark slide allows the film to be covered when changing lenses or film backs. A blind inside the camera covers the film prior to and after the exposure (but is not designed to be able to give accurately controlled exposure times) and a leaf shutter that is normally open is installed in the lens. To take a picture, the leaf shutter closes, the blind opens, the leaf shutter opens then closes again, and finally the blind closes and the leaf shutter re-opens (the last step may only occur when the shutter is re-cocked).
Using a focal-plane shutter, exposing the whole film plane can take much longer than the exposure time. The exposure time does not depend on the time taken to make the exposure over all, only on the difference between the time a specific point on the film is uncovered and then covered up again. For example, an exposure of 1/1000 second may be achieved by the shutter curtains moving across the film plane in 1/50th of a second but with the two curtains only separated by 1/20th of the frame width. In fact in practice the curtains do not run at a constant speed as they would in an ideal design, obtaining an even exposure time depends mainly on being able to make the two curtains accelerate in a similar manner.
When photographing rapidly moving objects, the use of a focal-plane shutter can produce some unexpected effects, since the film closest to the start position of the curtains is exposed earlier than the film closest to the end position. Typically this can result in a moving object leaving a slanting image. The direction of the slant depends on the direction the shutter curtains run in (noting also that as in all cameras the image is inverted and reversed by the lens, i.e. "top-left" is at the bottom right of the sensor as seen by a photographer behind the camera).
Focal-plane shutters are also difficult to synchronise with flash bulbs and electronic flash and it is often only possible to use flash at shutter speeds where the curtain that opens to reveal the film completes its run and the film is fully uncovered, before the second curtain starts to travel and cover it up again. Typically 35mm film SLRs could sync flash at only up to 1/60th second if the camera has horizontal run cloth curtains, and 1/125th if using a vertical run metal shutter.
Formats
A wide range of film and plate formats have been used by cameras. In the early history plate sizes were often specific for the make and model of camera although there quickly developed some standardisation for the more popular cameras. The introduction of roll film drove the standardization process still further so that by the 1950s only a few standard roll films were in use. These included 120 film providing 8, 12 or 16 exposures, 220 film providing 16 or 24 exposures, 127 film providing 8 or 12 exposures (principally in Brownie cameras) and 135 (35 mm film) providing 12, 20 or 36 exposures – or up to 72 exposures in the half-frame format or in bulk cassettes for the Leica Camera range.
For cine cameras, film 35 mm wide and perforated with sprocket holes was established as the standard format in the 1890s. It was used for nearly all film-based professional motion picture production. For amateur use, several smaller and therefore less expensive formats were introduced. 17.5 mm film, created by splitting 35 mm film, was one early amateur format, but 9.5 mm film, introduced in Europe in 1922, and 16 mm film, introduced in the US in 1923, soon became the standards for "home movies" in their respective hemispheres. In 1932, the even more economical 8 mm format was created by doubling the number of perforations in 16 mm film, then splitting it, usually after exposure and processing. The Super 8 format, still 8 mm wide but with smaller perforations to make room for substantially larger film frames, was introduced in 1965.
Camera accessories
Accessories for cameras are mainly for care, protection, special effects and functions.
- Lens hood: used on the end of a lens to block the sun or other light source to prevent glare and lens flare (see also matte box).
- Lens cap: covers and protects the lens during storage.
- Lens adapter: allows the use of lenses other than those for which the camera was designed.
- Lens filters: allow artificial colors or change light density.
- Lens extension tubes allow close focus in macro photography.
- Flash equipment: including light diffuser, mount and stand, reflector, soft box, trigger and cord.
- Care and protection: including camera case and cover, maintenance tools, and screen protector.
- Large format cameras use special equipment which includes magnifier loupe, view finder, angle finder, focusing rail /truck.
- Battery and sometimes a charger.
- Some professional SLR could be provided with interchangeable finders for eye-level or waist-level focusing, focusing screens, eye-cup, data backs, motor-drives for film transportation or external battery packs.
- Tripod, microscope adapter, cable release, electric wire release.
- Dew shield - Prevents moisture build up on the lens.
- UV filter, Can protect the front element of a lens from scratches, cracks, smudges, dirt, dust and moisture while keeping a minimum impact on image quality.
Camera design history
Plate camera
The earliest cameras produced in significant numbers used sensitised glass plates were plate cameras. Light entered a lens mounted on a lens board which was separated from the plate by an extendible bellows.There were simple box cameras for glass plates but also single-lens reflex cameras with interchangeable lenses and even for color photography (Autochrome Lumière). Many of these cameras had controls to raise or lower the lens and to tilt it forwards or backwards to control perspective.
Focussing of these plate cameras was by the use of a ground glass screen at the point of focus. Because lens design only allowed rather small aperture lenses, the image on the ground glass screen was faint and most photographers had a dark cloth to cover their heads to allow focussing and composition to be carried out more easily. When focus and composition were satisfactory, the ground glass screen was removed and a sensitised plate put in its place protected by a dark slide. To make the exposure, the dark slide was carefully slid out and the shutter opened and then closed and the dark slide replaced.
Glass plates were later replaced by sheet film in a dark slide for sheet film; adaptor sleeves were made to allow sheet film to be used in plate holders. In addition to the ground glass, a simple optical viewfinder was often fitted. Cameras which take single exposures on sheet film and are functionally identical to plate cameras were used for static, high-image-quality work; much longer in 20th century, see Large-format camera, below.
Folding camera
The introduction of films enabled the existing designs for plate cameras to be made much smaller and for the base-plate to be hinged so that it could be folded up compressing the bellows. These designs were very compact and small models were dubbed vest pocket cameras. Folding rollfilm cameras were preceded by folding plate cameras, more compact than other designs.
Box camera
Box cameras were introduced as a budget level camera and had few if any controls. The original box Brownie models had a small reflex viewfinder mounted on the top of the camera and had no aperture or focusing controls and just a simple shutter. Later models such as the Brownie 127 had larger direct view optical viewfinders together with a curved film path to reduce the impact of deficiencies in the lens.
Rangefinder camera
As camera a lens technology developed and wide aperture lenses became more common, rangefinder cameras were introduced to make focusing more precise. Early rangefinders had two separate viewfinder windows, one of which is linked to the focusing mechanisms and moved right or left as the focusing ring is turned. The two separate images are brought together on a ground glass viewing screen. When vertical lines in the object being photographed meet exactly in the combined image, the object is in focus. A normal composition viewfinder is also provided. Later the viewfinder and rangefinder were combined. Many rangefinder cameras had interchangeable lenses, each lens requiring its own range- and viewfinder linkages.
Rangefinder cameras were produced in half- and full-frame 35 mm and rollfilm (medium format).
Instant picture camera
After exposure every photograph is taken through pinch rollers inside of the instant camera. Thereby the developer paste contained in the paper 'sandwich' distributes on the image. After a minute, the cover sheet just needs to be removed and one gets a single original positive image with a fixed format. With some systems it was also possible to create an instant image negative, from which then could be made copies in the photo lab. The ultimate development was the SX-70 system of Polaroid, in which a row of ten shots - engine driven - could be made without having to remove any cover sheets from the picture. There were instant cameras for a variety of formats, as well as cartridges with instant film for normal system cameras.
Single-lens reflex
In the single-lens reflex camera, the photographer sees the scene through the camera lens. This avoids the problem of parallax which occurs when the viewfinder or viewing lens is separated from the taking lens. Single-lens reflex cameras have been made in several formats including sheet film 5x7" and 4x5", roll film 220/120 taking 8,10, 12 or 16 photographs on a 120 roll and twice that number of a 220 film. These correspond to 6x9, 6x7, 6x6 and 6x4.5 respectively (all dimensions in cm). Notable manufacturers of large format and roll film SLR cameras include Bronica, Graflex, Hasselblad, Mamiya, and Pentax. However the most common format of SLR cameras has been 35 mm and subsequently the migration to digital SLR cameras, using almost identical sized bodies and sometimes using the same lens systems.
Almost all SLR cameras use a front surfaced mirror in the optical path to direct the light from the lens via a viewing screen and pentaprism to the eyepiece. At the time of exposure the mirror is flipped up out of the light path before the shutter opens. Some early cameras experimented with other methods of providing through-the-lens viewing, including the use of a semi-transparent pellicle as in the Canon Pellix[59] and others with a small periscope such as in the Corfield Periflex series.[60]
Twin-lens reflex
Twin-lens reflex cameras used a pair of nearly identical lenses, one to form the image and one as a viewfinder. The lenses were arranged with the viewing lens immediately above the taking lens. The viewing lens projects an image onto a viewing screen which can be seen from above. Some manufacturers such as Mamiya also provided a reflex head to attach to the viewing screen to allow the camera to be held to the eye when in use. The advantage of a TLR was that it could be easily focussed using the viewing screen and that under most circumstances the view seen in the viewing screen was identical to that recorded on film. At close distances however, parallax errors were encountered and some cameras also included an indicator to show what part of the composition would be excluded.
Some TLR had interchangeable lenses but as these had to be paired lenses they were relatively heavy and did not provide the range of focal lengths that the SLR could support. Most TLRs used 120 or 220 film; some used the smaller 127 film.
Large-format camera
The large-format camera, taking sheet film, is a direct successor of the early plate cameras and remained in use for high quality photography and for technical, architectural and industrial photography. There are three common types, the view camera with its monorail and field camera variants, and the press camera. They have an extensible bellows with the lens and shutter mounted on a lens plate at the front. Backs taking rollfilm, and later digital backs are available in addition to the standard dark slide back. These cameras have a wide range of movements allowing very close control of focus and perspective. Composition and focusing is done on view cameras by viewing a ground-glass screen which is replaced by the film to make the exposure; they are suitable for static subjects only, and are slow to use.
Medium-format camera
Medium-format cameras have a film size between the large-format cameras and smaller 35mm cameras. Typically these systems use 120 or 220 rollfilm. The most common image sizes are 6×4.5 cm, 6×6 cm and 6×7 cm; the older 6×9 cm is rarely used. The designs of this kind of camera show greater variation than their larger brethren, ranging from monorail systems through the classic Hasselblad model with separate backs, to smaller rangefinder cameras. There are even compact amateur cameras available in this format.
Subminiature camera
Cameras taking film significantly smaller than 35 mm were made. Subminiature cameras were first produced in the nineteenth century. The expensive 8×11 mm Minox, the only type of camera produced by the company from 1937 to 1976, became very widely known and was often used for espionage (the Minox company later also produced larger cameras). Later inexpensive subminiatures were made for general use, some using rewound 16 mm cine film. Image quality with these small film sizes was limited.
Movie camera
A ciné camera or movie camera takes a rapid sequence of photographs on image sensor or strips of film. In contrast to a still camera, which captures a single snapshot at a time, the ciné camera takes a series of images, each called a "frame" through the use of an intermittent mechanism.
The frames are later played back in a ciné projector at a specific speed, called the "frame rate" (number of frames per second). While viewing, a person's eyes and brain merge the separate pictures to create the illusion of motion. The first ciné camera was built around 1888 and by 1890 several types were being manufactured. The standard film size for ciné cameras was quickly established as 35mm film and this remained in use until transition to digital cinematography. Other professional standard formats include 70 mm film and 16mm film whilst amateurs film makers used 9.5 mm film, 8mm film or Standard 8 and Super 8 before the move into digital format.
The size and complexity of ciné cameras varies greatly depending on the uses required of the camera. Some professional equipment is very large and too heavy to be hand held whilst some amateur cameras were designed to be very small and light for single-handed operation.
Camcorders
A camcorder is an electronic device combining a video camera and a video recorder. Although marketing materials may use the colloquial term "camcorder", the name on the package and manual is often "video camera recorder". Most devices capable of recording video are camera phones and digital cameras primarily intended for still pictures; the term "camcorder" is used to describe a portable, self-contained device, with video capture and recording its primary function.
Professional video camera
A professional video camera (often called a television camera even though the use has spread beyond television) is a high-end device for creating electronic moving images (as opposed to a movie camera, that earlier recorded the images on film). Originally developed for use in television studios, they are now also used for music videos, direct-to-video movies, corporate and educational videos, marriage videos etc.
These cameras earlier used vacuum tubes and later electronic sensors.
Digital camera
A digital camera (or digicam) is a camera that encodes digital images and videos digitally and stores them for later reproduction.[61] Most cameras sold today are digital,[62] and digital cameras are incorporated into many devices ranging from mobile phones (called camera phones) to vehicles.
Digital and film cameras share an optical system, typically using a lens with a variable diaphragm to focus light onto an image pickup device.[63] The diaphragm and shutter admit the correct amount of light to the imager, just as with film but the image pickup device is electronic rather than chemical. However, unlike film cameras, digital cameras can display images on a screen immediately after being recorded, and store and delete images from memory. Most digital cameras can also record moving videos with sound. Some digital cameras can crop and stitch pictures and perform other elementary image editing.
Consumers adopted digital cameras in 1990s. Professional video cameras transitioned to digital around the 2000s-2010s. Finally movie cameras transitioned to digital in the 2010s.
Panoramic camera
Panoramic cameras are fixed-lens digital action cameras. They usually have a single fish-eye lens or multiple lenses, to cover the entire 180° up to 360° in their field of view.
VR Camera
VR cameras are panoramic cameras that also cover the top and bottom in their field of view. There have also been camera rigs employing multiple cameras to cover the whole 360° by 360° field of view.
Image gallery
- The Giroux daguerreotype camera, the first to be commercially produced[13]
 19th century studio camera, with bellows for focusing
 Rangefinder camera, Leica c. 1936
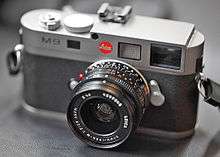 Leica M9 with a Summicron-M 28/2 ASPH Lens
 Olympus Four Thirds single-lens reflex camera
 Twin-lens reflex camera
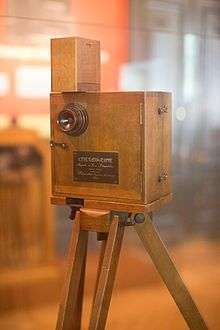 Cinématographe Lumière at the Institut Lumière, France
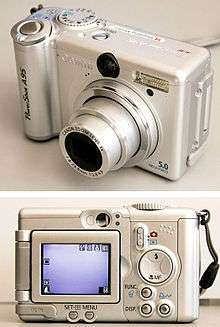 Front and back of Canon PowerShot A95, a typical pocket-size digital camera
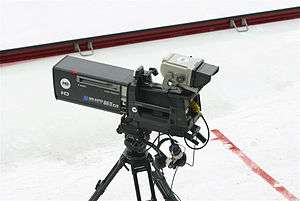 Digital television camera by Sony
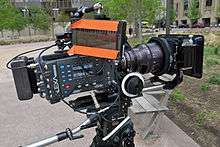 Arri Alexa, a digital movie camera
 Zenit-E with Helios 44-2 lens
 Smartphone with built-in camera spreads private images globally, c. 2013
See also
References
- ↑ Gustavson, pg. VII
- ↑ Young, Freedman & Ford, pg. 1182-1183
- ↑ London, Upton, Kobré & Brill, pg. 4
- ↑ London, Upton, Kobré & Brill, pp. 6-7
- ↑ Burian & Caputo, pg. 12
- ↑ Ascher & Pincus, pg. 4
- ↑ Plott, John C. (1984). Global History of Philosophy: The Period of scholasticism (part one). p. 460. ISBN 9780895816788.
- 1 2 Gustavson, pg. 4
- 1 2 Gernsheim, pg. 7
- ↑ Gernsheim, pg. 8
- ↑ Kirkpatrick, Larry D.; Francis, Gregory E. (2007). "Light". Physics: A World View (6 ed.). Belmont, California: Thomson Brooks/Cole. p. 339. ISBN 0-495-01088-X.
- ↑ Gustavson, pp. 3-5
- 1 2 Gustavson, pg. 9
- ↑ Gernsheim, pp. 9-11
- ↑ Gernsheim, pg. 9
- ↑ Gustavson, pg. 5
- ↑ Gernsheim, pg. 10
- ↑ Gustavson, pg. 6
- ↑ Gernsheim, pg. 11
- ↑ Hirsch, pg. 15
- ↑ Gustavson, pg. 21
- ↑ Hirsch, pg. 16
- ↑ Hirsch, pg. 67
- ↑ Gustavson, pg. 22
- ↑ London, et. al., pg. 370
- ↑ Gernsheim, pg. 15
- 1 2 Gustavson, pp. 8-9
- ↑ Frizot, pg. 38
- ↑ Frizot, pg. 39
- ↑ Gustavson (500 Cameras), pg. 6
- ↑ Spira, Lothrop, and Spira, pg. 28
- ↑ Gustavson (500 Cameras), pg. 7
- ↑ Hirsch, pg. 34
- ↑ Gernsheim, pg. 19
- ↑ Spira, Lothrop, and Spira, pp. 26-27
- ↑ Gustavson (500 Cameras), pg. 17
- ↑ Starl, pg. 38
- ↑ Hirsch, pp. 33-34
- ↑ Spira, pg. 25
- ↑ Roger Hicks (1984). A History of the 35mm Still Camera. Focal Press, London & Boston. p. 137. ISBN 0-240-51233-2.
- ↑ Rudolph Lea (1993). Register of 35mm SLR cameras. Wittig Books, Hückelhoven. p. 23. ISBN 3-88984-130-9.
- ↑ Michael R. Peres (2013), The Focal Encyclopedia of Photography, page 779, Taylor & Francis
- ↑ Gustavson (500 Cameras), pg. 442
- ↑ Hitchcock, pg. 225
- ↑ Nikon SLR-type digital cameras, Pierre Jarleton
- ↑ David D. Busch (2011), Nikon D70 Digital Field Guide, page 11, John Wiley & Sons
- ↑ The long, difficult road to Pentax full-frame The long, difficult road to Pentax full-frame, Digital Photography Review
- ↑ British Journal of Photography, Issues 7410-7422, 2003, page 2
- ↑ Canon EOS-1Ds, 11 megapixel full-frame CMOS, Digital Photography Review
- ↑ "Evolution of the Camera phone: From Sharp J-SH04 to Nokia 808 Pureview". Hoista.net. 2012-02-28. Retrieved 2013-06-21.
- ↑ "Definition of focus". IAC. Retrieved 31 January 2012.
- ↑ McHugh, Sean. "Understanding Camera Lenses". Cambridge in Colour. Archived from the original on 2013-08-19.
- ↑ Brown, Gary. "How Autofocus Cameras Work". HowStuffWorks.com. Archived from the original on 2013-09-30.
- ↑ Wehner, Mike (2011-10-19). "Lytro camera lets you focus after shooting, now available for pre-order". Yahoo! News. Archived from the original on 2011-10-22.
- ↑ "Star Trails over the VLT in Paranal". ESO Picture of the Week. Retrieved 16 December 2013.
- ↑ Fisher, Jim (2013). "Take Picture-Perfect Digital Photos." PC Magazine: 134–141.
- ↑ British Standards Institution (1963). Photographic lenses: Definitions, methods and accuraccy of marking (British Standard 1019) (2nd ed.). British Standards Institution. Retrieved 19 March 2016.
- 1 2 Spencer, Douglas A. (1973). The focal dictionary of photographic technologies. Englewood Cliffs, N.J.: Prentice Hall. ISBN 978-0133227192.
- ↑ "Canon Pellix Camera". Photography in Malaysia. Archived from the original on 2013-10-16.
- ↑ Parker, Bev. "Corfield Cameras - The Periflex Era". Wolverhampton Museum of Industry.
- ↑ Farlex Inc: definition of digital camera at the Free Dictionary; retrieved 2013-09-07
- ↑ Musgrove, Mike (2006-01-12). "Nikon Says It's Leaving Film-Camera Business". Washington Post. Retrieved 2007-02-23.
- ↑ MakeUseOf: How does a Digital Camera Work; retrieved 2013-09-07
Bibliography
- Ascher, Steven; Pincus, Edward (2007). The Filmmaker's Handbook: A Comprehensive Guide for the Digital Age (3 ed.). New York, New York: Penguin Group. ISBN 978-0-452-28678-8.
- Burian, Peter; Caputo, Robert (2003). National Geographic photography field guide (2 ed.). Washington, D.C.: National Geographic Society. ISBN 0-7922-5676-X.
- Frizot, Michel. "Light machines: On the threshold of invention". In Michel Frizot. A New History of Photography. Koln, Germany: Konemann. ISBN 3-8290-1328-0.
- Gernsheim, Helmut (1986). A Concise History of Photography (3 ed.). Mineola, New York: Dover Publications, Inc. ISBN 0-486-25128-4.
- Gustavson, Todd (2009). Camera: a history of photography from daguerreotype to digital. New York, New York: Sterling Publishing Co., Inc. ISBN 978-1-4027-5656-6.
- Gustavson, Todd (1 Nov 2011). 500 Cameras: 170 Years of Photographic Innovation. Toronto, Ontario: Sterling Publishing, Inc. ISBN 978-1-4027-8086-8.
- Hirsch, Robert (2000). Seizing the Light: A History of Photography. New York, New York: McGraw-Hill Companies, Inc. ISBN 0-697-14361-9.
- Hitchcock, Susan (editor) (20 Sep 2011). Susan Tyler Hitchcock, eds. National Geographic complete photography. Washington, D.C.: National Geographic Society. ISBN 978-1-4351-3968-8.
- Johnson, William S.; Rice, Mark; Williams, Carla (2005). Therese Mulligan and David Wooters, eds. A History of Photography. Los Angeles, California: Taschen America. ISBN 978-3-8228-4777-0.
- London, Barbara; Upton, John; Kobré, Kenneth; Brill, Betsy (2002). Photography (7 ed.). Upper Saddle River, New Jersey: Prentice Hall. ISBN 0-13-028271-5.
- Spira, S.F.; Lothrop, Jr., Easton S.; Spira, Jonathan B. (2001). The History of Photography as Seen Through the Spira Collection. New York, New York: Aperture. ISBN 978-0893819538.
- Starl, Timm. "A New World of Pictures: The Daguerreotype". In Michel Frizot. A New History of Photography. Koln, Germany: Konemann. ISBN 3-8290-1328-0.
- Wenczel, Norma (2007). "Part I - Introducing an Instrument". In Wolfgang Lefèvre. The Optical Camera Obscura II Images and Texts (PDF). Inside the Camera Obscura – Optics and Art under the Spell of the Projected Image. Max Planck Institute for the History of Science. pp. 13–30. Archived from the original (PDF) on 2 April 2012.
- Young, Hugh D.; Freedman, Roger A.; Ford, A. Lewis (2008). Sears and Zemansky's University Physics (12 ed.). San Francisco, California: Pearson Addison-Wesley. ISBN 0-321-50147-0.
External links
| Wikimedia Commons has media related to Camera. |