Battle of Aberdeen (1644)
The Battle of Aberdeen, also known as the Battle of Justice Mills and the Crabstane Rout, was an engagement in the Wars of the Three Kingdoms which took place outside the city of Aberdeen on 13 September 1644. During the battle, Royalist forces led by James Graham, Lord Montrose routed an army raised by the Covenanter-dominated Parliament of Scotland under Robert Balfour, 2nd Lord Balfour of Burleigh.
| Battle of Aberdeen | |||||||
|---|---|---|---|---|---|---|---|
| Part of Wars of the Three Kingdoms | |||||||
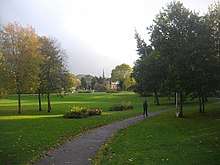 Bon Accord Terrace Gardens, Aberdeen. In 1644 this area was outside the city. Montrose attacked from the approximate line of Willowbank Road, in the distance, towards the camera position and the site of the Crabstane | |||||||
| |||||||
| Belligerents | |||||||
|
|
| ||||||
| Commanders and leaders | |||||||
|
|
| ||||||
| Strength | |||||||
| 1,500-foot, 80 horse | 2,000-foot, 300 horse | ||||||
| Casualties and losses | |||||||
| Light | 520 | ||||||
| 118–160 people killed in sack of Aberdeen by Royalists | |||||||
The battlefield was assessed to be inventoried and protected by Historic Scotland under the Scottish Historical Environment Policy of 2009, but it failed to meet one or more of the criteria.[1][2]
Prelude
After defeating the government forces commanded by Lord Elcho at the Battle of Tippermuir, outside Perth, Montrose's forces had captured a large cache of weapons and munitions. He was not, however, able to hold Perth: many of the Highlanders forming his army immediately returned home with their plunder and a stronger government force under the Marquess of Argyll was approaching the town from the west. Montrose departed Perth on 4 September. He reached Dundee on 6 September and ordered the town's surrender, but its burgesses answered defiantly.[3] Montrose's army was further depleted when Lord Kilpont, one of his commanders, was murdered by an associate, James Stewart of Ardvorlich: Kilpont's levies immediately disbanded. Rather than attempt to take Dundee by force, Montrose chose to head north in the hope of raising further recruits amongst the Marquess of Huntly's tenantry. With around 1,500 Irish infantry under Alasdair MacColla, a small number of Keppoch clansmen and around 80 horse, Montrose made a rapid advance, but found another government army blocking his path outside Aberdeen.
The Scottish government had ordered all available militia from the Mearns, Aberdeenshire and Banffshire to assemble at the city by 10 September; only the local Aberdeenshire contingents had arrived before Montrose.[4] These comprised the 500-strong Aberdeen Militia and a number of levies from the surrounding area. The government commander Lord Balfour of Burleigh also had two regiments of regular soldiers: his own regiment, brought from Fife, and a newly raised Aberdeenshire regiment led by Lord Forbes. Including regulars and militia the Covenanter infantry may have totalled 2,000 men.[4] There were also at least three troops of regular cavalry, commanded by Captain Alexander Keith, Sir William Forbes of Craigevar and Lord Lewis Gordon, along with further untrained 'fencibles'; government horse totalled around 300.[4]
Battle
On the morning of 13 September 1644, the Covenanter force under Burleigh marched out of the town to meet the attackers. Burleigh's men drew up in a strong defensive position south-west of the town, on a steep ridge above the valley of the How Burn.
Montrose sent a messenger and drummer under a flag of truce to demand the surrender of the city, or the defenders could expect no quarter. He also requested that they send women, children and elderly people out of the town before his attack.[5] Aberdeen's chief citizens and guild leaders received this ultimatum near the present day site of Justice Mill Lane. Although the ultimatum was rejected, the Royalist party were treated hospitably: they were treated to drink and one of the Aberdeen magistrates gave the drummer a coin worth 6 Pound Scots.[5] On the way back to the Royalist camp, a trooper of the Fife regiment fired on the Royalist party, killing the drummer.[6] Montrose was supposedly so angered by this that he ordered an immediate attack and gave his troops permission to sack the town.
Deployments
- Royalist (James Graham, Lord Montrose)
- Irish Brigade (Alasdair Mac Colla)
- Thomas Laghtnan's Regiment
- Manus O'Cahan's Regiment
- James MacDonell's Regiment
- Clan MacDonald of Keppoch
- Sir Nathaniel Gordon's Horse
- Sir Thomas Ogilvie's Horse
- Irish Brigade (Alasdair Mac Colla)
- Covenanter (Lord Balfour of Burleigh)
- Lord Balfour of Burleigh's Regiment
- Lord Forbes' Regiment
- Aberdeen Militia (Maj. Arthur Forbes)
- Aberdeenshire Fencibles
- Cavalry units:
- Sir William Forbes of Craigevar
- Capt. Alexander Keith
- Lord Lewis Gordon
- 'Fencible' cavalry (Lord Fraser, Lord Crichton)
Montrose drew up an extended line of men. His left wing, under the professional soldier Colonel James Hay, included Gordon's cavalry and a small unit of Irish musketeers led by Captain Mortimer of O'Cahan's regiment. The right wing, commanded by Sir William Rollo, included Ogilvie's troopers and a number of Highland infantry; the centre was made up of the Irish under Mac Colla.[4] Burleigh placed the majority of his cavalry, under Crichton and Fraser, on his left flank opposite Rollo, where the gradient to the ridge was shallowest and his defensive position weakest, with his 'regular' cavalry on his right wing. The infantry were in the centre, with his Fife regiment, the strongest, towards the left of the position.[4] A number of Burleigh's musketeers occupied defensive positions in the buildings of the Justice Mills, on his right flank towards the west side of the battlefield.
Actions during the battle
The battle began with a cannonade from the Covenanters' field guns. The Royalist troopers on the left wing under Gordon attempted to drive some government musketeers out of the Justice Mills buildings, but were attacked by Alexander Keith's cavalry, who in turn were repulsed by a volley from Mortimer's musketeers.[4] Craigevar's cavalry troop then advanced downhill towards the Royalist positions of O'Cahan's regiment. O'Cahan's men simply parted to let the cavalry through, firing at the troopers' backs, and in the confusion the government troopers were then charged and routed by Gordon's horse: Craigevar and his second in command Forbes of Boyndlie were taken prisoner.
On the Royalist right wing, Sir William Rollo and MacDonnell's foot defended against several inconclusive attacks by Fraser and Crighton's fencible cavalry. Montrose ordered the remaining uncommitted Irish regiment, Laghtnan's, to advance up the steep slope towards the Government centre. There was an intense and probably prolonged firefight at the top of the ridge in the vicinity of the Crabstane of Aberdeen. The Aberdeen Militia gave way before a final "Highland charge" and fled into the town, pursued by Laghtnan's men, beginning a general retreat of the government forces. One unit, the Fife regiment, held formation and attempted to outflank the Royalists to the east with the intention of escaping southwards, but Montrose ordered MacDonnell's regiment to engage them: they were scattered with great loss of life, forming the majority of the 520 or so government casualties.[4] Royalist casualties are unknown, but thought to be light. The battle had lasted around two hours.[7]
Royalist sack of the town
The Royalist troops pursued fleeing troops from the battle into the town, and cut down and killed any men they found within it, according to the chronicler John Spalding, who was present.[6] The violence went on for several days: goods were looted, women raped, and at least 118 (according to Spalding) and perhaps as many as 160 (according to Alexander Jaffray, who was also at the battle)[8] people were killed, including three members of the town council and a large number of tradesmen and ordinary residents.[6] Spalding recorded that the townspeople eventually took to wearing a twist of oats in their bonnets, the Royalists' badge, in an attempt to deflect the attentions of the marauding troops: "ilk ane had in his cap or bonnet a rip of oats, whilk was his sign, our town's people began to wear the like in their bonnets, and to knit them to the knocks of our yetts, but it was little safeguard to us, albeit we used the same for a protection".[9] The episode did severe damage to the Royalist cause, particularly as Aberdeen had been in general sympathetic to the Royalists, and eliminated Montrose's chances of recruiting in the area: despite the Royalist victory, this was probably the most significant outcome of the battle overall.
Aftermath
Montrose remained in Aberdeen for three days, before leaving for Rothiemurchus in the Highlands to recruit new men and avoid a confrontation with the approaching Parliamentarian force under the Marquess of Argyll.
A highly partial version of the sack of Aberdeen and a more accurate portrayal of the Royalist campaign of 1644–1645 in general feature in the 1937 novel And No Quarter by the Irish writer Maurice Walsh, told from the perspective of two members of O'Cahan's Regiment.
Notes
- Inventory battlefields, Historic Scotland, retrieved 1 August 2013
- "Inventory of Historic Battlefields Research Report: Aberdeen II" (PDF). Historic Environment Scotland. 11 July 2016. Retrieved 18 April 2019.
- Roberts, John L. (2000) Clan King and Covenant, Edinburgh University Press, p.55
- Reid, S. (2012) Auldearn 1645: the Marquis of Montrose's Scottish campaign, Bloomsbury
- Lang, Andrew. The History Of Scotland: Volume 3, p.136
- Dennison, Ditchburn and Lynch (eds) (2002) Aberdeen Before 1800: A New History, Dundurn, p.259
- Reid, S. (1990) The Campaigns of Montrose, Mercat, p.69
- Lang, p.137
- History of the Troubles And Memorable Transactions in Scotland, from the year 1624 to 1645, v2, p.239
References
- Brown, Chris (2002), The Battle of Aberdeen, 1645, Stroud, UK: Tempus Publishing, ISBN 0-7524-2340-1
- The Battlefields Trust; Fletcher, Craig; Jones, Christopher (2004), Battle of Aberdeen II, The Battlefields Trust website, retrieved 1 August 2013
Further reading
- Stuart, John, ed. (1871), Extracts from the Council register of the burgh of Aberdeen 1643–1747, 2, Edinburgh: Scottish Burgh Records Society, pp. 28–29 — a contemporary account of the battle.