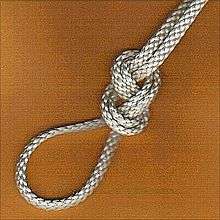
Figure-eight loop
| Figure-eight loop | |
|---|---|
 | |
| Names | Figure-eight loop, Flemish loop |
| Category | Loop |
| Related | figure-eight knot, flemish bend, Figure-of-nine loop, spider hitch |
| Releasing | Jamming |
| Typical use | climbing, caving |
| Caveat | jams |
| ABoK | #1047 |
| Instructions | |
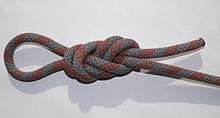
A figure-eight loop (also figure-eight on a bight, figure-eight follow-through, Flemish loop, or Flemish eight) is a type of knot created by a loop on the bight. It is used in climbing and caving where rope strains are light to moderate and for decorative purposes. The knot is commonly followed by tying a strangle knot (a.k.a. half a double fisherman's knot) or an overhand knot around the standing end.[1]
The Flemish loop or figure-eight loop is perhaps stronger than the loop knot. Neither of these knots is used at sea, as they are hard to untie. In hooking a tackle to any of the loops, if the loop is long enough it is better to arrange the rope as a cat's paw.
The double figure eight is used to put a loop in the end of a rope, or around an object. It is relatively easy to tie and is secure, but can become difficult to untie after heavy loading, and can jam badly in any rope type.
Tying methods
Traditional
A figure-eight loop is created by doubling the rope into a bight, then tying the standard figure-eight knot.
In climbing, this knot is used to save time when repeatedly attaching the rope to climbing harnesses, using locking carabiners, such as when a group of people are climbing on the same top-rope.[3]
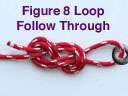
Follow through
Alternatively, to tie the knot directly around an object, the follow through method must be used.
- Tie a regular figure eight knot with a significant amount of extra tail.
- Loop the tail around the object.
- Thread the tail back through the figure eight to create a normal looking figure eight on a bight.
Climbing
This is the standard method for attaching a rope to a climbing harness.[4][5]
Often an additional double overhand "backup knot" is tied above the figure 8. This is not required for the knot's integrity,[4][3][6] but it does ensure that adequate tail length has been included, and gets excess tail out of the way.[7] If the finish knot is not included, the tail should be 5 to 8 inches long.[4]
The diameter of the loop should be kept small, to avoid being caught on protrusions while falling, or clipped into accidentally while lead climbing.[4] A well-dressed knot has a symmetrical appearance, with the strands parallel through each curve.[4]
See also
References
- ↑ Mountaineering: Freedom of the Hills, 8th ed., p. 141
- ↑ Ashley, Clifford W. (1944). The Ashley Book of Knots, p.190. Doubleday. ISBN 0-385-04025-3.
- 1 2 Fitch, Nate; Funderburke, Ron (2015-10-15). Climbing: Knots. Rowman & Littlefield. p. 32. ISBN 9781493015061.
Tying a double overhand or barrel knot in front of the figure 8 follow through does not alter the failure mechanism of the knot. It simply adds another step to an already secure knot.
- 1 2 3 4 5 Gaines, Bob; Martin, Jason D. (2014-05-20). Rock Climbing: The AMGA Single Pitch Manual. Rowman & Littlefield. ISBN 9781493009626.
When tied correctly, the knot is tight, with a 5- to 8-inch tail ... Tie the figure eight so that its loop is about the same diameter as your belay loop. The figure eight knot does not require a backup knot.
- ↑ Ritter, Max (2016-07-20). "Learn to Climb: Tie in With a Figure Eight Follow-Through Knot". Climbing Magazine. Retrieved 2018-07-13.
- ↑ Martin, Jason D. "The Figure-Eight Follow-Through". American Alpine Institute. Retrieved 2018-07-13.
The reality of the so-called "back-up knot" is that it is not necessary.
- ↑ "Is a safety knot on your figure-eight a necessity?". Mountain Project. Retrieved 2018-07-13.
External links
- Grog. "Figure Eight Follow Through". Animated Knots. Retrieved 2018-07-12.
- Photographs showing how to tie the figure of 8 loop knot
- Notable Knot Index - Figure 8 Loop
- Video of a figure-eight loop being stressed until breaking, showing that stopper knot is not needed.