Divisional insignia of the British Army
Formation signs at the division level were first introduced in the British Army in the First World War. They were intended (initially) as a security measure to avoid displaying the division's designation in the clear. They were used on vehicles, sign posts and notice boards and were increasingly, but not universally, worn on uniform as the War progressed. Discontinued by the regular army after 1918, only a few Territorial divisions continued to wear them before 1939. Reintroduced officially in late 1940 in the Second World War, divisional formation signs were much more prevalent on uniforms and were taken up by many other formations, independent brigades, corps, armies, overseas and home commands, military districts and lines of communication areas.
The sign itself could be based on many things, geometry (simple or more complex), heraldry, regional or historical associations, a pun, the role of the division, or a combination.
World War I
Until 1916 unit designations were written in plain language in vehicles, notice boards and camp flags, when an order to end this insecure practice was given to adopt a 'device, mark or sign' particular to that division. Initially only a few divisions wore the division sign as a badge on clothing, including some which had been wearing one before the order. This practice became more widespread, especially in 1918, but not universal.[1] The 43rd, 44th and 45th Divisions (all first line territorial) were sent to India to relieve the regular army there and did not adopt division insignia,[2] as did numbers of second line territorial and home service divisions.[3]
Battle Patches were distinct signs used at the battalion level as a means of identification on the battlefield, although some continued the scheme to include company and even platoon signs. Consisting of relatively simple shapes and colours they were introduced by Kitchener's Army troops in 1915, and could follow a divisional or brigade scheme, or be based on the regimental colours or insignia. They were worn on the sleeves, the back of the tunic or painted on the helmet.[1] (Examples: 23rd Division and 50th (Northumbrian) Division.)
Infantry


_Division_Insignia.png)
_Division_Insignia.png)
_Division_Insignia.png)
_Division_Insignia.png)
_Division_Insignia.png)
_Division_Insignia.png)
_Division_Insignia.png)
_Division_insignia.png)
_Division_sign_World_War_1.svg.png)


.svg.png)
 25th Division[13]
Vehicle sign.


_WW1.svg.png)


.svg.png)


_Division_Insignia.png)

_Division_insignia.png)
_Division_insignia_(WW1).png)
_Division_insignia.png)

_Division_Insignia.png)


_WW1.svg.png)
_Division_insignia.png)

_Division_Insignia.png)


_division_WW1.svg.png)

_Division_Insignia.png)

Cavalry


Empire


Commonwealth
Canadian divisions used simple colour oblongs as division signs. Each infantry battalion was designated by a colour - shape combination worn above the division sign, green, red or blue for the 1st, 2nd and 3rd brigades in each division and a circle, triangle, half circle or square for each battalion in the brigade. Other marks were used for brigade and division headquarters, machine gun and mortar units.[28] A 5th Canadian division was broken up for reinforcements before being fully formed, and would have had a burgundy/purple colour patch.[29]
Australian formation signs used a system whereby the shape of the sign identified the division and the colour - shape combination within that shape the particular unit, with 15 combinations for the infantry alone in each division. The Australian division signs shown below are those for the division headquarters. Infantry intended for a 6th Australian division was used instead for reinforcements, those infantry battalions used an upright oval.[30]


 1st Australian Division[32]
Second pattern 1917-1919.


.svg.png)
World War II
The use of divisional signs on uniform was discontinued by the regular army after the First World War, although when reformed in 1920, some territorial divisions continued to wear the signs they had adopted previously.[37] By the start of the Second World War, the British Army prohibited all identifying marks on its Battle Dress uniforms save for drab (black or white on khaki) regimental or corps (branch) slip-on titles, and even these were not to be worn in the field. In May 1940 an order (Army Council Instruction (ACI) 419) was issued banning division signs worn on uniforms, even though some were in use on vehicles in France.[38] Some infantry battalions in France had even started wearing battle patches in a similar manner to their First World War antecedents.[39]
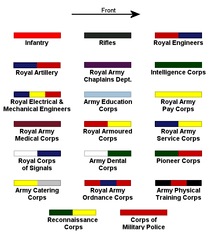
In September 1940 ACI 419 was replaced with ACI 1118, and division signs were permitted to be worn on uniform below the shoulder title. Below this was worn an 'arm of service' stripe (2 inches (5.1 cm) by 1⁄4 inch (0.64 cm)) showing the relevant corps colour (for example Artillery, red and blue, Service Corps, yellow and blue, RAMC dark cherry, and so on, see right). Battalion specific or general regimental patches, in addition to the shoulder title, could also be worn below the arm of service stripe, but the cost of these had to be borne from regimental funds, not the War Office.[40]
Until D-Day these signs were only to be displayed or worn in Britain, if a division went overseas all formation markings had to be removed from vehicles (tactical signs excepted) and uniforms. This order was obeyed to varying degrees in various theatres of war. However 21st Army Group formations wore their signs when they went to France.[41]
The signs shown below were used as vehicle signs and worn on uniform (except where noted). The briefly formed 7th Infantry Division did not have a formation sign and that for the 66th Division was designed but never used. Those for the 12th and 23rd divisions were worn by a small number of troops left behind in Britain.
In the British Army, ACI 1118 specified that the design for the formation sign should be approved by the general officer commanding the formation and reported to the War Office.[42] A further order of December 1941 (ACI 2587) specified the material of the uniform patch as printed cotton (ordnance issue), this replaced the embroidered felt (or fulled wool) or metal badges used previously. In other theatres the uniform patch could be made from a variety of materials including printed or woven cotton, woven silk, leather or metal embroidered felt (or fulled wool).[43]
Infantry

.svg.png)
 4th Infantry Division
Second pattern[45]


_Division_formation_sign.svg.png)

_division_WW2.svg.png)


_Badge.svg.png)
Armoured


.jpg)


Airborne
Empire


_division.svg.png)

.svg.png)
 11th (East Africa) Division, second pattern.[70]
11th (East Africa) Division, second pattern.[70]

Commonwealth
Commonwealth and Dominion forces were exempt from the order banning formation marks on uniform issued in May 1940.[72] The Canadians reused the formation signs of the First World War without the brigade and battalion distinguishing marks. The home service division's signs (6th, 7th and 8th) were made using combinations of the service division's colours. The vehicles of the divisions added a gold coloured maple leaf centrally to the coloured oblong.[28] The Division intended to invade Japan, the 6th Canadian Division (CAPF), used all the division colours and the black of the armoured brigades, volunteers for this division sewed a miniature of this sign on top of whichever formation sign they were wearing at the time.[73]
South African division signs used the national colours.
The Australians added a grey border to the colour patches used in the First World War for those troops reusing the patch as part of the Second Australian Imperial Force, and introduced new division shapes for the armoured divisions. The grey border was added to all of the militia's unit patches in May 1942 causing a little confusion and some resentment. All Australian divisions had distinct vehicle markings in addition to the signs worn on the uniform shown below.[74] The uniform signs shown below were worn by division headquarters personnel.
The New Zealand Division used a system of colour patches to distinguish it's various units, the sign below is the vehicle sign.[75]

.svg.png)


.svg.png) 2nd Armoured Division (Australia)
2nd Armoured Division (Australia)
Vehicle sign. 2nd Armoured Division (Australia)
uniform pacth (HQ).[80].jpg) 3rd Armoured Division (Australia)
3rd Armoured Division (Australia)
Vehicle sign. 3rd Armoured Division (Australia)
Uniform patch (HQ).[81].svg.png) 2nd Australian Division (Militia)
2nd Australian Division (Militia)
Vehicle sign.- 2nd Australian Division (Militia)
Uniform patch (HQ)[83] 


.svg.png)
 9th Australian Infantry Division[87]
9th Australian Infantry Division[87]
Second pattern after Tobruk.
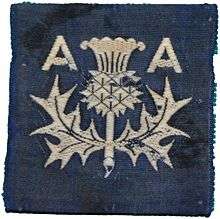
Anti-Aircraft
All Anti-Aircraft divisions were disbanded on 1 October 1942, the component units then displayed the Anti-Aircraft Command sign.[89]

.svg.png)
 4th Anti-Aircraft Division.[91]
4th Anti-Aircraft Division.[91]
Second pattern.


County
County divisions were infantry only formations charged with anti-invasion duties, formed in late 1940 to early 1941 and all disbanded before the end of 1941.


Post War
Infantry


 13th Infantry Division[47]
Greece, late 1945 - 1946.


Armoured

 7th Armoured Division>
Vehicle sign..svg.png) 7th Armoured Division, uniform patch.[109]
7th Armoured Division, uniform patch.[109]_Insignia.svg.png)

Modern
The Modern era is take to be the end of the Cold War and the implementation of Options for Change.
References
- 1 2 Chappell pps. 3-6
- ↑ Chappell p. 23
- ↑ Chappell p. 39
- 1 2 3 4 5 Chappell pps. 29, 46
- 1 2 3 Chappell pps. 32, 47
- 1 2 3 Chappell pps. 30, 46
- ↑ Chappell p. 8
- 1 2 3 4 Chappell p. 10
- 1 2 3 Chappell pps. 31, 47
- ↑ Chappell pps. 25, 42
- 1 2 Chappell p. 11
- ↑ Chappell pps. 26, 43
- 1 2 3 4 5 6 Chappell pps. 27, 44
- 1 2 Chappell p. 13
- 1 2 Chappell p. 14
- 1 2 Chappell p. 15
- 1 2 3 4 Chappell p. 16
- 1 2 Chappell p. 17
- ↑ Chappell p. 18
- 1 2 3 4 Chappell p. 19
- 1 2 3 4 5 Chappell pps. 28, 46
- ↑ Chappell p. 20
- ↑ Chappell p. 21
- 1 2 3 Chappell p. 24
- 1 2 Chappell p. 34
- 1 2 3 4 Chappell p. 36
- ↑ Chappell p. 35
- 1 2 3 4 5 6 7 8 9 Dorosh, Michael A. "canadiansoldiers.com". Retrieved 9 June 2017.
- ↑ Schnurr, Tony. "CEF Formation patches". Kaiser's Bunker. Retrieved 9 July 2017.
- ↑ Glyde Nos. 194-203
- ↑ Glyde No. 1
- ↑ Glyde No. 2
- ↑ Glyde No. 3
- ↑ Glyde No. 4
- ↑ Glyde No. 5
- ↑ Glyde No. 6
- ↑ Cole pp. 8-9
- ↑ Davis p. 92
- ↑ Davis p. 101
- ↑ Davis pps. 94, 97
- ↑ Cole p. 9
- ↑ Davis pps. 95, 97
- ↑ Davis pp. 99-100
- 1 2 3 Cole p. 36
- 1 2 3 4 Cole p. 37
- 1 2 3 Cole p. 38
- 1 2 3 Cole p. 39
- 1 2 3 4 Cole p. 40
- 1 2 Cole p. 41
- 1 2 3 Cole p. 42
- 1 2 Cole p. 43
- 1 2 3 4 Cole p. 44
- 1 2 Cole p. 45
- 1 2 3 Cole p. 46
- 1 2 3 4 Cole p. 47
- 1 2 3 4 Cole p. 48
- ↑ Cole p. 49
- ↑ Cole p. 95
- 1 2 Cole p. 32
- 1 2 3 4 5 Cole p. 33
- 1 2 3 Cole p. 34
- 1 2 3 Cole p. 35
- 1 2 Cole p. 77
- 1 2 Cole p. 78
- 1 2 3 Cole p. 79
- 1 2 Cole p, 80
- 1 2 3 4 Cole p. 81
- 1 2 3 4 Cole p. 82
- 1 2 Cole p. 83
- 1 2 3 4 Cole p. 91
- 1 2 Cole p. 92
- ↑ Davis p. 92
- 1 2 Cole p. 64
- ↑ Cole p. 65
- 1 2 Cole p. 71
- 1 2 3 4 5 Cole p. 62
- 1 2 3 Cole p. 73
- ↑ Cole p. 74
- ↑ Glyde No. 414
- ↑ Glyde No. 416
- ↑ Glyde No. 417
- ↑ Glyde No. 418
- ↑ Glyde No. 419
- ↑ Glyde No. 420
- ↑ Glyde No. 421
- ↑ Glyde No. 422
- 1 2 3 4 5 Johnstone pps 40, 63
- ↑ Glyde no. 429
- ↑ Cole p. 52
- 1 2 3 Cole p. 54
- 1 2 3 4 5 Cole p. 55
- 1 2 3 4 Cole p. 56
- ↑ Cole p. 57
- 1 2 3 4 5 Cole p. 58
- 1 2 3 Cole p. 59
- ↑ Boulanger p. 441
- ↑ Cole (2) p. 54
- ↑ Cole (2) p. 56
- ↑ Cole (2) p. 57
- ↑ Cole (2) p. 87
- ↑ Cole (2) p. 88
- ↑ Cole (2) p. 89
- 1 2 Cole (2) p. 90
- ↑ Cole (2) p. 91
- ↑ Cole (2) p, 92
- ↑ Cole (2) p. 93
- 1 2 Cole (2) p. 95
- ↑ Cole (2)p. 52
- 1 2 Cole (2) p. 53
- 1 2 Hodges p. 482
- ↑ Hodges p. 483
Bibliography
- Cole, Howard (1973). Formation Badges of World War 2. Britain, Commonwealth and Empire. London: Arms and Armour Press.
- Cole (2), Howard, N (1953). Badges on Battledress, Post-War Formation Signs; Rank and Regimental Insignia. Aldershot: Gale and Polden.
- Chappell, Mike (1986). British Battle Insignia (1) 1914-18. Oxford: Osprey Publishing. ISBN 9780850457278.
- Davis, Brian L. (1983). British Army Uniforms & Insignia of World War Two. London: Arms and Armour Press. ISBN 0853686092.
- Glynde, Keith (1999). Distinguishing Colour Patches of the Australian Military Forces 1915-1951. A reference guide. ISBN 0646366408.
- Hibbard, Mike; Gibbs, Gary (2016). Infantry Divisions, Identification Schemes 1917 (1 ed.). Wokingham: The Military History Society.
- Hodges, Lt. Col. Robin (2005). British Army Badges. London: Butler and Tanner. ISBN 9780955146305.
- Jonstone, Mark (2007). The Australian Army in World War II. Oxford: Osprey Publishing. ISBN 9781846031236.