4th Division (Australia)
| 4th Division | |
|---|---|
| Active |
1916–1919 1921–1944 |
| Country | Australia |
| Branch | Australian Army |
| Type | Division |
| Engagements |
World War I World War II
|
| Commanders | |
| Notable commanders |
Herbert Cox William Holmes Ewen Sinclair-Maclagan |
The Australian 4th Division was formed in the First World War during the expansion of the Australian Imperial Force (AIF) infantry brigades in February 1916. In addition to the experienced 4th Brigade (previously in the original New Zealand and Australian Division) were added the new 12th and 13th Brigades (spawned from the battalions of the 4th and 3rd Brigades respectively). From Egypt the division was sent to France. After the war ended and the AIF was demobilised, the division was dissolved.
In 1921, the 4th Division name was reactivated as a Citizen Military Forces (militia/reserve) formation. The division performed home defence duties for most of World War II, before deactivation in 1944.
History
World War I
Formation in Egypt
In January 1916, Major General Alexander Godley, then commanding the Australian and New Zealand Army Corps and the AIF, put forward a proposal to use Australian reinforcements then training in Egypt to form two new divisions. The Australian government concurred and the Australian 4th Division was formed in this expansion of the Australian Imperial Force infantry brigades in February 1916. In addition to the experienced 4th Brigade (previously in the original New Zealand and Australian Division) there were added the new 12th and 13th Brigades (spawned from the battalions of the 4th and 3rd Brigades respectively).
The 4th Division began forming in Egypt in February 1916. The new division included the 4th Infantry Brigade, 4th Field Company, 4th Field Ambulance and 7th Army Service Corps Company which had fought at Gallipoli. The 12th and 13th Infantry Brigades were formed by taking half the personnel of the 4th and 3rd Infantry Brigades. Delays in assembling the artillery meant that the division could not depart for France before June 1916.
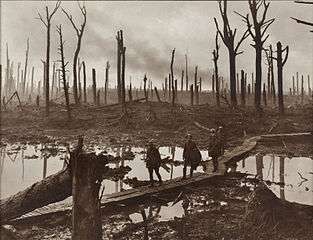
Somme, 1916
The division was initially stationed on the Suez Canal. In June 1916 it moved to France, taking over part of the "nursery" sector near Armentières. Its stay there was brief and soon it was accompanying the 1st and 2nd Divisions to the Somme sector. In August 1916 it relieved the 2nd Division on the Pozières Heights and repulsed a major German counterattack. It then drove north to the outskirts of Mouquet Farm. A second tour of the Somme at Mouquet Farm followed in September and a third at Flers in October.
Hindenburg Line
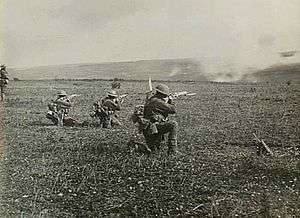
On 11 April 1917 the division assaulted the Hindenburg Line in the First Battle of Bullecourt. The battle was a disaster and 1,170 Australian prisoners were taken by the Germans. In June it participated in the Battle of Messines. In September it participated in the Battle of Polygon Wood.
German Spring Offensive, 1918
In March 1918 the division was rushed to the Somme region to stem the German Offensive. The Australian 3rd and 4th Divisions had been ordered to proceed to Amiens to strengthen the retreating British 5th Army. There it repulsed the advancing Germans in hard-fought battles at Hebuterne and Dernancourt. The First and Second Battles of Dernancourt involved the Australian 12th and 13th Brigades (4th Division) on the railway embankment and cuttings in Dernancourt, just south of Albert. The under strength Australian brigades (numbering about 4,000 men in total) faced four German divisions totalling about 25,000. Situated on the western side of the Ancre River valley, the Australians formed a defensive line at the railway embankment, from which they held back German attacks. The Australian 48th Battalion soon found itself outflanked by German to its rear. The 48th was ordered to hold at all costs but by midday was facing annihilation and the senior officer ordered a withdrawal. Much like the actions at Bullecourt the previous year, the Australian battalion withdrew successfully and in order. This action costs 12th and 13th Brigades (4th Division) 1,100 casualties.
In April, its 13th Infantry Brigade was involved in the counterattack at Villers-Bretonneux. On 21 April, German deserters revealed that German attack preparations were nearing completion. They revealed that the attack would commence early on 24 April, with the first two to three hours consisting of gas shelling. British aerial observations revealed German troops massing in trenches less than two kilometres south of Villers-Bretonneux in Hangard Wood.
On the night of 22–23 April, British and Australian artillery shelled German mustering areas. At dawn the infantry was standing ready but no attack eventuated, most of the activity on this day was in air as planes from both sides criss-crossed the battlefield, bombing, strafing and engaging in dogfights. It was during one of these dogfights that the German "Red Baron" was shot down over Australian lines, north of Villers-Bretonneux at Corbie. The strongest evidence points to Australian sergeant, Cedric Popkin of the 24th Machine-Gun Company, 4th Division as firing the actual bullet that killed Baron Manfred von Richthofen.
The division went on to fight in the Battle of Hamel, Battle of Épehy (with distinction), Battle of Amiens and the Hindenburg Line, finally reaching the town of Bellenglise.
The division was not selected to advance into Germany. Demobilisation commenced in late 1918, and in March 1919 the division merged with 1st Australian Division.
Commanders
1916: Maj. Gen. H. V. Cox
1916–1917: Maj. Gen. W. Holmes
1917–19: Maj. Gen. Ewen Sinclair-Maclagan
Casualties
- killed in action: 8,360
- died of wounds: 2,613
- other deaths: 872
- prisoners: 2,076
- wounded: 27,127
- total: 41,048
Inter war years and World War II
In 1921, following the demobilisation of the AIF, Australia's part-time military forces were reorganised to replicate the numerical designations of the AIF.[1] At this time, the 4th Division name was revived and was assigned to a Citizen Military Forces (reserve) formation headquartered in Melbourne. This formation consisted of three brigades spread across two states: the 2nd and 6th were based in Victoria, while the 3rd was based in South Australia.[2]
After the outbreak of war with Japan, the division was mobilised for war service and undertook defensive duties in southern Victoria. In April 1942, the division became part of III Corps, which was responsible for the defence of Western Australia. The division occupied positions around Guildford, Geraldton, Moora and Perth. Following the arrival of the 2nd Division in July 1942, the division handed over the Perth region to them, although several rotations occurred over the next six months. In January 1943, the division was slowly broken up with the 6th Brigade being sent to Queensland and the 13th deploying to the Northern Territory. In April and May 1943, the division's headquarters was transferred to north Queensland, establishing itself around Townsville, absorbing personnel from the disbanded Yorkforce headquarters. At this time, the division assumed control of a broad area, with many dispersed brigades: the 6th at Kuranda, the 11th at Cairns, the 12th at Smyth's Siding, and the 14th at Cluden.[3]
Over time all of these brigades were transferred elsewhere (Milne Bay, Darwin, and Merauke), meanwhile the division gained the 3rd Brigade. As the war advanced north, the need for strong garrison forces on the mainland of Australia diminished. As more garrison troops were moved to the Torres Strait, the 4th Division's headquarters was moved to Thursday Island in October 1943, and then to Cape York. At this time, the division assumed control of Torres Strait Force and Merauke Force, although both forces were reduced or redesignated shortly after, with Merauke Force being redesignated as the 11th Brigade and later being withdrawn back to Brisbane, and Torres Strait Force being reduced to an area command. As further Allied advances in New Guinea reduced the threat posed to the area the 4th Division became redundant and its headquarters elements were withdrawn to Atherton and disbanded in October 1944.[4]
See also
References
Citations
- ↑ Grey 2008, p. 125.
- ↑ Palazzo 2001, p. 91.
- ↑ McKenzie-Smith 2018, pp. 2034–2035.
- ↑ McKenzie-Smith 2018, p. 2035.
Bibliography
- Grey, Jeffrey (2008). A Military History of Australia (3rd ed.). Melbourne, Victoria: Cambridge University Press. ISBN 978-0-521-69791-0.
- McKenzie-Smith, Graham (2018). The Unit Guide: The Australian Army 1939–1945, Volume 2. Warriewood, New South Wales: Big Sky Publishing. ISBN 978-1-925675-146.
- Palazzo, Albert (2001). The Australian Army: A History of its Organisation 1901–2001. Melbourne, Victoria: Oxford University Press. ISBN 0195515072.
Further reading
- Franki, George; Slayter, Clyde (2003). Mad Harry, Australia's Most Decorated Soldier. East Roseville, NSW: Kangaroo Press. ISBN 9780731811885.
- Hatwell, Jeff (2005). No Ordinary Determination: Percy Black and Harry Murray of the First AIF. Fremantle, WA: Fremantle Arts Centre Press. ISBN 9781920731410.
- Walker, Jonathan (2000). The Blood Tub: General Gough and the Battle of Bullecourt 1917. Staplehurst, UK: Spellmount. ISBN 9781862270220.
- Lynch, Edward (2006). Davies, Will, ed. Somme Mud: The War Experiences of an Australian Infantryman in France 1916–1919. Milsons Point, NSW: Random House. ISBN 1-74166-547-7.
External links
- First AIF Order of Battle 1914–1918: Fourth Division
- Digger History: battles involving the 4th Division
- Bullecourt: First World War
- Australian 4th Division Vehicle Marking
| Expeditionary Forces |
| ||||
|---|---|---|---|---|---|
| Corps | |||||
| Divisions |
| ||||
| Brigades |
| ||||
| |||||