Battle of Stirling Bridge
| Battle of Stirling Bridge | |||||||
|---|---|---|---|---|---|---|---|
| Part of the First War of Scottish Independence | |||||||
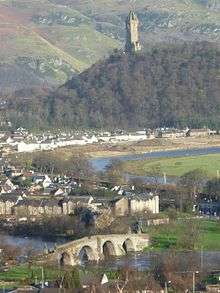 Old Stirling Bridge with the Abbey Craig and Wallace Monument. | |||||||
| |||||||
| Belligerents | |||||||
|
|
| ||||||
| Commanders and leaders | |||||||
|
William Wallace Andrew de Moray (WIA) |
| ||||||
| Strength | |||||||
|
5,300 to 6,300 men
|
9,000 men | ||||||
| Casualties and losses | |||||||
| Unknown |
100 cavalry killed[2] | ||||||
The Battle of Stirling Bridge was a battle of the First War of Scottish Independence. On 11 September 1297, the forces of Andrew Moray and William Wallace defeated the combined English forces of John de Warenne, 6th Earl of Surrey, and Hugh de Cressingham near Stirling, on the River Forth.
Background
The Earl of Surrey had won a victory over the aristocracy of Scotland at the Battle of Dunbar. However, by August 1297 Moray and Wallace controlled almost all of Scotland north of the Forth, except for Dundee. Surrey marched north with an army from Wicker to relieve Dundee. The town of Stirling was the key entry point to the north of Scotland.
The main battle
The 6th Earl of Surrey arrived with his supporters at the narrow, wooden bridge over the River Forth near Stirling Castle and determined that he would be at a tactical disadvantage if he attempted to take his main force across there. So he delayed crossing for several days to allow for negotiations, and to reconnoiter the area.[3] On 10 September Warenne gave orders to cross the river the next day. At dawn the English and Welsh infantry started to cross only to be recalled because Warenne had overslept.
The Scots arrived first and camped on Abbey Craig, which dominated the soft flat ground north of the river. The English force of English, Welsh and Scots knights, bowmen and foot soldiers camped south of the river. Sir Richard Lundie,[4] a Scots knight who joined the English after the Capitulation of Irvine, offered to outflank the enemy by leading a cavalry force over a ford two miles upstream, where sixty horsemen could cross at the same time. Hugh de Cressingham, King Edward's treasurer in Scotland, persuaded the Earl to reject this advice and order a direct attack across the bridge.[5]
The small bridge was broad enough to let only two horsemen cross abreast, but offered the safest river crossing, as the Forth widened to the east and the marshland of Flanders Moss lay to the west.[5] The Scots waited as the English knights and infantry made their slow progress across the bridge on the morning of 11 September. It would have taken several hours for the entire English army to cross.[3]
Wallace and Moray waited, according to the Chronicle of Hemingburgh, until "as many of the enemy had come over as they believed they could overcome". When a substantial number of the troops had crossed (possibly about 2,000)[6] the attack was ordered. The Scots spearmen came down from the high ground in rapid advance and fended off a charge by the English heavy cavalry and then counterattacked the English infantry. They gained control of the east side of the bridge, and cut off the chance of English reinforcements to cross. Caught on the low ground in the loop of the river with no chance of relief or of retreat, most of the outnumbered English on the east side were probably killed. A few hundred may have escaped by swimming across the river.[7] Marmaduke Thweng managed to fight his way back across the bridge and he thus became the only knight of all those on the far side of the river to survive the battle.
Surrey, who was left with a small contingent of archers, had stayed south of the river and was still in a strong position. The bulk of his army remained intact and he could have held the line of the Forth, denying the Scots a passage to the south, but his confidence was gone. After the escape of Sir Marmaduke Thweng, Surrey ordered the bridge to be destroyed, retreated towards Berwick, leaving the garrison at Stirling Castle isolated and abandoning the Lowlands to the rebels. James Stewart, the High Steward of Scotland, and Malcolm, Earl of Lennox, whose forces had been part of Surrey's army, observing the carnage to the north of the bridge, withdrew. Then the English supply train was attacked at The Pows, a wooded marshy area, by James Stewart and the other Scots lords, killing many of the fleeing soldiers.[8]
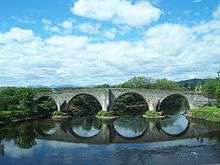
This Stirling Bridge is believed to have been about 180 yards upstream from the 15th century stone bridge that crosses the river today.[3] Four stone piers have been found underwater just north (56°07′45″N 3°56′12″W / 56.1290916°N 3.936764°W) and at an angle to the extant 15th-century bridge, along with man-made stonework on one bank in line with the piers. The site of the fighting was along either side of an earthen causeway leading from the Abbey Craig, atop which the Wallace Monument is now, to the north end of the bridge.[9][10][11] The battlefield has been inventoried and protected by Historic Scotland under the Scottish Historical Environment Policy of 2009.[12]
Aftermath

The Battle of Stirling Bridge was a shattering defeat for the English: it showed that under certain circumstances infantry could be superior to cavalry. It was some time, though, before this lesson was fully absorbed.
Contemporary English chronicler Walter of Guisborough recorded the English losses in the battle as 100 cavalry and 5,000 infantry killed.[2] Scottish casualties in the battle are unrecorded, with the exception of Andrew Moray. He appears to have been injured in the battle and died of his injuries around November.
De Cressingham's body was reportedly subsequently flayed and the skin cut into small pieces for souvenirs of the victory. The Lanercost Chronicle records that Wallace had[13] "a broad strip [of Cressingham’s skin]...taken from the head to the heel, to make therewith a baldrick for his sword".
Wallace went on to lead a destructive raid into northern England which did little to advance the Scots objectives, however the raids frightened the English army and stalled their advance. By March 1298 he had emerged as Guardian of Scotland. His glory was brief, for King Edward was coming north from Flanders. The two men finally met on the field of Falkirk in the summer of 1298, where Wallace was defeated.
The battle in fiction
The exploits of Wallace were passed on to posterity mainly in the form of tales collected and recounted by the poet Blind Harry, the Minstrel (d. 1492) whose original, probably oral sources were never specified. Blind Harry was active some two hundred years after the events described in his The Acts and Deeds of the Illustrious and Valiant Champion Sir William Wallace, c.1470. The tales were designed to entertain the court of James IV (r. 1488–1513) and are undoubtedly a blend of fact and fiction. Like most of his episodes, Blind Harry's account of the battle of Stirling Bridge is highly improbable, for example his use of figures of a biblical magnitude for the size of the participating armies. Nevertheless, his highly dramatised and graphic account of the battle fed the imaginations of subsequent generations of Scottish schoolchildren. Here is his description:
On Saturday they [Moray and Wallace] rode on to the bridge, which was of good plain board, well made and jointed, having placed watches to see that none passed from the army. Taking a wright, the most able workman there, he [Wallace] ordered him to saw the plank in two at the mid streit [middle stretch], so that no-one might walk over it. He then nailed it up quickly with hinges, and dirtied it with clay, to cause it to appear that nothing had been done. The other end he so arranged that it should lie on three wooden rollers, which were so placed, that when one was out the rest would fall down. The wright, himself, he ordered to sit there underneath, in a cradle, bound on a beam, to loose the pin when Wallace let him know by blowing a horn when the time was come. No one in all the army should be allowed to blow but he himself.
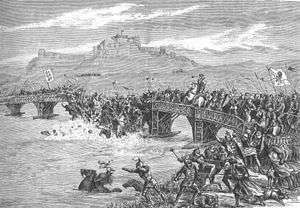
A Victorian depiction of the battle.[14] The bridge collapse suggests that the artist has been influenced by Blind Harry's account.Hugh Cressingham leads on the vanguard with twenty thousand likely men to see. Thirty thousand the Earl of Warren had, but he did then as wisdom did direct, all the first army being sent over before him. Some Scottish men, who well knew this manner of attack, bade Wallace sound, saying there were now enough. He hastened not, however, but steadily observed the advance until he saw Warren's force thickly crowd the bridge. Then from Jop he took the horn and blew loudly, and warned John the Wright, who thereupon struck out the roller with skill; when the pin was out, the rest of it fell down. Now arose an hideous outcry among the people, both horses and men, falling into the water. (...)
On foot, and bearing a great sharp spear, Wallace went amongst the thickest of the press. he aimed a stroke at Cressingham in his corslet, which was brightly polished. The sharp head of the spear pierced right through the plates and through his body, stabbing him beyond rescue; thus was that chieftain struck down to death. With the stroke Wallace bore down both man and horse.
The English army although ready for battle, lost heart when their chieftain was slain, and many openly began to flee. Yet worthy men abode in the place until ten thousand were slain. Then the remainder fled, not able to abide longer, seeking succour in many directions, some east, some west, and some fled to the north. Seven thousand full at once floated in the Forth, plunged into the deep and drowned without mercy; none were left alive of all that fell army.[15]
As well as the bridge ploy, Wallace's use of a spear appears to be a fictional element. A two-handed sword [Claidheamh de Laimh], purporting to be Wallace's, which may contain original metal from his sword blade, was kept by the Scottish kings[16] and is displayed as a relic in the Wallace Monument.
The potency of these tales can be gauged from the following statement by the poet Robert Burns, writing some three centuries after they were first related.
The two first books I ever read in private, and which gave me more pleasure than any two books I ever read again, were The Life of Hannibal and The History of Sir William Wallace [a modernised version of Blind Harry by William Hamilton of Gilbertfield]. Hannibal gave my young ideas such a turn that I used to strut in raptures up and down after the recruiting drum and bagpipe, and wish myself tall enough that I could be a soldier; while the story of Wallace poured a Scottish prejudice into my veins which will boil along there till the flood-gates of life shut in eternal rest.[17]
The Battle of Stirling Bridge is depicted in the 1995 film Braveheart, but it bears little resemblance to the real battle, there being no bridge (due mainly to the difficulty of filming around the bridge itself) and tactics resembling the Battle of Bannockburn.
Notes
- 1 2 3 BBC History Magazine July 2014, pp. 24–25
- 1 2 3 Cowan, Edward J., The Wallace Book, 2007, John Donald, ISBN 0-85976-652-7, 978-0-85976-652-4, p. 69
- 1 2 3 "The Battle of Stirling Bridge, 1297", Scotland's History, BBC
- ↑ lundie.org
- 1 2 "The Battle of Stirling Bridge", Foghlam Alba
- ↑ Reid, Stuart. Battles of the Scottish Lowlands, Battlefield Britain. Barnsley: Pen & Sword, 2004
- ↑ "Battle of Stirling Bridge", UK Battlefields Resource Centre
- ↑ "The Wars - Stirling Bridge", Stirling Council
- ↑ Page, R. (1992). "Ancient Bridge, Stirling (Stirling parish)" (PDF). Discovery and Excavation in Scotland: 17.
- ↑ Page, R. & Main, L. (1997). "Stirling Ancient Bridge (Stirling; Logie parishes)" (PDF). Discovery and Excavation in Scotland: 80–81.
- ↑ "Battle of Stirling Bridge". Historic Scotland Battlefields. Historic Scotland. Retrieved 14 December 2011.
- ↑ "Inventory battlefields". Historic Scotland. Retrieved 12 April 2012.
- ↑ Chronicle of Lanercost, ed. H. Maxwell, vol. 1, p. 164.
- ↑ Grant, James (1873). British Battles On Land and Sea. Cassell Petter & Galpin. p. 31.
- ↑ Sir William Wallace, His Life And Deeds By Henry The Minstrel In Modern Prose By Thomas Walker, Glasgow 1910
- ↑ "To bynding of Wallass's sword with cordis of silk and new hilt and plomet, new skabbard, and new hilt to the said sword, XXVj.sh.", entry in James IV's Household Book for 8 December 1505, in E M Brougham, News Out Of Scotland, Heinemann 1926
- ↑ letter to Dr. John Moore, dated 2 August 1787, quoted in M. Lindsay, Robert Burns, London and New York 1979
References
- Barrow, G.W.S., Robert Bruce and the Community of the Realm of Scotland, 1976.
- Brown, C., "William Wallace" 2005.
- Cowan, Edward J., The Wallace Book, 2007, John Donald, ISBN 0-85976-652-7, 978-0-85976-652-4
- Ferguson, J., William Wallace: Guardian of Scotland. 1948.
- "The Chronicle of Lanercost 1272–1346", ed. H. Maxwell, 1913.
- Nicholson, R., Scotland-the Later Middle Ages, 1974.
- Prestwich, M., The Three Edwards: War and State in England, 1272–1277, 1980.
- Traquair, P., Freedom's Sword