< RAC Attack - Oracle Cluster Database at Home
Linux Install (e)
Prev: Hardware and Windows Preparation
Linux Install (e)
- Create VM
- Prep for OS Installation
- OS Installation
- Wrap-up OS Installation
- Create RAC Attack DVD
- Prep for Oracle
Next: Create Cluster
Tip: If you are familiar with the unix command-line, then we recommend connecting through SSH in addition to using the VMware console. You can then copy-and-paste many commands from this handbook! Until we configure networking, VMware will assign the address 192.168.78.128.
-
Login as the user root with password racattack.

-
GNOME is the graphical window environment installed by default in OEL. First, disable GNOME CD automount. Go to the menu System >> Preferences >> Removable Drives and Media.

-
Uncheck all of the options under Removable Storage and click Close.

-
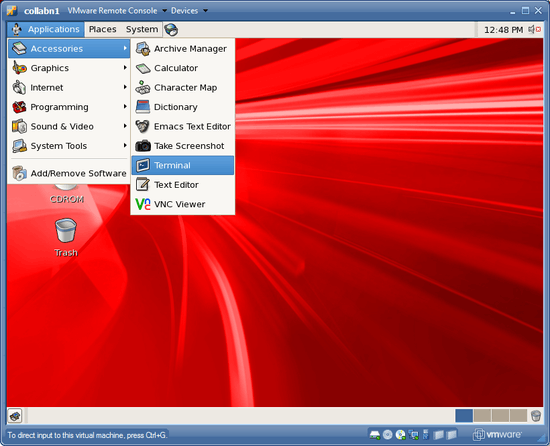
Open a terminal window from the menu Applications >> Accessories >> Terminal.
-
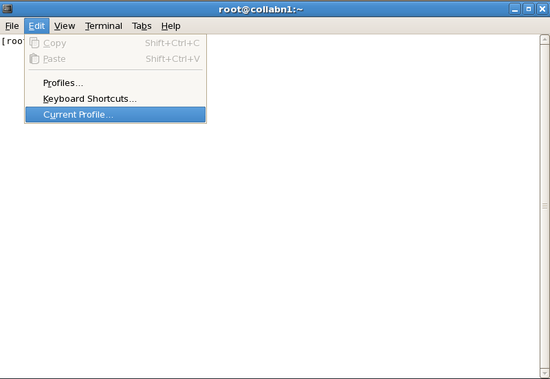
From the menus, open Edit >> Current Profile.
-
In the Title and Command tab, check the box for Run command as a login shell, then close the dialog.

-
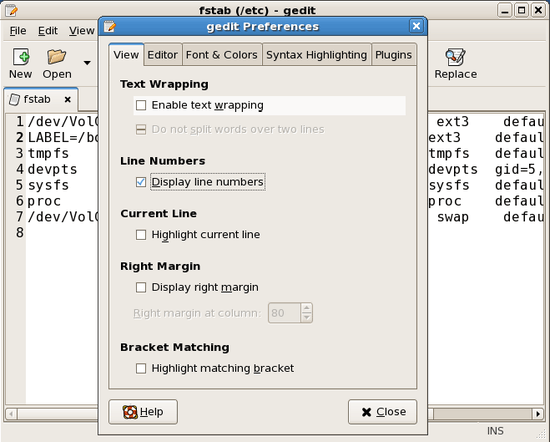
The editor "gedit" is a simple graphical editor – similar to notepad – and it can be used to edit files on Linux. If you are going to use gedit, then it is helpful if you open Edit > Preferences to disable text wrapping and enable line numbers.
-
In a terminal window as the root user, shutdown and disable anacron then run it manually with no delay.
[root@collabn1 ~]# service anacron stop
Stopping anacron: [ OK ]
[root@collabn1 ~]# chkconfig anacron off
[root@collabn1 ~]# chkconfig --list anacron
anacron 0:off 1:off 2:off 3:off 4:off 5:off 6:off
[root@collabn1 ~]# anacron -n
- In a terminal window as the root user, shutdown and disable the automounter. [root@collabn1 ~]# service autofs stop Stopping automount: [ OK ] [root@collabn1 ~]# umount /media/* [root@collabn1 ~]# chkconfig autofs off [root@collabn1 ~]# chkconfig --list autofs autofs 0:off 1:off 2:off 3:off 4:off 5:off 6:off
- In a terminal window as the root user, shutdown and disable the apple zeroconf service (avahi). [root@collabn1 ~]# service avahi-daemon stop Shutting down Avahi daemon: [ OK ] [root@collabn1 ~]# chkconfig avahi-daemon off [root@collabn1 ~]# chkconfig --list avahi-daemon avahi-daemon 0:off 1:off 2:off 3:off 4:off 5:off 6:off
-
If any of the small CD images in the status bar do not have a green dot, then click on the CD image and choose "Connect to [RAC11g] iso/... on Server". If a window opens showing the CD contents then make sure to close the window.

-
Create two CDROM directories named cdrom and cdrom5.
[root@collabn1 ~]# cd /mnt
[root@collabn1 mnt]# mkdir cdrom
[root@collabn1 mnt]# mkdir cdrom5
- Add entries to /etc/fstab for all CD's and then mount them. If you are in a class then you will probably have two CD's. If you are not in a class then you will probably have only one. [root@collabn1 ~]# ls /dev/cdrom-* /dev/cdrom-hda /dev/cdrom-hdb [root@collabn1 ~]# gedit /etc/fstab /dev/cdrom-hda /mnt/cdrom iso9660 defaults 0 0 /dev/cdrom-hdb /mnt/cdrom5 iso9660 defaults 0 0 [root@collabn1 mnt]# mount cdrom [root@collabn1 mnt]# mount cdrom5
- Install the additional required RPM's cd /mnt # From Enterprise Linux 5 CDROM 2 rpm -Uvh */*/compat-libstdc++-33* rpm -Uvh */*/libaio-devel-0.* rpm -Uvh */*/unixODBC-2.* rpm -Uvh */*/unixODBC-devel-2.* # From Enterprise Linux 5 CDROM 3 rpm -Uvh */*/sysstat-7.* # Additional required packages which are already installed: # From Enterprise Linux 5 CDROM 1 rpm -Uvh */*/binutils-2.* rpm -Uvh */*/elfutils-libelf-0.* rpm -Uvh */*/glibc-2.*i686* rpm -Uvh */*/glibc-common-2.* rpm -Uvh */*/libaio-0.* rpm -Uvh */*/libgcc-4.* rpm -Uvh */*/libstdc++-4.* rpm -Uvh */*/make-3.* # From Enterprise Linux 5 CDROM 2 rpm -Uvh */*/elfutils-libelf-devel-* rpm -Uvh */*/glibc-headers* rpm -Uvh */*/glibc-devel-2.* rpm -Uvh */*/libgomp* rpm -Uvh */*/gcc-4.* rpm -Uvh */*/gcc-c++-4.* rpm -Uvh */*/libstdc++-devel-4.*
- Eject the cdrom [root@collabn1 mnt]# eject /mnt/cdrom
-
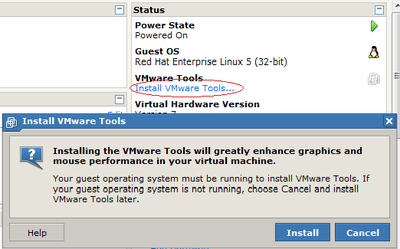
Return to the Summary tab in the VMware console. From the Status box, choose to Install VMware Tools. Click the Install button to begin.
-
Install VMware client tools and run configuration tool.
[root@collabn1 mnt]# mount /mnt/cdrom
mount: block device /dev/cdrom-hda is write-protected, mounting read-only
[root@collabn1 mnt]# rpm -ivh /mnt/cdrom/VMwareTools-7.7.5-156745.i386.rpm
Preparing... ########################################### [100%]
1:VMwareTools ########################################### [100%]
The installation of VMware Tools 7.7.5 for Linux completed successfully.
You can decide to remove this software from your system at any time by
invoking the following command: "rpm -e VMwareTools".
Before running VMware Tools for the first time, you need to
configure it for your running kernel by invoking the
following command: "/usr/bin/vmware-config-tools.pl".
Enjoy,
--the VMware team
[root@collabn1 cdrom]# vmware-config-tools.pl
...
Choose NO to skip the VMware FileSystem Sync Driver (vmsync)
Choose display size [12] – 1024x768
Mounting HGFS shares will probably FAIL, but this is ok.

-
Run the network commands. (You can cut and paste the commands into the terminal.) Next, run vmware-toolbox and enable clock synchronization.

-
Logout from your session.

- Unmount the VMware Tools image: umount /mnt/cdrom Using VMware Infrastructure web interface, mount Oracle Enterprise Linux from [RAC11g-iso] data store. Mount it: mount /mnt/cdrom
This article is issued from
Wikibooks.
The text is licensed under Creative
Commons - Attribution - Sharealike.
Additional terms may apply for the media files.