Battle off Samar
The Battle off Samar (Filipino: Labanan sa may Samar) was the centermost action of the Battle of Leyte Gulf, one of the largest naval battles in history, which took place in the Philippine Sea off Samar Island, in the Philippines on October 25, 1944. It was the only major action in the larger battle in which the Americans were largely unprepared. The Battle off Samar has been cited by historians as one of the greatest last stands in naval history; ultimately the Americans prevailed over a massive armada – the Japanese Imperial Navy's Center Force under command of Vice Admiral Takeo Kurita – despite their very heavy losses and overwhelming odds.[2]
| Battle off Samar | |||||||
|---|---|---|---|---|---|---|---|
| Part of Battle of Leyte Gulf, Philippines Campaign (1944–45), Pacific War (World War II) | |||||||
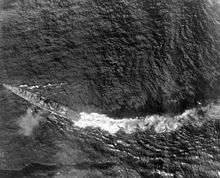
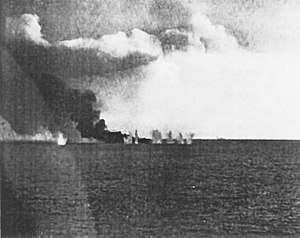 The escort carrier Gambier Bay, burning from earlier gunfire damage, is bracketed by a salvo from a Japanese cruiser (faintly visible in the background, center-right) shortly before sinking during the Battle off Samar. | |||||||
| |||||||
| Belligerents | |||||||
|
|
| ||||||
| Commanders and leaders | |||||||
|
|
| ||||||
| Units involved | |||||||
|
| ||||||
| Strength | |||||||
|
6 escort carriers, 3 destroyers, 4 destroyer escorts, 400 aircraft from Taffy 1, 2, and 3 |
4 battleships, 6 heavy cruisers, 2 light cruisers, 11 destroyers, 30 aircraft (in kamikaze attack) | ||||||
| Casualties and losses | |||||||
|
2 escort carriers sunk 2 destroyers sunk 1 destroyer escort sunk 23 aircraft lost 4 escort carriers damaged 1 destroyer damaged 2 destroyer escorts damaged 1,583 killed and missing 913 wounded |
3 heavy cruisers sunk 3 heavy cruisers damaged 1 destroyer damaged 52 aircraft[1] | ||||||
Admiral William Halsey, Jr. was lured into taking his powerful 3rd Fleet after a decoy fleet, taking with him every ship in the area that he had the power to command. The remaining American forces in the area were three escort carrier groups of the 7th Fleet. The escort carriers and destroyer escorts which had been built to protect slow convoys from submarine attack had been adapted to attack ground targets and had few torpedoes, as they normally relied on Halsey's fleet to protect them from armored warships.
A Japanese surface force of battleships and cruisers – led by the super battleship Yamato, the largest and most-heavily gunned ship afloat – had been battered earlier in the larger battle and was thought to have been in retreat. Instead it had turned around unobserved and encountered the northernmost of the three groups, Task Unit 77.4.3 ("Taffy 3"), commanded by Rear Admiral Clifton Sprague. Taffy 3's three destroyers and four destroyer escorts possessed neither the firepower nor the armor to oppose the 23 ships of the Japanese force capped by the Yamato's 18-inch guns but attacked anyway with 5"/38 caliber guns and torpedoes to cover the retreat of their slow "jeep" carriers. Aircraft from the carriers of Taffy 1, 2, and 3, including FM-2 Wildcats, F6F Hellcats and TBM Avengers, strafed, bombed, torpedoed, rocketed, depth-charged, fired at least one .38 caliber handgun and made numerous "dry" runs at the Japanese force when they ran out of ammunition.[3][4]
The force lost two escort carriers, two destroyers, a destroyer escort and several aircraft. Over a thousand Americans died, comparable to the combined losses of American men and ships at the Coral Sea and Midway. The Americans sank three Japanese cruisers, disabled another three and caused enough confusion to persuade the Admiral Kurita to regroup and ultimately withdraw, rather than advancing to sink troop and supply ships in Leyte Gulf. In the combined Battle of Leyte Gulf, 10,000 Japanese sailors and 3,000 Americans died. Although the battleship Yamato and the remaining force returned to Japan, the battles marked the final defeat of the Imperial Japanese Navy, as the ships remained in port for most of the rest of the war and ceased to be an effective naval force.[5]
Background
The overall Japanese strategy at Leyte Gulf—a plan known as Shō-Go 1—called for Vice-Admiral Jisaburō Ozawa's fleet—known as Northern Force—to lure the American 3rd Fleet away from the Allied landings on Leyte, using an apparently vulnerable force of Japanese carriers as bait. The landing forces, stripped of air cover by the 3rd Fleet, would then be attacked from the west and south by Vice Admiral Takeo Kurita's Center Force, which would sortie from Brunei, and Vice Admiral Shoji Nishimura's Southern Force. Kurita's force consisted of five battleships, including Yamato and Musashi, the largest battleships ever built, escorted by cruisers and destroyers. Nishimura's flotilla included two battleships and would be followed by Vice Admiral Kiyohide Shima with three cruisers.
On the night of October 23, two American submarines, Dace and Darter, detected Center Force entering the Palawan Passage. After alerting Halsey, the submarines torpedoed and sank two cruisers, while crippling a third and forcing it to withdraw. One of the cruisers lost was Admiral Kurita's flagship, but he was rescued and transferred his flag to Yamato.
Subsequently, the carriers of the 3rd Fleet launched a series of air strikes against Kurita's forces in the Sibuyan Sea, damaging several vessels and sinking Musashi, initially forcing Kurita to retreat. One wave of aircraft from the 3rd Fleet also struck Nishimura's Southern Force, causing minor damage. At the same time, Vice-Admiral Takijirō Ōnishi launched strikes from airfields on Luzon against Halsey's forces, with one bomber scoring a hit on the U.S. light carrier Princeton that ignited explosions, causing her to be scuttled.
That same night, Nishimura's Southern Force of two battleships, a heavy cruiser, and four destroyers was to approach from the south and coordinate with Kurita's force. The second element of the Southern Force, commanded by Vice Admiral Kiyohide Shima and consisting of three cruisers and seven destroyers, lagged behind Nishimura by 40 nmi (46 mi; 74 km). In the Battle of Surigao Strait, Nishimura's ships entered a deadly trap. Outmatched by the U.S. Seventh Fleet Support Force, they were devastated, running a gauntlet of torpedoes from 28 PT boats and 28 destroyers before coming under accurate radar-directed gunfire from six battleships (five of them survivors of the Pearl Harbor attack) and eight cruisers. Afterward, as Shima's force encountered what was left of Nishimura's ships, it too came under attack, but managed to withdraw. Of Nishimura's force, only one destroyer survived.
At the Battle of the Sibuyan Sea Halsey's Third Fleet savaged the Center Force which had been detected on its way to landing forces from the north. It lacked any air cover to defend against the 259 sorties from the five fleet carriers Intrepid, Essex, Lexington, Enterprise and Franklin and light carrier Cabot which sank the massive super-battleship Musashi (sister to Yamato) with 17 bombs and 19 torpedoes. It had seemingly beaten into a retreat, but even that overwhelming force failed to stop Kurita, as most of the attacks were directed at sinking just one battleship. Besides a cruiser crippled by a torpedo, every other ship including Yamato remained battleworthy.
Halsey's Third Fleet would miss the battle and head off to the Battle off Cape Engaño where Ozawa's Northern Force consisted of one fleet carrier and three light carriers fielding a total of 108 airplanes (slightly more than the normal complement of a single large fleet carrier), two battleships, three light cruisers and nine destroyers. Halsey was convinced that the Northern Force was the main threat, just as the Japanese had planned their sacrificial diversion. Halsey took three groups of Task Force 38 (TF 38), overwhelmingly stronger than Ozawa's Northern Force, with five aircraft carriers and five light fleet carriers with more than 600 aircraft between them, six fast battleships, eight cruisers, and over 40 destroyers. Halsey easily dispatched what was later revealed to be a decoy of no serious threat.
As a result of Halsey's decision, the door was left open to Kurita. When Kurita initially withdrew, the Americans assumed that the Japanese force was retreating from the battle. Kurita eventually turned around and made his way through the San Bernardino Strait under cover of darkness, intent on destroying the American landing forces. Only the light Taffy forces attached to support the landing forces of Seventh Fleet stood in his way. They were equipped to attack ground troops and submarines under the protection of Halsey's fleet carriers, not face off against Kurita's battleships and cruisers which had already largely shrugged off combined attacks from six fleet and light carriers. It would be up to them to improvise a last ditch defense as they were thrust by Halsey's mistake into the role of a sacrificial diversion to protect their landing forces.
Battle summary
The Japanese Center Force of 23 Japanese warships (four battleships, eight cruisers, and eleven destroyers) commanded by Admiral Kurita engaged a U.S. task unit of six escort carriers, three destroyers, and four destroyer escorts of 7th Fleet. The Americans were taken entirely by surprise because the 7th Fleet had firmly believed that its northern flank was being protected by Admiral Halsey's immensely powerful 3rd Fleet, which consisted of ten fleet carriers and six fast battleships.
The brunt of the Japanese attack fell on the northernmost of the escort carrier units, Task Unit 77.4.3 (usually referred to by its radio call-sign "Taffy 3", a subcomponent of Task Force 77), under the command of Rear Admiral Clifton Sprague. Ill-equipped to fight large-gunned warships, Taffy 3's escort carriers attempted to escape from the Japanese force, while its destroyers, destroyer escorts, and aircraft made sustained attacks on Kurita's ships. The destroyers and destroyer escorts only had torpedoes and guns of up to 5 in (127 mm) caliber; nonetheless, the destroyers (but not the destroyer escorts) had radar-assisted gun directors; the Japanese had heavy caliber weapons up to 18.1 in (460 mm), but they had less accurate optical rangefinders and fire-assisting radar. The Americans also had large numbers of aircraft available, which the Japanese lacked. The ordnance for the escort carriers' aircraft consisted mostly of high-explosive 500 lb (230 kg) bombs used in ground support missions, and depth charges for antisubmarine warfare, rather than the armor-piercing bombs and torpedoes which would have been more effective against heavily armored warships. Nevertheless, even when they were out of ammunition, American aircraft continued to harass the enemy ships, making repeated mock attacks, which distracted their gunners and disrupted their formations.[6]
In all, two U.S. destroyers, a destroyer escort, and an escort carrier were sunk by Japanese gunfire, and another U.S. escort carrier was hit and sunk by a kamikaze aircraft during the battle. Kurita's battleships were driven away from the engagement by torpedo attacks from American destroyers; they were unable to regroup in the chaos, while three cruisers were lost after attacks from U.S. destroyers and aircraft, with several other cruisers damaged. The ferocity of the defense convinced Kurita that he was facing a far superior force and so he withdrew from the battle, ending the threat to the troop transports and supply ships.
The battle was one of the last major naval engagements between U.S. and Japanese surface forces in World War II. After this, the Philippines were liberated by the U.S., which cut the Japanese off from their oil-producing colonies in Southeast Asia, and its major shipyards and repair facilities were in Japan. The Imperial Japanese Navy never again sailed into battle in such force; most ships returned to bases in Japan and remained largely inactive for the rest of the war.
This battle is often depicted as one of the major "what-ifs" in World War II. If Kurita had continued the attack, instead of withdrawing, it is possible that the U.S. could have suffered heavy losses in troops and supplies, which would have delayed the liberation of the Philippines. If Kurita's and Halsey's forces met, that would have been the long-awaited "decisive battle" in which both sides would have finally been able to pit their largest battleships against each other. However, Halsey's 3rd Fleet outnumbered Kurita's in ships of all types, particularly with six American battleships versus four for the Japanese. Only Yamato had heavier armor and larger guns than the American battleships; the other three Japanese battleships were of World War I design and were generally inferior in firepower and protection, but their 3rd Fleet counterparts were all recently built battleships, mounting 16 in (406 mm) main guns and equipped with radar-guided fire control systems.
Forces
The Japanese Center Force now consisted of the battleships Yamato, Nagato, Kongō, and Haruna; heavy cruisers Chōkai, Haguro, Kumano, Suzuya, Chikuma, Tone; light cruisers Yahagi, and Noshiro; and 11 Kagerō-, Yūgumo- and Shimakaze-class destroyers. The battleships and cruisers were fully armored against Taffy 3's 5-inch (127 mm) projectiles. They together had dozens of larger caliber guns, including the Yamato's 18.1-inch (460 mm) guns, which could reach out to 25 mi (22 nmi; 40 km). Surface gunnery was controlled by optical sighting which fed computer-assisted fire control systems, though they were less sophisticated than the radar-controlled systems on U.S. destroyers.[7]
Each of the three task units of the 7th Fleet's Task Group 77.4 had six small Casablanca-class or larger Sangamon-class escort carriers (CVEs) defended by destroyers and destroyer escorts. The destroyers had five 5 in (127 mm) guns, the destroyer escorts had two, and the carriers only a single 5-inch (127 mm) gun "stinger" at the stern. Most of the pilots and sailors were reservists with scant combat experience, and because of their tasking against ground troops and submarines, the carriers had been given only a few armour-piercing bombs or torpedoes against the unlikely possibility that they might encounter attack by other ships.[8]
Lacking any ships with any larger guns that could reach beyond 10 mi (8.7 nmi; 16 km), Taffy 3 appeared hopelessly mismatched against Japanese gunnery, which emphasized long range and large guns. The battle revealed that Japanese Navy's partly-automated fire control was largely ineffective against maneuvering ships at long range though some ships such as Kongō hit their targets when they got closer. Although the Japanese warships opened fire with their heavier-caliber offensive armament at maximum range and scored some hits and damaging near misses, their fire was not effective until they had closed within range of the carriers' own 5-inch (127 mm) protective armament. By contrast, the American destroyers but not destroyer escorts had the Mark 37 gun fire-control system that aimed automatic, accurate fire against multiple surface and air targets while maneuvering. The lack of a comparable system in Japanese ships also contributed to reports from American pilots on the ineffectiveness of the Japanese antiaircraft fire.
_and_escorts_making_smoke_off_Samar_1944.jpeg)
Rear Admiral Thomas L. Sprague's Task Unit 77.4.1 ("Taffy 1") consisted of the Carrier Division 22 escort carriers Sangamon, Suwannee, Santee, and Petrof Bay. (The remaining two escort carriers from Taffy 1, Rear Admiral George R. Henderson's Carrier Division 28 Chenango and Saginaw Bay, had departed for Morotai, Dutch East Indies on October 24, carrying "dud" aircraft from other carriers for transfer ashore for repair. They returned with replacement aircraft after the battle.)
Rear Admiral Felix Stump's Task Unit 77.4.2 ("Taffy 2") Carrier Division 24 consisted of Natoma Bay and Manila Bay, and Rear Admiral William D. Sample's Carrier Division 27 Marcus Island, Kadashan Bay, Savo Island, and Ommaney Bay.
Rear Admiral Clifton Sprague's Task Unit 77.4.3 ("Taffy 3") consisted of Carrier Division 25 Fanshaw Bay, St. Lo, White Plains, Kalinin Bay, and Rear Admiral Ralph A. Ofstie's Carrier Division 26 Kitkun Bay and Gambier Bay. Screening for Taffy 3 were the destroyers Hoel, Heermann and Johnston, and destroyer escorts Dennis, John C. Butler, Raymond, and Samuel B. Roberts.
Though each escort carrier was small and carried an average of about 28 planes, that gave the 16 CVEs of the three "Taffies" a combined total of approximately 450 aircraft, equivalent to four large fleet carriers. While their top speed of 17.5 kn (20.1 mph; 32.4 km/h) was adequate to escort cargo convoys or to provide ground support, they were too slow to engage or to escape a fast task force in combat. Since their aircraft were intended for ground attack, defense against aircraft, and antisubmarine warfare, the first flights from Taffy 3 were armed only with machine guns, depth charges, and high-explosive and antipersonnel aerial bombs, that were effective against enemy troops, aircraft, submarines, and destroyers, but not very effective against I.J.N. battleships and cruisers. In later sorties from the carriers of Taffy 2, the aircraft had enough time to be rearmed with torpedoes and armor-piercing bombs that could be expected to be more effective against warships.
Battle

Kurita's force passed through San Bernardino Strait at 03:00 on October 25, 1944 and steamed southwards along the coast of Samar, hoping that Halsey had taken the bait and moved most of his fleet away as he had in fact done. Kurita had been advised that Nishimura's Southern Force had been destroyed at Surigao Strait and would not be joining his force at Leyte Gulf. However, Kurita did not receive the transmission from the Northern Force that they had successfully lured away Halsey's Third Fleet of battleships and fleet carriers. Through most of the battle, Kurita would be haunted by doubts about Halsey's actual location. The wind was from the North-Northeast and visibility was approximately 23 miles (20 nmi; 37 km) with a low overcast and occasional heavy rain squalls which the US forces would exploit for concealment in the battle to come.[9]
Taffy 3 comes under attack
Steaming about 60 nmi (69 mi; 110 km) east of Samar before dawn on October 25, St. Lo launched a four-plane antisubmarine patrol while the remaining carriers of Taffy 3 prepared for the day's air strikes against the landing beaches. At 06:37, Ensign William C. Brooks, flying a Grumman TBF Avenger from St. Lo, sighted a number of ships expected to be from Halsey's 3rd Fleet, but they appeared to be Japanese. When he was notified, Admiral Sprague was incredulous, and he demanded positive identification. Flying in for an even closer look, Brooks reported, "I can see pagoda masts. I see the biggest meatball flag on the biggest battleship I ever saw!" Yamato alone displaced as much as all units of Taffy 3 combined. Brooks had spotted the largest of the three attacking Japanese forces, consisting of four battleships, six heavy cruisers, two light cruisers, and about ten destroyers.
They were approaching from the west-northwest only 17 nmi (20 mi; 31 km) away, and they were already well within gun and visual range of the closest task group, Taffy 3. Armed only with depth charges in case of an encounter with enemy submarines, the aviators nevertheless were determined to carry out the first attack of the battle, aggressively setting the tone of the battle by leaving a calling card of several depth charges which bounced off the bow of a cruiser.
The lookouts of Taffy 3 spotted the antiaircraft fire to the north. The Japanese came upon Taffy 3 at 06:45, achieving complete tactical surprise. At about the same time, others in Taffy 3 had picked up targets from surface radar and Japanese radio traffic. At about 07:00, Yamato opened fire at a range of 17 nmi (20 mi; 31 km). The Americans were soon astonished by the spectacle of colorful geysers as the first volleys of shellfire found their range. Each Japanese battleship used a different color of dye marker so they could spot their own shells. Lacking the Americans' gunnery radars and Ford Mark I Fire Control Computer, which provided co-ordinated automatic firing solutions as long as the gun director was pointed at the target, Japanese fire control relied on two mechanical calculators (one for ballistics and one for own and target course and speed) fed by optical range finders aided by color-coded dye loads in each shell. Only the Type 1 AP projectiles of the battleships carried dye loads: Nagato used a brilliant pink, Haruna used a greenish yellow variously described as green or yellow by the Americans, and Kongo used a blood red dye which could appear red, purple, or even blue in some circumstances. Only Yamato which had relatively primitive fire control radar, used no dye loads, so her shell splashes appeared white.[N 1][10]
Not finding the silhouettes of the tiny escort carriers in his identification manuals, Kurita mistook them for larger fleet carriers and assumed that he had a task group of the 3rd Fleet under his guns. His first priority was to eliminate the carrier threat, ordering a "General Attack". Rather than a carefully orchestrated effort, each division in his task force was to attack separately. The Japanese had just changed to a circular antiaircraft formation, and the order caused some confusion, allowing Sprague to lead the Japanese into a stern chase, which restricted the Japanese to using only their forward guns, and restricted their anti-aircraft gunnery. Sprague's ships would not lose as much of their firepower in a stern chase as their stern chase weapons were more numerous than their forward guns, and his carriers would still be able to operate aircraft.
Run to the east
At 06:50 Admiral Sprague ordered a formation course change to 090, directed his carriers to turn to launch their aircraft and then withdraw towards a squall to the east, hoping that bad visibility would reduce the accuracy of Japanese gunfire. He ordered his escorts to the rear of the formation to generate smoke to mask the retreating carriers and ordered the carriers to take evasive action, "chasing salvos" to throw off their enemy's aim, and then launched all available FM-2 Wildcat fighter planes and TBM Avenger torpedo bombers with whatever armament they were already loaded with. Some had rockets, machine guns, depth charges, or nothing at all. Very few carried anti-ship bombs or aerial torpedoes which would have enabled aircraft to sink heavy armored warships. The Wildcats were deemed a better fit on such small aircraft carriers instead of the faster and heavier Grumman F6F Hellcats that were flown from the larger U.S. Navy carriers. Their pilots were ordered "to attack the Japanese task force and proceed to Tacloban airstrip, Leyte, to rearm and refuel". Many of the planes continued to make "dry runs" after expending their ammunition and ordnance to distract the enemy. At about 07:20 the formation entered the squall and the Japanese fire slackened markedly as they lacked gunnery radar that could penetrate the rain and smoke.[11]
Kurita meanwhile was already experiencing the consequences of ordering a General Attack, as his Fifth Cruiser Division and Tenth Destroyer division cut across the course of the Third Battleship Division in their haste to close with the American carriers, forcing the battleship Kongo to turn North out of formation. Kongo would act independently for the remainder of the battle.[12] Concerned that his destroyers would burn too much fuel in stern chase of what he presumed were fast carriers while obstructing his battleships' line of fire, Kurita ordered his destroyers to the rear of his formation at 07:10, a decision which had immediate consequences as the Tenth Destroyer Squadron was forced to turn away just as they were gaining the right flank of the American formation. For the Second Destroyer Squadron the consequences were more significant if less immediate: ordered to fall in behind Third Battleship Division Yahagi and her accompanying destroyers steamed North from their position on the South side of Kurita's formation seeking division flagship Kongo, leaving no Japanese units in position to intercept the American carriers when they turned back South at 07:30. Despite his General Attack order Kurita would continue to dictate fleet course changes throughout the battle.[13]
American destroyer and destroyer escort counterattack

Three destroyers and four smaller destroyer escorts had been tasked to protect the escort carriers from aircraft and submarines. The three Fletcher-class destroyers—affectionately nicknamed "tin cans" because they lacked armor—were fast enough to keep up with a fast carrier task force. Each had five single 5 in (127 mm) guns and light antiaircraft guns which were not designed to take on armored warships. Only their ten 21 in (530 mm) Mark-15 torpedoes—housed in two swiveling five-tube launchers amidships—posed a serious threat to battleships and cruisers. One advantage the American destroyers had was the radar-controlled Mark 37 Gun Fire Control System which provided coordinated automatic firing solutions for their 5 in (127 mm) guns as long as the gun director was pointing at the target.
A dual-purpose system, the Mark 37's gunfire radar and antiaircraft capabilities allowed the destroyers' guns to remain on target despite poor visibility and their own radical evasive maneuvering. The Japanese reliance on optical range finders aided by color-coded dye loads in each shell and mechanical calculators made it difficult for them to identify their targets through the rain and smoke and limited their ability to maneuver while firing.
The four John C. Butler-class destroyer escorts were smaller and slower, since they had been designed to protect slow freighter convoys against submarines. Armed with two 5 in (127 mm) guns without automatic fire control they also carried only three torpedoes, though their crews rarely trained for torpedo attacks. Since the torpedoes only had a range of about 5.5 nmi (6.3 mi; 10.2 km), they were best used at night. During daylight, an attacker would have to pass through a gauntlet of shellfire that could reach out to 25 nmi (29 mi; 46 km). In this battle they would be launched against a fleet led by the largest battleship in history, though it was their ability to generate dense, heavy smoke from their funnels and chemical smoke generators which would most influence the course of the battle.
After laying down smoke to hide the carriers from Japanese gunners, they were soon making desperate torpedo runs, using their own smoke for concealment. The ship profiles and aggressiveness caused the Japanese to think the destroyers were cruisers and the destroyer escorts were full-sized destroyers. Their lack of armor tended to aid clean penetration of armor-piercing rounds before Japanese gunners switched to high-explosive (HE) shells, which caused much more extensive damage. Their speed and agility enabled some ships to dodge shellfire completely before launching torpedoes. Effective damage control and redundancy in propulsion and power systems kept them running and fighting even after they had absorbed dozens of hits before they sank although the decks would be littered with the dead and the seriously wounded. Destroyers from Taffy 2 to the south also found themselves under shellfire, but as they were spotted by Gambier Bay, which had signaled for their assistance, they were ordered back to protect their own carriers.[14]
USS Johnston
At 07:00, Commander Ernest E. Evans of the destroyer Johnston, in response to incoming shell fire bracketing carriers of the group he was escorting, began laying down a protective smokescreen and zigzagging. At about 07:10, Gunnery Officer Robert Hagen began firing at the closest attackers, then at a range of 8.9 nautical miles (10 mi; 16 km) and registered several hits on the leading heavy cruisers. The Japanese targeted Johnston and soon shell splashes were bracketing the ship. In response and without consulting with his commanders, Evans ordered Johnston to "flank speed, full left rudder", beginning an action that would earn him the Medal of Honor.[15] Johnston, still making smoke and zigzagging, accelerated to flank speed towards the Japanese.
At 07:15, Hagen concentrated his fire on the leading cruiser squadron's flagship, the heavy cruiser Kumano.[16] Firing at the 5 in (127 mm) gun's maximum range of 10 nmi (12 mi; 19 km) Johnston scored several hits on Kumano's superstructure, which erupted into flame and smoke.[17]
At 07:16, Sprague ordered Commander William Dow Thomas aboard Hoel, in charge of the small destroyer screen, to attack. Struggling to form an attack formation, the three small ships (Hoel, Heermann, Samuel B. Roberts) began their long sprint to get into firing position for their torpedoes.
Johnston pressed its attack, firing more than two hundred shells as it followed an evasive course through moderate swells, making it a difficult target.[16] Johnston closed to within maximum torpedo range, and at 4.4 nautical miles (5.1 mi; 8.2 km) she fired a full salvo of ten torpedoes.[18] At 07:24, two or three struck, blowing the bow off Kumano.[17] Minutes later, at 07:33, Kongo was narrowly missed by four torpedoes. (Morrison asserts Kongo was forced to turn away north to avoid these torpedoes but this is not reflected in Kongo's own action report. It is not clear if these torpedoes were fired by Johnston or Hoel.) [19][20] The heavy cruiser Suzuya, suffering damage from air attacks, was also taken out of the fight, as she stopped to assist Kumano. The effect of Johnston's attack was to generate confusion in the minds of the Japanese commanders, who thought they were being engaged by American cruisers. Evans then reversed course and, under cover of his smokescreen, opened the range between his ship and the enemy.
At 07:30, three battleship main battery shells passed through the deck of Johnston and into her portside engine room, cutting the destroyer's speed in half to 17 kn (20 mph; 31 km/h) and disrupting electric power to her aft gun mounts. Hagen reports them as 14 in (360 mm) shells from the battleship Kongō, at a range of 7 nmi (8.1 mi; 13 km), but that is unlikely as Kongo was on the far side of the Japanese formation and Kongo's action report states she was not engaging any targets at that time as she was blinded by a rain squall. Based on the bearing and the angle of fall, it is far more likely that they were 18.1 in (460 mm) shells fired by Yamato from a range of 10.029 nautical miles (11.541 mi; 18.574 km), as moments later, three 6.1 in (150 mm) shells from Yamato struck Johnston's bridge, causing numerous casualties and severing the fingers of Commander Evans's left hand. The ship was mangled badly, with dead and dying sailors strewn across her bloody decks. Yamato reported sinking a "cruiser" (the Japanese consistently overestimated the size of the US ships engaged) with a main battery salvo at 07:27.[21] Destroyer Kishinami, which was also firing at Johnston at the time, reported "The Yamato sank one enemy cruiser" at 07:28.[22]
However, Johnston was not sunk. Her stores of fuel had been seriously depleted before the battle, saving her from a catastrophic explosion.[23] The ship found sanctuary in rain squalls, where the crew had time to repair damage, restoring power to two of the three aft gun mounts. Johnston's search radar was destroyed, toppled to the deck in a tangled mess. The fire control radar was damaged, but was quickly returned to service. Only a few minutes were required to bring Johnston's main battery and radar online, and from its hidden position in the rain, Johnston fired several dozen rounds at the lead Japanese destroyer at 4.9 nautical miles (5.7 mi; 9.1 km) beginning at approximately 07:35. Fire was then shifted to the cruisers approaching from the east. Several dozen more rounds were fired at the closest target at 5.4 nautical miles (6.3 mi; 10 km).[16][17][24] Since neither of the targets could be observed visually, they could not be positively identified but Johnston's presumed "cruiser" was most likely the battleship Haruna.[25]
At 07:37, Commodore Thomas ordered a torpedo attack via voice radio. Johnston and Heermann acknowledged.[26] As Johnston continued its course away from the Japanese, it came upon the charging screening force, led by the damaged Hoel. Evans then had Johnston rejoin the attack to provide gun support to Commander Thomas' small squadron on their torpedo run. Attacking Tone, the leading heavy cruiser to the east of the formation, Johnston closed to 6,000 yards (3.0 nmi; 5.5 km), now firing with reduced efficiency due to her lost SC radar, yet still registering many hits.[27][28]
All available fighters and bombers from the Taffys converged on the Japanese fleet. At 08:40, moving erratically through the smoke and rain, Johnston avoided Heermann by the narrowest of margins.[29][30] Heermann was "within potato range" at one point (between 08:08 and 08:25) of a Japanese destroyer for several minutes, before being separated by the smoke.[31]
During the battle, Evans engaged in several duels with much larger Japanese opponents. At 08:20, emerging through smoke and rain squalls, Johnston was confronted by a 36,600-ton Kongō-class battleship (probably Haruna, which reported engaging a US destroyer with her secondary battery around this time.)[32] Johnston fired at least 40 rounds, and more than 15 hits on the battleship's superstructure were observed. Johnston reversed course and disappeared in the smoke, avoiding Kongō's 14 in (36 cm) return fire. At 08:26 and again at 08:34, Commander Thomas requested an attack on the heavy cruisers to the east of the carriers.[26] Responding at 08:30, Johnston bore down on a huge cruiser firing at the helpless Gambier Bay, then closed to 6,000 yards (3.0 nmi; 5.5 km) and fired for ten minutes at a heavier and better-armed opponent, possibly Haguro, scoring numerous hits.[33]
At 08:40, a much more pressing target appeared astern. A formation of seven Japanese destroyers in two columns was closing in to attack the carriers.[16][17][34][35][36] Reversing course to intercept, Evans attempted to pass in front of the formation, crossing the "T", a classical naval maneuver which would have put the force being "crossed" at a great disadvantage. Evans ordered Johnston's guns to fire on this new threat. The Japanese destroyers returned fire, striking Johnston several times. Perhaps seeing his disadvantage, the commander of the lead destroyer turned away to the west. From as close as 7,000 yards (3.5 nmi; 6.4 km), Hagen fired and scored a dozen hits on the destroyer leader before it veered off. He shifted fire to the next destroyer in line, scoring five hits before it too turned away. Amazingly, the entire squadron turned west to avoid Johnston's fire. At 09:20, these destroyers finally managed to fire their torpedoes from extreme range, 5.2 nautical miles (6.0 mi; 9.6 km).[16] Several torpedoes were detonated by strafing aircraft or defensive fire from the carriers, and the rest failed to strike a target.
The Japanese and the American ships were now intertwined in a confused jumble. The heavy smoke had made the visibility so poor by 08:40 Johnston nearly collided with Heerman while it crossed the formation to engage the Japanese Destroyers, forcing Samuel B. Roberts to evade them both.[37] Gambier Bay and Hoel were sinking. Finding targets was not difficult. After 09:00, with Hoel and Samuel B. Roberts out of the fight, the crippled Johnston was an easy target. Fighting with all she had, she exchanged fire with four cruisers and numerous destroyers.
Johnston continued to take hits from the Japanese, which knocked out the number one gun mount, killing many men. By 09:20, forced from the bridge by exploding ammunition, Evans was commanding the ship from the stern by shouting orders down to men manually operating the rudder. Shell fire knocked out the remaining engine, leaving Johnston dead in the water at 09:40. As her attackers gathered around the vulnerable ship, they concentrated fire on her rather than the fleeing carriers. Johnston was hit so many times that one survivor recalled "they couldn't patch holes fast enough to keep her afloat."
At 09:45, Evans finally gave the order to abandon ship. Johnston sank 25 minutes later with 186 of her crew. Evans abandoned ship with his crew but was never seen again. He was posthumously awarded the Medal of Honor. However, it was the Japanese themselves who first recognized Johnston's incredible actions that day. As the Japanese destroyer Yukikaze cruised slowly nearby, Robert Billie and several other crewmen watched as her captain saluted the sinking Johnston.[38]
USS Samuel B. Roberts
_off_Boston%2C_Massachusetts_(USA)%2C_circa_in_June_1944_(NH_90603).jpg)
Although destroyer escorts were conceived as the most inexpensive small ships that could protect slow cargo convoys against submarines, they had retained a basic anti-ship capability with torpedoes and 5 in (127 mm) guns. In this battle, USS Samuel B. Roberts (DE-413) would distinguish herself as the "destroyer escort that fought like a battleship" when thrown into the fray against armored cruisers which were designed to withstand 5 in (127 mm) gunfire. Sometime around 07:40, Lieutenant Commander Robert W. Copeland maneuvered his small ship to evade the charging Heermann and, as he watched the destroyer receding towards the enemy, sized up the situation,[39] which he passed to his crew over the 1MC public-address circuit: "This will be a fight against overwhelming odds from which survival cannot be expected. We will do what damage we can." He realized that at his current heading and location his small ship would be in a textbook position to launch a torpedo attack at the leading heavy cruiser. Without orders and indeed against orders, he proceeded at full speed and set course to follow Heermann in to attack the cruisers.
Under the cover of the smokescreen from the destroyers, Roberts escaped detection. Not wanting to draw attention to his small ship, he repeatedly denied his gun captain permission to open fire with the 5 in (127 mm) guns; even though targets were clearly visible and in range, he intended to launch torpedoes at 5,000 yards (4.6 km). A stray shell, probably intended for one of the nearby destroyers, hit Roberts' mast which fell and jammed the torpedo mount at 08:00. Finally recovering, at 4,000 yards (3.7 km), Roberts launched her torpedoes at Chōkai without being fired upon. Quickly reversing course, Roberts disappeared into the smoke. A lookout reported at least one torpedo hit, and the crippled Chōkai started losing speed and fell to the rear of the column at 08:23.[40][41]
By 08:10, Roberts was nearing the carrier formation. Through the smoke and rain, the heavy cruiser Chikuma appeared, firing broadsides at the carriers. Copeland changed course to attack and informed his gun captain, "Mr Burton, you may open fire."[42] Roberts and Chikuma began to trade broadsides. Chikuma now divided her fire between the carriers and Roberts. Hampered by the closing range and slow rate of fire, Chikuma fired with difficulty at her small, fast opponent. (Early in the battle, when it had become apparent that Roberts would have to defend the escort carriers against a surface attack, chief engineer Lt. "Lucky" Trowbridge bypassed all the engine's safety mechanisms, enabling Roberts to go as fast as 28 knots (52 km/h; 32 mph).)[43] Roberts did not share Chikuma's problem of slow rate of fire. For the next 35 minutes, from as close as 5,300 yards (4.8 km), her guns would fire almost the entire supply of 5 in (127 mm) ammunition on board—over 600 rounds.[44] In this seemingly unequal contest, Chikuma was raked along its entire length. However, unknown to the crew of Roberts, shortly after Roberts engaged Chikuma, Heermann also aimed her guns at the cruiser, putting her in a deadly crossfire. Chikuma's superstructure was ripped by salvo after salvo of armor-piercing shells, high-explosive shells, anti-aircraft shells, and even star shells that created chemical fires even in metal plates. The bridge of Chikuma was devastated, fires could be seen along her superstructure, and her number three gun mount was no longer in action.[45]
However, Chikuma was not alone, and soon, the Japanese fleet's multicolored salvos were bracketing Roberts, indicating that she was under fire from Yamato, Nagato, and Haruna.[46] In a desperate bid to avoid approaching shells, Copeland ordered full back, causing the salvo to miss. Now, however, his small ship was an easy target, and at 08:51, cruiser shells found their mark, damaging one of her boilers. At 17 knots (31 km/h; 20 mph), Roberts began to suffer hits regularly. Credit is given to Kongō for striking the final decisive blows at 09:00, which knocked out her remaining engine.[29] Dead in the water and sinking, Roberts's part in the battle was over.[47]
Gunner's Mate Paul H. Carr was in charge of the aft 5 in (127 mm) gun mount, which had fired nearly all of its 325 stored rounds in 35 minutes before a breech explosion caused by the gun's barrel overheating. Carr was found dying at his station, begging for help loading the last round he was holding into the breech. He was awarded a Silver Star, and a guided missile frigate was later named for him.[48] The guided missile frigates Samuel B. Roberts (FFG-58) and Copeland (FFG-25) were named for the ship and its captain.
Companion destroyer escorts USS Raymond (DE-341), USS Dennis (DE-405), and USS John C. Butler (DE-339) also launched torpedoes. While they missed, this helped slow the Japanese chase. Dennis was struck by a pair of cruiser shells, and John C. Butler ceased fire after expending her ammunition an hour into the engagement.
USS Hoel
The fast destroyer Hoel, captained by Commander Leon S. Kintberger, was the flagship of the small destroyer and destroyer escort screen of Taffy 3. As towering splashes from Japanese shells began bracketing the ships of the task group, Hoel started zig-zagging and laying smoke to help defend the now fleeing CVEs. When the Japanese had closed to 18,000 yards (16 km) Kintberger opened fire, and was in turn targeted by the Japanese. Yamato's 6.1 inches (15 cm) guns scored a hit on Hoel's bridge at 14,000 yards (13 km), knocking out all voice radio communication, killing four men and wounding Kintberger and Screen Flag Officer Commander William Dow Thomas.[49]
Admiral Sprague then ordered Thomas to attack the Japanese with torpedoes. From his position on the damaged Hoel, he formed up the three destroyers of his command as best he could and at 07:40 ordered "Line up and let's go."[50] Through rain showers and smoke, Hoel zig-zagged toward the Japanese fleet, followed by Heermann and Samuel B. Roberts. Lurking in the rain, Johnston was targeting unsuspecting Japanese cruisers with her radar.
Kintberger now had to choose a target quickly as the distance closed rapidly. In the Combat Information Center, Executive Officer Fred Green quickly suggested a course that would put Hoel in a position to attack the leading "battleship", either Kongo or possibly the heavy cruiser Haguro. Without hesitation, Kintberger ordered Hoel in. No consideration was given to the fact that the course would put the small ship in the middle of the charging Center Force.[51]
Gunnery Officer Lt. Bill Sanders directed Hoel's main battery of five 5"/38 caliber guns in a rapid-fire barrage and scored several hits, drawing the attention of a substantial portion of the Japanese fleet. Soon shells of all calibers were straddling the attacking destroyer.
Sometime near 07:27, at a range of 9,000 yards (8.2 km), Hoel fired a half salvo of torpedoes and reversed course.[52] The results of this salvo were not observed, but several histories report that Haguro was forced to turn sharply away from the torpedo attack and dropped out of the lead to behind Tone,[53] an assertion that is contradicted by Haguro's detailed action report, which records turning to engaging an "enemy cruiser" (Hoel) at 10,300 yards (9.4 km), but not a torpedo attack.[54]
Moments after Hoel loosed her first half salvo, a devastating series of multi-caliber shells struck Hoel in rapid succession, disabling all the primary and secondary battery weapons aft of the second stack, stopping her port engine and depriving her of her Mark-37 fire control director, FD radar, and bridge steering control. His ship slowing to 17 knots under hand steering, Kintberger realized he would have to fire his remaining torpedoes quickly before his ship was shot out from under him.[55]
Heading southwest after his initial torpedo attack, Commander Kintberger turned west and launched his second torpedo salvo at a "Heavy Cruiser" (probably Yamato or Haruna, both sides having difficulty with target identification in the poor visibility) at approximately 07:50. This time, Hoel's crew were rewarded by what appeared to be the sight of large columns of water alongside their target. The torpedo hits could not be confirmed, however. The water spouts were probably near misses by bombs. Japanese action reports reveal that Hoel's target was probably Yamato, which turned hard to port to evade a torpedo salvo at 07:54 and was forced to run north until the torpedoes ran out of fuel, taking Kurita out of the battle and causing him to lose track of his forces.[56]
Hoel was now crippled and surrounded by the enemy, with her speed reduced to 17 knots. Within a few minutes, steerage had been restored from the aft steering room. Kintberger ordered a course south towards Taffy 3. In the process of fishtailing and zig-zagging, she peppered the closest enemy ships with her two remaining guns. Finally at roughly 08:30,[52] after withstanding over 40 hits from 5–16 in (127–406 mm) guns, an 8 in (200 mm) shell disabled her remaining engine. With her engine room underwater and No. 1 magazine ablaze, the ship began listing to port, settling by the stern. The order to abandon ship was given at 08:40, and many of her surviving crew swam away from the ship.
A Japanese cruiser and several destroyers closed to within 2,000 yards (1.8 km), giving the two forward gun crews, under Gun Captain Chester Fay, a large, close target. For about ten minutes, they traded salvos with the Tone-class cruiser. When the destroyers slowed and approached to about 1,000 yards (910 m), they were also fired upon. The Japanese fire only stopped at 08:55 when Hoel rolled over and sank in 8,000 yards (7.3 km) of water, after enduring 90 minutes of punishment.[57]
Hoel was the first of Taffy 3's ships to sink, and suffered the heaviest proportional losses: only 86 of her complement survived; 253 officers and men died with their ship. Commander Kintberger, who would live to retire a rear admiral, described the courageous devotion to duty of the men of Hoel in a seaman's epitaph: "Fully cognizant of the inevitable result of engaging such vastly superior forces, these men performed their assigned duties coolly and efficiently until their ship was shot from under them."
USS Heermann
Heermann—captained by Commander Amos T. Hathaway—was on the disengaged side of the carriers at the start of the fight when at 07:37 he received an order from Commodore Thomas to take the lead position in a column of "small boys" to attack the approaching enemy fleet. Heermann steamed into the action at flank speed through the formation of "baby flattops" through smoke and intermittent rain squalls that had reduced visibility at times to less than 100 yd (91 m), twice having to back emergency full to avoid collisions with friendly ships, first with Samuel B. Roberts and then at 07:49 with Hoel, as she tried to take her assigned position at the head of the column in preparation for a torpedo attack.[58]
At 07:50, Heermann engaged the heavy cruiser Haguro with her 5 in (127 mm) guns, while hurriedly preparing a half-salvo torpedo attack. In the confusion of battle, the torpedoman on the second torpedo mount mistakenly fired two extra torpedoes at the same time as the number one mount before he was stopped by the mount captain. After firing seven torpedoes, Heermann changed course to engage a column of three battleships that had commenced firing upon her.[58]
Hathaway may now have been responsible for causing a series of events that may have had a decisive influence on the outcome of the battle. He directed 5 in (127 mm) gunfire on the battleship Haruna, the column's leader. Then, he quickly closed to a mere 4,400 yd (4.0 km) and fired his last three torpedoes.[58] Haruna evaded all of them, but historian Samuel Eliot Morison, with his usual disregard for Japanese sources, asserts that Yamato was bracketed between two of Heermann's torpedoes on parallel courses, and for 10 minutes was forced to head north away from the action, while Lundgren, based on a comparison of both Japanese and American sources, asserts that the torpedoes came from Hoel's second salvo fired at 07:53.[59] In either case, Kurita and his most powerful ship were temporarily out of the action. The Japanese had now lost the initiative. The stubborn American defense had completely taken the wind out of the Japanese attack.
At 08:03, believing that one of the torpedoes had hit the battleship, Hathaway set course for the carrier formation, zigzagging and under the cover of smoke. Still undamaged, Heermann was able to fire through the smoke and rain at nearby targets. Now under continuous fire, Heermann began an unequal duel with Nagato, whose salvos were beginning to land uncomfortably close.[58]
At 08:26, Commander Thomas requested covering fire on the cruisers firing on the CVEs from the east. Hathaway responded but first had to pass through the formation of carriers and escorts. This task proved hazardous. Traveling at flank speed, Heermann again had two near misses, this time with Fanshaw Bay and Johnston.
Finally on course for the enemy cruisers, Heermann came upon the heavily damaged Gambier Bay which was being pummeled at point-blank range. At 12,000 yards (11 km), Heermann engaged Chikuma as her guns cleared Gambier Bay. Chikuma was now caught in a crossfire between Heermann and Samuel B. Roberts and taking considerable punishment. During this phase of the battle, Heermann came under fire from the bulk of the Japanese fleet. Colored splashes of red, yellow, and green indicated that she was being targeted by Kongō and Haruna. Many uncolored splashes were also observed, likely from the line of heavy cruisers being led by Chikuma. At 08:45, a hit on Heermann's wheelhouse killed three men outright and fatally wounded another.[58] A series of 8 in (200 mm) shell hits flooded the forward part of the destroyer, pulling her bow down so far that her anchors were dragging in the water, and one of her guns was knocked out.
At 08:50, aircraft from VC-10 approached the scene and were vectored via VHF by Taffy 3 to the cruisers to the east. By 08:53, Chikuma and the rest of the four heavy cruisers were under heavy air attack. At 0902, under the combined effort of Heermann, Roberts, and the bombs, torpedoes, and strafing from the carrier-based planes, Chikuma finally disengaged, but sank during her withdrawal.[58]
At 09:07, the heavy cruiser Tone exchanged fire with Heermann until she too turned away at 09:10. By 09:17, Sprague ordered Hathaway to lay smoke on the port quarter of the CVEs, and by 09:30, the group had reformed in its normal formation and was headed southward.[58]
Convinced he was facing a much larger force because of the ferocity of the American resistance, Kurita gave a "cease action" order at 09:00, with instructions to rendezvous north. Thus, unexpectedly, the Japanese began to disengage and turned away.
Though extensively damaged, Heermann was the only destroyer from the screen to survive.
The Run to the South
Temporarily safe within the rain squall, Admiral Sprague had a difficult decision to make. The easterly course was drawing the enemy too close to San Bernardino Strait and away from any help that might come from Admiral Oldendorf's forces to the south, and Kurita was about to gain the windward side of his formation, which would render his smoke less effective. Thus, at 07:30 Sprague ordered a course change, first to the southeast and then to the south, and ordered his escorts to make their torpedo attack to cover the carrier's emergence from the storm. That was a very risky decision for Sprague because it gave Kurita a chance to cut across the diameter of Sprague's arc and cut him off.
However, Kurita missed the chance and his forces followed Taffy 3 around the circle, his earlier decision to send his destroyers to the rear having removed them from a position that they could have intercepted or prevented the American formation's turn.[60] The aircraft carriers of Taffy 3 turned south and withdrew through shellfire at their top speed of 17.5 knots (20.1 mph; 32.4 km/h). The six carriers dodged in and out of rain squalls, occasionally turning into the wind to launch the few planes they had left.
After one hour, the Japanese had closed the chase to within 10 miles (16 km) of the carriers. That the carriers had managed to evade destruction reinforced the Japanese belief that they were attacking fast fleet carriers. The heavy clouds of black and white smoke generated by the Americans were now making target observation extremely difficult. At 08:00, Sprague ordered the carriers to "open fire with pea-shooters when the range is clear." The stern chase was also advantageous for the sole anti-ship armament of small carriers was a single manually controlled stern-mounted 5 in (127 mm) gun as a stinger, though they were loaded with anti-aircraft shells.[61] Fire from the CVEs' stingers would be credited with hitting Japanese warships that ventured within 5 in (127 mm) gun range and contributing to the sinking of heavy cruiser Chōkai.[62] As anti-aircraft gunners observed helplessly, an officer cheered them by exclaiming, "Just wait a little longer, boys, we're suckering them into 40-mm range."
Carriers under attack
During the run to the east the ships had been battered by near-misses. At 08:05, Kalinin Bay was struck by an 8 in (200 mm) shell and the carriers started taking direct hits. However, the Japanese ships were firing armor-piercing (AP) shells, which often carried right through the unarmored escort carriers without detonating. Though CVEs were popularly known as "Combustible Vulnerable Expendable," they would ultimately prove durable in first dodging and then absorbing heavy shell fire and in downing attacking kamikaze planes.
USS White Plains
When Yamato opened fire at 06:59 at an estimated range of 17 nautical miles (32 km), she targeted White Plains with her first four salvos.Yamato's third salvo was a close straddle landing at 07:04. One shell from this salvo exploded beneath the turn of White Plains port bilge near frame 142, close to her aft (starboard) engine room. While the ship was not struck directly, the mining effect of the under-keel explosion severely damaged her hull, deranged her starboard machinery, and tripped all of the circuit breakers in her electrical network. Prompt and effective damage control restored power and communications within three minutes and she was able to remain in formation by overspeeding her port engine to compensate. The gout of black smoke resulting from the shock of the explosion convinced Yamato (and Nagato, which was also firing her main battery at White Plains at the time) that they had scored a direct hit and they shifted fire to other targets.[63] The turn to the south put White Plains in the lead of the formation and she escaped any further hits from Japanese fire.
During the surface phase of the action, White Plains's 5 in (127 mm) gun crew claimed six hits on heavy cruiser Chōkai,[14] causing its eight deck-mounted Type 93 "Long Lance" torpedoes to explode. The explosion crippled Chokai, making it vulnerable to air attack. Chokai was later sunk by planes from Ommaney Bay (CVE-79), an escort carrier of Taffy 2. However, Haguro's detailed action report states that Chokai's immobilizing damage resulted from a bomb hit at 08:51[64] and so while the claim is plausible, it is not verified by Japanese sources.
USS Gambier Bay
As Japanese gunners concentrated on the closest target, Gambier Bay effectively was a sacrifice that diverted attention from the other fleeing carriers. At 08:10, Chikuma closed to within 5 nmi (5.8 mi; 9.3 km) and finally landed hits on the flight deck of Gambier Bay, which was the most exposed. Subsequent hits and near-misses, as the Japanese switched to high-explosive shells, first caused Gambier Bay to lose speed, and she was soon dead in the water. Three cruisers closed to point-blank range, as destroyers such as Johnston were unsuccessful in drawing fire away from the doomed carrier. Fires raged through the riddled escort carrier. She capsized at 09:07 and disappeared beneath the waves at 09:11. The majority of her nearly 800 survivors were rescued two days later by landing and patrol craft dispatched from Leyte Gulf. Gambier Bay would be the only U.S. carrier sunk by naval gunfire in World War II.[65]
USS St. Lo
Straddled several times during the run to the east, St. Lo escaped serious damage during the surface phase of the action. By 07:38 the Japanese cruisers approaching from St. Lo's port quarter had closed to within 14,000 yards (13 km). St. Lo responded to their salvos with rapid fire from her single 5 in (127 mm) gun, claiming three hits on a Tone-class cruiser. At 10:00, she launched an Avenger armed with a torpedo to join the attack launched by Kitkun Bay at 10:13. At 10:51 Lt. Yukio Seki, leader of the Shikishima squadron, crashed his A6M Zero into her flight deck from astern. The resulting explosions and fires within her hangar forced Captain McKenna to order abandon ship at 11:00. USS St Lo capsized and sank at 11:25 with the loss of 114 men.[66]
USS Kalinin Bay
As the trailing ship in the escort carrier van after the turn to the south, Kalinin Bay came under intense enemy fire. Though partially protected by smoke, a timely rain squall, and counterattacks by the screening destroyers and destroyer escorts, she took the first of fifteen direct hits at 07:50. Fired from an enemy battleship, the large-caliber shell (14 in (360 mm) or 16 in (410 mm)) struck the starboard side of the hangar deck just aft of the forward elevator.
By 08:00 the Japanese cruisers off her port quarter (Tone and Haguro) had closed to within 18,000 yards (16 km). Kalinin Bay responded to their straddling salvos with her 5 in (127 mm) gun. Three 8 in (200 mm) armor-piercing projectiles struck her within minutes. At 08:25, the carrier scored a direct hit from 16,000 yards (15 km) on the No. 2 turret of a Nachi-class heavy cruiser, and a second hit shortly thereafter forced the Japanese ship to withdraw temporarily from formation.
At 08:30, five Japanese destroyers steamed over the horizon off her starboard quarter. They opened fire from about 14,500 yards (13.3 km). As screening ships engaged the cruisers and laid down concealing smoke, Kalinin Bay shifted her fire, and for the next hour traded shots with Destroyer Squadron 10. No destroyer hit Kalinin Bay, but she took ten more 20 centimetres (8 in) hits from the now obscured cruisers. One shell passed through the flight deck and into the communications area and destroyed all the radar and radio equipment. Most of the hits occurred after 08:45 when Tone and Haguro had closed to within 10,100 yards (9.2 km).[67]
At 09:15, an Avenger from St. Lo—piloted by Lieutenant (j.g.) Waldrop—strafed and exploded two torpedoes in Kalinin Bay's wake about 100 yards (91 m) astern of her. A shell from the latter's 5 in (127 mm) gun deflected a third from a collision course with her stern. At about 09:30, as the Japanese ships fired parting salvos and reversed course northward, Kalinin Bay scored a direct hit amidships on a retreating destroyer. Five minutes later, she ceased fire and retired southward with the other survivors of Taffy 3.
Around 10:50, the task unit came under a concentrated air attack. During the 40 min battle, the first attack from a kamikaze unit in World War II, all escort carriers but Fanshaw Bay were damaged. Four diving planes attacked Kalinin Bay from astern and the starboard quarter. Two were shot down close aboard, but the third crashed into the port side of the flight deck, damaging it severely, and the fourth destroyed the aft port stack. Kalinin Bay suffered extensive structural damage during the morning's intense action, as well as five dead among her sixty casualties. Twelve direct hits were later confirmed by damage and two large-caliber near misses. Ironically, it was the two near-misses that exploded under her counter that threatened the ship's survival.
USS Kitkun Bay
Straddled several times early in the surface action during the run to the east as she was at the rear of the formation alongside White Plains, Kitkun Bay was towards the front of the formation after the turn to the south and escaped serious damage. At 10:13 she launched five Avengers (four armed with torpedoes, one with bombs) to attack the retreating Japanese. The five (along with one from St. Lo) attacked Yamato at 10:35 without result. Attacked by a kamikaze at 11:08, she was successfully defended by her own and Fanshaw Bay's AA batteries. She was the only one of Sprague's carriers to escape undamaged.

USS Fanshaw Bay
Targeted by Kongo and Haruna early in the action (red, yellow and blue shell splashes) Sprague's flagship Fanshaw Bay escaped serious damage during the run to the east and was on the far side of the formation across from Gambier Bay during the run to the south. During the later kamikaze attacks, the Fanshaw Bay took a near-miss kamikaze close aboard, helped down a plane just about to crash into Kitkun Bay, and landed planes from her sunk or damaged sisters. Fanshaw Bay suffered four dead and four wounded.
Battleship Yamato
Yamato engaged enemy surface forces for the first and only time at Samar, entering the battle two meters down by the bow and limited to 26 knots due to 3000 tons of flooding caused by three armor-piercing bombs during the Battle of the Sibuyan Sea. Yamato opened the battle at 06:59, firing on USS White Plains at an estimated range of 19.616 miles (17.046 nmi; 31.569 km), severely damaging White Plains with a near miss from her third salvo. The resulting gout of smoke from the stricken carrier obscured the target and convinced Yamato she was destroyed so they checked fire at 07:09. At 07:27, Yamato reported main and secondary battery hits on an "enemy cruiser" at 11.541 miles (10.029 nmi; 18.574 km), the time, range and bearing of which all correspond with the hits on the destroyer Johnston.[68] At 07:51, she turned her secondary battery on USS Raymond at a range of 5.736 miles (4.985 nmi; 9.232 km) before steering hard to port to avoid a torpedo salvo from the charging USS Hoel at 07:54. At 07:55, Yamato opened fire on Hoel with her 5 in (127 mm) anti-aircraft guns and was struck by an American 5 in (127 mm) shell in return. Hemmed in by Haruna to starboard and her destroyers to port Yamato was forced to run due North away from the battle until the torpedoes ran out of fuel, finally turning back at 08:12.[69]
At 08:23 Yamato's F1M2 "Pete" floatplane reported a primary battery hit on Gambier Bay though this hit was also claimed by Kongo. Gambier Bay's own records report a damaging near miss from a battleship caliber shell around this time.[70] At 08:34 Yamato trained her secondary batteries on another "light cruiser", probably USS Hoel, which was observed sinking at 08:40.[71] At 08:45 Yamato sighted three of the American carriers, US smoke screens preventing her from seeing the entire US formation. Between 09:06 and 09:17 Yamato received multiple strafing and torpedo attacks from US aircraft, claiming one US aircraft shot down at 09:15. Fighter pilot Lieutenant Richard W. Roby reportedly attacked destroyers before raking the decks and then bridge of Yamato with his .50 in (12.7 mm) machine guns, further discouraging her.[72] However, US reports that Yamato closed to within 2,400 yards (2.2 km) of the American ships before she was attacked by American aircraft are not supported by Yamato's own action report.[73] At 09:11, Kurita ordered his ships to regroup to the North and at 09:22 Yamato slowed to 20 knots and came round to course 040, finally setting course 000 (due north) at 09:25. Kurita reported that his force had sunk two carriers, two cruisers, and some destroyers, apparently assuming that Yamato had indeed sunk White Plains with her first four salvoes.[74][75][76] Kurita's forces had actually sunk one carrier, two destroyers, and one destroyer escort, and Yamato's guns likely contributed to the sinking of three out of four, with claimed hits (some unconfirmed or disputed) on all except Samuel B. Roberts.
.jpg)
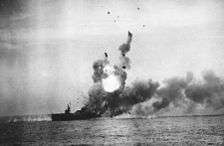
Japanese cruiser Chōkai hit by White Plains
Targeted by 5 in (127 mm) gunfire from the destroyers and destroyer escorts, the Japanese cruiser Chōkai was hit amidships, starboard side, most likely by the sole 5 in (127 mm) gun of the carrier White Plains.[62] The shell could not pierce the hull armor, but the 7 pounds (3.2 kg) bursting charge that it contained may have set off the eight deck-mounted Japanese Type 93 "Long Lance" torpedoes, which were especially volatile because they contained pure oxygen, in addition to their 1,080 lb (490 kg) warheads. The explosion resulted in such severe damage that it knocked out the rudder and engines, causing Chōkai to drop out of formation. Within minutes, an American aircraft dropped a 500 lb (230 kg) bomb on her forward machinery room. Fires began to rage and she went dead in the water. Later that day, she was scuttled by torpedoes from the destroyer Fujinami.
However, Haguro's detailed action report states that Chokai's immobilizing damage resulted from a bomb hit at 08:51[64] and so while the claim is plausible, it is not verified by Japanese sources.
Japanese take further hits
After Johnston blew off the bow of Kumano with a Mark 15 torpedo, the Japanese ship retired towards the San Bernardino Strait, where she suffered minor damage from an aerial attack.
Chikuma engaged the U.S. escort carriers, helping to sink Gambier Bay, but came under fire from Heermann and under a heavy air attack. It is generally thought that destroyer Nowaki took off survivors from Chikuma, and then scuttled her at 11°25′N 126°36′E in the late morning of on October 25, 1944, but a more recent study suggests Chikuma sank from the effect of the air attack, and Nowaki arrived only in time to pick up survivors from the water.[77]
While withdrawing from the battle area, Nowaki was herself sunk, with the loss of all but one of Chikuma's surviving crewmen.
The heavy cruiser Suzuya, which had also engaged the carriers, received fatal damage from the air, ironically without suffering any direct hits. Early in the battle, she was attacked by ten Avengers from Taffy 3. A near-miss close astern to port by an HE bomb from one of the TBMs carried away one of Suzuya's propellers, reducing her maximum speed to 20 knots. At 10:50, she was attacked by 30 more carrier aircraft. Another near miss by a bomb, this time starboard amidships, set off the Long Lance torpedoes loaded in one of her starboard tube mounts. The fires started by the explosion soon propagated to other torpedoes nearby and beyond, the subsequent explosions damaging one of the boilers and the starboard engine rooms. Abandon ship was ordered at 11:50, none too soon, as the fires set off the remaining torpedoes and her main magazines just ten minutes later. Suzuya rolled over and sank at 13:22, with 401 officers and crew rescued by destroyer Okinami, followed by further rescues by American ships later.
Kurita withdraws
Though Kurita's battleships had not been seriously damaged, the air and destroyer attacks had broken up his formations, and he had lost tactical control. His flagship Yamato had been forced to turn north in order to avoid torpedoes, causing him to lose contact with much of his task force. The ferocity of the determined, concentrated sea and air attack from Taffy 3 had already sunk or crippled the heavy cruisers Chōkai, Kumano, and Chikuma, seemingly confirming to the Japanese that they were engaging major fleet units rather than escort carriers and destroyers. Kurita was at first not aware that Halsey had already taken the bait and that his battleships and carriers were far out of range. The ferocity of the air attacks[78] further contributed to his confusion since he assumed that such devastating strikes could come only from major fleet units rather than escort carriers. Signals from Ozawa eventually convinced Kurita that he was not engaging the entirety of 3rd fleet and that remaining elements of Halsey's forces might close in and destroy him if he lingered too long in the area.[79]
Finally, Kurita received word that the Southern Force that he was to meet had been destroyed the previous night. Calculating that the fight was not worth further losses and believing he had already sunk or damaged several American carriers, Kurita broke off the engagement at 09:20 with the order: "all ships, my course north, speed 20." He set a course for Leyte Gulf but became distracted by reports of another American carrier group to the north. Preferring to expend his ships against capital ships, rather than transports, he turned north after the nonexistent enemy fleet and ultimately withdrew back through the San Bernardino Strait.
As he retreated north and then west through the San Bernardino Strait, the smaller and heavily-damaged American force continued to press the battle. While watching the Japanese retreat, Admiral Sprague heard a nearby sailor exclaim, "Damn it, boys, they're getting away!"
The kamikaze attack
Around 10:47, Taffy 3 came under a concentrated air attack. During the 40 min battle, the first attack from a kamikaze unit in World War II, all of the escort carriers except Fanshaw Bay were damaged. One plane crashed alongside Fanshaw Bay without damaging her, shot down by her anti-aircraft battery. Another struck the water near White Plains alongside her flight deck, wounding 11 sailors and causing minor damage. Four diving planes attacked Kalinin Bay from astern and the starboard quarter. Two were shot down close aboard, but the third crashed into the port side of the flight deck, damaging it severely, and the fourth destroyed the aft port stack and catwalk.[80]
Seventh Fleet's calls for help
Shortly after 08:00, desperate messages calling for assistance began to come in from 7th Fleet. One from Vice Admiral Thomas C. Kinkaid, sent in plain language, read, "My situation is critical. Fast battleships and support by airstrikes may be able to keep enemy from destroying CVEs and entering Leyte."
At 08:22, Kinkaid radioed, "Fast Battleships are Urgently Needed Immediately at Leyte Gulf".[81]
At 09:05, Kinkaid radioed, "Need Fast Battleships and Air Support".
At 09:07, Kinkaid broadcast what his mismatched fleet was up against: "4 Battleships, 8 Cruisers Attack Our Escort Carriers".
3,000 nautical miles (3,500 mi; 5,600 km) away at Pearl Harbor, Admiral Chester W. Nimitz had monitored the desperate calls from Taffy 3, and sent Halsey a terse message: "Where is TF 34?". To complicate decryption, communications officers were to add a nonsense phrase at both ends of a message, in this case, "Turkey trots to water" and suffixed with "The world wonders." The receiving radioman repeated the "where is" section of this message and his staff failed to remove the trailing phrase "the world wonders." A simple query by a distant supervisor had, through the random actions of three sailors, become a stinging rebuke.
Halsey was infuriated since he did not recognize the final phrase as padding, possibly chosen for the 90th anniversary of the Charge of the Light Brigade. He threw his hat to the deck and began to curse.
Halsey sent Task Group 38.1 (TG 38.1), commanded by Vice Admiral John S. McCain, to assist.[82] Halsey recalled that he did not receive the vital message from Kinkaid until around 10:00 and later claimed that he had known that Kinkaid was in trouble but had not dreamed of the seriousness of the crisis. McCain, by contrast, had monitored Sprague's messages and turned TG 58.1 to aid Sprague even before Halsey's orders arrived (after prodding from Nimitz), putting Halsey's defense in question.
At 10:05, Kinkaid asked, "Who is guarding the San Bernardino Strait?"
McCain raced towards the battle and briefly turned into the wind to recover returning planes. At 10:30, a force of Helldivers, Avengers, and Hellcats was launched from Hornet, Hancock, and Wasp at the extreme range of 330 nautical miles (380 mi; 610 km). Though the attack did little damage, it strengthened Kurita's decision to retire.[83]
At 11:15, more than two hours after the first distress messages had been received by his flagship, Halsey ordered TF 34 to turn around and head south to pursue Kurita, but the Japanese forces had already escaped.
Just hours after his perceived chastisement by Nimitz, Halsey's forces destroyed all four enemy aircraft carriers he had pursued. However, despite the complete absence of 3rd Fleet against the main Japanese force, the desperate efforts of Taffy 3 and assisting task forces had driven back the Japanese. A relieved Halsey sent the following message to Nimitz, Kinkaid and General Douglas MacArthur at 12:26: "It can be announced with assurance that the Japanese Navy has been beaten, routed and broken by the Third and Seventh Fleets."
Survivors' ordeal
Partly as a result of disastrous communication errors within 7th Fleet and a reluctance to expose search ships to submarine attack,[84] a very large number of survivors from Taffy 3, including those from Gambier Bay, Hoel, Johnston, and Roberts, were not rescued until October 27, after two days adrift.[85][86] A plane had spotted the survivors, but the location radioed back was incorrect. By then, many had died as a result of exposure, thirst and shark attacks. Finally, when a Landing Craft Infantry[87] of Task Group 78.12 arrived, its captain used what is almost a standard method of distinguishing friend from foe, asking a topical question about a national sport, as one survivor, Jack Yusen, relates:
We saw this ship come up, it was circling around us, and a guy was standing up on the bridge with a megaphone. And he called out 'Who are you? Who are you?' and we all yelled out 'Samuel B. Roberts!' He's still circling, so now we're cursing at him. He came back and yelled 'Who won the World Series?' and we all yelled 'St. Louis Cardinals!' And then we could hear the engines stop, and cargo nets were thrown over the side. That's how we were rescued.
Aftermath
The Japanese had succeeded in luring Halsey's 3rd Fleet away from its role of covering the invasion fleet, but seemingly light forces proved to be a very considerable obstacle. What Halsey had unwittingly left behind still packed the air power of 4 carriers even if they were inexpensive, slow, lightly armed, and equipped with older-type combat aircraft. With an available air force of over 400 aircraft, they were the numeric, though far from qualitative, equivalent of four of Halsey's five large fleet carriers. The naval aircraft, despite not being armed for anti-ship duties, did much to confuse and harass the Center Force and even contributed to the sinking of three Japanese heavy cruisers.
The breakdown in Japanese communications resulted in Kurita being unaware of the opportunity that Ozawa's decoy plan had offered him. Kurita's mishandling of his forces during the surface engagement further compounded his losses. Despite Halsey's failure to protect the northern flank of the 7th Fleet, Taffy 3 and assisting aircraft turned back the most powerful surface fleet Japan had sent to sea since the Battle of Midway. Domination of the skies; prudent and timely maneuvers by the U.S. ships; tactical errors by the Japanese admiral; and superior American radar technology, gunnery and seamanship all contributed to this outcome.
In the engagement, the Japanese had numerous large-caliber battleship and cruiser main guns with much more range and power than the Americans, but the Japanese guns lacked a blind fire capability and were thwarted by rain squalls and by smoke laid by screening American destroyers. Japanese fire control systems manually computing solutions for targets on a constant course were fighting American destroyers that would constantly alter course. Running zig zag, a 40 ft (12 m)-wide destroyer at 30 kn (35 mph; 56 km/h) can travel up to 0.41 nmi (0.47 mi; 0.76 km) away in the 49 seconds it takes for a 46 cm (18.1 in) armor piercing capped (APC) shell to cover 15 nmi (17 mi; 28 km).[88] The Japanese visual-aiming system produced "bracketing" multiple shots and so American ships' crews would see sets of shells fall and notice that subsequent shells would be predictably placed. The American destroyers could predict the fall of Japanese shells and have ample time to maneuver away from a bracket that was closing in. While exploiting the freedom to dodge "bracketing" shots, American destroyers were still able to land accurate hits, thanks to their inclusion of the MK-37 radar-directed fire control system and its computer, as well as their main guns' faster reloading; Samuel B. Roberts and Heermann devastated the superstructure of cruiser Chikuma.
In addition, the excellent U.S. 5 in (127 mm) and 40 mm anti-aircraft fire directed by radar and computer control downed several kamikazes, and the lack of comparable systems made the Japanese ships vulnerable to American fliers. Lastly, the attacking Japanese force initially used armor-piercing shells which proved largely ineffective against unarmored ships as they passed through and out without exploding, which was fortuitous as American destroyers and destroyer escorts were engineered with enough redundancy to survive dozens of hits without or before sinking.
The American escort carriers landed hits when the large Japanese ships, which could not maneuver while firing, came within range of guns as small as the 5 in (127 mm) carrier-mounted guns. The small guns would prove their value; White Plains found an Achilles' heel by setting off the Type 93 torpedoes carried by heavy cruiser Chokai.
In summary, the Japanese had built the largest battleships, but the fleet was largely unrefined and had numerous technical limitations and weaknesses, and the commanding officers made mistakes and failed to take into account their weaknesses or to make the best use of their strengths. The American Navy had superior technology, and while the commanding officers made some mistakes, they were limited in nature, and the Americans had sufficient numbers of all types of ships and weapons to compensate for the mistakes. After all, the important capital ships of the American Navy and the invasion units were not damaged by even the surprise attack.
It may be argued that of all of the battles in the Pacific War, Samar best demonstrates the effectiveness of air attack and destroyer-launched torpedoes against larger surface vessels. Cautious Japanese tactics were hampered by the belief that they were fighting a much more powerful force. Conversely, the Americans accurately sensed the gravity of their predicament and quickly improvised a strategy based on harassment and delay that did not hesitate to throw inadequately-armed planes and ships directly against battleships if that was what was available:
Well, I think it was really just determination that really meant something. I can't believe that they didn't just go in and wipe us out. We confused the Japanese so much. I think it deterred them. It was a great experience.
— Interview by Hornfischer of Tom Stevensen, Survivor Samuel B. Roberts[89]
Clifton Sprague's task unit lost two escort carriers: Gambier Bay, to surface attack and St. Lo, to kamikaze attack. Of the seven screening ships, fewer than half, two destroyers (Hoel and Johnston) and a destroyer escort (Samuel B. Roberts), were lost, as were several aircraft. The other four U.S. destroyers and escorts were damaged. Though it was such a small task unit, well over a thousand Americans died, comparable to the losses suffered at the Allied defeat of the Battle of Savo Island off Guadalcanal, when four cruisers were sunk. It was also comparable to the combined losses of the 543 men and 3 ships at the Battle of the Coral Sea, and 307 men and 2 ships at the Battle of Midway.
On the other side of the balance sheet, the Japanese were forced to scuttle three heavy cruisers, and a fourth limped back to base seriously damaged, having lost its bow. All of Kurita's battleships except Yamato suffered considerable damage, all of the other heavy ships stayed inactive in their bases, and the Japanese Navy, as a whole, had been rendered ineffective for the remainder of the war. Of the six U.S. ships, totaling 37,000 long tons (38,000 t), lost during Leyte Gulf operations, relatively tiny Taffy 3 bore the brunt of losses, sacrificing five ships. By comparison, the Japanese lost 26 ships, totaling 306,000 long tons (311,000 t).[90]
The battle took place above the Philippine Trench, with most of the hull losses occurring in waters of over 7,000 metres (23,000 ft) deep. Though not all of the wreckage has yet been located and the sinking locations are approximate, the battle produced some of the deepest shipwrecks on record, including the deepest wreck yet found - the Johnston at 6,220 metres (20,410 ft).[91]
Criticism of Halsey
Halsey was criticized for his decision to take TF 34 north in pursuit of Ozawa and for failing to detach it when Kinkaid first appealed for help. A piece of U.S. Navy slang for Halsey's actions is "Bull's Run," a phrase combining Halsey's newspaper nickname "Bull" (in the U.S. Navy, the nickname “Bull” was used primarily by enlisted men, and Halsey's friends and fellow officers called him “Bill”) with an allusion to the Battle of Bull Run in the American Civil War.[92]
In his dispatch after the battle, Halsey gave reasons for his decision as follows:
- "Searches by my carrier planes revealed the presence of the Northern carrier force on the afternoon of October 24, which completed the picture of all enemy naval forces. As it seemed childish to me to guard statically San Bernardino Strait, I concentrated TF 38 during the night and steamed north to attack the Northern Force at dawn.
- "I believed that the Center Force had been so heavily damaged in the Sibuyan Sea that it could no longer be considered a serious menace to Seventh Fleet."[93]
Halsey also said that he had feared that leaving TF 34 to defend the strait without carrier support would have left it vulnerable to attack from land-based aircraft and leaving one of the fast carrier groups behind to cover the battleships would have significantly reduced the concentration of air power going north to strike Ozawa.
Morison wrote in a footnote, "Admiral Lee, however, said after the battle that he would have been only too glad to have been ordered to cover San Bernardino Strait without air cover."[93] If Halsey had been in proper communication with 7th Fleet, the escort carriers of TF 77 could have provided adequate air cover for TF 34, a much easier matter than it would be for those escort carriers to defend themselves against the onslaught of Kurita's heavy ships.
It may be argued that the fact that Halsey was aboard one of the battleships and "would have had to remain behind" with TF 34 while the bulk of his fleet charged northwards to attack the Japanese carriers may have contributed to that decision. However, it would have been perfectly feasible and logical to have taken one or both of 3rd Fleet's two fastest battleships (USS Iowa and/or New Jersey) with the carriers in the pursuit of Ozawa, while leaving the rest of the Battle Line off San Bernardino Strait. (Indeed, Halsey's original plan for the composition of TF 34 was that it would contain only four, not all six, of the 3rd Fleet's battleships.) Therefore, to guard San Bernardino Strait with a powerful battleship force would have been compatible with Halsey's personally going north aboard the New Jersey.
It seems likely that Halsey was strongly influenced by his Chief of Staff, Rear Admiral Robert "Mick" Carney, who was also wholeheartedly in favor of taking all Third Fleet's available forces northwards to attack the Japanese carrier force.
Clifton Sprague, the commander of Task Unit 77.4.3 in the battle off Samar, was later bitterly critical of Halsey's decision and of his failure to inform Kinkaid and the 7th Fleet clearly that their northern flank was no longer protected:
In the absence of any information that this exit [of the San Bernardino Strait] was no longer blocked, it was logical to assume that our northern flank could not be exposed without ample warning.
Regarding Halsey's failure to turn TF 34 southwards when 7th Fleet's first calls for assistance off Samar were received, Morison wrote:
If TF 34 had been detached a few hours earlier, after Kinkaid's first urgent request for help, and had left the destroyers behind, since their fueling caused a delay of over two hours and a half, a powerful battle line of six modern battleships under the command of Admiral Lee, the most experienced battle squadron commander in the Navy, would have arrived off San Bernardino Strait in time to have clashed with Kurita's Center Force.... Apart from the accidents common in naval warfare, there is every reason to suppose that Lee would have crossed the T of Kurita's fleet and completed the destruction of Center Force.
Morison also observed:
The mighty gunfire of the Third Fleet's Battle Line, greater than that of the whole Japanese Navy, was never brought into action except to finish off one or two crippled light ships.
— Morison (1956), pp. 336–337[94]
Perhaps the most telling comment was made laconically by Vice Admiral Willis Augustus Lee in his action report as the Commander of TF 34:
No battle damage was incurred nor inflicted on the enemy by vessels while operating as Task Force Thirty-Four.
Presidential Unit Citation
Taffy 3 was awarded a Presidential Unit Citation:
For extraordinary heroism in action against powerful units of the Japanese Fleet during the Battle off Samar, Philippines, October 25, 1944.... the gallant ships of the Task Unit waged battle fiercely against the superior speed and fire power of the advancing enemy... two of the Unit's valiant destroyers and one destroyer escort charged the battleships point-blank and, expending their last torpedoes in desperate defense of the entire group, went down under the enemy's heavy shells.... The courageous determination and the superb teamwork of the officers and men who fought the embarked planes and who manned the ships of Task Unit 77.4.3 were instrumental in effecting the retirement of a hostile force threatening our Leyte invasion operations and were in keeping with the highest traditions of the United States Naval Service.[95]
Legacy
A number of ships were named after participants and ships from that battle, including USS Copeland (FFG-25), USS Evans (DE-1023), USS Clifton Sprague (FFG-16), USS Carr (FFG-52) and USS Hoel (DDG-13), and USS Johnston (DD-821). When USS Samuel B. Roberts (FFG-58) struck a mine, her crew would touch a plaque commemorating the original crew as they struggled to save the ship.[96]
While the battle is frequently included in historical accounts of the Battle of Leyte Gulf, the duels between the destroyer and destroyer escorts and Yamato and the Japanese force were the subject of a Dogfights television episode, "Death of the Japanese Navy".[97] That episode, as well as a History Channel documentary, was based on The Last Stand of the Tin Can Sailors, written by James D. Hornfischer. There was also an episode of Ultimate Warfare on American Heroes Channel called Courage at Sea.
The survivors formed associations which still meet annually, and raised funds to build memorials in San Diego near the current location of the USS Midway (CV-41) Museum, which contains a model of Gambier Bay.
The 1962 novel Harm's Way bears many similarities to the battle. The combined small destroyer/jeep carrier/cruiser group portrayed as facing a battle group centered on the Japanese battleship Yamato is quite similar, as are the lopsided results of the battle. The author was Halsey's public relations officer and can be assumed to have drawn on detailed knowledge of the real engagement acquired when it was taking place.
The 2005 Japanese movie Yamato shows Yamato firing its main guns against surface targets, and battling against aircraft, but it is not made clear that the ship withdrew in the face of an attack by light escort ships.
References
Notes
- US Navy Battleships also used dye loads in their main battery shells; not being battleship sailors the men of Taffy 3 would have no reason to know this.
Citations
- "Action Report – Leyte Operation from 12 October to 29 October 1944, p.31". United States Pacific Fleet Carrier Division 22 via bosamar.com. n.d. Retrieved June 9, 2012.
- Hornfischer, James D. (March 2005). The Last Stand of the Tin Can Sailors: The Extraordinary World War II Story of the U.S. Navy's Finest Hour. Bantam. ISBN 978-0-553-38148-1.
- "Reoccupation of Leyte Island...25 October 1944,p.13,14". United States Pacific Fleet Carrier Division 24 via bosamar.com. n.d. Retrieved June 9, 2012.
- "Reoccupation of Leyte Island...25 October 1944,p.20". United States Pacific Fleet Carrier Division 24 via bosamar.com. n.d. Retrieved June 9, 2012.
- "Navy Cmdr. Ernest Evans' Courage Helped Sink Japan's Hopes In World War II". Investors Business Daily. May 27, 2011. Archived from the original on May 27, 2012. Retrieved June 9, 2011.
- Hornfischer 2004, p. 241, 353.
- Tincan Sailors p. 153
- USS Samuel B Roberts became known as The Destroyer Escort That Fought Like a Battleship
- Lundgren, Robert (October 23, 2014). The World Wonder'd: What really happened off Samar, p. 15. Nimble Books LLC. ISBN 978-1-608-88046-1.
- Lundgren, pp.21–22
- Lundgren p. 86
- Lundgren p. 20
- Lundgren p. 59
- Hornfischer, James D. (March 2005). The Last Stand of the Tin Can Sailors: The Extraordinary World War II Story of the U.S. Navy's Finest Hour. Bantam. pp. 308–310. ISBN 978-0-553-38148-1.
- "Loss of Ship – Report Of , p. 1". U.S.S. Johnston (DD557) via bosamar.com. November 10, 1944. Retrieved June 14, 2012.
- "We Asked For the Jap Fleet – and Got It". The Saturday Evening Post via bosamar.com. May 26, 1945. Retrieved June 9, 2012.
- "Action Report – Surface Engagement off Samar, P.I., 25 October 1944". U.S.S. Johnston (DD557) via bosamar.com. November 14, 1944. Archived from the original on February 9, 2016. Retrieved June 10, 2012.
- "Loss of Ship – Report Of". U.S.S. Johnston (DD557) via bosamar.com. November 10, 1944. Retrieved June 10, 2012.
- Morison, p. 258.
- Lundgren, p.81
- Lundgren, p.70
- Lundgren, p.78
- "Action Report – Surface Engagement off Samar, P.I., 25 October 1944, p.8". U.S.S. Johnston (DD557) via bosamar.com. November 14, 1944. Archived from the original on February 9, 2016. Retrieved June 10, 2012.
- "HIJMS NOSHIRO: Tabular Record of Movement, Rev. 2". Bob Hackett and Sander Kingsepp. Retrieved June 9, 2012.
- Lundgren p.74
- "Combined Action Report ... Report of loss of U.S.S. Samuel B. Roberts (DE 413)". U.S.S. Samuel B. Roberts (DE413) via bosamar.com. November 20, 1944. Archived from the original on February 9, 2016. Retrieved June 11, 2012.
- "Action Report – Surface Engagement off Samar, P.I., 25 October 1944, p. 3". U.S.S. Johnston (DD557) via bosamar.com. November 14, 1944. Archived from the original on February 9, 2016. Retrieved June 10, 2012.
- "Second Screening Action at 07:50". Robert Jon Cox via bosamar.com. 2009. Retrieved June 11, 2012.
- "Combined Action Report – Surface Engagement off Samar... 25 October 1944, p. 5". EX- U.S.S. Samuel B. Roberts (DE-413) via bosamar.com. November 20, 1944. Archived from the original on February 9, 2016. Retrieved June 13, 2012.
- "Action Report – Surface Engagement off Samar, P.I., 25 October 1944". U.S.S. Johnston (DD557) via bosamar.com. November 14, 1944. Archived from the original on February 9, 2016. Retrieved June 10, 2012.
- Hornfischer, p. 256.
- Lundgren, p.124
- "Action Report – Surface Engagement off Samar, P.I., 25 October 1944, p. 4". U.S.S. Johnston (DD557) via bosamar.com. November 14, 1944. Archived from the original on February 9, 2016. Retrieved June 11, 2012.
- "My Online Book, The Battle Off Samar, Chapter 11". Robert Jon Cox via bosamar.com. 2012. Retrieved June 11, 2012.
- "Long Beach Navy Officer Commander's Ship Named in Thrilling Magazine Story". Newspaper article from unnamed newspaper from the personal collection of Joan Bayless Brandt via bosamar.com. Retrieved June 9, 2012.
- "Johnston Survivor Tells of Ship's Defiant Stand". Newspaper article by Lilian E. Haislip from unnamed newspaper from the personal collection of Joan Bayless Brandt via bosamar.com. Retrieved June 9, 2012.
- Lundgren, p.142
- "In Harm's Way". bosamar.com. Retrieved June 9, 2012.
- Hornfischer 2004, p. 198-201.
- "Action Report of 25 October 1944". U.S.S. Kalinin Bay (CVE-68), Enclosure "A" via bosamar.com. n.d. Retrieved June 9, 2012.
- Hornfischer 2004, p. 253-255.
- Hornfischer 2004, p. 286.
- "Combined Action Report – Surface Engagement off Samar ... 25 October 1944, p. 12". EX- U.S.S. Samuel B. Roberts (DE-413) via bosamar.com. November 20, 1944. Archived from the original on February 9, 2016. Retrieved June 13, 2012.
- "Combined Action Report – Surface Engagement off Samar ... 25 October 1944". EX- U.S.S. Samuel B. Roberts (DE-413) via bosamar.com. November 20, 1944. Archived from the original on February 9, 2016. Retrieved June 13, 2012.
- Hornfischer 2004, p. 285-289.
- "Combined Action Report – Surface Engagement off Samar ... 25 October 1944, p. 9". EX- U.S.S. Samuel B. Roberts (DE-413) via bosamar.com. November 20, 1944. Archived from the original on February 9, 2016. Retrieved June 13, 2012.
- Hornfischer 2004, p. 325-332.
- Tincan Sailors p. 332.
- "Combined Action Report and Report of Loss of U.S.S. Hoel (DD533),p. 3,7". U.S.S. Hoel (DD533) via bosamar.com. November 15, 1944. Retrieved June 14, 2012.
- "Action Report – Philippine Operation; Battle East of Samar Island, Enclosure (F), p. 8". U.S.S. Heermann (DD532) via bosamar.com. November 1, 1944. Retrieved June 11, 2012.
- Hornfischer, p. 222-224.
- "Combined Action Report and Report of Loss of U.S.S. Hoel (DD533),p. 3". U.S.S. Hoel (DD533) via bosamar.com. November 15, 1944. Retrieved June 14, 2012.
- Morison, p. 259.
- Lundgren, Robert (2014). The World Wonder'd: What Really Happened Off Samar. Ann Arbor: Nimble Books LLC. p. 80. ISBN 9781608880461.
- Hornfischer, p. 229.
- Lundgren, Robert (2014). The World Wonder'd: What Really Happened Off Samar. Ann Arbor: Nimble Books LLC. p. 109. ISBN 9781608880461.
- U.S. Destroyers: An Illustrated Design History, by Norman Friedman. Naval Institute Press, 2004. ISBN 1-55750-442-3, ISBN 978-1-55750-442-5 (excerpt on Google Books).
- "Action Report – Philippine Operation; Battle East of Samar Island". U.S.S. Heermann (DD532) via bosamar.com. November 1, 1944. Retrieved June 11, 2012. (subscription required)
- Lundgren, p. 111
- Lundgren, pp. 86–87
- "Battleship Yamato Battles". Battleshipyamato.info. Archived from the original on October 5, 2010. Retrieved March 18, 2010.
- Hornfischer 2004, p. 309.
- Lundgren, Robert (October 23, 2014). The World Wonder'd: What really happened off Samar, pp.29–36. Nimble Books LLC. ISBN 978-1-608-88046-1.
- Lundgren | p. 184
- "CVE73". Bosamar.com. Retrieved March 18, 2010.
- Lundgren pp. 222–223
- Lundgren, p. 175
- Lundgren p. 70
- Lundgren p. 110
- Lundgren p. 131
- Lundgren p. 153
- Dogfights: Death of the Japanese Navy
- Lundgren p.159
- "Battleship Yamato Battles". Battleshipyamato.info. Archived from the original on March 24, 2010. Retrieved March 18, 2010.
- Reynolds, Clark G (1982). The Carrier War. Time-Life Books. ISBN 0-8094-3304-4
- "Yamato (Battleship, 1941–1945) — in the Battle of Leyte Gulf, 22–26 October 1944". Japanese Navy Ships. Naval Historical Center, Department of the Navy. May 13, 2000. Archived from the original on November 2, 2000. Retrieved March 7, 2009.
- Anthony P. Tully, 'Solving some Mysteries of Leyte Gulf: Fate of the Chikuma and Chokai ', Warship International No. 3, 2000, pp. 248–258, especially p. 251.
- "Thomas J. Lupo & Taffy 3". Bookscrounger.com. December 11, 2015. Retrieved October 21, 2017.
- L, Klemen (1999–2000). "Rear-Admiral Takeo Kurita". Forgotten Campaign: The Dutch East Indies Campaign 1941–1942.
- Lundgren p.225
- "Battleship Musashi". Home.earthlink.net. October 24, 1944. Archived from the original on June 2, 2011. Retrieved March 18, 2010.
- McCain, Faith of My Fathers, 40–41.
- "danfs WASP IX". History.navy.mil. Archived from the original on April 26, 2009. Retrieved March 18, 2010.
- Heavy Metal: Destroyers television show
- "U.S.S. PC 623 War Diary, 25-28 October 1944 via bosamar.com". bosamar.com. Retrieved June 12, 2012.
- "U.S.S. PC 1119 War Diary, October 1944 via bosamar.com". bosamar.com. Retrieved June 12, 2012.
- "The Battle Off Samar – Taffy III at Leyte Gulf, Chapter 13". bosamar.com. Retrieved May 17, 2012.
- "Japan 40 cm/45 (15.7") Type 94 - NavWeaps".
- Tin Can Sailors audio book, end track.
- "The Battle Off Samar: The Taffy III at Leyte Gulf Chapter 14 Robert Jon Cox". Bosamar.com. Retrieved March 18, 2010.
- "Wreck of Famed WWII Destroyer USS Johnston May Have Been Found". USNI News. October 30, 2019. Retrieved October 31, 2019.
- Potter, E. B. (May 11, 2013). "Last Years". Bull Halsey: A Biography. Naval Institute Press. p. 378. ISBN 978-1-61251-224-2.
- Morison, Samuel E. (1956). "Leyte, June 1944 – January 1945". History of United States Naval Operations in World War II. XII. Boston: Little & Brown.
- Note: Task Group 34.5 — in fact only finished off the straggling destroyer Nowaki, and this was not achieved by the battleships, but rather by their escorting light cruisers and destroyers (Source: U.S. Naval Historical Center).
- "Memorial to Admiral Sprague and Task Unit 77.4.3 (Taffy 3)". NavSource Online Naval History. Retrieved May 11, 2007.
- Hornfischer 2004, p. 425-427.
- "Dogfights: Death of the Japanese Navy". Tv.com. Retrieved March 18, 2010.
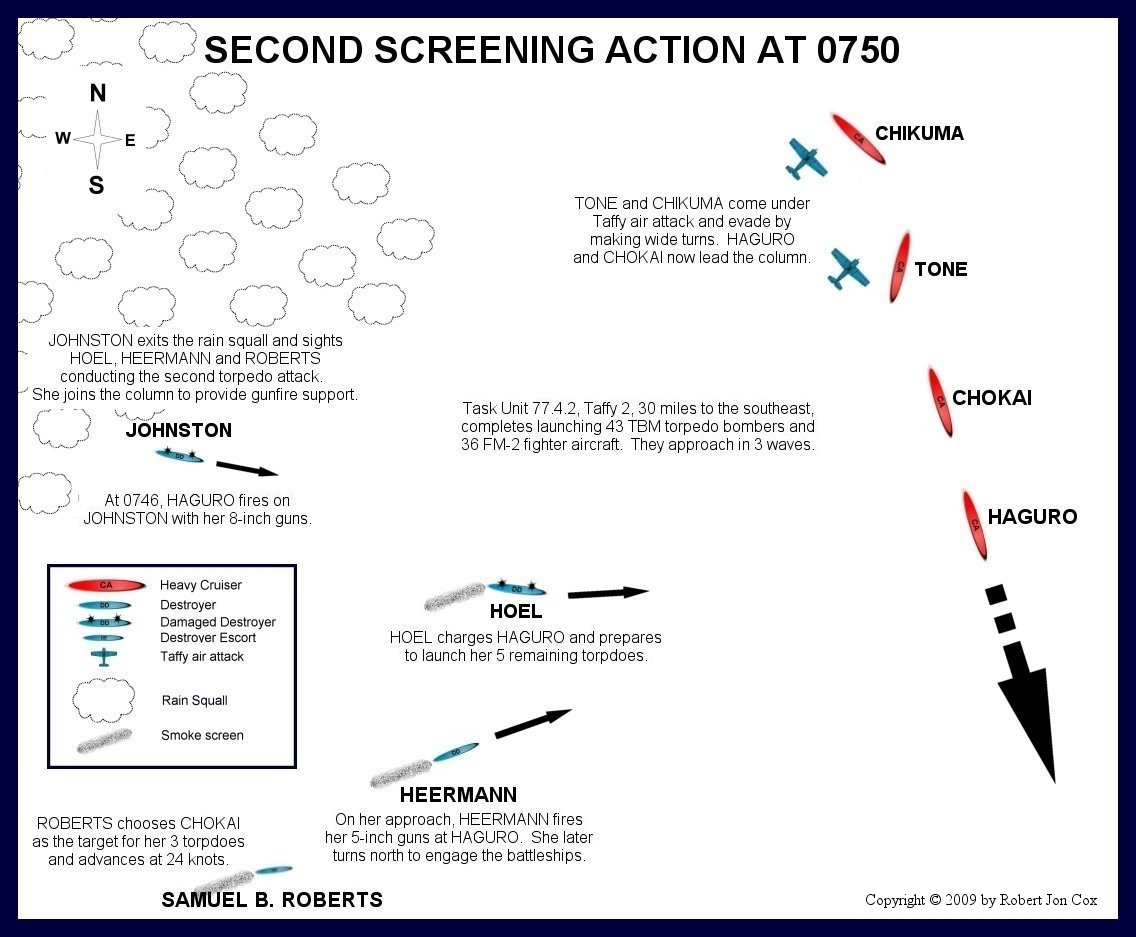
Bibliographys
- Bess, Michael (2006). Choices Under Fire: Moral Dimensions of World War II. New York: Alfred A. Knopf. ISBN 0-307-26365-7.
- Copeland, Robert W. (1950). The Spirit of the Sammy B. Seattle: Self-published Lulu.com.
- Cox, Robert Jon (2010). The Battle Off Samar: Taffy III at Leyte Gulf (5th ed.). Agogeebic Press, LLC. ISBN 978-0-9822390-4-9.
- Cutler, Thomas (2001). The Battle of Leyte Gulf: 23–26 October 1944. Annapolis, Maryland, U.S.: Naval Institute Press. ISBN 1-55750-243-9.
- D'Albas, Andrieu (1965). Death of a Navy: Japanese Naval Action in World War II. Devin-Adair Pub. ISBN 0-8159-5302-X.
- Drea, Edward J. (1998). "Leyte: Unanswered Questions". In the Service of the Emperor: Essays on the Imperial Japanese Army. Nebraska: University of Nebraska Press. ISBN 0-8032-1708-0.
- Dull, Paul S. (1978). A Battle History of the Imperial Japanese Navy, 1941–1945. Naval Institute Press. ISBN 0-87021-097-1.
- Field, James A. (1947). The Japanese at Leyte Gulf: The Sho Operation. Princeton University Press. ASIN B0006AR6LA.
- Hornfischer, James D. (2004). The Last Stand of the Tin Can Sailors. Bantam. ISBN 0-553-80257-7.
- Hoyt, Edwin P. (2003). The Men of the Gambier Bay: The Amazing True Story of the Battle of Leyte Gulf. The Lyons Press. ISBN 1-58574-643-6.
- Lacroix, Eric; Linton Wells (1997). Japanese Cruisers of the Pacific War. Naval Institute Press. ISBN 0-87021-311-3.
- Morison, Samuel Eliot (2004). Leyte, June 1944 – January 1945, vol. 5 of History of United States Naval Operations in World War II (reissue ed.). Champaign, Illinois, U.S.A.: University of Illinois Press; Reprint edition. ISBN 0-252-07063-1.
- Potter, E. B. (2005). Admiral Arleigh Burke. Naval Institute Press. ISBN 1-59114-692-5.
- Potter, E. B. (2003). Bull Halsey. Naval Institute Press. ISBN 1-59114-691-7.
- Thomas, Evan (2006). Sea of Thunder: Four Commanders and the Last Great Naval Campaign 1941–1945. Simon & Schuster. ISBN 0-7432-5221-7.
- Willmott, H. P. (2005). The Battle Of Leyte Gulf: The Last Fleet Action. Indiana University Press. ISBN 0-253-34528-6.
- Woodward, C. Vann (2007). The Battle for Leyte Gulf: The Incredible Story of World War II's Largest Naval Battle. Skyhorse Publishing. ISBN 978-1-60239-194-9.
- Wukovits, John (2013). For Crew and Country: The Inspirational True Story of Bravery and Sacrifice Aboard the USS Samuel B. Roberts. St. Martin's Press. ISBN 978-0312681890.
Reports
- War Damage Report A-3(420), Summary of War Damage—December 8, 1943 to December 7, 1944, pp28. BuShips, Design Division, Preliminary Design Section, War Damage Assessment Team. June 1, 1945.
- War Damage Report #60, Escort Carriers Gunfire, Bomb, Kamikaze Damage and Loss During World War II, BuShips, Design Division, Preliminary Design Section, War Damage Assessment Team.
- Reports of General MacArthur, JAPANESE OPERATIONS IN THE SOUTHWEST PACIFIC AREA Volume II – Part II, pp394–402. Library of Congress Catalog Card Number 66-60007
Magazine and news articles
- Reynolds, Quentin; Jones, George E.; Teatsorth, Ralph; Morris, Frank D. (January 27, 1945). "America's Greatest Naval Battle: Report on the Second Battle of the Philippines (Third of three parts)". Collier's. pp. 18, 69–72.
Web
| Wikimedia Commons has media related to Battle of Leyte Gulf. |
- Animated History of The Battle of Leyte Gulf including the Battle off Samar
- Battle Experience: Battle for Leyte Gulf [Cominch Secret Information Bulletin No. 22]
- Task Force 77 Action Report: Battle of Leyte Gulf
- "Turkey Trots to Water"—detailed description of the battle from battleship.org
- Order of battle: Samar.
- "Glorious Death: The Battle of Leyte Gulf" by Tim Lanzendörfer
- The Battle Off Samar – Taffy III at Leyte Gulf website by Robert Jon Cox
- Return to the Philippines: public domain documents from ibiblio.org
- The Battle for Leyte Gulf Revisited
- Timeline for USS Samuel B. Roberts (DE 413)
- Japan's TA-Operation: A Blueprint for Disaster by Irwin Kappes
- Case study if Halsey had formed task force 34
- USS Johnston-Hoel Association
- USS Samuel B. Roberts (DE-413) Survivors Association
- The Ship Has Sunk and the Sharks are Hungry The account of survivor Earl Bagley
Audio/visual media
- Lost Evidence of the Pacific: The Battle of Leyte Gulf. History Channel. TV. Based on book by Hornfischer, James D. (2004). The Last Stand of the Tin Can Sailors.
- Dogfights: Death of the Japanese Navy. History Channel. TV. Based on book, and with interview by Hornfischer, James D. (2004). The Last Stand of the Tin Can Sailors. History Channel DVD "Score one for the little guy as Taffy 3 sends Yamamoto's fleet limping home."