20th (Light) Division
| 20th (Light) Division | |
|---|---|
_Division_sign_World_War_1.svg.png) 20th (Light) Division sign, used on notice boards and signs. | |
| Active | September 1914 - May 1919 |
| Country |
|
| Branch |
|
| Type | Infantry |
| Engagements | |
The 20th (Light) Division was an infantry division of the British Army, part of Kitchener's Army, raised in the First World War. The division was formed in September 1914 as part of the K2 Army Group. The division landed in France July 1915 and spent the duration of the First World War in action on the Western Front.
History
1914-15
Formation and Training
The 20th (Light) Division was authorised on 11 September 1914 and was to be composed of newly raised battalions from quick marching rifle and light infantry regiments.[1] The 59th[lower-alpha 1] and 60th[lower-alpha 2] Brigades were concentrated at Blackdown with the Division Headquarters and other division troops. The 61st Brigade[lower-alpha 3] was concentrated at Aldershot, where the medical component also trained, the Artillery was formed near Deepcut, the engineers were trained at Chatham.[2] Clothing, in the form of emergency Kitchener Blue uniforms did not arrive until November, together with a few old rifles for drill practice, the artillery had only two 90mm guns and two 15 pounders per brigade. The supply situation had improved by February 1915 when the Division moved to Whitley, by which time the 11th DLI, which had a large number or miners in it had become the Division pioneer battalion, trading places in the 61st Brigade with the 12th King's Regiment, the original divisional troops battalion.[3] In April the Division marched to Salisbury Plain to complete its training and were joined by the field ambulances after their training in June. the Division was inspected by the King at the end of that month, and embarked for France in the later part of July.[4]
France
Leaving Amesbury on 20 July, by 26 July the Division was concentrated in the Lumbres area 22 miles (35 km) east of Boulogne-sur-Mer. By 30 July the Division was part of III Corps of the First Army, and was billeted in the area between Hazebrouck and Armentières. Training now began in trench warfare, with officers and N.C.O.s being posted to the 8th and 27th Divisions, and bombing (grenades), machine gun and gas mask training for the other troops. The units of the Division were rotated though the 8th and 27th Divisions in turn to experience trench warfare first hand between 2 and 17 August. The engineers and pioneers were employed at various tasks behind the lines.[5]
.jpg)
At the end of August the Division went into the front line in front of Levantie, 5 miles (8.0 km) south west of Armentiers, 59th and 60th Brigades in the line and the 61st in reserve. In this area the high water table meant that breastworks were required for defence.[6] During September mining and counter mining were carried out and snipers were trained in response to losses from German snipers. The 61st Brigade moved into the line on 5 September, relieving a brigade of the 8th Division. In the early hours of 13 September a mine was exploded by the Germans under a small salient held by 7th S.L.I., the crater was occupied by others from the battalion in spite of German shelling and mortaring, and 12 of the soldiers buried by the explosion were rescued alive. The division history records the first gallantry awards earned by men of the Division during this action, a Military Cross and a Distinguished Service Medal.[7]
Loos
As part of a subsidiary action north of Loos, the 20th Division with the flanking Divisions (the Meerut Division to the south and the 8th to the north) were to launch a diversionary attack on the German lines, holding any lines gained. After four days of bombardment, with changes in the tempo of the shelling falsely indicating an imminent attack, and other demonstrations from the front line the attack was made on the morning of 25 September. Troops from the Indian Bareilly Brigade, and two battalions from the 60th Brigade (6th K.S.L.I. and 12th R.B.) managed to enter the German lines, but an attempt to drive a sap back towards the British lines was met with heavy enfilade fire and was halted Unable to be supported the British were forced to retire around midday. The other two brigades made no advance that day but were still shelled in their trenches. Lieutenant George Allen Maling R.A.M.C. of the field ambulance attached to the 60th Brigade won the Victoria Cross for treating men in the open under heavy shell fire all through the day.[8]
The 60th Brigade had suffered 561 casualties in total, and next day the pioneers (11th D.L.I.) were attached to the Brigade as reinforcing infantry until 10 November, and the 68th Brigade from the 23rd Division was attached as division reserve.[9][10]
The three brigades remained in the line, engaged in patrolling, mining, mortaring, sniping and demonstrating in order to prevent the Germans relieving parts of their line. The Division's mounted troops rotated through the trenches, and the cyclist company troops provided working parties.[11] On 10 November the Indian Corps to the Division's right was relieved and replaced with XI Corps, this allowed the Division to shorten its line to two Brigades, the pioneers and the 68th Brigade returned to their normal roles.[12] For the rest of the year the Division's artillery saw the most use, however a trench raid by parties from 10th R.B. and 11th K.R.R.C. was mounted on the night of 12–13 December. The 11th K.R.R.C. entered the German trenches, inflicting casualties, the 10th R.B. party had further to travel over no-mans land and faced an alerted enemy and were forced to withdraw.[13]
1916
A gas attack, planned for the previous December, was finally launched with the arrival of favourable winds, as the Division began to leave the Levantie sector on 9 January 1916. Less than half of the cylinders intended were still in place and trench raids planned for that night were cancelled.[14] The final units of the division arrived in the reserve area on 13 January. After one weeks rest and training the Division was ordered to the Ypres Salient.[15]
Ypres

Arriving on 22 January in VI Corps reserve area, officers and N.C.O.s were sent to 14th Division, which the Division was to relieve, to become acquainted with the area. On 4 February VI Corps handed over to the newly formed XIV Corps (20th Division and the Guards Division).[16] The Division was in the northern section of the salient, 2.5 miles (4.0 km) north of Ypres with its left on the canal. The area had been rendered a quagmire by shelling and the trench system was fragmented, shallow and poorly maintained, these remnants being separated by gaps of up to 80 yards (73 m) of mud.[17] On the night of 11–12 February during the first placement of 60th Brigade into the line, the Germans attempted to interrupt the relief, but were thrown back after temporarily capturing one of the trench fragments. They were praised by Army and Corps commanders for their successful actions "...in novel conditions which might have placed them at a disadvantage.", and by their own Division and Brigade commanders. Shortly after this isolated points were abandoned, one of which was 20 yards (18 m) from the German line and connected to it by a sap. The engineers and pioneers began the task of improving the trench system, the size of the task indicated by the fact that for a time 4 long tons (4.1 t) of material per night were being moved from divisional workshops to the 96th Field Company R.E., attached to the 60th Brigade.[18] The difference in conditions in the salient can be seen in the casualty figures for the first month, of around 1,000 men killed, wounded or missing, equal to those of the whole five months while in the Laventie sector.[17]
In early March the Division was strengthened by the arrival of three companies of machine gunners, one attached to each brigade.[19]
The Division was relieved by the 6th Division on 15 April, and went into GHQ and Corps reserve around Poperinghe, with the men of each brigade spending around a week on leave in Calais. During a month of rest and retraining, the artillery was reorganised and the mounted troops and cyclist company left the Division.[20]
On 18 May the Division returned to the salient, relieving the Guards Division to the right of its previous position between Wieltje and Hooge, with the 6th Division on its left and the Canadian Corps on its right.[21]
Battle of Mont Sorrel
On 2 June the Germans launched an attack on the Canadians to the right of the Division. The right of the 60th Brigade received some of the German artillery barrage and two artillery pieces, placed near the Canadian front line to give enfilade fire along the Division's front, were lost with most of the crews. Units travelling up to the line were also shelled, including two companies of 12 K.R.R.C., sent to reinforce the Canadian left.[22] The 60th Brigade was targeted by German artillery on 6 June, however it was able to fire on German infantry moving up to attack the Canadians at Hooge, an infantry attack on the brigade later that day was repulsed, but a mine was exploded under the trenches of 12 R.B. at Gulley Farm killing 11 men.[23] Throughout the day the Division supported the Canadians with Trench mortar fire and the engineers assisted with the maintenance of communications. When the Canadians counter-attacked in the early hours of 13 June the Division launched gas, smoke and artillery attacks on the German lines, followed by patrols and trench raids which met with varied success.[24]
The remainder of the Division's time at Ypres was spent patrolling and in trench raids. On 13 July 60th Brigade was placed under orders of II ANZAC Corps and transferred to the Armentieres sector, and supported an unsuccessful attack by the 61st (2nd South Midland) Division and the 5th Australian Division on 19 June. The remainder of the Division was relieved on 14 July. On 19 July the Division began to move back into the Line between Messines and Wytschaete, relieving the 24th Division. The Division Commander had been in command of the area for little more than an hour when verbal orders were received for a move south. The 60th Brigade rejoined the Division on 23 July, on 25–26 July the Division moved south leaving its artillery in the Ypres area.[25]
The Somme
By 29 July the division was in the line on the north of the Somme battlefield, between Beaumont-Hamel and Hebuterne, having relieved the 38th (Welsh) Division except for its artillery which stayed to support the 20th. To the right of the division was the 25th Division, and to the left, the 56th (1st London) Division. The trenches in this area had been heavily shelled by the Germans in the first days of the battle, and the front could only be held with advance parties. The pioneers and engineers of the division dug new firing trenches and had to repair the communications trenches up to 500 yards (460 m) behind the front line. The division signal company was also employed repairing and replacing the buried telephone cables of the area, all the while under sporadic artillery and trench mortar fire. The 38th Division artillery was relived by the Guards Division artillery on 7 August, and on 16 August the division was relieved by the Guards Division.[26]
Battle of Guillemont
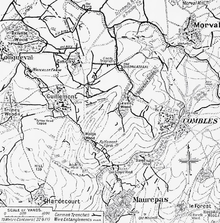
The division returned to the line on 22 August, relieving the 24th Division north of the Guillemont-Montauban road and south of Delville Wood. The 59th and 61st brigades were in the line with one battalion each in the firing trenches, the division was supported by the artillery of the 6th Division. Preparations for an assault on 24 August were begun, repairing and digging new trenches for the assault, but this was interrupted by German artillery on the evening of 23 August followed by an infantry advance on the 11th K.R.R.C., this was broken up by rifle and machine-gun fire, but the trenches were damaged again and the battalion suffered around 150 casualties from the bombardment.[27] The attack was postponed by the Corps command, and the division side stepped to the south of the Guillemont-Montauban road, west of the village on 25–26 August. Preparations for the new attack were hampered by a rain and heavy shelling, including the use of gas shells by the Germans. Supply of the front line became difficult and at one point (29 August) 37 of the division's vehicles were stuck in the mud of the Carnoy-Montauban road. On the night of 28–29 August all available men of all three brigades were working in the mud of the forward area still covered in the bodies of the dead from previous assaults. Coupled with German probing attacks the troops were becoming exhausted and some time out of the trenches was agreed for the 59th and 60th brigades which were scheduled to make the attack, which had been put back to 3 September. The 59th brigade had suffered 600 casualties in the line in nine days and the 60th was so weakened that (with the exception of 6th Ox and Bucks L.I.) it was withdrawn into Corps reserve and replaced in the division with 47th brigade from the 16th (Irish) Division. The 6th Ox and Bucks L.I, still only 550 rifles strong, was attached to 59th brigade.[28]
The 59th brigade returned to the trenches prepared by the pioneers and engineers during the night of 2–3 September, they were to be the right of the divisions advance with the 47th brigade on the left, each brigade supported by a battalion from the 61st brigade and a company of the division's engineers and one of pioneers, the remainder of 61st brigade and the three battalions of 60th brigade (only around 1000 men) were in reserve. The 5th Division was to advance on the division's right, and the 7th Division on its left. Additional artillery support was provided by the artillery from the 8th and 24th divisions and the Corps heavy artillery.[29]
The artillery bombardment began at 06:00 hours at selected targets, moving around the battle field and including gas at around 08:30 hours. The 5th division's advance began at 09:00 hours, 20th division advanced at noon behind stationary and rolling barrages, with the advance lead by the 10th and 11th R.B. and the 6th Connaught Rangers and 7th Leinsters. The first objective was occupied by 12:30, a sunken road some 350 yards (320 m) from the start line and parts of the western edge of the village were held by the 6th Ox and Bucks L.I. and 10th K.R.R.C., parts of the northern edge of the village were held by the 6th Connaught Rangers and 7th Leinsters. The reserve brigade began to move forward.[30]
The attack on the second objective, a road running roughly north-south through the eastern part of the village, then north-east towards Ginchy, on average about 100 yards (91 m) further on, began at 12:50, with the 10th and 11th R.B. in the lead supported by the two K.R.R.C. battalions and the 6th Ox & Bucks, and on the 47th brigade front the 8th Munster Fusiliers with the Leinsters and Connaughts in support. The road was reached by 13:30 with the supporting infantry mopping up in the village and an orchard to the south. The assault on the third objective, a road between Ginchy to the north and "Wedge wood" to the south, about 400 yards (370 m) east of the village was begun at 14:00 hours, while the 59th brigade encountered only small parties of Germans, the 6th Royal Irish and the Munsters had to rush the last 70 yards (64 m) to the road under fire from positions on it.[31]
The final objective was a line between the corner of Leuze wood to the south (800 yards (730 m) further forward) and the railway line to the north (300 yards (270 m) from the third line). However the 5th division had not gained ground and the right flank of 59th brigade was open, Brigadier-General Shute then lengthened the line 300 yards (270 m) to the right with the 6th Ox and Bucks and used the 7th D.C.L.I. to form a flank facing south east. On the left, 7th division were reported in the village of Ginchy. The engineers and pioneers continued to consolidate the village and troops from the reserve moved forward through it. An advance to the fourth line was ordered at 15:50 hours. However, by 17:00 hours the situation had changed, 7th division were driven out of Ginchy and the 5th division had not managed to advance to Leuze wood.[32] A bombardment by Corps artillery helped stabilise the line in front of the 20th division that night. Patrols were made up to the forth line and on the flanks, one of these from the 12th King's sent towards Ginchy became isolated during repeated German attacks on that flank between 17:30 and 20:30 hours. That night the 83rd and 96th engineer companies, the 7th D.C.L.I. and two companies of pioneers continued to consolidate Guillemont, while the 84th engineer company and the remaining pioneers strengthened the line on the road. Orders for the next day (4 September) were to send out patrols under artillery support and establish the division on the fourth objective. Due to their losses the Royal Irish and the Munsters were ordered to be replaced by 60th brigade, 12th K.R.R.C. and 12 R.B. and the 7th K.O.Y.L.I.. The 59th brigade was also becoming exhausted and two companies of the 11th D.L.I. were sent to relieve the most tired units.[33]
The attack began at 19:30 hours, and with the 5th division advancing on the right, reached the final objective. The 47th and 59th brigades were relieved by the 16th (Irish) Division during the nigh and morning of 4–5 September, including the isolated patrol from the 12 King's, lead by Sgt David Jones, this reduced platoon had held out for two days, repulsing three attacks on the morning of 5 September. For this Sgt Jones was awarded the Victoria Cross. The remainder of the division left the front line on 7 September. During the battle the division had lost 1973 officers and men killed, wounded or missing.[34]
Morval and Lesbœufs
The division artillery had returned from the Ypres salient to the Somme on 13 September and was posted to XIV Corps but not under command of the 20th division. While at Ypres 90th artillery brigade had been broken up a distributed amongst the other to increase each battery from four to six 18 pounders or 4.5" howitzers. The 91st artillery brigade was in action on 15 September supporting the 56th (London) Division. The division returned to the front on 15 September as XIV Corps reserve, after a short rest but no reinforcement. The 59th brigade could muster only 900 rifles, the 60th brigade 1100 and the 61st brigade 1200. In the early hours of 16 September the 60th and 61st brigade went into the front line under orders of the Guards Division, the 61st to the right of the Guards line opposite Lesbœufs and the 60th in reserve.[35]
The objective was a trench line around 1,200 yards (1,100 m) west of the villages of Morval and Lesbœufs and was to be taken by 61st brigade on the right and the 3rd Guards brigade on the left. The 31st brigade right flank was open as the 6th division was held up by the 'Quadrilateral' fortification. Due to late orders the 61st brigade was late forming up and was subject to heavy machine-gun and Minenwerfer fire, causing many casualties. Following the rolling barrage 7th D.C.L.I. gained the objective, however only one company of the 7th S.L.I. gained the line. Both flanks of the 7th D.C.L.I. were initially open as the remainder of the 7th S.L.I. had dug in short of the trench line and the guards brigade, which had also received their orders late, had faced strong opposition during their advance. In this isolated position the advance to the second line was called off. Later that morning the right flank of the brigade was secured by the 7th K.O.Y.L.I. and the 12th King's and the 84th Engineer company reinforced the position. All battalions remained in this position overnight, under fire from the Germans, until relieved the next morning.[36]
While the 61st brigade went into Corps reserve the remainder of the division relieved the Guards in the front line during the night of 16–17 September, the 60th brigade on the right, the 59th on the left. The relief was made against German opposition, the 59th brigade moving up under gas attack and the 60th facing German attempts to enter their trenches later that day. On 17 September the 59th brigade were ordered to capture the remaining 800 yards (730 m) of the trench line not taken the previous day. The orders were received only a short time before the attack due to the difficulty in communicating with the front line, which was an old communications trench at right angles to the line of intended advance. One company of the 11th R.B. did not receive any orders, all the runners to this unit being killed or wounded. With no artillery support available the attack failed with some men of the 10th R.B. being killed on reaching the German wire. After consolidating the trenches the division was relieved on 21 September. The division's artillery, still under Corps control supported a number of other divisions in this area, which resulted in the capture of Morval and Lesbœufs on 25 September.[37]
Le Transloy

The division returned to the front on 25 September and eventually relieved the 21st Division on the night of 29–30 September from halfway between Lesbœufs to a point 250 yards (230 m) east of Gueudecourt, facing a low ridge beyond which was Le Transloy. The front line was held by 61st brigade with 60th in support and the 59th brigade in reserve some 5 miles (8.0 km) behind the line, west of Guillemont. For the next advance the division was to be supported by a strong artillery group consisting of the division's own three artillery brigades, those of the Guards division and a brigade from the 6th division. This artillery was crowded together in a valley known as 'Toc 7 Valley' about 800 yards (730 m) north-east of Delville Wood, a position known to the Germans and shelled regularly.[38]
Before the main assault, on 1 October 7 S.L.I. and 7th D.C.L.I. pushed the line forward by 400 yards (370 m) in a series of small posts into dead ground within 200 yards (180 m) of the German line, repelling a counter-attack later that day. That night the engineers and pioneers connected and consolidated these posts. On the night of 3–4 October the 60th brigade joined the 61st in the front line, however due to a break in the weather the assault was put back for two days to 7 October. This allowed the troops who were to make the assault two days rest out of the line, further supplies to be brought up and more front line and communications trenches to be prepared. The strength of the brigades had recovered to a total of just under 6,500 men in total, still only slight over 50% of the nominal strength.[39]
The objective was to establish a line over the crest of the ridge overlooking Le Transloy on the second German trench and was only a small part of an attack of the whole front of Fourth Army. On the left 61st brigade would attack with 6th Ox and Bucks L.I and 12th R.B. with 12th K.R.R.C. in support and 6th K.S.L.I. in reserve and on the right for 60th brigade, 7th K.O.Y.L.I. and 12th King's with 7th S.L.I in support and 7th D.C.L.I. in reserve. On 7 October the preceding artillery bombardment managed to cut most of the German wire except for some on the 60th brigade front. At 13:45 hours the attack began behind the rolling barrage with each battalion advancing in four lines. The uncut wire caused delays and heavy casualties to the 6th Ox and Bucks and 12th R.B. and an open left flank, caused by a heavy German bombardment on 12th (Eastern) Division, caused casualties to the 61st brigade from enfilade fire. In spite of this the first two lines of troops took the first trench, 'Rainbow Trench' and the third and fourth lines formed up beyond it ready for the next stage. At 14:05 hours the next barrage began and the second trench, 'Cloudy Trench', was found to be little more than a line of disturbed earth when it was taken against lighter resistance only ten minutes later. The division, now digging in on its new line, was now in a salient with exposed flanks and a gap of around 350 yards (320 m) between the brigades with the leading battalion lines commanded by a Captain (12th King's) and a lieutenant (7th K.O.L.I.). Companies from the support and reserve battalions were brought forward to fill in the gaps and German counterattacks later that day were beaten off. The engineers and pioneers together with other troops established a communication trench to the front line, and men from the 59th brigade came forward to continue work in the starting lines.[40]
The division was relieved by 6th division on the night of 8–9 October, having lost 1,112 killed, wounded and missing from the brigades and taken 192 German prisoners. It moved to Treux for a period of rest, while there, corps commander praised the men of the division for their part in the Somme battles and added,
I have asked the Army Commander and the Commander-in-Chief not to take away the 20th Division if they can help it, and they have promised to do their best. I would not lose the 20th Division for crowns and crowns.
The division's artillery remained in the line as part of the Corps artillery group, assisting in later assaults. The remainder of the division would spent two months out of the line resting, retraining and absorbing much needed replacements. The division returned to the line on 9 December, relieving the 29th Division around 1 mile (1.6 km) south-west and south of Le Transloy. The weather was bad and communications between the front line and rear area was slow at first, a relief to the firing trench taking as long as nine hours, with only some improvement achieved by the time the division left the area. After a relatively uneventful time the division was relieved by the 17th (Northern) Division on 25 December. The 93rd artillery brigade was transferred permanently to Army control about this time.[42]
1917
The division returned to the front on 4 January, relieving the Guards 2.5 miles (4.0 km) south of Le Transloy in a line through the village of Sailley-Saillisel. Two brigades, the 60th and 61st were at the front with two battalions each in the fire trench, the Guards division was to the right and the 17th (Northern) to the left. The front line consisted of a series of isolated posts, some only 10 yards (9.1 m) from the Germans. The divisions artillery was once again under command of the division for a while as part of the Corp group, with 29th division's artillery and other units. Until relieved on 30 January by 17th (Northern) division, the 20th held the line repulsing German attacks with the machine gunners and artillery providing covering fire for other formations attacks.[43] On 10 February the division returned to the front, on the northern edge of their previous position and lost one of the more isolated advanced posts which was out of sight from the British line and which the division had been given permission to abandon shortly before its loss. By the beginning of March the British were aware that the Germans in tended to withdraw to a more favourable line.[44]
The Hindenburg Line
The Germans began to retire from the line in front of 20th division on 17 March, after morning patrols had found them still in place. Thereafter the division kept pace with the German rearguard and by 28 March had advanced some 6 miles (9.7 km) from its position in front of Le-Transloy. Here the Germans established a line of resistance along the line of the villages of Fins, Neuville-Bourjonval and Ruyaulcourt. During this time the division had been transferred to XV Corps and had been joined on 24 March by the 217th Machine Gun Company as the divisional machine gunners. The initial advance of the division's artillery (still part of the corps group) had been hampered by the torn-up ground of the battlefield, on one occasion taking up to six hours to move guns 1 mile (1.6 km), and on another losing one gun in a water filled shell hole. In order to improve the roads in the division's rear the 96th engineer company, 11th D.L.I., 10th RB. and 7th K.O.Y.L.I were detached under corps orders to improved road and rail communications, returning to the division at the end of the month.[45] On 28 March the 61st brigade supported by the 91st artillery brigade, 84th engineer company and a squadron of the Corps cavalry regiment (King Edward's Horse) were ordered to take the villages of Neuville-Bourjonval (7th D.C.L.I.) and Ruyaulcourt (12th King's). Starting from the village of Ytres at 20:15 hours against heavy machine gun fire Neuville-Bourjonval was entered early on 29 March and was occupied by 02:30 hours with posts established 100 yards (91 m) to its east.

The attack on Ruyaulcourt was defeated by a wire trap not previously known and the battalion entrenched 500 yards (460 m) south west of the village. The next night the village was found empty and occupied by the 7th S.L.I. while the 59th brigade established a line along the northern half of the Neuville-Bourjonval - Fins road.[46] On 4 April the 59th brigade supported by 83rd engineer company and the whole of the division artillery attacked a German line between the village of Metz 1.7 miles (2.7 km) west of Neuville-Bourjonval and the corner of Haverincourt Wood. The 10th and 11th K.R.R.C. suffered heavy casualties, around 25% due to machine gun and rifle fire but occupied the village some two hours after the assault began. German prisoners stated that they had not expected to be attacked until 7 April. Thereafter the line was continually pushed forwards, and before the end of April was in front of the Hindenburg Line from north of Trescault, 9 miles (14 km) from Le-Transloy, north west through Haverincourt Wood to the Canal du Nord. For the next few weeks the division had a relatively quiet time, apart from digging the new front line. On 23 May the division was relieved by the 40th Division and it was transferred to the Fifth Army, IV Corps.[47]
The division was redeployed 7.5 miles (12.1 km) to the north west facing Quéant where IV Corps relieved I Anzac Corps, 48th (South Midland) Division was to the division's right and 58th (2/1st London) Division (of V Corps) to its left. The line here, from ~1,000 yards (910 m) east of Bullecourt (in the original Hindenburg system) to just east of Lagnicourt, was a series of posts, as the trench system had been comprehensively wrecked, and the divisional artillery could only be sited in valleys which ran towards the German lines and were so under observation. Three weeks of active patrolling and trench raids followed with the division suffering heavy bombardment, especially during reliefs. By 22 June the artillery had left the line to refit and on 29 June the rest of the division was relieved by 62nd (2nd West Riding) Division.[48]
Third Battle of Ypres

The division concentrated south east of Amiens on 1 July for rest and retraining. The artillery marched to the Ypres salient over the first two weeks of July, here the two brigades rejoined the 93rd (Army) artillery brigade in the XIV Corps artillery group and covered the corps front between the Ypres-Pilckem road and the canal in the north of the salient, where 20th division had been in 1916. The gun batteries and ammunition column suffered casualties from German counter battery fire. The rest of the division arrived on 20 July and went into the XIV corps area as a reserve. On 25 July 10th and 11th K.R.R.C. and 10th R.B. were detached to 38th (Welsh) Division as carrying parties and the 59th and 217th machine gun companies were also sent forward.[49] On 30 and 31 July the 59th Brigade, 83rd engineer company and the 11th D.L.I. went forward to positions west and south of Elverdinghe, some 2 miles (3.2 km) west of the front line and the artillery fired fixed and rolling barrages for the advance of the Guards and 38th divisions during the Battle of Pilckem Ridge. The subsequent advance of the artillery to the Yesr canal was made difficult by the rain that fell from the afternoon of 31 July to 3 August. On 6 August the division relieved the 38th (Welsh), with the 61st brigade in the front along 1,000 yards (910 m) of the Steenbeek with its left on the railway line.[50]
Battle of Langemarck
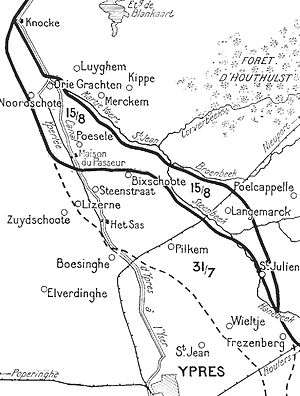
On 7 August the 59th brigade was tasked with establishing a series of post of the eastern bank of the Steenbeek, as the 11th (Northern) Division to the right and the 29th Division to the left had already done. This was complicated on the 20th Division front by the marshy nature of the ground on both sides of the stream and a German strong point at Au Bon Gite, 300 yards (270 m) east of the stream on the Langemarck road. Initial attempts by two companies of the 11th K.R.R.C. made on 8 August failed, as did another with two companies of the 10th K.R.R.C. given artillery support on 11 August, a third attack on 14 August by six companies of 10th and 11th R.B. reached the Au Bon Gite pillboxes, but could not take the largest of them and were forced back by a counterattack 200 yards (180 m) with heavy casualties of over 210 officers and men. A fourth attempt on 15 August was cancelled and the ground gained was deemed sufficient for forming up for the forthcoming attack.[51]
The larger operation, a phase of the Third battle of Ypres, was to begin on 16 August, with 60th and 61st brigades attacking north-east towards, around and past Langemarck, after the previous weeks losses 59th brigade, as division reserve, was reinforced with two battalions, 10th and 15th battalions, the Welch Regiment, from 38th (Welsh) Division. The 83rd and 84th engineer companies placed wooden bridges across the Steenbeek to allow the initial assaulting troops to form up on the east bank, and in spite of having to form up in some places within 80 yards (73 m) of German posts in front of the Au Bon Gite strong point, the build up on the east bank was achieved with out the Germans being aware of the movement even while it was conducted through the 'usual' harassing, but undirected, artillery and machine gun fire. The three phase lines were a road through the west of Langmarck, the second a line east of the village and the third on a road junction about 1 mile (1.6 km) from the Steenbeek.[52]
The 60th brigade would attack on the right on a one battalion front, through the village, the 61st, on the left, on a two battalion front along the railway line. The 61st brigade front would widen, and the 60th brigades front veer northward after Langemarck, widening the division's front to 1,400 yards (1,300 m) at the last phase line. In 60th brigade the 6th Ox and Bucks were to take the first two phase lines then the 12th K.R.R.C. and the 6th K.L.S.I. advance to the last, screening the German reserve known to be in Poelkapelle. On the 61st brigade front two companies each of the 7th K.O.Y.L.I. and the 7th S.L.I. were each allotted to the first and second phase lines, 12th King's and 7th D.C.L.I. taking the third. Sections of the brigade machine gun companies and trench mortar batteries would also accompany the assault. For the remaining hard points at Au Bon Gite, a company of the 11th R.B., familiar with the area, and a party of the 83rd engineer company would advance with the Oxfords to reduce and mask them while the rest the advance continued. The 29th Division were to the left and the 11th (Northern) Division on the right[53]
The artillery barrage and infantry advance began at 04:45 hours, with the assault on the Au Bon Gite blockhouse starting at the same time from the 11th R.B. who had crawled up within a few yards of the position. It was soon captured, but only after being able to fire at the 61st brigade advance in enfilade. The most severe hold up was due to the condition of the ground, which was '...nothing more than a swampy crater field as far as the final objective', and particularly bad up to the first objective. The first wave of the 6th Ox and Bucks gained the first line at 05:20 with few losses. On the 61st brigade front the 7th K.O.Y.L.I. were fired on from blockhouses in Langemarck and at Langemarck railway station causing heavy losses to the officers, here Private Wilfred Edwards won the Victoria Cross attacking one of the blockhouses, and the first line on this brigade front was reached at 05:40.[54] The advance to the second line began at 05:45, and the second wave of the 6th Ox and Bucks reach the second line soon after. Behind them the 6th K.S.L.I and 12th K.R.R.C., mopping up in the village, came under fire from another blockhouse. Crossing 250 yards (230 m) of open ground Sergeant Edward Cooper subdued the position capturing 46 prisoners and seven machine guns, winning the second Victoria Cross of the day in the division. These two battalions then formed up on the second line. On the left in 61st brigade, the K.O.Y.L.I. was left with only one officer as a company commander, the others being lead by sergeants. The 12th King's and 7th D.C.L.I. which had suffered casualties in the mopping up, now formed up in the second line. The advance to the third line began at 07:20 and by 07:45 the 60th brigade reached the final line after opposition from its right flank and the 61st brigade reached the line at 08:00. The division was in contact with both flanking divisions on the final objective, and had taken around 400 prisoners, including a battalion commander, a section of howizers, a 77mm field gun and around 25 machine guns.[55]
A division stretcher bearer party, some 200 men strong, was created for the battle and tasked with clearing the battlefield of wounded. They worked throughout the day and night, and were regarded as an unqualified success.[56]
The Germans counter-attacked at 16:00 at the junction of the brigades and drove back the 12th K.R.R.C. and 12th King's 200 yards (180 m), with one company of the 12th K.R.R.C. being almost wiped out. The next day an attempt to retake the ground partly succeeded, the mixed force of 12th King's, 7th S.L.I. and a company of 7th D.C.L.I. retaking the line on the right, but the attack of the 12th R.B. was defeated by enfilade fire. That night the division was relieved by the 38th (Welsh) Division, except for the artillery which remained under orders of the Welsh.[57]
Eagle Trench
After three weeks out of the line the division returned to the front on 5 September north-east of Langemarck. However, having had no reinforcement, it was under strength after the Langemarck battles with an average battalion strength of only 350 rifles. Relieving the 38th (Welsh) Division, an attack on the trench line opposite Poelkapelle was scheduled for 20 September. Preceded by a "hurricane" bombardment, the 59th brigade on the left and the 60th brigade on the right attacked that morning with the left flank reaching its objective, the right flank was held up by fire from strong points and the centre (the inner flanks of both brigades) making no progress due to fire from Eagle Trench, which was later discovered to be well sited between two 8 feet (2.4 m) embankments, and had an excellent field of fire. The attack was repeated that evening, with the artillery using smoke which was only partly successful, the 11th R.B. gaining a foothold in the trench but at a cost of two thirds of its men and 11 out of 16 officers. The 60th brigade gained further ground on the right. A follow-on attack was planned for 22 September with the aid of two tanks, but these became stuck in Langemarck, and the attack was re-planned for the next day without them. A German counterattack on the 60th brigade, 35 minutes before the planned attack was beaten off, and the attack began at 07:00. With trench mortars bombarding the trench, and both brigades working their way to the centre of the trench from the ends they held using bombing parties (grenade throwers), the 12th K.R.R.C. from the south, 10th R.B. from the north and frontally from the west. A total of 158 prisoners were taken and a number of machine guns captured. The attack earned praise from the Army Commander, General Sir Hubert Gough. Until the division was relieved at the end of the month the pioneers and engineers laboured to establish and strengthen communications to the front line through Langemarck.[58]
The artillery remained in the salient and assisted in attacks that captured Poelcapelle and conducted a difficult relocation across the muddy ground. By the time the artillery was relieved on 18 October they had been in action for three months without relief.[59]
Cambrai
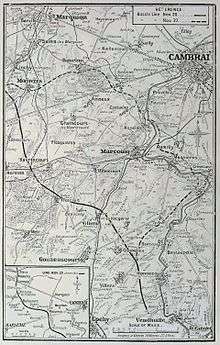
On 1 October the division (less the artillery) entrained for Bapaume, and by 10 October had relieved the 40th Division with all three brigades in the line from Villers Plouich to Villers Guislains about 1.5 miles (2.4 km) north to south-east of Gouzeaucourt. Now part of III Corps of the Third Army, the division had a quiet time in the line and was rejoined by its artillery on 25 October.[60] On 29 October the division line was shortened when the 55th (West Lancashire) Division took over the southern third of the line around Villers Guislains. While in the line, those battalions rotated out of the line were trained in infantry-tank cooperation, the artillery was moved to new positions in the open closer to the line during the nights of 16-19 November and the Division Signals Company was detailed to provide the telephone and signal lines of three attacking divisions, laying 137 miles (220 km) of armoured cable in the preceding weeks. On 19 October the 60th and 61st brigade entered the new division line from Villers Plouich, south-east to a point 1,000 yards (910 m) north west of Gonnelieu facing 'Welsh Ridge', with the outposts of the old line still manned by the 20th division. The 59th Brigade was in reserve at Gouzeaucourt.[61] In spite of the noise the tanks made moving up to the line the Germans did not respond.
At midnight a continuous roar in the distance informed us that the tanks were moving up to their positions. Everyone was in a dither of excitement. The noise of their approach got louder and louder; minute by minute our anxiety increased, as we could not think it possible that the enemy could help hearing the outrageous noise they were making. As they approached their positions in the dark the guides in front were shouting directions at the top of their voices. We were expecting every minute the German batteries to open up along the whole front line with all the guns they could bring to bear. The tank close to me made the most shattering noise. It seemed to have an open exhaust, and the captain, or whoever was in charge, seemed to have no realisation of the close proximity to the enemy. However, he got the great hulk into his allotted position, and at last stopped his engine, and still nothing happened.
— Captain G Dugdale, HQ 60th brigade, [62]
The plan called for the 60th brigade, supported by 24 tanks of 'A' battalion[63] and 61st brigade, supported by 36 tanks of 'I' battalion[64], to advance behind a standing barrage launched at the same time as the infantry advance. This advance was to be to the north-east astride Welsh Ridge and the valley to the south east of it.[65]
Order of battle
- 10th (Service) Battalion, King's Royal Rifle Corps (disbanded February 1918)
- 11th (Service) Battalion, King's Royal Rifle Corps
- 10th (Service) Battalion, Rifle Brigade (disbanded February 1918)
- 11th (Service) Battalion, Rifle Brigade
- 2nd Battalion, Cameronians (Scottish Rifles) (from February 1918)
- 59th Machine Gun Company (joined 3 March 1916, left to form 20th MG Battalion 15 March 1918)
- 59th Trench Mortar Battery (formed July 1916)
- 6th (Service) Battalion, Oxfordshire and Buckinghamshire Light Infantry ( disbanded February 1918)
- 6th (Service) Battalion, King's Shropshire Light Infantry
- 12th (Service) Battalion, King's Royal Rifle Corps
- 12th (Service) Battalion, Rifle Brigade
- 60th Machine Gun Company (joined 3 March 1916, left to form 20th MG Battalion 15 March 1918)
- 60th Trench Mortar Battery (formed July 1916)
- 7th (Service) Battalion, Somerset Light Infantry
- 7th (Service) Battalion, Duke of Cornwall's Light Infantry
- 7th (Service) Battalion, King's Own Yorkshire Light Infantry ( disbanded February 1918)
- 11th (Service) Battalion, Durham Light Infantry (to division pioneers January 1915)
- 12th (Service) Battalion, King's (Liverpool Regiment) (from division troops January 1915)
- 61st Machine Gun Company (joined 3 March 1916, left to form 20th MG Battalion 15 March 1918)
- 61st Trench Mortar Battery (formed July 1916)
- Divisional Troops
- 12th Battalion, King’s (Liverpool Regiment) ( to 61st Brigade January 1915)
- 11th Battalion, Durham Light Infantry (pioneers) (from 61st Brigade January 1915)
- 9th Battalion, Devonshire Regiment (left April 1915)
- 14th Motor Machine Gun Battery (26 January 1915 — 22 April 1916)
- HQ, D Sqn and MG Section, Westmorland and Cumberland Yeomanry (24 June 1915 — 29 April 1916)
- 20th Divisional Cyclist Company, Army Cyclist Corps (formed 22 December 1914, left 17 May 1916)
- 217th Company, MGC ( March 1917, moved into 20th Machine Gun Battalion 15 March 1918)
- 20th Battalion Machine Gun Corps (formed 15 March 1918)
- 20th Divisional Train Army Service Corps
- 158th, 159th, 160th and 161st Companies
- XC Brigade, Royal Field Artillery (RFA) (broken up 30 August 1916)
- XCI Brigade, RFA
- XCII (Howitzer) Brigade, RFA (left 8 January 1917)
- XCIII Brigade, RFA (broken up 8–9 September 1916)
- 20th Divisional Ammunition Column RFA
- 20th Heavy Battery, Royal Garrison Artillery (RGA) (raised with the Division but moved independently to France in August 1915)
- V.20 Heavy Trench Mortar Battery RFA (formed May 1916, broken up 2 February 1918)
- X.20, Y.20 and Z.20 Medium Mortar Batteries RFA (formed May 1916; Z battery broken up in February 1918, and distributed to X and Y batteries)
- 83rd Field Company
- 84th Field Company
- 96th Field Company (from 26th Division in January 1915)
- 20th Divisional Signals Company
- 60th Field Ambulance
- 61st Field Ambulance
- 62nd Field Ambulance
- 33rd Sanitary Section (left 24 April 1917)
Victoria Cross Recipients
- Major Edward Cooper 12th King's Royal Rifle Corps
- Major Wilfred Edwards 7th King's Own Yorkshire Light Infantry
- Sergeant David Jones (VC) 12th King's (Liverpool) Regiment
- Lieutenant George Allan Maling R.A.M.C.
- Rifleman Albert Edward Shepherd 12th King's Royal Rifle Corps
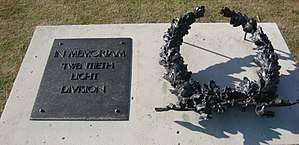
Memorial
General Officer Commanding
- Major General Richard Hutton Davies C.B. September 1914 — 8 April 1916[66]
- Major General William Douglas Smith C.B. 8 April 1916 — 3 April 1918[67]
- Major General George Glas Sandeman Carey C.B. C.M.G. 3 April 1918 — 11 November 1918[68][69][70]
Battle Insignia
The practice of wearing battalion specific insignia (often called battle patches) in the B.E.F. began in mid 1915 with the arrival of units of Kitchener's Armies and was widespread after the Somme Battles of 1916.[71] The patches shown were adopted by the division during late 1917, and were designed to an overall divisional scheme of a simple shape for each brigade and a number of stripes below that indicating the seniority of the battalion (according to the regimental order of precedence).[72]
 | From left to right, top row: 10th, 11th King's Royal Rifle Corps, 10th, 11th Rifle Brigade. Bottom row: brigade H.Q., 59th machine gun company and 59th trench mortar battery. The 11th K.R.R.C. also worn a green diamond with an '11' over '60th' in red on helmet coverings.[72] |
 | From left to right, top row: 6th Oxford and Buckinghamshire Light Infantry, 6th King's Shropshire Light Infantry, 12th K.R.R.C., 12th Rifle Brigade. Bottom row: brigade H.Q., 60th machine gun company and 60th trench mortar battery. Before the adoption of the divisional scheme the 6th K.S.L.I. wore a green oval embroidered with 'VI' above a regimental badge.[72] |
 | From left to right, top row: 12th King's Regiment, 7th Somerset Light Infantry, 7th Duke of Cornwall's Light Infantry, 7th King's Own Yorkshire Light Infantry. Bottom row: brigade H.Q, 61st machine gun company and 61st trench mortar battery. Before the adoption of the divisional scheme the 7th S.L.I. wore a rifle green horizontal rectangle on the right sleeve.[72] |
Notes
- ↑ 10th and 11th battalions King's Royal Rifle Corps (KRRC), 10th and 11th battalions Rifle Brigade (Rifles)
- ↑ 6th Oxfordshire and Buckinghamshire Light Infantry (Ox & Bucks), 6th battalion King's Own Shropshire Light Infantry (KSOLI), 12th battalion KRRC and 12th battalion Rifles
- ↑ 7th battalion Somerset Light Infantry, 7th battalion Duke of Cornwall's Light Infantry (DCLI), 7th battalion King's Own Yorkshire Light Infantry (KOYLI) and (initially) the 11th battalion Durham Light Infantry (DLI)
References
- ↑ Inglefield p. 1
- ↑ Inglefield pp. 3-4
- ↑ Inglefield pps. 3, 5
- ↑ Inglefield pp. 6-7
- ↑ Inglefield pp. 7-9
- ↑ Inglefield pp. 11-12
- ↑ Inglefield pp. 12-14
- ↑ Inglefield pp. 15-22
- ↑ Sandilands p. 32-33
- ↑ Inglefield p. 23
- ↑ Inglefield p. 34
- ↑ Inglefield p. 29
- ↑ Inglefield pp. 31-33
- ↑ Inglefield pp. 33-34
- ↑ Inglefield p. 35
- ↑ Inglefield p. 36
- 1 2 Inglefield p. 37
- ↑ Inglefield pp. 39-43
- ↑ Inglefield p. 43
- ↑ Inglefield pp. 47-48
- ↑ Inglefield p. 48
- ↑ Inglefield pp. 49-51
- ↑ Inglefield pp. 51-52
- ↑ Inglefield pp. 53-54
- ↑ Inglefield pp. 54-60
- ↑ Inglefield pp. 61-64
- ↑ Inglefield pp. 64-67
- ↑ Inglefield pp. 68-70
- ↑ Inglefield pp.71-75
- ↑ Inglefield pp. 75-77
- ↑ Inglefield pp. 77-78
- ↑ Inglefield pp. 78-80
- ↑ Inglefield pp. 81-83
- ↑ Inglefield pps. 82, 84-85
- ↑ Inglefield pp. 89-91
- ↑ Inglefield pp. 91-93
- ↑ Inglefield pp.94-98
- ↑ Inglefield pp. 98-99
- ↑ Inglefield pp. 99-101
- ↑ Inglefield pp. 101-107
- ↑ Inglefield p. 107
- ↑ Inglefield pp. 108-113
- ↑ Inglefield pp. 113-116
- ↑ Inglefield pp.116-121
- ↑ Inglefield pp. 121-126
- ↑ Inglefield pp. 127-128
- ↑ Inglefield pp. 128-139
- ↑ Inglefield pp. 139-142
- ↑ Inglefield pp. 142-148
- ↑ Inglefield pp. 149-151
- ↑ Inglefield pp. 151-155
- ↑ Inglefield pp. 155-157
- ↑ Inglefield pp. 156-157
- ↑ Inglefield pp.157-160
- ↑ Inglefield pp. 160-163
- ↑ Inglefield p. 164
- ↑ Inglefield pp. 165-166
- ↑ Inglefield pp. 167-173
- ↑ Inglefield pp. 174-177
- ↑ Inglefield p. 178
- ↑ Inglefield p. 180
- ↑ Hammond p. 106
- ↑ Hammond p. 130
- ↑ Hammond p. 129
- ↑ Inglefield p. 181
- ↑ Inglefield p 3
- ↑ Inglefield p. 44
- ↑ Inglefield p. 256 facing
- ↑ Inglefield p. 271
- ↑ Inglefield p. 306
- ↑ Chappel pp 5-6
- 1 2 3 4 Hibbard pp. 21-22
Bibliography
- Chappell, Mike (1986). British Battle Insignia (1). 1914-18. Oxford: Osprey Publishing. ISBN 9780850457278.
- Hibbard, Mike; Gibbs, Gary (2016). Infantry Divisions, Identification Schemes 1917 (1 ed.). Wokingham: The Military History Society.
- Hammond, Bryn (2008). Cambrai 1917 (1 ed.). London: Phoenix. ISBN 9780753826058.
- Inglefield, Capt. V.E. The History of the Twentieth (Light) Division. Naval and Military Press. ISBN 9781843424093.
- Sandilands, H. R. (2003) [1925]. The 23rd Division 1914–1919 (Naval & Military Press ed.). Edinburgh: Wm. Blackwood. ISBN 1-84342-641-2.
See also
External links
Further reading
- Inglefield, V.E. (1921). The History of the Twentieth (Light) Division. London: Nisbet and Co.