LaTeX can be used for creating presentations. There are several packages for the task, including the beamer package.
The Beamer package
The beamer package is provided with most LaTeX distributions, but is also available from CTAN. If you use MikTeX, all you have to do is to include the beamer package and let LaTeX download all wanted packages automatically. The documentation explains the features in great detail. You can also have a look at the PracTex article Beamer by Example.[1]
The beamer package also loads many useful packages including hyperref.
Introductory example
The beamer package is loaded by calling the beamer class:
\documentclass{beamer}
The usual header information may then be specified.
Inside the document environment, multiple frame environments specify the content to be put on each slide. The frametitle command specifies the title for each slide (see image):
\begin{document}
  \begin{frame}
    \frametitle{This is the first slide}
    %Content goes here
  \end{frame}
  \begin{frame}
    \frametitle{This is the second slide}
    \framesubtitle{A bit more information about this}
    %More content goes here
  \end{frame}
% etc
\end{document}

The usual environments (itemize, enumerate, equation, etc.) may be used.
Inside frames, you can use environments like block, theorem, proof, ... Also, \maketitle is possible to create the frontpage, if title and author are set.
For the actual talk, if you can compile it with pdflatex then you could use a pdf reader with a fullscreen mode, such as Okular, Evince or Adobe Reader. If you want to navigate in your presentation, you can use the almost invisible links in the bottom right corner without leaving the fullscreen mode.
Document Structure
Title page and information
First, you give information about authors, titles and dates in the preamble.
\title[Crisis] % (optional, only for long titles)
{The Economics of Financial Crisis}
\subtitle{Evidence from India}
\author[Author, Anders] % (optional, for multiple authors)
{F.~Author\inst{1} \and S.~Anders\inst{2}}
\institute[Universities Here and There] % (optional)
{
  \inst{1}%
  Institute of Computer Science\newline
  University Here
  \and
  \inst{2}%
  Institute of Theoretical Philosophy\newline
  University There
}
\date[KPT 2004] % (optional)
{Conference on Presentation Techniques, 2004}
\subject{Computer Science}
Then, in the document, you add the title page :
\begin{frame}[plain]\titlepage\end{frame}
Table of Contents
The table of contents, with the current section highlighted, is displayed by:
\begin{frame}
\frametitle{Table of Contents}
\tableofcontents[currentsection]
\end{frame}
This can be done automatically at the beginning of each section using the following code in the preamble:
\AtBeginSection[]
{
  \begin{frame}
    \frametitle{Table of Contents}
    \tableofcontents[currentsection]
  \end{frame}
}
Or for subsections:
\AtBeginSubsection[]
{
  \begin{frame}
    \frametitle{Table of Contents}
    \tableofcontents[currentsection,currentsubsection]
  \end{frame}
}
Sections and subsections
As in all other LaTeX files, it is possible to structure the document using
\section[Section]{My section}
,
\subsection[Subsection]{My subsection}
and
\subsubsection[Subsubsection]{My subsubsection}
Those commands have to be put before and between frames. They will modify the table of contents with the argument in brackets. The optional argument will be shown in the headline navigation on the slide, depending on the theme used.
You can use \sectionpage macro to generate a separator slide for a declared section, for example
\begin{frame}\sectionpage\end{frame}
References (Beamer)
The following example shows a manually made references slide containing two entries:
\begin{frame}[allowframebreaks]
  \frametitle<presentation>{Further Reading}
  \begin{thebibliography}{10}
  \beamertemplatebookbibitems
  \bibitem{Autor1990}
    A.~Autor.
    \newblock {\em Introduction to Giving Presentations}.
    \newblock Klein-Verlag, 1990.
  \beamertemplatearticlebibitems
  \bibitem{Jemand2000}
    S.~Jemand.
    \newblock On this and that.
    \newblock {\em Journal of This and That}, 2(1):50--100, 2000.
  \end{thebibliography}
\end{frame}
As the reference list grows, the reference slide will divide into two slides and so on, through use of the allowframebreaks option. Individual items can be cited after adding an 'optional' label to the relevant bibitem stanza. The citation call is simply \cite. Beamer also supports limited customization of the way references are presented (see the manual).
The different types of referenced work are indicated with a little symbol (e.g. a book, an article, etc.). The symbol is set with the commands beamertemplatebookbibitems and beamertemplatearticlebibitems . It is also possible to use setbeamertemplate directly, like so
\begin{frame}[allowframebreaks]
  \frametitle<presentation>{Further Reading}
  \begin{thebibliography}{10}
  \setbeamertemplate{bibliography item}[book]
  \bibitem{Autor1990}
    A.~Autor.
    \newblock {\em Introduction to Giving Presentations}.
    \newblock Klein-Verlag, 1990.
  \setbeamertemplate{bibliography item}[article]
  \bibitem{Jemand2000}
    S.~Jemand.
    \newblock On this and that.
    \newblock {\em Journal of This and That}, 2(1):50--100, 2000.
  \end{thebibliography}
\end{frame}
Other possible types of bibliography items, besides book and article , include e.g. online , triangle and text . It is also possible to have user defined bibliography items by including a graphic.
If one wants to have full references appear as foot notes, use the \footfullcite from the biblatex package.
For example, it is possible to use
\documentclass[10pt,handout,english]{beamer}
\usepackage[english]{babel}
\usepackage[backend=biber,style=numeric-comp,sorting=none]{biblatex}
\addbibresource{biblio.bib}

\begin{frame}
 \frametitle{Title}
 A reference~\footfullcite{ref_bib}, with ref_bib an item of the .bib file.
\end{frame}
Style
Themes
The first solution is to use a built-in theme such as Warsaw, Berlin, etc. The second solution is to specify colors, inner themes and outer themes.
The Built-in solution
To the preamble you can add the following line:
\usetheme{Warsaw}
to use the "Warsaw" theme. Beamer has several themes, many of which are named after cities (e.g. Frankfurt, Madrid, Berlin, etc.).
This Theme Matrix contains the various theme and color combinations included with beamer. For more customizing options, have a look to the official documentation included in your distribution of beamer, particularly the part Change the way it looks.
The full list of themes is:
|
|
|
|
|
|
Color themes, typically with animal names, can be specified with
\usecolortheme{beaver}
The full list of color themes is:
|
|
|
The do it yourself solution
First you can specify the outertheme. The outertheme defines the head and the footline of each slide.
\useoutertheme{infolines}
Here is a list of all available outer themes:
- infolines
- miniframes
- shadow
- sidebar
- smoothbars
- smoothtree
- split
- tree
Then you can add the innertheme:
\useinnertheme{rectangles}
Here is a list of all available inner themes:
- rectangles
- circles
- inmargin
- rounded
You can define the color of every element:
\setbeamercolor{alerted text}{fg=orange}
\setbeamercolor{background canvas}{bg=white}
\setbeamercolor{block body alerted}{bg=normal text.bg!90!black}
\setbeamercolor{block body}{bg=normal text.bg!90!black}
\setbeamercolor{block body example}{bg=normal text.bg!90!black}
\setbeamercolor{block title alerted}{use={normal text,alerted text},fg=alerted text.fg!75!normal text.fg,bg=normal text.bg!75!black}
\setbeamercolor{block title}{bg=blue}
\setbeamercolor{block title example}{use={normal text,example text},fg=example text.fg!75!normal text.fg,bg=normal text.bg!75!black}
\setbeamercolor{fine separation line}{}
\setbeamercolor{frametitle}{fg=brown}
\setbeamercolor{item projected}{fg=black}
\setbeamercolor{normal text}{bg=black,fg=yellow}
\setbeamercolor{palette sidebar primary}{use=normal text,fg=normal text.fg}
\setbeamercolor{palette sidebar quaternary}{use=structure,fg=structure.fg}
\setbeamercolor{palette sidebar secondary}{use=structure,fg=structure.fg}
\setbeamercolor{palette sidebar tertiary}{use=normal text,fg=normal text.fg}
\setbeamercolor{section in sidebar}{fg=brown}
\setbeamercolor{section in sidebar shaded}{fg=grey}
\setbeamercolor{separation line}{}
\setbeamercolor{sidebar}{bg=red}
\setbeamercolor{sidebar}{parent=palette primary}
\setbeamercolor{structure}{bg=black, fg=green}
\setbeamercolor{subsection in sidebar}{fg=brown}
\setbeamercolor{subsection in sidebar shaded}{fg=grey}
\setbeamercolor{title}{fg=brown}
\setbeamercolor{titlelike}{fg=brown}
Colors can be defined as usual:
\definecolor{chocolate}{RGB}{33,33,33}
Block styles can also be defined:
\setbeamertemplate{blocks}[rounded][shadow=true]
\setbeamertemplate{background canvas}[vertical shading][bottom=white,top=structure.fg!25]
\setbeamertemplate{sidebar canvas left}[horizontal shading][left=white!40!black,right=black]
You can also suppress the navigation symbols:
\beamertemplatenavigationsymbolsempty
Fonts
You may also change the fonts for particular elements. If you wanted the title of the presentation as rendered by \begin{frame}[plain]\titlepage\end{frame} to occur in a serif font instead of the default sanserif, you would use:
\setbeamerfont{title}{family=\rmfamily}
You could take this a step further if you are using OpenType fonts with Xe(La)TeX and specify a serif font with increased size and oldstyle proportional alternate number glyphs:
\setbeamerfont{title}{family=\rmfamily\addfontfeatures{Scale=1.18, Numbers={Lining, Proportional}}}
Math Fonts
The default settings for beamer use a different set of math fonts than one would expect from creating a simple math article. One quick fix for this is to use
\usefonttheme[onlymath]{serif}
Frames Options
The plain option. Sometimes you need to include a large figure or a large table and you don't want to have the bottom and the top off the slides. In that case, use the plain option:
\begin{frame}[plain]
% ...
\end{frame}
If you want to include lots of text on a slide think twice and restructure your presentation instead. Your audience will thank you for not including too much content on a single slide. If you fail to find another way or hate your audience, use the shrink option.
\begin{frame}[shrink]
% ...
\end{frame}
The allowframebreaks option will auto-create new frames if there is too much content to be displayed on one. This option is evil and should only be used if really necessary, e.g. for automatically created bibliographies.
\begin{frame}[allowframebreaks]
% ...
\end{frame}
Before using any verbatim environment (like listings), you should pass the option fragile to the frame environment, as verbatim environments need to be typeset differently. Usually, the form fragile=singleslide is usable (for details see the manual). Note that the fragile option may not be used with \frame commands since it expects to encounter a \end{frame}, which should be alone on a single line.
\begin{frame}[fragile]
\frametitle{Source code}

\begin{lstlisting}[caption=First C example]
int main()
{
    printf("Hello World!");
    return 0;
}
\end{lstlisting}
\end{frame}
Hyperlink navigation
Internal and external hyperlinks can be used in beamer to assist navigation. Clean looking buttons can also be added.
By default the beamer class adds navigation buttons in the bottom right corner. To remove them one can place
\beamertemplatenavigationsymbolsempty
in the preamble.
Animations
The following is merely an introduction to the possibilities in beamer. Chapter 9 of the beamer manual provides much more detail, on many more features.
Making items appear on a slide is possible by simply using the \pause statement:
\begin{frame}
\frametitle{Some background}
We start our discussion with some concepts.
\pause
The first concept we introduce originates with Erd\H os.
\end{frame}
Text or figures after \pause will display after one of the following events (which may vary between PDF viewers): pressing space, return or page down on the keyboard, or using the mouse to scroll down or click the next slide button. Pause can be used within \itemize etc.
Instead of \pause, \uncover specifies the appearance explicitly; \only works the same but without reserving space when hidden.
\begin{frame}
\frametitle{Some background}
\only<1>{To be replaced.}
\uncover<2-3>{Only visible on slides two and three.}
\uncover<4->{Can be seen afterwards until the end.}
\end{frame}
Text animations
For text animations, for example in the itemize environment, it is possible to specify appearance and disappearance of text by using <a-b> where a and b are the numbers of the events the item is to be displayed for (inclusive). For example:
\begin{itemize}
  \item This one is always shown
  \item<1-> The first time (i.e. as soon as the slide loads)
  \item<2-> The second time
  \item<1-> Also the first time
  \only<1-1> {This one is shown at the first time, but it will hide soon (on the next event after the slide loads).}
\end{itemize}
A simpler approach for revealing one item per click is to use \begin{itemize}[<+->].
\begin{frame}
	\frametitle{`Hidden higher-order concepts?'}
	\begin{itemize}[<+->]
	\item The truths of arithmetic which are independent of PA in some
	sense themselves `{contain} essentially {\color{blue}{hidden higher-order}},
	 or infinitary, concepts'???
	\item `Truths in the language of arithmetic which \ldots
	\item	That suggests stronger version of Isaacson's thesis.
	\end{itemize}
\end{frame}
In all these cases, pressing page up, scrolling up, or clicking the previous slide button in the navigation bar will backtrack through the sequence.
Handout mode
In beamer class, the default mode is presentation which makes the slides. However, you can work in a different mode that is called handout by setting this option when calling the class:
\documentclass[12pt,handout]{beamer}
This mode is useful to see each slide only one time with all its stuff on it, making any \itemize[<+->] environments visible all at once (for instance, printable version). Nevertheless, this makes an issue when working with the only command, because its purpose is to have only some text or figures at a time and not all of them together.
If you want to solve this, you can add a statement to specify precisely the behavior when dealing with only commands in handout mode. Suppose you have a code like this
\only<1>{\includegraphics{pic1}}
\only<2>{\includegraphics{pic2}}
These pictures being completely different, you want them both in the handout, but they cannot be both on the same slide since they are large. The solution is to add the handout statement to have the following:
\only<1| handout:1>{\includegraphics{pic1}}
\only<2| handout:2>{\includegraphics{pic2}}
This will ensure the handout will make a slide for each picture.
Now imagine you still have your two pictures with the only statements, but the second one show the first one plus some other graphs and you don't need the first one to appear in the handout. You can thus precise the handout mode not to include some only commands by:
\only<1| handout:0>{\includegraphics{pic1}}
\only<2>{\includegraphics{pic2.eps}}
The command can also be used to hide frames, e.g.
\begin{frame}<handout:0>
or even, if you have written a frame that you don't want anymore but maybe you will need it later, you can write
\begin{frame}<0| handout:0>
and this will hide your slide in both modes.
A last word about the handout mode is about the notes. Actually, the full syntax for a frame is
\begin{frame}
...
\end{frame}
\note{...}
\note{...}
...
and you can write your notes about a frame in the field note (many of them if needed). Using this, you can add an option
\setbeameroption{show only notes}
or
\setbeameroption{show notes}
The first one is useful when you make a presentation to have only the notes you need, while the second one could be given to those who have followed your presentation or those who missed it, for them to have both the slides with what you said.
Columns and Blocks
There are two handy environments for structuring a slide: "blocks", which divide the slide (horizontally) into headed sections, and "columns" which divides a slide (vertically) into columns. Blocks and columns can be used inside each other.
Columns
Example
\begin{frame}
\frametitle{Example of columns 1}
\begin{columns}[c] % the "c" option specifies center vertical alignment
\column{.45\textwidth} % column designated by a command
Contents of the first column
\column{.45\textwidth}
Contents split \newline into two lines
\end{columns}
\end{frame}
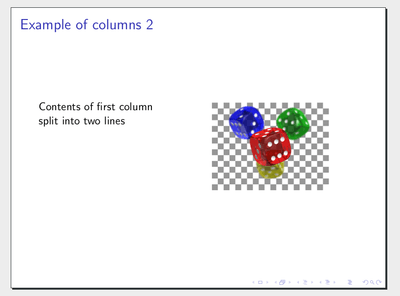
\begin{frame}
\frametitle{Example of columns 2}
\begin{columns}[T] % contents are top vertically aligned
\begin{column}{5cm} % each column can also be its own environment
Contents of first column \newline split into two lines
\end{column}
\begin{column}{5cm} % alternative top-align that's better for graphics
\includegraphics[height=3cm]{graphic}
\end{column}
\end{columns}
\end{frame}
Blocks
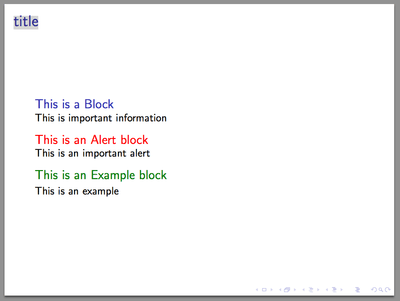
Enclosing text in the block environment creates a distinct, headed block of text (a blank heading can be used). This allows to visually distinguish parts of a slide easily. There are three basic types of block. Their formatting depends on the theme being used.
Simple
\begin{frame}

   \begin{block}{This is a Block}
      This is important information
   \end{block}

   \begin{alertblock}{This is an Alert block}
   This is an important alert
   \end{alertblock}

   \begin{exampleblock}{This is an Example block}
   This is an example
   \end{exampleblock}

\end{frame}
PDF options
You can specify the default options of your PDF.[2]
\hypersetup{pdfstartview={Fit}} % fits the presentation to the window when first displayed
Numbering slides
It is possible to number slides using this snippet:
\insertframenumber/\inserttotalframenumber
However, this poses two problems for some presentation authors: the title slide is numbered as the first one, and the appendix or so-called "backup" (aka appendix, reserve) slides are included in the total count despite them not being intended to be public until a "hard" question is asked.[3] This is where two features come in:
- Ability to exclude certain frames from being numbered. For instance, this may be used at the title slide to avoid counting it:
\begin{frame}[noframenumbering]
content...
\end{frame}
- This stuff works around the problem of counting the backup frames:
\documentclass[12pt,handout]{beamer}

\usetheme{CambridgeUS}
\setbeamertemplate{page number in head/foot}[appendixframenumber]

\begin{document}

\begin{frame}
content
\end{frame}

\appendix

\begin{frame}
content...
\end{frame}

\end{document}
The powerdot package
The powerdot package is an alternative to beamer. It is available from CTAN. The documentation explains the features in great detail.
The powerdot package is loaded by calling the powerdot class:
\documentclass{powerdot}
The usual header information may then be specified.
Inside the usual document environment, multiple slide environments specify the content to be put on each slide.
\begin{document}
  \begin{slide}{This is the first slide}
    %Content goes here
  \end{slide}
  \begin{slide}{This is the second slide}
    %More content goes here
  \end{slide}
% etc
\end{document}
Simple presentations
The beamer class is very powerful and provides lots of features. For a very simple presentation, a class based on article can be used.
\documentclass[paper=160mm:90mm,fontsize=10pt,DIV=16]{scrartcl}
\usepackage{lmodern}
\pagestyle{empty}
\renewcommand{\familydefault}{\sfdefault}
\newenvironment{slide}[1]{\clearpage
	{\LARGE\bfseries#1\par}\vspace{\baselineskip}
}{}
\usepackage{enumitem}
\setlist{noitemsep}
\title{XeTaL}
\author{Carl Capybara}
\begin{document}
\maketitle
\begin{slide}{slide title}
	This is just some text
	\begin{itemize}
		\item Wombat
		\item Capybara
		\item Mara
	\end{itemize}
\end{slide}
\begin{slide}{Wombat  title}
	This is just some different text
\end{slide}
\end{document}
References
- ↑ Andrew Mertz and William Slough, Beamer by Example
- ↑ Other possible values are defined in the hyperref manual
- ↑ Appendix Slides in Beamer: Controlling frame numbers
Links
- Wikipedia:Beamer (LaTeX)
- Beamer user guide (pdf) from CTAN
- The powerdot class (pdf) from CTAN
- A tutorial for creating presentations using beamer