The current, editable version of this book is available in Wikibooks, the open-content textbooks collection, at
https://en.wikibooks.org/wiki/How_To_Assemble_A_Desktop_PC
Contents
Preface
Building a computer can be a very rewarding experience. Since you’re reading this, you’re probably thinking about building your next computer instead of buying one pre-built. This is a very viable option these days and can bring many benefits; you can learn a lot about computer hardware by building one, you get a totally personalized computer, you can choose better components and you may be able to save some money and have fun.
Additionally, if you are the sort of person who wants to understand how things work, if you take broken stuff apart just to see how it all fits together, if you have a drawer somewhere full of “parts” you think may come in handy someday, then you just may be in the right place.
Choosing the parts
The first step to building a computer is acquiring the parts. This guide will start with a quick explanation of essential parts and elaborate on them further on.
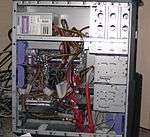
A computer is made up of a case (or chassis) which houses several important internal components, and provides places to connect the external components, including non-peripherals.
Inside the case go the following internal parts:
- Power Supply Unit/PSU – Power Supply Unit, converts outlet power, which is alternating current (AC), to direct current (DC) which is required by internal components, as well as providing appropriate voltages and currents for these internal components.
- Motherboard/mainboard – As the name indicates, this is the electronic centerpiece of the computer: everything else connects to the motherboard.
- Processor/CPU – central processing unit, the "brain" of the computer, most actual computation takes place here.
- RAM – random access memory, the "short-term memory" of a computer, used by the CPU to store program instructions and data upon which it is currently operating. Data in RAM is lost when the computer is powered off, thus necessitating a hard drive.
- Storage - either HDD (Hard disk drive - slower of the two but less expensive) and/or SSD (solid state drive. Very fast but not as cheap) – the "long-term memory" of the computer, used for persistent storage – i.e. the things stored on it remain even when the computer is powered down. The operating system, and all your programs and data are stored here. OSes can be booted and use storage from inexpensive USB Drives, although this is only with extremely lightweight systems.
Optional components follow: (Components that depend on the function that will be given to the machine)
- Optical Drive – device for reading/writing optical disks. May read CDs, DVDs, or other optical media, depending on the type. It is essential for installing many operating systems and programs, although the vast majority can be run from USB. It may be able to write some of these discs, as well. Some people like to have two such drives for copying disks.
- GPU/Graphics Card/GPU – does processing relating to video output. Some motherboards and processors have an "on-board" GPU built in so you don’t need (but may add) a separate video card. Otherwise, you will need a video card. These plug into a slot on the motherboard and provide a place to connect a monitor to your computer.
- Sound card - Comes with motherboard but may want to be upgraded
On top of the internal components listed above, you will also need these external components:
- Keyboard – for typing on. Some motherboards will not complete the boot process without a keyboard attached (option often found on the BIOS) and most will report an error on boot if not set otherwise.
- Mouse – for pointing and clicking. Unless you chose a text-based operating system, you will likely want one of these.
- Monitor – it is a output device that displays the information after it is processed.They come in many forms, the most common being CRT and LCD.
These are the parts that a standard PC will use. We are not considering such esoterica as headless, touch-screen, or voice-controlled systems. You might want to make a check list (perhaps using a spreadsheet) of parts to use as you go about your process of research and selection. That way you won’t find yourself sitting down with a pile of brand new hardware only to find that you forgot an essential component.
Before you jump onto the web and start spending lots of money on expensive computer parts, there are three important questions you should answer which will guide your purchases:
- What will be the main function of the computer?
- What useful parts do you have on hand, from an old computer or otherwise?
- How much can you afford to spend on the system?
What operating system am I going to use?
Before you buy components, be sure that they are supported by the operating system you plan to use. Almost all commonly available PC devices have drivers (small programs that allow the operating system to recognize and work with a hardware device) available for current versions of Windows (generally 7, 8, 10 or newer); if you want to run an alternative operating system, you'll have to do some research; many alternatives have extensive 'Hardware Compatibility Lists' (HCLs) as well as software compatibility.
Main operating systems available
- Microsoft Windows - 7 (Home Basic/Home Premium/Professional/Ultimate), 8 (at revision 8.1) (Core/Pro), 10(Home/Pro).
- Popular GNU/Linux Distros - Red-Hat, Ubuntu, Knoppix, SuSE, Fedora, Debian, Parsix, and others
- Popular BSD Variants - FreeBSD, OpenBSD, NetBSD, and others
- BeOS - No longer supported by the original creators, but was taken over as an open source project
- DOS - MS-DOS, PC-DOS, DR-DOS, FreeDOS, etc - Disc Operating System
Windows information and hardware support lists
Microsoft Windows is a series of operating systems made by the major software corporation Microsoft. Nearly everybody who has worked with computers has used Windows in some way or another. Windows is ideal for most personal computing and fits the needs (or wants) of just about anyone: gamers, video/graphics editors, office workers, or the average guy who wants to surf the web and play a bit of solitaire here and there. Today, Windows 10, Windows 8.1 and Windows 7 are the 3 most common versions of the operating system (Windows 10 being the latest, Windows 7 being the most common).
Windows in general supports most processors and motherboards based on the i386 (x86; 32-bit) or x86_64 (AMD64/EM64T; 64-bit) architectures. Put simply, most available consumer processors (especially from AMD or Intel) will work with the Windows 10 operating system, as well as most internal and external devices, including Wireless Receivers, Graphics Cards/GPUs, and Storage Devices.
For other hardware, see Microsoft's compatibility list.
GNU/Linux information and hardware support lists
As one of the most popular open-source (free) operating systems, GNU/Linux is a very good (and popular) alternative. Linux is a UNIX-like series of operation systems and comes in many different distributions (AKA "distros"), such as Ubuntu, Debian, openSuSE, Fedora, and Mandriva. Linux can perform many of the same functions as Windows and features similar programs. Linux is also much more flexible than Windows because it's open-source, making it developer-friendly. Some companies also sell versions of Linux with technical support.
Linux has versions for many different architectures, including i386, x64 and PowerPC. It also support all kinds of processors, enabling it to be used on Palm PCs and even iPods. There are many different versions of Linux, produced by different companies and organizations. These are called 'distributions' or 'distros' for short. For a desktop PC, you should make sure to pick a desktop distribution, one where the company/organization has desktop users in mind, e.g. Ubuntu, Fedora, or Mandriva. It should be noted, however, that many popular programs, especially games, are not available for Linux, and the only way to run them is with special compatibility layers or programs like Wine, which may or may not work with a specific program. Even if you manage to get a certain program running, you may still encounter issues in the program's emulation.
All this is important to bear in mind as different distributions will support different hardware (generally more 'bleeding-edge' distributions will support newer hardware – look at Fedora, SuSE, Ubuntu, compared to the latest stable release of Debian). A good rule of thumb to ascertain compatibility is to buy hardware that is 12 to 18 months old, as it most likely has Linux support with most distributions, but won't be too old. You may also buy newer hardware, and if it follows common standards (eg. x86, ISA, SATA), it should be supported.
BSDs information and hardware support lists
BSD, or the Berkeley Software Distribution, is also a UNIX-Like series of operating systems and could be considered the alternative to Linux (an alternative to an alternative?). Now, BSD is an open-source (free) operating system and has its own descendants, such as FreeBSD and OpenBSD. BSD Hardware Support is similar to Linux's - it can handle most hardware. Unlike Linux, however, BSD tends not to support "new" hardware (such as Core i7 and Xeon processors) but can handle a lot of both older and modern components. FreeBSD is also very compatible with many Linux applications as they are both UNIX-based and can be installed on a variety of platforms (even Xbox consoles!).
- DesktopBSD, see FreeBSD 5.4/i386 and FreeBSD 5.4/amd64
- Dragonfly BSD
- FreeBSD
- NetBSD
- OpenBSD
- PC-BSD, see FreeBSD 6.0/i386
Hackintosh
Hackintosh is a Windows-based computer which runs Mac OSX. This is extremely risky and could damage your whole motherboard if it is not done properly. Mac OSX is designed with Apple PC's in mind and trying to port them to a PC is risky and difficult. If you still want to attempt the same, read this.
- You should be using a comparable Intel CPU which should've been used by Apple in one of their computers.
- You'll need to find out which version of Mac OSX will work with the CPU. For instance, an Intel Core2Duo T7200 with GMA950 graphics is not supposed to run OSX 10.8 or later. Also using new Intel CPU's on a older version of macOS can cause kernel panics.
- Graphics also matter. Look up your CPU/GPU combination to see if it works.
- You'll be violating the Apple EULA.
- You'll need to (mostly) get modified installers, as the official installers may block installation.
- Only macOS 10.4 and higher can even run on Windows-based PC's, as OSX till then ran on PowerPC processors.
- You'll need patience and tinkering up with things if something goes wrong.
- A unsupported motherboard could be destroyed by Mac OSX
- Updating between releases could be difficult.
What will be the main function of the computer?
If you're going to build a computer from scratch for a specific purpose, you'll want to keep that purpose in mind when choosing your components; don't just go to the store or an online shop and start buying. Consider what you want to use the computer for, you may be able to save money by specifying expensive, premium parts only where needed.
Any reasonably configured computer built from current components will offer adequate Internet browsing and word-processing capabilities. For an office computer, this is often all that is needed. As long as you provide enough RAM for your chosen operating system (4 GB at least), any processor you can buy new will provide acceptable performance. If the computer is for gaming, a fast processor and the addition of a high-end graphics card (or two) and extra RAM will provide a more satisfactory gaming experience. Besides gaming, computers intended for video editing, serious audio work, CAD/CAM, or animation will benefit from beefier components which are specifically designed for that purpose.
Here are some general system categories. Your own needs will probably not fit neatly into one of these, but they are a good way to start thinking about what you are going to use your computer for. With each we’ve indicated the components you should emphasize when building the system and we've also included sample builds for each configuration, which you're free to modify it to fit your needs and budget.
Simple web surfer
To provide basic functionality to a user who just needs web surfing, a little word processing, and the occasional game of solitaire, it’s important not to go overboard. Such a user has no need for a top of the line processor or 3D graphics card. A modestly configured system with an adequate Internet connection will suit this user best and can be assembled quite cheaply.
This usage pattern is not going to stress any particular component; you should be looking at a mid - to low-level processor (historically, and currently, at about the $125 price point or less), enough RAM for the OS and a mother board with built in Ethernet, video and audio. You can use a mid-level case/power supply combo (these components are often sold as a pair).
If you have a little extra money, spend it on a better monitor, mouse/keyboard, and case/power supply in that order.
| Component | Low build | Average build | Higher/Extreme build |
|---|---|---|---|
| CPU | AMD X4-7500 | Intel Pentium G3450($70) | Intel i3-8320($149) |
| Graphics | Integrated | Integrated | AMD Radeon R5 |
| Hard disk | 320 GB HDD(5400 rpm) | 128 GB SSD | 256 GB SSD |
| RAM | 4 GB | 4 GB | 8 GB |
Office computer
An office computer can be expected to do word processing, spreadsheet and database work, network access, e-mail and a little light development of spreadsheets, databases, and presentations. It might also be called on to do page layout work, some 2D graphic creation, and/or terminal emulation.
None of this stresses any particular component either, but since office workers often run several applications at the same time, and because time is money in this space, a strong mid-level processor is suggested. Typically this would be the processor one or two places from the top of the line. Plenty of RAM will also facilitate multitasking and save time.
You will not need much in the way of 3D graphics power so current generation integrated graphics solutions from both AMD and Intel are perfectly adequate for office tasks. You should be aware that they will appropriate a portion of the system RAM for video duties thus reducing the total amount of RAM available for the OS and other programs so play accordingly and increase the total system RAM amount to compensate. Choosing the fastest operating frequency RAM your motherboard and budget can support will positively improve the performance of integrated graphics. If you decide that you need a dedicated graphics card after all, opt for an inexpensive model. A sub $75 (for this and other prices in US dollars see www.xe.com/ucc or other currency converter of your choice for conversion into your local currency) video card with 1 GB or more should be more than sufficient. However, do your research carefully because many inexpensive graphics cards actually have poorer performance than current generation integrated graphic solutions.
You’ll want a sturdy case (computers kept under desks get kicked by users and poked by cleaning staff) with a reliable power supply but nothing fancy. If you plan on keeping the system running nearly all the time, look for a power supply with a good reliability record. Any extra budget after the above should focus on a better monitor, better/more ergonomic mouse/keyboard and more RAM.
| Component | Low-end | Average | High end |
|---|---|---|---|
| CPU | Celeron G1850 | Intel i5-8400 | Intel i7-8700K2 |
| Graphics | Integrated | Nvidia GTX 1050 | Nvidia GTX 970/equivalent Quadro model1 |
| Hard Disk | 500 GB HDD(5400 rpm) | 256 GB SSD | 512 GB SSD |
| RAM | 4 GB | 8 GB | 16 GB |
1 - Nvidia Quadro(or AMD FirePro) models are generally intended for workstation models. While they cost quite more for the same graphics performance than their equivalent GeForce model, they are optimized for workstation programs and have a wider set of certified and approved drivers for these purposes. That said, most office users will be fine using a GeForce or Radeon(AMD) model.
2- For those who do not want to bother with overclocking, an i7-8700 could be a better choice and is slightly cheaper.
Server
A server these days can be anything from a home unit serving MP3's and homework files to the kids, to a machine running a business-critical system for a small business, to a 3u rack mount unit serving up millions of hits a day on the Internet.
The thing that most servers have in common is that they are always on and therefore reliability is a key characteristic. Also they serve more than one user while storing and processing important information. For this reason servers are often equipped with redundant systems such as dual power supplies, RAID 5 arrays of four or more hard disks, special server grade processors that require error-correcting memory, multiple high-speed Ethernet connections, etc.
All of this is a little beyond the scope of the current work, but, in general, servers need lots of RAM, fast redundant hard drives, and the most reliable components your budget will allow. The CPU choice should be made in accordance with the use of the server. A simple print/fax server will do fine with a CPU stolen from a museum, whereas a server running a database and a front end for that, will work much better with a top of the line CPU.
On the other end of the hardware list, since nobody is usually sitting at them, you can get away with the cheapest possible keyboard, mouse and monitor (in fact many servers run "headless" with no monitor at all). Graphics are also a very low priority on these machines, and a read only CD/DVD-ROM optical drive (used, infrequently, for installing software and updates) will do just fine. We're not including sample builds for this configuration because of the huge variety of possibilities.
Gaming system
We’re not talking here about the occasional game of solitaire or a secret late night Zuma obsession. We’re talking about cutting edge 3D gaming – first-person shooters or real-time strategy games with thousands of troops on the screen at the same time, with anisotropic filtering and anti-aliasing and mip-mapped specular reflections and a lot of other confusing terminology describing visual effects that will make anything less than a top-of-the-line system fall down on its knees and beg for mercy.
A top of the range processor is not critical to gaming performance (though it does help), but you will need at least a mid range one and plenty of RAM, as well as a motherboard to match, since the speed of the motherboard buses can limit high-end components. Please remember that if you plan on running the latest games in 1080p, or even higher, on highest settings, or even with three monitors, you will need a high end processor. This will stop the chances of bottle-necking the GPU (Graphic Processing Unit) and not give you the gaming experience you need. The most important part will be the video card (or cards) with cutting edge GPUs. AMD (formerly ATI) and NVIDIA have been competing for "king of the graphics card" honors for years and the competition is so keen that new cards running on new GPUs are released, it seems, twice a month.
If you want to run two or more screens, one option would be to run two cards in either Crossfire X (AMD) or SLI (NVidia). But this is expensive and not all motherboards support both company's methods, so do your research and buy the best current cards you can afford. Also be aware that not all types of Intel CPU's can work fully with CrossFireX or Nvidia. For instance, all consumer Intel i7's can utilize up to 16 PCI Gen3 lanes, with another 8 PCI Gen2 from the CPU(1/2 bandwith of x8 PCI Gen3). This essentially means that with these types of CPU's, running more than 2 graphic cards will be difficult as you may lose performance instead because there will not be enough bandwidth for the graphic card(you'll have to go for something like x4, x4 and x8), unless there is a PLX chip, which are not there in many motherboards. The Extreme i7 and the Xeons which do not use the same socket as the consumer products can utilize up to 40 PCI Gen3 lanes with an additional 8 PCI Gen2 lanes from the CPU. This is enough to fully power 4 graphics cards(at x8,x8,x8 and x16)
The other component which can offload some of the burden from your CPU is a good audio card. The DSPs (Digital Signal Processors) on the audio card can take over a lot of the sound processing and free up the CPU for other tasks. Currently Creative Labs and ASUS Xonar are the leading brands, but again do your research (partly by reading on) and get the best audio card you can afford. Some motherboards have audio cards already built in, though these are generally of lesser quality, depending on the quality of the motherboard.
Finally all of these components are going to require a pretty hefty power supply, particularly if you decide to run two graphics cards in Crossfire (ATI) or SLI (NVIDIA) mode, in which case make sure the power supply is rated for the dual-graphics card mode you choose. Generally a serious gaming rig will require at least a 500 watt supply; units are available up to 2000 watts (1.5 Kilowatts) and more being rare. Keep in mind that having a higher-rated power supply will not actually increase the power your computer draws. The rating is the maximum that the power supply is designed to provide. Get the best you can afford.
As you may have noticed, pretty much every component inside the computer needs to be top of the line; the same is true outside the case. You’ll want a big monitor, and a high sensitivity mouse. There are even gaming keyboards with the keys specially arranged, not to mention joysticks, throttle controllers, driving wheels, etc.
So, given that your budget is not bottomless, how do you prioritize? Well, the processor and video card are the components that will have the most effect on your gaming performance. Next comes the motherboard and RAM. If you use one instead of two or more video cards, you can also use a less expensive power supply. One of the advantages to building your own computer is that you can get the components you can afford now and plan to upgrade them later.
A note on cases for gaming rigs – it is not necessary to get a case with a side window that reveals glowing blue fans and revolving animated heat-sinks. A well-built plain case will do just as well and let you spend more money on the components that matter. But if you have the cash, and that’s your taste, there are lots of flashy add-ons available these days.
| Component | Budget build | Performance | Extreme |
|---|---|---|---|
| CPU | Intel Pentium G4560 | AMD Ryzen 5 1600X | AMD Ryzen 7 3800X |
| HDD | 1 TB 7200 rpm HDD | 512 GB SSD+ 2 TB HDD(7200 rpm) | 1 TB SSD + 4 TB HDD(7200 rpm) |
| RAM | 8 GB | 16 GB | 16+ GB |
| Graphics | Nvidia GTX 1050 | Nvidia GTX 1070 | AMD RX 5700 XT |
Entertainment system/media center
This is a computer designed to sit in the living room with the rest of your A/V gear. The idea is that it will record and serve audio and video files for replay via your existing television and stereo. The current notion is that this computer should be built in a special case that makes it look more like a stereo component, the size of which can present a challenge when it comes to getting all the necessary parts fitted.
For this system a mid-range processor will be fine, along with a generous amount of RAM. A fast Ethernet connection will facilitate sharing large files. You’ll also want a TV tuner card (or two) to get video in and out of the machine. Many of these also provide DVR (digital video recorder) functionality, often without the monthly subscription fees and DRM (digital rights management) restrictions required by companies like Tivo. A wireless keyboard and mouse provide for couch-based use and a separate monitor may be unnecessary as your TV will fill that role.
All components should be as quiet as possible since you'll likely be watching/listening in the same room. For this application it makes sense to trade a little power for passively-cooled (without fans) parts. Following this logic, one may consider fan-less CPUs and mainboards.
Workstation
A workstation was originally a single-user computer with more muscle than a PC intended to support a demanding technical application, like CAD or complicated array-based simulations of real world phenomena. The niche that these computers filled – between high end PC’s and low end minicomputers – has essentially evaporated. The serious scientific applications have migrated to clusters of PC's with near super-computer speeds, and end-user applications, like video editing, music production and CAD, run well on high-end PC's. One sector that still uses large workstation farms from Sun or Silicon Graphics is serious, Pixar-style animation.
For any of the following uses, you will need the fastest processor and the most RAM you can manage.
Video editing
Big and fast hard drives are key. Solid State Drives or 10000 RPM Raptors in Raid 0 as working space with multiple 1 Terabyte or larger drives for storage is a good target. SATA/600 is highly recommended and SCSI subsystems should also be considered. A large amount of memory (16 GB +) would be beneficial, as would a fast CPU, with many cores/threads, especially if you intend to render effects or wish to quickly transcode video. Most editing and transcoding programs utilize some form of GPU acceleration (primarily OpenCL and/or CUDA), where the graphics processor is used, along with the CPU, to perform many calculations at the same time, greatly reducing processing time, compared to CPU-only processing.
Music production
Plenty of disk space is important, you'll also want at least 2 GB of RAM, but a music production (recording and mixing) workstation is chiefly distinguished by specialized external components – studio reference monitors instead of normal speakers, mixing consoles, microphones, etc. If you want to record external sources, like vocals or instruments, you'll need an audio interface which allows you to plug mics or instruments into your computer.
Audio interfaces allow anything from a single microphone or instrument on up to pro level systems that have 32 or more simultaneous inputs. These separate inputs will allow you to record each one as a separate track in your DAW. Most use Steinberg's ASIO interface (a software driver that connects your hardware to your DAW software). If you don't wish to invest in anything other than the onboard sound card your computer comes with, consider ASIO4All, a free driver that imitates the ASIO framework for almost any sound card.
One piece of advice, if you have extra money, get better microphones - even if you have to trade the Bluesmobile.
CAD/CAM
(Computer Assisted Design / Computer Aided Manufacturing)
A CAD/CAM workstation is usually a machine that runs a single, very intense, application. These machines often utilize specialized video hardware, like the Nvidia Quadro series of GPU's, which are designed specifically for CAD/CAM rendering. Since these machines are usually devoted to a single, expensive, application it's especially important to pay close attention to the requirements of that application. Spec the hardware to support the software - always a good idea but especially important here.
Some examples of this specialized software are Autodesk 3ds Max, Autodesk Maya, AutoCAD, Cinema 4D and Maxwell Render amongst many others.
Do I plan on overclocking my computer?
Overclocking consists of running components at faster internal speeds than they are rated for. If you are serious about overclocking your computer, you need to do extensive research into the components you select, as some parts respond to overclocking better than others. Processors that respond well to heavy overclocking are generally not very expensive (though overclockable memory is), but the price of a component is by no means a guarantee of its overclocking potential. Overclocking usually voids your warranty and is risky (you can destroy your entire computer), so be warned! You need to think hard about cooling the computer as overclocking generates heat. Anything from a few extra fans to a liquid-cooled system may be necessary depending on the nature of your system.
For Intel CPU, as of Kaby Lake-R, only the K series CPU's(which cost about 20-40 $ more than the equivalent non-overclockable variant) and the Extreme Series generally allow full overclocking, while others have limited(Turbo Boost) or none. Examples are i7-4770K, i5-6600K or i7-5960X. The cheapest Intel CPU overclockable is Pentium G3258, and there are no overclockable Celeron versions. Some processors(within the same model!) may be able to overclock higher or lower. For example, a good Haswell 4770K chip can clock up to about 4.6 Ghz, an excellent one may be able to hit 5 Ghz, while a bad one may stop at 4.3 GHz(assuming that all use the same cooling method). It's all luck of the draw - some vendors even sell pre-binned CPU's which have been previously tested to overclock well.
Do I plan on underclocking my computer?
This can be ideal for always-on entertainment systems. Underclocked parts run cooler, often enabling passive cooling options to be used, which leads to a much quieter system, and you'll also save on power.
However, you'll lose performance from the CPU. You may wish to undervolt the CPU instead; see the /Silencing section to find out how.
Can I use any of the parts from my old computer?
This depends on your situation; if your computer is more than four years old, chances are that most of the parts will be too old, slow or incompatible for your new machine. On the other hand, if you are upgrading from a fairly new machine, you may be able to use many of the parts. All of this assumes the old computer will no longer be used. If you, or someone else, is going to continue using your old computer, it's probably best just to leave it intact.
One important point – if you are selling your old computer it's a good idea to erase the hard drive before giving it to its new owner. Special precautions must be taken to ensure that you are not giving away your sensitive or personal information. Don't forget that a simple 'delete' command does not actually erase the data on your hard drive. The original data will still be present and can later be recovered by someone else using special programs and/or equipment. To avoid this, programs are available that will effectively 'shred' your data, making it unrecoverable. Driver floppies or CD's that come with some hard drives may also have programs to do this, that write 0s or 1s (either way, "blankness") to the whole drive. Lower-tech approaches include drilling a few holes in the drive or taking a blowtorch to it. Obviously, either prevents it from being used again (Be planet friendly and try to avoid this).
Since monitor technology moves quite slowly, you can probably keep your current monitor and use it on the new computer if it's of sufficient size and clarity for your work. The same can go for keyboards, as well as mice, printers, scanners, and possibly speaker sets. On the inside, you may be able to take out the floppy drive, CD-ROM drive, and possibly the sound card and hard drive (depending on how good they are, of course). Sometimes so much is used from the old computer, that the line between an upgrade and a new computer can become blurred.
Reusing a hard drive is an easy way to keep data from your old computer. With most Windows operating systems moving a boot drive from one motherboard to another will entail a series of reboots and installation of new drivers. Back up your data before trying this, and note that Windows will usually ask you to reactivate. Keep the licence key ready.
Where do I find the parts?
Once you have decided what you’re going to use your computer for, and have reviewed which parts are available for reuse, you should make a list of what components you will need to buy. A few hours of research can save you years of regret, so make sure that the computer you build will do what you need it to do.
Computer terminology can be confusing, so if there are terms you don’t understand, be sure to look them up. Wikipedia is an excellent place to start if, for example, you’re not clear on the difference between, say, DDR3 and DDR4 memory.
There are several places to buy parts:
- Internet retailers generally offer the best price for new parts. If a part needs to be returned, you may be stuck for the shipping; check return policies before you purchase.
- Auction sites like eBay and several others offer very good prices for used parts. This is especially useful for parts which do not wear out. Returns can be problematic or impossible. Some auctions may not be legitimate. Always check the shipping cost before you bid.
- Local PC shops - Their prices are often higher, but they may make up for this by providing a lot of expertise. Get opinions from other sources, however, as they may be eager to sell you parts you don't need.
- Big local retailers often lack technical expertise and charge higher prices, but can be useful because they usually handle returns quickly. Also good if you need something right away.
- Trade shows that occur from time to time also provide a good place to shop, as the prices are often significantly reduced, and the variety of prefabricated computers built towards specific computing needs tend to be higher.
Also, your local town dump may have a special section for computers and monitors that others have got rid of. These can be more or less brand new computers with trivial problems such as a busted power supply or faulty cables. Of course if the dump does have such a section, you should ask permission of those in charge. They're usually glad to let you go through it, but don't leave a mess. Taking advantage of this can yield incredible finds, with a price tag of nothing or very little.
OEM vs Retail

Many hardware manufacturers will sell the same components in both OEM and Retail versions. Retail hardware is intended to be sold to the end-user through retail channels, and will come fully packaged with manuals, accessories, software, etc. OEM stands for "original equipment manufacturer"; items labeled as such are intended to be sold in bulk for use by firms which integrate the components into their own products.
However, many online stores will offer OEM hardware at (slightly) cheaper prices than the corresponding retail versions. You will usually receive such an item by itself in an anti-static bag. It may or may not come with a manual or a CD containing drivers. Warranties on OEM parts may often be shorter or nonexistent, and sometimes require you to obtain support through your vendor, rather than the manufacturer. OEM components are also sometimes specified differently than their retail counterparts, parts may be clocked slower, and ports or features may be missing. Some of the support may be less (as in the case of Microsoft). Again, do your research.
What should affect the choice of any part/peripheral?
Many things should be taken into account when deciding what parts to buy. Below are some things to consider.
Compatibility
You’ll want to make sure that all the parts you buy work together without problems. The CPU, the motherboard, and the RAM in particular must be compatible with each other. Check the motherboard manufacturer's web site; most will list compatible RAM and processors. Often quality RAM that is not on the approved list (but is of the proper type) will work anyway, but the manufacturers list of processors should be rigidly adhered to.
Again, you’ll also want to make sure that your operating system supports the hardware you choose. Windows is supported by almost everything, though watch out for older components if you're planning on using Windows 10. If you have any interest in running Linux, macOS or another operating system now or in the future, buy parts that are supported by that OS (Operating System). It is also worth checking around the Internet to make sure there is no history of your chosen components clashing (e.g. certain combinations of hardware causing instability, crashing, etc.)
It is worth noting that Intel Kaby Lake or AMD Ryzen CPU's aren't supported on Windows 7 or 8.1; while they should install, Windows updates are blocked for those computers.
Ergonomics
Ergonomics is the science of designing things so that they work with the human body. This is obviously important when choosing peripherals such as a keyboard or mouse but should also be considered when selecting a monitor, and especially when setting up the computer for your use. If your wrist hurts or you’re getting a crick in your neck, look at the physical setup of your computer, check your chair height and posture. An ounce of prevention here can avert troublesome repetitive strain injuries. Learning to type without looking down at the keyboard is very useful for avoiding neck strain.
Operating temperature
Modern components, notably processors, GPUs, RAM, and some elements on the motherboard, are very small and draw a lot of power. A small area doing a lot of work with a lot of power leads to high temperatures. Various factors can cause electronic parts to break down over time and all of these factors are exacerbated by heat. Very high temperatures can burn out chips almost instantly, while running hot can shorten the useful life of a part, so the cooler we can make these parts, the better.
If you are not going to overclock your system, stock air cooling, when paired with a good case with adequate fans, should be enough to keep your system cool. If you want a quiet computer then components designed for passive (fan-less) cooling can be paired with very low noise case fans (or a well-vented case). In general, high-end parts will require more attention to cooling.
To keep your system at a proper operating temperature, you can monitor vital components with software (which usually comes with your motherboard). If you are seeing high temps, make sure the interior of your case is dust free, and remember that most cooling solutions can not reduce the temperature of your computer parts below room temperature. Of course, unless you happen to have your computer outdoors in a climate such as the Sahara, room temperature will be well within the thermal limits of any component on your computer.
Which brings us to overclocking. It's specialty cooling solutions that make overclocking possible, a processor that might run stable at a maximum of 3.3 GHz at 60C could hit speeds as high as 5 GHz with specialized cooling systems. A sensible person wanting a 20% overclock could add a special fan/heatsink to his CPU and some extra case fans. An enthusiast seeking a major overclock might go with a water-cooling solution for the CPU and GPU and sometimes other chips. The real fanatics have been known to use liquid nitrogen or total immersion in pure water or oil. You should not try any of the more extreme solutions unless you really know what you're doing.
Price
Today, there are a wide array of hardware components and peripherals tailored to fit every home computing need and budget. With all these options to choose from, it can be a bit overwhelming if you've never bought computer parts before. Shop around and remember to factor in shipping and handling, and taxes. Some places may be priced a bit higher, but offer perks such as free shipping, limited warranties, or 24-hour tech support. Many websites, such as CNET and ZDNet offer comprehensive reviews, user ratings, and links to stores, including price comparisons.
Since prices for any given part are always falling, it’s tempting to just wait until the part you want goes down in price. Unfortunately the reason prices decline is that better/faster parts are coming out all the time, so the part you want this year that costs $500 may well be $300 next year, but by that time you won’t want it any more, you’ll want the new, better part that still costs $500. At some point you’ve got to get on the bus and ride, even if the prices are still falling.
Usually the best bet is to buy just behind the bleeding edge, where, typically, you can get 90% of the performance of the top of the line part for 50% or 60% of the price. That last 10% is very expensive and if you don’t need it, you can save a lot of money with the second-tier part.
It's a good idea to think about future upgradeability when selecting some components. While the computer that you're building today may be fine for your current needs you may want to upgrade it later. So look for components that support the newest standards and have room for future expansion, like a motherboard that will allow you to fit more memory than you are planning to use, or a case that has room for extra hard drives. If your current machine is maxed out the only possible upgrade is often a new machine.
You may also find that by over-specifying in some areas you can save money on others, e.g. if you don't currently need fantastic sound but you do need IEEE1394 (Firewire, iLink) then you might want to purchase a sound card anyway as some of the higher end sound cards also have a IEEE1394 port.
Performance
If money is no object, this is an easy question; just buy the most powerful components you can find. If, like most of us, there are limits to what you can/want to spend, then focus on those areas where more powerful parts will pay off for you and scrimp on others. Always look for that sweet spot on the price/performance curve where you get the most bang for your buck.
Primary components
These are the components that will be the core of your new computer. It is impractical to put together a PC compatible computer without these components and a bare set of peripherals.

1 Monitor
2 Motherboard
3 CPU (Microprocessor)
4 ATA sockets
5 Main memory (RAM)
6 Expansion cards
7 Power supply unit
8 Optical disc drive
9 Hard disk drive (HDD)
10 Keyboard
11 Mouse
Chassis (case) & power supply
In earlier eras most cases were beige, and since most components drew far less power than similar components do now, power supplies received little attention. Recently, however, cases for the home market have become considerably more elaborate, with lights, side windows, glow-in-the-dark cables and other shiny/glowing embellishments. Cases now come in a plethora of styles and colors to suit anyone's taste. And as current components require much more power, power supply quality and size is an important issue.
If you are only building an office computer, the style of case will be of little concern to you. You might want an inexpensive ATX case (ATX is a specification which refers to the size of the motherboard. Any ATX motherboard, and the parts designed therefore, will fit in any ATX case), and an inexpensive power supply as you won't be running a high-end processor or graphics card. As a guide, you’ll want a power supply with a rating of more than 300 watts; any less won’t reliably power modern components. Most case/PSU bundles are adequate, but tend to feature a lower quality power supply than those that are sold separately from cases. If possible, avoid power supplies with sleeve bearing fans, as these are of considerably lesser quality.
Before purchasing any PSU, make sure that the supplied wattage is sufficient for your components. Power requirements are usually listed in the manuals that came with your components. It is important to note a power supply's total power, and the power at each voltage: 3.3, 5 and 12V. If any of these do not meet your requirements, the rest of the specifications don't matter.
Some companies have calculators to help you determine what your power supply needs are; if you are the type to just plug in the numbers without reading the details, you should buy a power supply that is 1.5 to 2 times the wattage that results from these calculators.
For a quiet system, you can choose a fan-less power supply -- more expensive but well worth it if noise is a concern, but be sure to monitor system temperatures to make sure cooling is adequate.
For cases and power supply here are some things to consider:
Form factor
Form factor is the specification that provides the physical measurements for the size of components and where mounting devices for them are located.
- EATX or Extended ATX boards are 12"x13". This format is almost exclusive to workstation computers.
- ATX is the most common form factor and is the de facto standard. In this form factor the motherboard is (usually) vertically mounted for more space and more efficient cooling than some other standards.
- microATX, or µATX, is smaller than standard ATX, but at the cost of fewer expansion slots. Many cases that support ATX also allow micro-ATX. Flex ATX is even smaller than micro-ATX, but only allows 2 expansion slots.
- WTX is intended for workstations and servers. Note: WTX has been discontinued as of 2008.
- BTX is another formfactor designed for more efficient cooling.
- PicoBTX 8"x10.5"
- MicroBTX up to 10.4"x10.5"
- BTX up to 12.8"x10.5"
- Mini-ITX is even smaller than BTX, at 6.75" square.
- NLX
Many OEM computers use non-standard form factors. Be sure to choose a motherboard compatible with your case's form factor.
The Mini-ITX form factor is much different in important ways unlike its relatives the Micro-ATX and the Flex-ATX. The mainboard size can be up to 170mm x 170 mm which is smaller than the Flex and Micro-ATX can be. Usually at less than 450 watts, the Mini-ITX PSU is energy efficient(but you may not be able to use high power GPU's and to a lesser extent, CPU's). The Mini-ITX is also backward-compatible with the Flex/Micro-ATX models
Number of storage drive spaces
Internal hard drives take up space in the case, so make sure you consider how many drives you will need and what size slot they require. Note that optical drives and floppy drives will need what are called "external" slots (meaning they have a hole in the case through which their face can be accessed), while hard drives do not need to be manipulated manually often, so they can usually go into an "internal" slot. This is not to be confused with an external drive, which doesn't go into the case at all.
Note that it's possible to buy adapters to fit items that go in small bays (usually hard drives) into large bays. It is, however, not possible to do the reverse.
Power rating
The power supply unit (PSU) you choose needs to supply enough stable DC power to all the components and even to some of the peripherals. It needs also to be consistent, by complying with accurate standard voltages, i.e. the 12 volt rail needs to supply 12 volts (within normal tolerances of 10% or so) steadily under any foreseeable load, likewise the 3 and 5v rails at their respective voltages. Cheap power supplies tend to fall down in these areas. There are several tech-heavy websites that actually throw a multimeter on the PSU in the course of a review, seek these out and make sure you select a quality PSU.
In selecting a power supply, check carefully that it has the power feeds you need, e.g. six-pin PCI power, 20 vs. 24-pin motherboard connectors, etc. If you are planning on running two or more video cards in SLI (NVIDIA) or Crossfire (AMD) mode, make sure your power supply is approved for that. Both companies have certification programs.
There are several calculators that try to help you select an adequate PSU for your system, such as:
Choose an efficient PSU. Efficient PSUs run cooler and more quietly and thus do not create as much noise (important if you plan to sleep (or think) in the same room with it or use it as a media center PC). They also reduce the wastage on energy.
If your budget allows, consider opting for a modular PSU. These have connectors that can be added or removed, which allows for more versatility and also reduces clutter. The power supply also has an exhaust fan that is responsible for cooling the power supply, as well as providing a hot air exhaust for the entire case. Some power supplies have two fans to promote this effect.
It is important to buy a power supply that can accommodate all of the components involved. Some may argue that it is the most important part of a computer, and therefore it is worth spending the money to get a decent one.
More information about this can be found at Silent PC Review, OCAU Wiki, among others.
Fans
.jpg)
Most cases mount one or more case fans, distinct from the fans that may be attached to the power supply, video card and CPU. The purpose of a case mounted fan is to move air through the system and carry excess heat out. This is why some cases may have two or more fans mounted in a push-pull configuration (one fan pulls cool outside air in, the other pushes hot interior air out). The more air these fans can move, the cooler things will generally be.
Fans for case cooling currently come in two common sizes, 80 mm and 120 mm, and computer cases tend to support one size or the other. The larger 120 mm fans spin more slowly while moving a given volume of air, and slower fans are usually quieter fans, so the 120 mm fans are generally preferred, even though they cost a little more. Good 80 mm fans can still be fairly quiet, so while fan size is a factor, it shouldn't be a deal-breaker if the case has other features you like.
Make sure the power plug on the chosen case fan is supported by your motherboard; 3- and 4-pin Molex connectors are common. Fans can also be powered directly by the PSU, but in that configuration, the motherboard can't control or report the fan's speed.
Variable speed fans with built-in temperature sensing are available, but they may need to be specially ordered from an electronics supply warehouse. They also may not have power plugs attached to their wire leads, but this can be remedied by a competent technician. Variable speed fans tend to run quieter than constant speed fans, as they only move as much air as needed to maintain a set temperature within the case or the power supply box. Under typical operating conditions they may be barely audible.
Since fans run continuously when the computer is turned on, bearing selection may be important for long life. The least expensive fans use sleeve bearings. As the fan ages, the lubricant in the sleeve bearing dries out and eventually the bearing wears, allowing the fan blade to nutate or vibrate, making it very noisy. In severe cases the bearing may seize and the fan will stop turning entirely, possibly jeopardizing the computer when ventilation fails. The most expensive fans tend to be those that use ball bearings, but they also have very long service lives. It isn't uncommon for a ball bearing fan to run continuously for 7 to 10 years — possibly longer than the useful technological life of the computer within which it is mounted. Ball bearing fans tend to be slightly noisier than sleeve bearing fans. A fairly recent type of fan bearing is a magnetic or "maglev" bearing, which uses a magnetic field to suspend the fan rotor without physical contact. Such fans exhibit practically zero bearing wear and barring a failure in their motor drive components, have essentially an infinite service life. Maglev bearings also tend to be completely silent, and when used in a variable speed fan, can produce practically silent ventilation.
CPU (processor)
We discuss choosing a CPU in the next chapter, How To Assemble A Desktop PC/Choosing the parts/CPU.
Motherboard
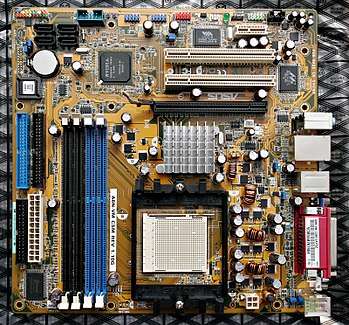
The motherboard is a very important part of your computer. The difference between a cheap and a quality motherboard is typically around $100. A good motherboard allows a modest CPU and RAM to run at maximum efficiency whereas a bad motherboard restricts high-end products to run only at modest levels.
There are six things one must consider in choosing a motherboard: CPU interface, Chipset, IDE or SATA support, Expansion slot interfaces, and other connectors. One must also make sure that the motherboard is of a form factor compatible with the case.
CPU interface
The CPU interface is the "plug" that your processor goes into. For your processor to physically fit in the motherboard, the interface must be an exact match to your processor. Intel currently has two mainstream formats, the LGA 2011-v3 for their current i7 Extreme/Xeons processors (i7-5820K or i7-59xx) or the LGA 2011 supporting their older (cannot be interchanged)high-end Core i7 39XX and 49xx CPUs (as well as Xeon CPUs for servers), the LGA 1151 for the current generation desktop Core i5 and i7 series, and LGA1151/5 for the older processors. AMD currently uses four sockets: AM3+, AM3, FM1, and FM2. The AM3 and AM3+ sockets are compatible with DDR3 RAM. The FM1 and FM2 sockets are used for AMD's line of A-series APU processors, which are also compatible with DDR3.
Check with the motherboard manufacturer to ensure that the slot on the motherboard will support the CPU you want to use. It is important to know whether the motherboard's bus can support the exact CPU you plan on using.
If the motherboard, CPU, and heatsink/fan are not compatible and installed correctly, you can destroy the CPU and/or the motherboard in a matter of seconds. Most modern processors come with a stock cooling fan which will work well at stock speeds, stick with this if you have any doubts.
Chipset
The function of BIOS is highly important. Some BIOS feature crash proof functions essential for updating the firmware. Other motherboards allow BIOS control of overclocking of CPU, RAM and Graphics card which are much more stable and safer for overclocking. Newer BIOS have temperature controls, and functions that shut down the computer if the temperature gets too high.
The CPU chipset is also important. Some low-end motherboards use cheaper chipsets (low-end). These have limited ports and features.
For instance, take the support of SATA 3 and USB 3 ports. The low-end H81 chipset supports only 2 of these, while the high-end Z97 supports 6 of them.
IDE (ATA) or SATA interface
Used for connecting hard and optical drives, most motherboards used to have two parallel, 40 pin IDE interface connectors which are now mostly used for backwards compatibility if they are present. These old PATA (parallel ATA) connections have been largely replaced by SATA (Serial ATA) connections for hard drives and optical drives. SATA connections are simple - one plug, one cable, one device.
In the older PATA/IDE standard up to two devices could be connected to each port in a Master/Slave configuration. A 44 wire ribbon cable was used for this connection with three connectors, one on each end and one in the middle (actually slightly off center). One end was plugged into the motherboard connection and the other end plugged into the first (or only) device. If two devices are connected the second is connected to the middle connection. The device plugged into the end must be configured as a master (usually via a jumper on a set of pins on the device) while the second must be configured as a slave – OR both must be configured as “cable select”.
Two devices connected on the same IDE port can contend for access to the bus, causing a reduction in the effective speed of the drives. The newer serial ATA (SATA) interface has four or more separate motherboard connections that allow independent access and can increase the speed at which hard drives work. The cables are also narrower, improving the flow of air inside the case.
Expansion slot interfaces

Due to the evolution of new graphics cards on the serial PCI-Express Technology, current newer motherboards have the following connections:
- PCI-Express(Gen 1/2/3) 16x/8x/4x for mainstream graphics cards (PCI Express Gen 1 x16 is 4 times speed of AGP 8x)
- PCI-Express(Gen 1/2/3) 1x for faster expansion cards (replacing older PCI)
Other connectors

- Universal Serial Bus (USB)
- In addition to the USB 2.0 ports provided on the back panel, most motherboards will have connectors for additional ports, either on the front of the case or in a panel that fits where a PCI card might otherwise be connected. USB 2.0 ports (and be sure that your chosen motherboard supports the faster 2.0 standard) are used for connecting various peripherals such as printers, external hard drives etc. USB connectors are also used for connecting MP3 players, some cameras and an assortment of less serious devices like fans, Nerf missile launchers and drink warmers. Given the growing popularity of USB devices, the more ports your motherboard supports, the better.
USB 3.0 ports are now available on the majority of motherboards and they are even faster than USB 2.0 — up to 5 Gbps. Although the majority of keyboards, mice and other such devices use USB2, almost all HDD's available now support the USB 3.0 standard as they are much faster under that.USB 3.0 ports are backwards compatible and can be used with USB 1 or 2 devices, although these will not receive the benefit of USB 3.0 speeds.

- Serial (COM) or parallel (printer) ports
- Use of traditional 25-pin subminiature D parallel printer ports and RS-232 9-pin subminiature D serial ports has been waning since the early 1990s since the introduction of the Universal Serial Bus. Many motherboards no longer offer parallel ports — formerly used almost exclusively for connecting printers — altogether, while serial ports, which once numbered as many as four, are now usually solitary. The principal use for serial ports once was to connect to a mouse or an external modem; both of these devices now connect via USB. Unless you are connecting old peripheral hardware, these ports will be of minimal importance. Even so, USB-to-Parallel and USB-to-Serial adapter cables are available, allowing late model computers to communicate with older peripherals.
Note that, regardless of the motherboard's native support, additional ports of all kinds can always be added via a PCI or PCI-E 3 expansion card.
Memory
The amount of random access memory (RAM) to use has become a fairly simple choice. Unless one is building on a very restricted budget, one just has to choose between installing 4 or 8 gigabytes. 4 gigabyte of RAM is plenty for most modern operating systems, but all of them will run a little faster with 8 or 16 gigabytes. While 32-bit operating systems can address 4 gigabytes, they can utilize little more than three gigabytes as system RAM (actually 4 gigabytes minus Video RAM minus overhead for other devices). If one wishes to utilize the full 4 (or more) gigabytes of RAM, one needs to install a 64-bit operating system. It really comes down to a financial decision. Some specialized applications may profit from more than 8 gigabytes of RAM. If one plans on using such, make sure to check that both the operating system and the motherboard will accommodate the amount of RAM one has in mind. One might also choose to get 4 gigabyte of high quality RAM over 8 gigabytes of lesser quality, especially if one plans to overclock, though that is quite rare now.
Another thing to consider when choosing the amount of RAM for one's system is the graphics card. Most motherboard-integrated graphics chips and PCI Express graphics cards marketed with the "Turbo Cache" feature will use system memory to store information related to rendering graphics; this system memory is generally not available at all to the operating system. On average, these graphics processors will use between 64 megabytes and 512 megabytes of system memory for rendering purposes.
The actual type of RAM one will need depends on the motherboard and chipset one gets. Old motherboards use DDR (Double Data Rate) RAM or DDR2. DDR4 is the current industry standard. Chip sets that use dual-channel memory require one to use two identical — in terms of size and speed — RAM modules.
For older motherboards (ones before the Core i series), the RAM should usually operate at the same clock speed as the CPU's Front Side Bus (FSB). The motherboard may not be able to run RAM slower than the FSB, and using RAM faster than the FSB will simply have it run at the same speed as the FSB. Buying low-latency RAM will help with overclocking the FSB, which can be of use to users who want to get more speed from their systems. This won't apply for motherboards using Core i series, as the Front Speed Bus has been replaced with QPI(QuickPath Interconnect).
If one is upgrading an existing computer, it is best to check if one's machine requires specific kinds of RAM. Many computer OEMs, such as Gateway and Hewlett-Packard, require custom RAM, and generic RAM available from most computer stores may cause compatibility problems in such systems.
Overclocking of RAM is possible, but you will have to keep the same precautions(actually more) for RAM. If your RAM temperatures get too high, they can get damaged. For this purpose, there are dedicated RAM coolers that can be used, but most will not find any need for them. The benefit of overclocking RAM, unlike overclocking your CPU, is limited to a few applications.
Labeling of RAM
RAM is labeled by its memory size in megabytes (MB) and clock speed (or bandwidth).
For example,
- DDR4-2133 8 GB is a 8GB DDR4 stick running at 2133 MHz
- DDR3L-1600 4 GB is a low-power DDR3 stick running at 1600 MHz. Commonly seen in laptops, but also seen in some desktops.
DDR RAM has 4 versions: DDR (also DDRI), DDR2 (or DDRII), DDR3 and DDR4. DDR and DDR2 are currently obsolete.
- DDR4 supports DDR4-2133 and higher.
- DDR3 supports DDR3-1333 to DDR3-3000(generally overclocked).
Hard drive and SSD

Things to consider when shopping for a hard drive or SSD:
- Interface
- The interface of a drive is how the hard drive communicates with the rest of the computer. The following hard drive interfaces are available:
- Parallel IDE drives (PATA, also known as ATA or IDE) use cables that can be distinguished by their wide 40-pin connector, colored first-pin wire, and usually gray "ribbon" style cables. This technology is largely obsolete because SATA uses thinner cables, eliminates contention for the IDE bus that can occur when two PATA drives are attached to the same connector, and promises faster drive access. SSD's are generally not available for IDE, as they are too slow for a SSD(one notable exception is Transcand as of November 2014).
- SATA drives have the advantages outlined above. If you want Serial ATA, you will either need to purchase a motherboard that supports it (all newer motherboards do), or purchase a PCI card that will allow you to connect your hard drive. Note that some older motherboards will not allow you to install Windows XP to a Serial ATA hard drive. There are 3 types of SATA. SATA 1 provides up to about 150 MB/s, SATA 2 provides about 300MB/s, SATA3 provides up to about 600 MB/s. Most new computers and HDD's come in SATA 3, but older computers may use SATA 2/1. Although they are both backwards and forward comparable, SSD's should be used in SATA 3 since they are too fast for SATA 2 or 1.
- SCSI, although more expensive and less user friendly, is usually worthwile on high performance workstations and servers. Few consumer desktop motherboards built today support SCSI, and when building a new computer, the work needed to implement SCSI may be outweighed by the relative simplicity and performance of IDE and SATA. SCSI hard drives typically reach rotational speeds of up to 15,000 RPM, and are more expensive.
- USB can be used for connecting external drives. An external drive enclosure can convert an internal drive to an external drive.
- PCI-E uses the PCI lanes of your computer. These lanes can be used to connect premium SSD's, and they are much faster than SATA-based SSD's.
SSD
SSD is a hard storage systems that use flash memory rather than rotational platters. Because of this, they make virtually no noise and generate far lesser heat than a HDD. If you plan to upgrade a computer, it is an excellent idea to replace an HDD with an SSD as the performance of the computer can be boosted by a wide margin. However, there are some important drawbacks.
- They are significantly more expensive than a comparable HDD.
- SSD sizes top out at about 2 terabytes, while comparably, for HDD, it is about 8 TB.
- They cannot last forever. The majority of SSD's use NAND cells, which will wear about after a certain amount of writes. However, this problem is mitigated to a lot of extent by using technologies so that all cells wear out at the same time. Also, good SSD's have huge data life (150 TB) and high warranty period(10 years).
There are some important precautions to note if you do buy a SSD.
- Do not defragment the drive! SSD, unlike HDD, does not need to get defragmented and will instead cause unnecessary writes and can wear out the drive faster. If you do use a SSD in a Windows OS before Windows 7, make sure to disable automatic disk defragging. Newer Windows versions already identifies the drive and makes necessary optimizations.
- Use SATA 3. As outlined above, using SATA 2 or below reduces speed. If you can afford it, go for a PCI-E SSD as they are faster.
- Cache
- The cache of a Hard drive is a faster media than the hard drive itself and is normally 8MB (low end and laptop drives), 16MB, 32MB (standard desktop drives), or 64MB (high end, high capacity desktop drives). The existence of a cache increases the speeds of retrieving short bursts of information, and also allows pre-fetching of data. Larger cache sizes generally result in faster data access.
- Form factor
- 3.5 inch drives are usually used in desktops.
- 2.5 inch drives are usually used in laptops.
A 2.5 inch disk can be used in desktops using adaptors, but not vice-versa.
- Capacity
- The smallest desktop drives that are widely available hold about 160 gig of data, although the largest drives available on the market can contain 6TB (6072GB). Note that the advertised capacity is usually more than the actual size due to the binary differences in calculation. Few people will need disks this large - for most people, somewhere in the range of 300-750GB will be sufficient. The amount of space you will need can depend on many factors, such as how many high-end games and programs you want to install, how many media files you wish to store, or how many high-quality videos you want to render. It is usually better to get a hard drive with a capacity larger than you anticipate using, in case you need more in the future. If you run out of space, you can always add an additional hard drive using any free IDE or Serial ATA connector, or through an external interface, such as USB or FireWire.
- Rotational Speed
- The speed at which the hard drives platters spin. Most laptop (2.5 inch) drives spin at 5400 RPM, while common desktop drives come in at 7200. There are PATA and SATA drives that spin at 10,000 RPM and some SCSI drives hit 15,000. However drives above 7,200 RPM usually have limited capacity, and a much higher price than comparable 7,200 RPM drives, making such drives advisable only when the fastest possible speeds are required. SSD's do not have rotational components.
- Noise and Heat
- Modern hard drives are fairly quiet in operation though some people are sensitive to the faint hum and occasional buzz they do make. If your HDD is loud, it’s time to think about replacing it. Hard drives will also throw some heat and adequate air circulation should be provided, usually by case fans. There is software available that will allow you to monitor both the health and temperature of your hard drive(s), it’s a good idea to check from time to time. SSD's do not generate noise and heat as HDD does because they have no rotational parts. Try not to heat the HDD above 50 C.
- Warranty
- Many manufactures offer warranties ranging from 30 days (typically OEM) up to five years. It may be worth spending an extra few dollars to get the drive that carries a longer warranty. Good quality SSD's can provide up to 10 years warranty (like Samsung 850 Pro).
Secondary components
These components are important to your computer, but are not as central as the Core Components.
Video output
Some form of video output must be provided by the hardware of a computer as to permit the use of an image display. The majority of home and office computers, which predominantly use 2D graphics for office applications and web surfing can use an 'onboard' or integrated graphic processor which will be included on most low to mid range motherboards. For gaming, or 3D modeling, a good quality graphics/video card may be needed and relying on one will undoubtedly permit a simpler upgradeable path. Then there is also high computational tasks from running physics models to process large blocks of data has created a move towards modular Graphical processors units (GPU) that can even be stacked to grant more power, a trend that predates even multiple core cpus.
Currently, two companies dominate the 3D graphics accelerator market; nVIDIA and AMD (formerly known as ATI). nVIDIA and AMD build their own graphics products, and license their technologies to other companies. Both companies make a complete line of cards with entries at every price/performance level, and each brand has its own supporters. Video cards have their own RAM, and many of the same rules that govern the motherboard RAM field apply here: to a point, the more RAM, and the faster it is, the better the performance will be. Most applications require at least 1 GB of video RAM, although 2 GB is rapidly becoming the new standard. On the other end, 4GB to 8GB video cards top the consumer end of the video card market. As a rule of thumb, if you want a high end video card, you need a minimum of 2GB of video memory -- preferably 4GB. Don't be fooled, though; memory is only part of the card and the actual video processor is more important than the memory.
It is generally better to choose your video card based on your own research, as everyone has slightly different needs. Many video card and chip makers are known to measure their products' performances in ways that you may not find practical. A good video card is often much more than a robust 3D renderer; be sure to examine what you want and need your card to do, such as digital (DVI) output, TV output, multiple-monitor support, built-in TV tuners and video input. Another reason you need to carefully research is that manufacturers will often use confusing model numbers designed to make a card sound better than it is to sell it better. For example, the NVIDIA GeForce GT series claim to be part of the current line up (as of June 2018, the 1000-series of cards), however, they are inadequate for modern gaming, in many cases, and perform much closer to old, mid-end 600 and 700 series cards than to the GTX 900/1000 series cards.
Newer technologies such as SLI and Crossfire allow the use of two (theoretically 4) video cards to render the same video scene, similar to using two physical CPUs. These systems tend to be expensive, as only some video cards offer this option, and you'll need two of them. However, it can be a useful upgrade path to consider. A SLI-capable motherboard is usually not much more expensive than the regular model, and will work fine with a single video card. You can use it with one card now, and buy another one in the future (which will probably be much cheaper by then), which means you will take advantage of your old video card too. If you do plan to use 2 graphics cards, make sure that your PSU is up to the task by making sure that it has enough power and also making sure that it has the requisite ports required.
If you have a CPU that does not have a graphics processor (like Haswell Extreme (Intel) or AMD Ryzen), then you will need to buy a discrete video card (otherwise your computer will simply not work!). If your tasks are likely to be CPU-intensive, you should be able to get away with an entry-level GPU.
Interface
There are two different current graphics card interfaces: integrated and PCI-Express.
Most retail computers will ship with an integrated graphics card. It is important to understand that an integrated graphics card uses the system's RAM, and relies heavily on your system's CPU. This will mean slow performance for graphic-intensive software, such as games. Most motherboards that have integrated graphics will also have one of the other three slot interfaces available so it isn't hard to place a new card to suit your needs if the need ever arises.
Current graphic cards use the PCI-Express (not to be confused with PCI-X) system that supports up to 16x speeds. While most motherboards have only one PCI-E 3 16x slot, those with two such slots can combine the power of two video cards using technologies known as SLI for NVidia, and CrossFire for ATI. However, you will have to match the video cards to a motherboard supporting the multiple card technology of choice, and use two similar video cards that both support dual video cards.
Keep in mind that to provide best picture quality your graphics card must be capable of displaying the same resolution as your LCD display's native resolution.
CD/DVD
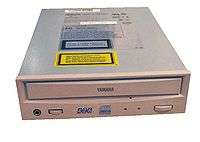
Optical drives have progressed a long way in the past few years, and you can now easily purchase DVD writers that are capable of burning 9GB of data to a disk for an insignificant amount of money. Even if you don't plan on watching or copying DVDs on your computer, it may still be worth purchasing a burner in the event you need to do so.
When purchasing a DVD writer, you will want one that is capable of burning both the '+' and '-' standards, and it should also be Dual Layer compatible. This will ensure that you can burn to almost all recordable DVDs currently on the market (the other major format, DVD-RAM is almost unused, for the most part, so don't worry about it).
That being said, most applications are now being distributed via the Internet or even using a USB flash drive, so you may find that you truly do not need an optical drive at all, but it's still worth getting one just in case.
Cleaning CD's
Dust can be removed from a CD's surface using compressed air or by very lightly wiping the information side with a very soft cloth (such as an eyeglass cleaning cloth) from the center of the disc in an outward direction. Wiping the information surface of any type of CD in a circular motion around the center, however, has been known to create scratches in the same direction as the information and potentially cause data loss. Fingerprints or stubborn dust can be removed from the information surface by wiping it with a cloth dampened with diluted dish detergent (then rinsing) or alcohol (methylated spirits or isopropyl alcohol) and again wiping from the center outwards, with a very soft cloth (non-linting : polyester, nylon, etc.). It is harmful, however, to use acetone, nail polish remover, kerosene, petrol/gasoline, or any other type of petroleum-based solvent to clean a CD-R; the use of petroleum based solvents will damage the polycarbonate surface and the CD-R will become unreadable.
Sound card
Most motherboards have built-in sound features. These are often adequate for most users. However, you can purchase a good sound card and speakers at relatively low cost - a few dollars at the low end can make an enormous difference in the range and clarity of sound. Also, these onboard systems tend to use more system resources, so you are better off with a real sound card for gaming.
Sound card quality depends on a few factors. The digital-analog converter (DAC) is generally the most important stage for general clarity, but this is hard to measure. Reviews, especially those from audio file sources, are worth consulting for this; but don't go purely by specifications, as many different models with similar specifications can produce completely different results. Cards may offer digital (S/PDIF) output, in which case the DAC process is moved from your sound card either to a dedicated receiver or to one built into your speakers.
Sound cards made for gaming or professional music tend to do outstandingly well for their particular purpose. In games, various effects are often times applied to the sound in real-time, and a gaming sound card will be able to do this processing on-board, instead of using your CPU for the task. Professional music cards tend to be built both for maximum sound quality and low latency (transmission delay) input and output, and include more different kinds of inputs than those of consumer cards.
Modem
A modem is needed in order to connect to a dial up Internet connection. A modem can also be used for faxing. Modems can attach to the computer in different ways, and can have built-in processing or use the computer's CPU for processing.
Modems with built-in processing generally include all modems that connect via a standard serial port, as well as any modems that refer to themselves as "Hardware Modems". Software Modems, or modems that rely on the CPU generally include both Internal and USB modems, or have packaging that mentions drivers or requiring a specific CPU to work.
Modems that rely on the CPU are often designed specifically for the current version of Windows only, and will require drivers that are incompatible with future Windows versions, and may be difficult to upgrade. Software Modems are also very difficult to find drivers for non-Windows operating systems. The manufacturer is unlikely to support the hardware with new drivers after it is discontinued, forcing you to buy new hardware. Most such modems have internal or external USB, but this is not always the case.
Modems can be attached via USB, a traditional serial port, or an internal card slot. Internal modems and USB modems are more easily auto-detected by the operating system and less likely to have problems with setup. USB and serial port modems often require an extra power supply block.
Gaming modems are normal modems that default to having a low compression setting to reduce lag, but are generally no longer used by games, which prefer broadband connections.
Network interface card

A Network interface card, or Ethernet card, is required in order to connect to a local area network or a cable or DSL modem. These typically come in speeds of 10Mbps, 100Mbps, or 1000Mbps (gigabit); these are designated as 10Mbps, 10/100Mbps, or 10/100/1000Mbps products. The 10/100Mbps and 10/100/1000Mbps parts are most common in use today. In many cases, one or two Ethernet adapters will be built into a motherboard. If there are none, you will have to purchase one. These typically are inserted into a PCI slot. To get the full speed of 10/100/1000Mbps Ethernet, it's best to get a motherboard with that connector built in. A typical Ethernet card usually costs around US$13.
Peripherals
Anything outside the case that connects to your computer is considered a peripheral. The keyboard, mouse and monitor are pretty much the bare minimum you can go with and still be able to interact with your computer. Your choice in peripherals depends on personal preference and what you intend to do with your computer.
Mouse and keyboard
There are broadly two types of mouse: optical and mechanical. Mechanical mice use a rubber coated ball bearing that contacts the mousepad or other surface and actually rolls around. Optical mice use a bright light and a sensor to track the movement of the mouse.
When choosing a mouse, there is generally no reason not to choose an optical mouse. They are considerably lighter (and as such, reduce RSI) as they have no moving parts, they are much better at smoothly tracking movement, and they don’t require constant cleaning like ball mice (though it may be wise to brush off the lens with a q-tip or other soft tool on occasion). Make sure that you spend money on a decent-quality mouse made by companies such as Microsoft or Logitech, as lower-end optical mice will skip if moved too fast. Mice of medium-to-high quality will track your movement almost flawlessly.
Although three buttons are generally enough for operating a computer in normal circumstances, extra buttons can come in handy, as you can add set actions to each button, and they can come in handy for playing various video games. One thing to note is that with some mice those extra buttons are not actually seen by the computer itself as extra buttons and will not work properly in games. These buttons use software provided by the manufacturer to function. However, it is sometimes possible to configure the software to map the button to act like a certain keyboard key so that it will be possible to use it in games in this manner.
Wireless keyboards and mice do not now display the sort of noticeable delay that they once did, and now also have considerably improved battery life. However, gamers may still want to avoid wireless input devices because the very slight delay may impact gaming activities, though some of the higher end models have less trouble with this. The extra weight of the batteries can also be an inconvenience.
Printer and scanner
For most purposes, a mid-range inkjet printer will work well for most people. If you plan on printing photos, you will want one that is capable of printing at around 4800dpi. Also, you will want to compare the speed of various printers, which is usually listed in ppm (pages per minute). When choosing a printer, always check how much new cartridges cost, as replacement cartridges can quickly outweigh the actual printer's cost. Be aware of other possible quirks as well. For example, Epson has protection measures that make refilling your own ink cartridges more difficult because an embedded microchip that keeps track of how much ink has been used keeps the printer from seeing the cartridge as full once it has been emptied.
For office users that plan to do quite a bit of black and white printing buying a black and white laser printer is now an affordable option, and the savings and speed can quickly add up for home office users printing more than 500 pages a month.
Scanners are useful, especially in office settings, they can function with your printer as a photocopier, and with software can also interact with your modem to send Faxes. When purchasing a Scanner, check to see how "accessible" it is (does it have one-touch buttons), and check how good the scanning quality is, before you leave the store if possible.
Finally, "Multi-Function Centres" (also called "Printer-Scanner-Copiers") are often a cost-effective solution to purchasing both, as they take up only one port on your computer, and one power point, but remember that they can be a liability, since if one component breaks down, both may need to be replaced.
Display
When choosing a display for your computer, you have two choices: a Cathode Ray Tube (CRT) screen, or a Liquid Crystal Display (LCD) screen. Both technologies have their advantages and disadvantages but CRT's, now nearly obsolete, are almost unavailable new - making the argument moot. Used CRT's on the other hand, can be had nearly for free and still work if you have the room for them.
LCD panels
Liquid Crystal Displays (LCDs) have the advantage of being a completely digital setup, when used with the DVI-D or HDMI digital connectors. When running at the screen's native resolution, this can result in the most stable and sharp image available on current monitors. Many LCD panel displays are sold with an analog 15-pin VGA connector or, rarely, with an analog DVI-I connector. Such displays will be a bit fuzzier than their digital counterparts, and are generally not preferred over a similarly-sized CRT. If you want an LCD display, be sure to choose a digital setup if you can; however, manufacturers have chosen to use this feature for price differentiation.
The prime disadvantage of LCDs is "dead pixels", small, failed areas on your monitor, which can be very annoying, but generally aren't covered under warranty; this can make purchasing LCD displays a financial risk. In fact, most LCD panel manufacturers allow for a certain number of dead pixels in their product specification.
LCDs are acceptable for fast-paced gaming, but you should be sure that your screen has a fairly fast response time (of 12 ms or lower) if you want to play fast games. Many flat panels sold today meet this requirement, some by a factor of 3.
When picking an LCD, keep in mind that they are designed to display at one resolution only, so, to reap the benefits of your screen, your graphics card must be capable of displaying at that resolution. That in mind, they can display lower resolutions with a black frame around the outside (which means your entire screen isn't filled), or by stretching the image (which leads to much lower quality).
When choosing an LCD, make sure to get one which uses IPS technology, as that one provides for sharper colour reproduction and also has high viewing angles. The older TN (often found in very cheap displays) is only relevant for gamers who need fast response times; otherwise, it has weaker colours and has poor viewing angles and should be ignored.
Speakers
Computer loudspeaker sets come in two general varieties; 2/2.1 sets (over a wide range of quality), and "surround", "theater", or "gaming" sets with four or more speakers, which tend to be somewhat more expensive. A 2-speaker set is adequate for basic stereophonic sound. A 2.1-speaker set adds a sub-woofer to handle low frequencies. Low-end speakers can suffer from low bass response or inadequate amplification, both of which compromise sound quality. Powered speakers with separate sub-woofers usually cost only a little more and can sound much better. At the higher end, one should start to see features like standard audio cables (instead of manufacturer-specific ones), built in DACs, and a separate control box.
The surround sets include a sub-woofer, and two or more sets of smaller speakers. These support 5.1 or 7.1 standards that allow sound to be mixed not only left and right, as with standard stereo speakers, but front and back and even behind the listener. Movies and video games make use of this technology to provide a full-immersion experience. Make sure your sound hardware will support 5.1 or 7.1 before buying such a speaker system. If your budget allows, you can avoid the computer speaker market entirely and look into piecing together a set of higher-end parts. If you are buying a speaker system designed for PCs, research the systems beforehand so you can be certain of getting one that promises clarity rather than just raw power. Speaker power is usually measured in RMS Watts. However, some cheap speakers use a different measure, Peak Music Power Output (PMPO), which appears much higher.
Headphones can offer good sound much more cheaply than speakers, so if you are on a limited budget, but want maximum quality, they should be considered first. The advantage of headphones is that the acoustic environment between the audio driver is fully contained and controlled within the earcups and is not dependent on room acoustics. There are even headphones which promise surround-sound, though these have not been favorably reviewed.
External links
- Power supply calculators
- the Computer Component wiki has a few product reviews and "community reviewed systems"; you can help.
- PCPartPicker can help check for compatibility issues before you buy.
Assembly
Now that you have selected your parts, you get to what is arguably the most fun part of the process: putting the parts together.
Tools and equipment
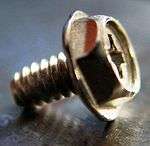
You won’t need many tools to assemble your computer, in fact the only one you must have is the screwdriver, but if you can get most of the following together, you’ll find things go a little easier.
Basic tools
Before you begin building or refitting a computer, you should have some basic tools:
- #2 Phillips-head (cross-shaped) screwdriver
- Needle-nose pliers
- A large level working space
- Brush

Optional, but useful tools
Some other tools and equipment can come in handy as well, such as:
- Anti-static Wrist Strap (Highly Recommended)
- Anti-static plate
- Spring action parts grabber.
- Electrical tape
- Wire or nylon ties
- Flashlight, preferably hands-free
- A second, working computer to swap parts, look for tips, ask for help on-line, download drivers and patches, etc. - very useful
- A can of compressed air - useful when working with older parts that have collected dust. A better alternative but also more costly, is a vacuum cleaner designed for cleaning electronics.
- Magnetic screwdriver
- Zip ties or velcro ties for cable management
Preparation
Proper preparation is the key to a successful build. Before you begin, make sure you have all the tools you will need, secure a clear, well-lit workspace, gather all the components you’ll be using and unpack them one at a time, verifying that everything that is supposed to be there is actually present. At this point you should leave the parts themselves in their protective anti-static bags, and assemble all the accompanying manuals. Now I know you want to get started, but trust me, read the manuals, check the diagrams, make sure you understand where each part goes and how it attaches. If there is anything you don’t understand, now is the time to do a little extra Internet research or call the manufacturer with your questions.
Find a dry, well-ventilated place to do your work. You should have plenty of light and if possible, you should choose an area without carpet on the floor, as carpet tends to generate a lot of static. An unfurnished basement is a good work location.
Safety precautions are important for your own security. Please read the safety precautions thoroughly.
Safety precautions
- Static electricity is the biggest danger to the expensive parts you are about to assemble. Even a tiny shock which is much too small for you to feel can damage or ruin the delicate electronic traces many times smaller than a human hair that make up your CPU, RAM and other chips. It’s important to use your anti-static wrist strap to prevent damage to these components. Once you have the power supply installed in the case, clip the end of the wrist strap to the outside of the power supply. (Never plug your computer in while you are connected to it by a wrist strap.) This will ensure that you, the case and the power supply are all connected to a common ground, in other words there will be no inequality of charge that will allow a spark to jump from you to the case. It’s also helpful to have an anti-static mat to set the case and other components on.
- Nobody but you is at fault if you shock your components with static electricity. Make sure that you take the precautions in the previous paragraph to ground yourself from static electricity. (Note: if you really must work on a computer and have not got proper anti-static equipment, it is usually OK if you make sure that you do not move about much; are not wearing any static-prone clothing; handle components by the edges; and regularly (once a minute or so), touch a grounded object.). The case metal of your PC's power supply will usually be a suitable grounded object (please note that the metal must be unpainted). As noted above, touch it every few minutes while you are working on your PC if you haven’t got a wrist strap.
- Turn off your computer and switch off your Power Supply at the wall before installing or removing any components - if power is flowing to components as they are installed or removed, they can be seriously damaged. In order to have a computer properly grounded, you need it plugged in at the wall but turned off at the power supply and at the wall. The neutral line may be earthed.
- Never cut the grounding pin off your power cord. This "safety ground" stands between you and potentially lethal voltages inside the power supply.
- Be wary of sharp edges! Many lower-end PC cases have sharp, unfinished edges. This is especially so on interior surfaces, and where the case has been cut or punched-out. Use care and take your time to avoid cutting your hands. If your case has this problem, a little time with some sandpaper before you begin construction can spare you a lot of pain. Be extra careful not to cut yourself when installing the I/O Shield.
- Dismantling discrete electronic components such as your Power Supply or Monitor is dangerous. They contain high voltage capacitors, which can cause a severe electric shock if you touch them. These hold a charge even when the unit is not plugged in and are capable of delivering a fatal shock.
Construction
Start by putting your case down on your work surface, with the case door facing up, and open the case.
Motherboard


Find the motherboard standoffs (spacers) that should have come with the case. They are screws, usually brass, with large hexagonal heads that are tapped so you can fasten screws into the top. These hold the motherboard up off the case preventing a short-circuit. Set these aside.

Remove the I/O Shield from the back of the case where the ports on the back of the motherboard will fit, and put in the I/O Shield that came with your motherboard. There may be small metal tabs on the inside of this face plate, if so you may have to adjust them to accommodate the ports on the back of the motherboard.
Some case styles make it difficult to install the motherboard or the CPU with the power supply installed. If the power supply is in your way, take it out and set it aside (we'll put it back in later).
Now locate the screw holes on your motherboard and find the corresponding holes on the motherboard plate (or tray) in the case. Put a standoff in each of these holes on the tray and position the motherboard so that you can see the holes in the top of the standoffs through the screw holes in the motherboard.
Now is the time to make sure the ports on the motherboard are mating with the backplate you just installed, and make any necessary adjustments. The small metal tabs are intended to make contact with the metal parts of the connections on the back of the motherboard and ground them, but you may have to bend these tabs a bit to get the ports all properly mounted, this is where those needle-nose pliers may come in handy.
If you have trouble lining up the screw holes, double check that you have the standoffs in the proper holes on the tray. With lower quality cases there are sometimes alignment problems and you may have to forgo one or two screws. If this is the case, make sure you remove the corresponding standoffs. Some combinations of motherboards and cases may also use different types of screws in different places or provide non-matching screw holes that cannot be used in a specific case. The motherboard can possibly be damaged if you try to push it into position with the wrong set of standoffs underneath or when trying to use the wrong set of screw holes.
Now fasten a screw through each of the motherboard screw holes into the standoffs underneath. These screws should be snug but not tight, there is no reason to torque down on them, hand tight is fine, otherwise you can damage the motherboard.
Once the motherboard is installed, it is time to plug the other components.
CPU
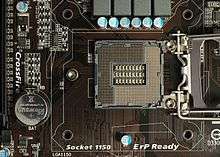

Installing the CPU, and the CPU’s heat-sink and fan, are by far the most difficult steps you’ll have to complete during your build. Here, more than anywhere else, it will pay to read the instructions carefully, look at the parts, study the diagrams that came with your CPU and/or third party cooling solution, and make sure you thoroughly understand what you are going to do before you try to do it. During the process, if anything does not seem to fit or make sense, put the parts down and look things over carefully before you proceed. Some operations, especially installing the heat-sink/fan combination, can require pretty firm pressure, so don’t be afraid to push a little harder if you’re sure everything is set up correctly.
The details of the installation process differ in slight but important ways for each manufacturer’s processors, and even within a manufacturer's product line. Therefore, for these details, you should rely on the instructions that are provided with the CPU.
The two things that go wrong the most often and most expensively (minimum of a killed CPU, sometimes more) in building one's own computer are both related to the CPU and its cooler:
- Switching the computer on "just to see if it works" before adding any CPU cooling unit. Without cooling, CPUs heat up at extreme rates (a CPU heats up anywhere between ten times and a thousand times as fast as a cooking area on your stove!). By the time you see the first display on the screen, your CPU will already be severely overheating and might be damaged beyond repair.
- Mounting the CPU cooler improperly. Read the instructions that came with your CPU and cooler very carefully and ensure you are using all components in the correct order and correct place.
If you buy a third party cooling solution for your CPU make sure you get one that is compatible with the CPU you have. "Compatibility" here just means, "Can you fit it in next to your RAM or whatever else is sticking up in the neighborhood." Most brands come with multiple mounting brackets that will suit many different chipsets, but it is best to check for compatibility just in case.
After the CPU is installed in the socket and secured in place, it's time to add thermal paste and then install the cooler. The plain metal back of the CPU, which is what you're now seeing, is exactly matched by the bottom plate of the cooler. You add thermal paste only on the CPU, never on the cooler's surface. Very little is needed. The two flat metallic surfaces will spread the paste between them, and it will spread a bit more when it becomes hot. (The cooler surface may have a protective piece of film over it; don't forget to remove it. But see below for the possibility of "thermal pad" being supplied, instead of paste. This is rare nowadays, but read the instructions.) A pea-sized dot is the amount usually advised, though some people make a thin "X" on the CPU surface, and some draw a line. (There are numerous videos on Youtube advocating one or another, some with photos using glass plates.) Don't overdo -- you don't want paste squeezing out the edges. Some people suggest spreading paste over the whole surface, then cleaning it off with a razor blade, then adding the pea. The idea is to close invisible imperfections in the metal. This is probably overkill, and involves extra handling of the CPU, never a good idea. Try not to touch the mating surfaces of the CPU and cooler -- the oils from your skin will impede heat transfer. You should receive a tube or applicator of thermal paste in the CPU or cooler package, some CPU coolers come pre-applied with thermal paste (such as AMD's wraith cooler), you can optionally add your own to the CPU as extra or continue with the pre-applied compound. If your CPU didn't come with thermal paste and the cooler didn't have any pre-applied, thermal paste is readily available from most computer retailers.
See Arctic Silver Instructions for more info on how to apply and remove thermal paste/grease. (It was written to be specifically for Arctic Silver paste, but the same techniques can be applied to other brands of thermal paste.)
If using a thermal pad supplied with your cooler, make sure you remove any protective tape from the die just before installing and do not get it dirty - and do not combine thermal pads with thermal paste, it is either one or the other. Then, check that you install the cooler in the right orientation and that you set it flat on the CPU die without exerting undue pressure on any edges or corners - the latter can make small pieces of the die break off, killing the CPU.
One option you may consider, before installing the heat-sink, is to "lap" the heat-sink, which means to smooth out the bottom surface. To do this, you will need a very flat surface; a piece of thick window glass will work. Fasten your sandpaper on the flat surface, invert the heat-sink on the sandpaper and sand in small circles, applying minimum pressure. Check frequently and when you see a uniform pattern of scratches, switch to finer grained sandpaper (the numbers go up as the sandpaper is finer, so something such as 220 is coarse while 2000 will be very fine.) Remember that you are not trying to remove any material, just polish out surface irregularities. If you get it right, you should have a surface which feels completely smooth to the touch (but don’t touch it, the oil in your fingers can cause corrosion of the fresh surface) with a mirror finish. Some companies producing heat-sinks lap the surface themselves, so if the surface already looks like a perfect mirror, leave it alone. A lapped heat-sink is more effective as it will have better surface contact with the chip.
Tighten the cooler using only the specified holding devices - if you did everything right, they will fit. If they do not fit, check your setup - most likely something is wrong. After mounting the cooler, connect any power cables for the fan that is attached to the cooler.
As an aside to the instructions above, it has been my personal experience that fitting the CPU and heat sink is best done on a supportive surface (a telephone directory on a table in my case) prior to installation, to avoid excessive flexing of the motherboard.
A last note: if something goes wrong and the cooler has to be removed (like maybe you realize you didn't take the protective film off the cooler surface), the paste will have to be removed from the CPU for the restart. Don't panic! All it takes is a coffee filter (not paper towels or anything else that will leave fibers) and a little isopropyl alcohol (from the drugstore). Thermal paste removes easily with a little gentle rubbing. Work from the outside edge in.
If you've got the CPU and its cooler installed, and the motherboard in the case, you’re over the hump, there are just a few more easy pieces to go before that momentous first power-up.
Memory slots
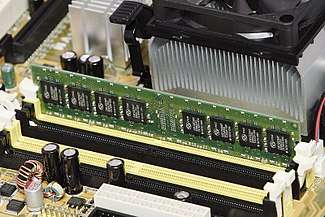
Next, you will need to install your RAM (random access memory). Find the RAM slots on your motherboard; they will look something like the picture on your left. To install the RAM modules, first push on the levers (white plastic in the picture) on either side of the DIMM socket, so that they move to the sides. Do not force them, they should move fairly easily.
Put the RAM module in the socket. Line up the notch in the center of the module with the small bump in the center of the RAM socket, making sure to insert it the right way. Push down on the module until both levers move up into the notches on the sides of the module. There should be a small "snap" when the module is fully seated. Although this does require a fair bit of force, do not overdo it or you may break the RAM module.

Take a good look at your seated RAM, if one side seems to be higher than the other, odds are it is improperly seated - take it out and try again. As you handle the RAM, try not to touch the copper stripes you can see along the bottom edge, as doing so is the best way to damage the part.
Start adding RAM at the slot labeled "Bank 0" or "DIMM 1". If you do not have a stick in "Bank 0" or "DIMM 1" the system will think there is no RAM and will not boot.
On motherboards with 4 slots, you'll see alternating colours. For example, slot 1 is blue, slot 2 is black, slot 3 is blue, slot 4 is black.
If you were to put 4 gigabyte of RAM in your personal computer, it is best to use dual channel 2 GBx2 sticks. Put the first 2 GB stick in slot 1, and put the 2nd stick in slot 3 (the two slots that are blue) - leaving slot 2 empty. This will give you better performance, than putting 4 GB in slot 1 alone.
Power supply
Installing your power supply is pretty straightforward, if it came with your case it was pre-installed and if you took it out earlier to get the motherboard in, now is the time to put it back. Otherwise a few moments of screwdriver work will get the job done. Generally there will be a bracket on the top of the case where the power supply is mounted and a few screws used to fix it in place. Some cases place the Power Supply differently, see the documentation that came with yours.
Some power supplies come with modular cables, so you can plug in only those you’ll be using; now is a good time to figure out what you’ll need and plug them in. Other power supplies have all the cables hardwired in, you’ll want to separate out the ones you’ll need and neatly coil the remainder somewhere out of the way.
If your power supply has a switch to select 115 V or 220 V make sure it is set properly, this is important. Many newer power supplies can automatically select and don’t have such a switch.
Once you get the power supply installed make sure you check the motherboard documentation carefully for the location of the power sockets. You may then connect the main power, a 20 or 24 pin plug, into the motherboard. There may also be an additional four or eight pin power lead that needs to be plugged in to the motherboard (the CPU power connector) usually located near the processor socket.
Graphics card

If your motherboard or CPU has a built-in graphics adapter you want to use (like Intel HD Graphics), skip this section.
If you have a PCI Express video card, install it into the PCI Express socket. Your computer will have a few of them, but choose the one which is most convenient for you and will allow you to fit it into the desktop case easily. Check your motherboard manual for instructions.
When your card is properly installed the line formed by the top of the card will be exactly perpendicular to the motherboard, if one side seems to be higher than the other, chances are that it is not fully inserted, press a little harder on the high side or pull it out and try again.
Installing drives
Next install the hard drive and optical drives.
How a drive is physically installed will depend on the case.
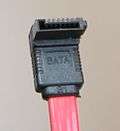

Most drives are SATA (Serial ATA) which use simple, small cables for a data connection. The ends of the cables are L shaped, just look carefully at the cable ends and the connector on the drive and match them up. Only one drive can be connected to each SATA port on the motherboard. Some SATA drives have two different power ports - make sure you connect ONLY ONE of these ports to the power supply, connecting both can damage the drive.
Older drives have PATA (Parallel ATA) connections which use a flat ribbon (IDE) cable for data connection. When using an IDE cable, plug the two connectors that are closer together into the 2 drives, and the third to the controller or motherboard. The connector furthest from the board should be attached to the drive set as Master. Make sure the drive that you will install your OS on is the primary master. This is the master drive on the Primary IDE bus which is usually the IDE 40 pin port on the motherboard labeled “Primary” or “IDE 1”.
Next, plug a 4 pin molex power connector into each hard drive and optical drive. If you are installing the power connector to a SATA drive, some drives have the option of using either the SATA power connector (a flat about 1" wide connector) or the standard molex connector; use one or the other, not both. Connecting both can break your hard drive. For better data transfer, you can purchase heat-protected high-end data cables at your nearest electronics store.
Newer SSD's will often use the PCI Express standard; for those, follow the same instructions as you would do for a PCI Express graphics card.
If you install a floppy disk drive, the cable is very similar to the IDE cable, but with fewer wires, and a strange little twist in the middle. Floppy drives do not have master/slave configurations. The floppy disk connector is not usually keyed, making it all too easy to plug it in the wrong way! One wire in the IDE cable will be colored differently: this is pin 1. There is usually some indication on the floppy drive as to which side this is. The power plug for a floppy is 4 pins in a line, but rather smaller than the standard hard drive power connector. Plug the end of the cable with the twist into the floppy drive ("drive A:"). Plug the other end of the floppy ribbon cable into the motherboard. If you install a second floppy drives, plug the middle connector into "drive B:". The twist between drive A: (on the end) and drive B (in the middle) helps the computer distinguish between them.[1]
Other connections

In order to turn the computer on, you will need to connect the power button and while you are at it, you might as well do the reset buttons and front panel lights as well.
There will be a set of pins, usually near the front edge of the motherboard to which you will attach the cables sometimes already connected to the front of the case, or if needed to be supplied with the motherboard. Most of the time the plugs will be labeled as the pins they will connect to in the motherboard, there they can be difficult to read since the print is very small or you may not be in the right orientation to do so. The documentation that came with your case and motherboard should tell where these connectors are.
In addition, you can connect any case-specific ports if they are supported by the motherboard. Many cases have front mounted USB, Firewire and/or sound ports.
Other connections of this type to remember can be power for the CPU fans, various temperature sensors and Wake-on-LAN cables (if the feature is supported) from the network card to the motherboard.
Prepare for power up
Some people will put power to a system several times during assembly and for experienced builders this may serve some purpose. For first timers though, it’s best to assemble a minimal complete system before powering up. Minimal because that way there are comparatively few potential sources of trouble, complete so that you can test everything at once and because the fewer times you have to put power to an open machine, the better..
If you’ve been working along with us you should now have such a minimal system put together. Briefly this includes a case with a motherboard in it, a processor (and its cooling unit) and some RAM plugged into the motherboard, hard and floppy drives installed, and some kind of video available. If your motherboard has built-in video, you might want to use that for this first try, even if you are going to install a video card later.
For this test, you’ll want to have the computer open, so that you can see all of the fans, and you’ll need to connect a monitor and a keyboard and a mouse (OK, you don’t really need the mouse . . .)

Monitors will either have a VGA, DVI, HDMI (see picture, as they are a lot less apparent than PS/2 / USB by comparison) or for newer ones, a Thunderbolt 3/USB 3.1 plug. Most monitors use HDMI connectors, and so most graphics cards have HDMI output. If you have one type of plug and the graphics card has another, you can easily buy an adapter. Some cards even come with one.
There are two standard connectors for mice and keyboards; PS/2 connectors and the more modern USB connectors. Plug the mouse and keyboard in the appropriate slot.
Note: If you intend to install an operating system from a boot CD or floppy, or modify BIOS settings you will need to use either a PS/2 keyboard, a USB to PS/2 converter, or a motherboard that supports USB devices. Otherwise your keyboard will not work until the operating system has loaded USB drivers.
Once you have this all set up, it’s time to double check, then triple check that you have made all the necessary connections and that you haven’t left any foreign objects (where’s that screwdriver?) in the case.
Power up
Take a moment to check one more time that everything is as it should be. Make sure you've removed your wrist strap, turn on the monitor, then press the power button, and observe the inside of the open machine. (Do not touch any part of the inside of the machine while it is powered up – you will NOT die but your computer might.) The first thing to look for is that the CPU cooler fan spins up, if it does not, cut the power immediately. This fan should start up right away; something is wrong if it doesn’t and your CPU is in danger of overheating so stop now and troubleshoot.
NOTE: If you have a Gigabyte brand motherboard, the CPU fan may twitch and stop turning. Wait 10-15 seconds and it should start. If it does not, there is a problem and you should immediately cut power as stated above. Other fans such as case fans should turn on and spin.
If the CPU fan spins up, check that all the other fans that should be spinning – case fans and fans on the power supply and video card (if installed) are also spinning. Some of these fans may not spin up until a temperature threshold is passed, check your documentation if anything is not spinning.
If the fans spin, you can turn your attention to the monitor, what you are hoping to see is the motherboard’s splash-screen, usually featuring the manufacturer’s logo. If you see this, take a moment to bask in the glow, you’ve built a computer!
If this happy event does not occur, if smoke appears, or if the computer does not do anything, unplug the power cord immediately and check the steps above to make sure you have not missed anything. Give special attention to the cables and power connections. If the computer does appear to come on, but, you hear beeps, listen carefully to the beeps, turn the computer off, and refer to your motherboard's manual for the meaning of the beeps. Some boards have an optional diagnostic device, usually a collection of LEDs, which when properly plugged in will inform you of the nature of the problem. Instructions for installing this as well as the meaning of its display should be in the manual for the motherboard. If the computer turns on but the only thing that comes on is your power supply, turn it off. This probably means something is shorted, and leaving it on could damage the parts.
If all is well it is time to turn the computer off, and close it up. Then you may want to turn it on again and set certain options in the computer's BIOS/UEFI (usually by pressing 'F1' or 'Del' a few seconds after boot.) These options will be explained in the motherboard manual. In general, the default options are OK, but you may wish to set the computer's hardware clock to the correct time and date. The BIOS/UEFI is also where you determine the default boot order of the system, typically F\floppy, then CD-ROM, then Hard Disc.
If you want to install Windows 7 on a UEFI-based motherboard, you may have to configure it to start in legacy mode. Check your documentation for instructions on how to do so.
If you want a further quick test before you install an operating system, you may find a bootable CD-ROM such as Knoppix extremely useful.
Additional hardware and peripherals
Now that you have a working system it’s time to think about installing an operating system, which is covered in the next section. It’s best to leave the installation of additional components (like sound-cards, modems, and second video cards) and peripherals (printers, joysticks, etc.) until after the OS install in order to allow the plug n’ play features of the OS to do their trick.
References
Software
Now that you’ve got a functioning computer, you’ll need to install some software if you’re going to do anything with it. An operating system or two must come first, then hardware drivers (so that the operating system can access your hardware) followed by security software and utilities. And that’s as far as we’re going to go with you, but you’ll also want to install some application software – games, word processors, databases, programming languages – whatever floats your boat... That’s pretty much the point of this whole computer business after all, though I hope you’ve found the journey of building it yourself has been worthwhile in its own way.
In this section we’ll consider what software you’ll want to install and how you might go about doing so.
BIOS updates
One important step that can be required as the starting point after you have a working PC, depending on how stable your BIOS is (bugs or any lacking specific software and hardware support), is to do an update of it (called "flashing" the BIOS). This step can be overlooked if you are sure that any later versions of your BIOS will not solve any issues or requirements you have. The simplest way as an initial step is to, find another computer, download the flash update and put it on a USB thumb drive (or another a bootable support media) and boot the new computer with it. If you do not have another computer or thumb drive, you will need to put off this step until after you install the operating system (you can also use a boot disk that permits you to get an OS running out of it) to get the new computer connected to the network.
Operating system(s)
If you have a workable machine that recognizes the basic hardware (CPU, memory, HD, mouse and keyboard) you can now start installing an operating system (OS). You may select from several available on the Internet or from your local computer store.
Options can be varied, there are many operating systems to choose from, including commercial ones like Microsoft Windows (of which the current version is Windows 10 version 1803) or free ones like GNU/Linux distribution (a free Software operating system) or BSD. It all depends on the uses you will be giving to your machine (function and required software) and the price tag you are willing to pay and the support you require. Simply put, can you accomplish your day to day tasks with the software that will run under the operating system in question? Do you require some special software availability, ability to run on older equipment? Have you considered the costs? Determine your needs before installing an operating system.
Note that you also have the option of installing more than one operating system in what is called a multiboot setup. Having installed an OS, you can always install another later. The complexity of doing so may vary, depending on how the last one automates (or not at all) the process. If your multi-boot setup is Windows-only, install the oldest Windows version first.
Installing Windows
The installation of Windows is relatively easy. Push the power button on the front of the PC, put the DVD-ROM in your optical drive or insert the USB, and follow the on-screen instructions (you may have to configure your BIOS to start with the DVD or USB). If you are doing a Windows-only install, just allocate all of the hard drive to Windows.
Some people find that it's useful to create separate partitions for the operating system and data. This means that if something goes wrong with the operating system, the partition can be formatted and the operating system can be reinstalled, possibly without losing data. If you have already allocated the whole disk to 1 partition and you want to change it later, you can do so and create new partition (from the existing partition) using Disk Management in Windows Vista and later or use a third-party tool.
If you are installing Windows on a RAID drive, or a SATA drive in some cases, you are going to have to provide drivers to the Windows installer so that it can access the hard drive on the raid controller. At the prompt where you are asked to choose a partition, you can click Load Driver and browse (or ask Windows to search) for the driver. Unlike Windows XP, you are not limited to floppies; a USB flash drive suffices.
If you do have a copy of Windows 7 or later version, it used to be possible to upgrade to Windows 10 for free, though that offer is no longer available.
Installing Windows to dual-boot with GNU/Linux
If you are dual-booting, some extra factors must be considered. NTFS, which is the default file system that Windows uses, is fairly well supported in Linux. NTFS-3g has reached a usable stage, with users reporting no data corruption or loss during ordinary use of the latest versions of the driver, providing GNU/Linux users with a reliable way to read and write NTFS partitions. This system is now in widespread use and most up-to-date Linux distros will support the NTFS file system. Previously only read support was safe, and this may still be the case for some distributions. However, NTFS does have some advantages over FAT32, in that a 4GB file size limit no longer exists. Though Linux supports NTFS, Windows does not have built-in support for any of the standard GNU/Linux file systems. However, there are Windows applications, such as Ext2 IFS that can be used to read/write ext2 and ext3 systems.
When it comes to partition the hard disk(s), remember to leave space for GNU/Linux (a good amount is on the order of a third of your total hard disk space). You may want to have a spare FAT32 partition (of around one third of your disk space) on which to share documents between Windows and GNU/Linux. Though this will most likely not be necessary unless you are using a distro which cannot read/write NTFS. You should also modify the partition table as necessary - you may not need as much space for Windows or you may need more in your FAT32 transfer area. But you must ensure that you leave at least 30 GB for your Windows installation, since the standard installation of Windows takes up about 10-15 GB of hard drive space, and it is always wise to leave extra on, to allow for any changes that may occur. Windows 8 in particular blocks installing on drives less than 16GB (20GB for 64-bit) free space. If you have 16 GB or higher RAM, you'll need more space.
Installing GNU/Linux
The primary problem faced in installing GNU/Linux is choosing between distributions. Of the many variants of GNU/Linux, Fedora, SuSE, and Ubuntu are generally recommended, as they are updated regularly and compatible with a broad range of hardware:
- Fedora, currently at version 28. Used to be the de facto GNU/Linux.
- openSuSE, currently at version 15.
- Ubuntu, currently at version 18.04 LTS. Increasingly gaining popularity as an easy to use desktop GNU/Linux.
- Debian , currently at version 9.4.
Some GNU/Linux variants may support hardware that these do not. If you have obscure or old hardware, you may want to search forum sites for various GNU/Linux variants to ensure compatibility. For example, Puppy Linux is a small Linux distro designed to run on older systems, as is Damn Small Linux.
For example, let’s consider Ubuntu. It's a variant of Debian, and is the current standard for easy-to-use GNU/Linux distributions. One can download the .iso image or order a CD set (containing a combined installation CD and LiveCD) from its website. An .iso is nothing more than a special file format that your CD drive burning software uses to create a copy of the software, in this case a copy of Ubuntu GNU/Linux.
The installation of most distros GNU/Linux is relatively easy. Push the button on the front of the PC, put the CD-ROM in your optical drive, and follow the on-screen instructions. By default, the installation version of Ubuntu will erase all files on the hard drive and partition 1.8 GB for the OS. If you want to customize, follow the on-screen instructions carefully. The LiveCd version does not erase your hard drive and is intended solely for a user to test drive Ubuntu GNU/Linux.
When installing a GNU/Linux distro, you may be asked to choose between alternatives – whether to run KDE or Gnome, for instance, or to install vi or Emacs or nano. If the terms are unfamiliar a quick Google will usually bring enlightenment. Also, as in these two examples, most such choices are a matter of preference and either choice will work.
Security
After installation, security should be your priority.
Updates
From time to time, software companies and independent programmers release new and improved versions to their software; these are known as updates. Updates usually install new features or fix problems. Usually, you should download the latest updates to improve system performance though it's sometimes wise to wait a little while to be sure the update itself does not cause problems. Many programs update themselves and this process is known as an automatic update. If you have to manually update your software, do so through the software developer's site, not through a secondary source. This approach will reduce the chance of contracting a virus or other piece of malicious software.
Windows
A newly installed Windows computer using a broadband connection can be attacked within moments of being connected to the Internet. In severe cases, the attacks can render a system unbootable or make a second reinstallation faster or easier than manually removing the malicious programs causing the problems. The SANS Institute provides a PDF guide called Windows XP: Surviving the First Day, which explains how to update a new Windows XP box without immediately becoming infected by viruses and worms. To avoid having your new computer attacked, install a firewall, or activate the one that came with your OS. Both Windows and GNU/Linux have in-built firewalls: In some GNU/Linux distributions, it is enabled by default; in Windows XP Service Pack 2, it can be found by going to the Start button and choosing "Control Panel" then double-clicking the "Windows Firewall" icon. Windows 8 includes antivirus however, but still it is recommended to use Windows Update.
As soon as you are on the Internet, run your operating system's update facility to fix any security flaws that have been found since your CD was printed. To do this under Windows, simply click on your Start Menu, click on 'All Programs', and then click on Windows Update, and follow the instructions(Open Settings and click Update and Security in Windows 10). If you use other Microsoft products, such as Microsoft Office, then it can be valuable to use Microsoft Update, which covers updates for all Microsoft products, and can be done within Windows Update. For either of these, you can also switch on "Automatic Updates" from the Security Center program mentioned above.
GNU/Linux

The method of updating your GNU/Linux system varies greatly from distribution to distribution.
For SuSE, there are two ways:
- YaST (Yet another Setup Tool), the default package manager/system management tool for SuSE
- ZENworks updater, a GUI-based updating service
For Fedora, type
yum update
as the root user inside a terminal window.
It is perhaps easiest to update the OS from Debian-based distributions such as Debian, Ubuntu and Linspire. For Debian and Linspire you type the following into a terminal window while running as the root user:
apt-get updateapt-get dist-upgrade
Ubuntu has you run sudo to switch run a program as root. Type the following into a terminal:
sudo apt-get updatesudo apt-get dist-upgrade
Most distros, including Ubuntu, also have a GUI-based updater program.
Automatic updates
If your computer will be running overnight (or if you're just lazy), it may be good to have your computer update itself.
Debian-based (LINUX) - Debian-based operating systems (including Ubuntu, but Ubuntu already has a more simplified automatic updater) will typically use a cron script for receiving automatic updates by the console (although you can download some GUI-based updating tools - that is, if you're working with a GUI).
Ubuntu (LINUX) - As Ubuntu is based on Debian, you can use a cron script, but an easier way of doing it (if you're using GNOME) is to go to the "System" menu, then "Administration", then "Software Sources". Then open up the "Updates" tab and select "Automatic updates", also select "Install security updates without confirmation".
SuSE (LINUX) - SuSE uses YaST to manage updates, packages (applications), and system settings. YaST can be configured to use automatic updates in the YaST control centre.
Microsoft Windows - Microsoft has always used the Microsoft Update service (formerly called "Windows Update") to manage updates both automatically and manually (although by default it usually is a automatic update). Windows XP onwards reminds you when the computer is needed to be restarted if an update requires one via a special icon in the notification area.
Windows 10 provides an option of setting active hours; the computer will not restart to complete updates during that time.
If you have Windows 10 Pro, it is possible to defer (postpone) updates for up to one year or one month, depending on the type of update. It is also possible to completely stop updates for up to 35 days (with the caveat that all updates will then have to be installed before the updates can be stopped again). To configure such options, go to Settings>Update and Security>Advanced Options.
Anti-malware
Anti-virus, anti-spyware, and anti-spam programs (which generically are all called anti-malware programs) of commercial quality or better can be found for free online quite easily and can protect your computer from various nasties you might get while surfin' on the Internet. Windows programs are listed in the software section below. (Usually these are not needed for non-Windows OSes). Third-party firewalls for Windows are recommended as the built-in default one Windows provides is not nearly powerful as, for example, ZoneAlarm, a third-party Firewall solution that not only monitors incoming traffic, but monitors outgoing traffic as well. Windows 8 and higher include antivirus (Windows Defender), though you can still use any antivirus you want if you want extra features or protection. Windows 7 and Vista, through they include Windows Defender, do not include antivirus protection (only spyware).
Security software is important and should be set up first. The best procedure is not to connect to the Internet at all until your choice of anti-virus, anti-spyware and firewall software is installed and activated, then connect to the Internet and update each of these programs, though it is usually fine to connect to the Internet for the purpose of downloading it.
Once secured, your system should be safe for prudent Internet browsing; however, remember to schedule regular scans and keep your security software up to date.
Drivers
Now that your computer is relatively secure, you will need to install software to control your various hardware components. This type of software is known as a driver.
Although you may find that all of your hardware works out of the box, consider downloading the driver straight from the company's Internet site. This will ensure you have the latest edition of the software. Knowing where to download the driver is also good in case you lose the CD that came with the device.
If you do not have a fast Internet connection (broadband), the company usually provides an option to receive the driver CD in the mail, in which case you'll want to use the CD you have now and update the driver later. Even if something seems to be working fine, downloading new drivers may help increase computer efficiency, though there is always a risk that a brand new version may break something. Downloading drivers for your motherboard's chipset can often help if you are having a problem. Finally, many monitors will not go above a certain refresh rate without the proper driver, which may be of great concerns to gamers.
If you are using Microsoft Windows, you can generally find drivers for your selected hardware on the manufacturer's website. Most GNU/Linux systems already have all of the drivers installed, with the exception of proprietary modem and graphics drivers. If you can't find the driver you need, a simple Google search will often yield the best results. Windows Update also often can install the latest drivers (though you may have to go to Windows Update to install it, as they may not be considered important).
Software
Before buying software for your new PC, remember that there is an abundance of useful software, free for downloading, available on the Internet. From web browsers to word processors to graphic manipulation programs, there is plenty of software available online.
Though most of what is available is safe and useful, it’s always a good idea to do a little research and make a backup before installing anything new. The following are some proven and reliable programs that are available, free (or gratis), for individual use (and sometimes more; check the license).
Broadly speaking, there are three types of licenses:
- Proprietary - This is the type of license that comes with most software that is purchased. Source code is not available, and you cannot make copies for others.
- Freeware - The software is zero cost (free), and you may share copies with others. You cannot make copies and sell them, however. The source code is usually not available.
- Free software/Open Source - The source code is available. This means that if you know how to program, you can make and distribute variations of the program yourself, fix bugs you find, etc. You may share copies with others, and you may pay for the software on disk, or download it for free. (The "free" in "free software" refers to "free" as in "free speech", not as in "free beer".)
Of course, there is a lot of overlap and many exceptions to these generalizations. Be sure to check the license that comes with your software to be sure of what your rights are!
Windows
- Web Browser: Mozilla Firefox, Google Chrome/Chromium, or Opera. Microsoft's Internet Explorer is already included with Windows systems and is updated though Windows Update or manually. Microsoft Edge is included as the default browser in Windows 10.
- E-mail Client: Windows Live Mail, Mozilla Thunderbird, Novell Evolution (Mail is included in Windows 8+)
- Office Suite: LibreOffice (If you have an Office 365 subscription, you can also download Office (desktop or Touch) from the Microsoft Store.
- Disc Tools: DVD Decrypter CD Burner XP, Burn at Once (You can burn DVD's directly from Explorer)
- Instant Messenger: Pidgin, Trillian, Miranda
- Media Player: DivX Player, Nullsoft Winamp, iTunes, SnackAmp, VLC media player(Windows Media Player is included, and you may have Windows Media Center (version-dependent, not available in Windows 10) or Windows DVD Player(Windows 10 only))
- Anti-virus: AVG Anti-Virus, Free Edition, avast!Antivirus Home edition, ClamWin (Windows Defender is included with antivirus protection in Windows 8+)
- Security: Spybot: Search & Destroy, Ad-Aware Personal Edition, K9 Anti-Spam, ZoneAlarm Free Edition
- Compression: 7-Zip, IZArc, TUGZip (You can compress and decompress ZIP files in Explorer)
- Desktop Search: Google Desktop, Copernic Desktop Search(Windows includes built-in Search functionality)
- PDF Reader: Adobe Acrobat Reader or Evince PDF Reader(Reader is included in Windows 8+)
- Photo Editing: Paint.Net, GIMP(Paint is included in Windows)
To ease out the installation process for utilities and other basic software, you can use Ninite. Check all the software that you need and download the installation utility. However, note that this utility will only install in your Windows partition and you cannot manually specify the directories in which you want the applications installed.
You can also get many of these programs (or alternatives) from the Microsoft Store.
GNU/Linux
Unlike Windows, on a GNU/Linux system the majority of the software that you will want for everyday use of your computer is usually included. You will probably not need to download anything. Most GNU/Linux distributions have a package manager (Portage for Gentoo, APT for Debian-based distros like Debian and Ubuntu, etc.) For some distributions you can simply download RPM or DEB files from your distribution's web site.
If they aren't already installed by your distribution:
- Web Browser: Mozilla Firefox, Google Chrome/Chromium, Konqueror or Opera.
- EMail Client: Mozilla Thunderbird, Evolution, or Kmail
- Office Suite: OpenOffice.org, LibreOffice, or KOffice
- Instant Messenger: Pidgin or Kopete.
- Media Players: Totem Media Player, Rhythmbox, mpd, amaroK (depending on what desktop environment you use), Beep Media Player or Video Lan Client.
- Movie/DVD Player: Xine or MPlayer.
- Windows Compatibility Layer: WINE.
- x86 Emulator: QEMU or VMWare.
- PPC Emulator: PearPC.
- Photo Editing: GIMP.
Additional Software
For additional software some excellent sources of free and open-souce software are
- FileDoggy - Free only software and its updates with links to developers pages in one place.
- FileHippo - Windows only software, up to the bleeding edge on all updates. Also includes links to developers pages, if you're interested in Linux or Mac versions of software. Also has automatic updating software.
- Tucows - a downloads site with freeware, shareware, open-source as well as commercial software. It has many mirrors all over the world for speedy downloads from local servers.
- Download.com - similar to tucows
- SourceForge - a site featuring many OpenSource projects. You can start your own, or get software for almost every need. Most projects have GNU and Windows versions. The mirror system isn't as large as Tucows, but you can still usually get a mirror on the same continent.
- Table of equivalents - can be useful if you want to know more about specific programs when changing from windows to GNU or vice-versa.
Of course, it is also possible to buy copies of software, particularly for the Windows operating system.
See also
Overclocking
Overclocking is the practice of making a component run at a higher clock speed than the manufacturer's specification. The idea is to increase performance for free or to exceed current performance limits, but this may come at the cost of stability.
Extensive overclocking will result in the destruction of hardware so ensure proper cooling before overclocking.
Overclocking is like souping up a car: if you just want to get where you're going, there's no need for it. But it is fun and educational and can get you a machine that provides performance all out of proportion to its cost.
Think of the 4 GHz on your new 4 GHz Core i7 as a speed limit asking to be broken. Some other components in your computer can also be overclocked, including RAM and your video card in many cases. Over clocking is possible because of the way electronic parts, especially VLSI (Very Large Scale Integration) chips are made and sold. All processors in a given line, the i7 for example, are made the same way, on a large die that is cut up into individual processors, those processors are then tested and graded as to speed, the best chips will be marked as 4 GHz, the second best 3.8 etc. As time goes by and production processes and masks improve, even the lower rated chips may be capable of faster speeds, especially if vigorous cooling is implemented. Also many manufacturers will mark chips that test faster at slower speeds if there is higher demand for the lower end component.
It’s important to note that not every chip will be overclockable; it’s really the luck of the draw. Some companies that sell ‘factory overclocked’ systems engage in a practice called “binning” where they buy a number of processors, test them for overclocking potential and throw the ones that don’t overclock in a bin to be resold at their rated speed. Even with processors that have a reputation for overclocking well, some parts simply will not exceed their rating.
That said, effective cooling can give a boost to a chip's overclockability. With luck you will be able to get extra performance out of your components for free. With luck and skill you can get performance that is not possible even when using the top of the line components. Sometimes you can buy cheaper parts, and then OC them to the clock speed of the higher end component, though the cost of extra cooling can compromise any money you may be saving on the part, not to mention warranty and part life issues.
WARNING: OVERCLOCKING MAY VOID THE WARRANTY ON THE PARTS BEING OVERCLOCKED. MAKE SURE YOU KNOW WHAT YOU ARE DOING, AS OVERCLOCKING MAY ALSO CAUSE SYSTEM INSTABILITY, AND MAY ALSO CAUSE DAMAGE TO COMPONENTS AND DATA. REMEMBER THE 3 "C'S" WHEN OVERCLOCKING: CAREFUL, CONSERVATIVE, and CAUTIOUS.
Things that can't be overclocked
Although it is possible to overclock many of the components of a computer (such as the CPU, FSB frequency and video card), it is not possible to overclock all components. For example, it is not possible to overclock a hard disk drive nor an optical drive such as a CD-ROM drive. For such devices other solutions exist, i.a. use a quicker file system and/or faster components in the first place; also in some special cases of hard disks drives, update the driver (which contains optimized code); remap blocks with high latencies to low latency blocks (using a tool such as mhdd), and in event a RAID is present, change the configuration, driver and/or software and/or settings. However such techniques and procedures are beyond the scope of this document.
Components
CPU
Choosing the CPU
While the CPU is usually the best component to overclock, most CPU's these days are locked, which means that the multiplier cannot be changed from its default clocks. While previously (until Sandy Bridge), users used to work around this limitation by adjusting the base clock of the CPU, on Sandy Bridge till Broadwell (2nd to 5th), attempting to do so over a few megahertz would usually cause the system to crash, even if the CPU itself is stable. This is because increasing the base clock would also affect other system components.
This means that, at a best case scenario of a 5 MHz increase over the usual 100 MHz base clock, an i3-4370 (3.8 GHz) can only be overclocked by 38*5 = 190 MHz, which would increase the clock speed to only 3.99 GHz.
This limits your Intel CPU choice to the following, if you want to overclock:
- CPU's labelled with a K at the end of their model number (eg:- i5-4690K)
- Extreme Edition processors (X series). An example would be the octa-core i7-5960X.
- Pentium G3258 (more on that later)
- C (high end graphics) line.
Most (if not all) AMD Ryzen CPU are overclockable; it is not necessary to buy the highest-end model (aka the X variant) solely for overclocking, though such variants may include better coolers instead.
For Intel chips, these overclockable chips usually come at a 5-15% premium over the non overclockable but otherwise identical CPU.
Now about the Intel Pentium G3258. This chip caused a lot of hype when it was first released back in 2014, as it was the cheapest and lowest-end Pentium chip released by Intel in honour of its 20th year anniversary. However, the main steal in this is the fact that this CPU is highly overclockable, which made all the difference. Still though, it won't reach the level of a stock i5 with overclocking; its dual-core no hyperthreading design can hurt it badly, and it's now over 4 years old. If you really need to build an ultra-budget PC, then a Ryzen 3 or a non-overclockable Pentium Gold processor would be a better choice.
The integrated graphics (if present) on the chip can often be overclocked even on otherwise non-overclockable CPU's.
How to overclock
For older computers, one changes the clock speed of the CPU in the BIOS. This holds true for newer computers as well, but you can usually use Intel's Extreme Tuning Utility (XTU) or AMD's Wattman if you want to do it in Windows itself. This method, while probably safer, is not the best method to overclock.
Assuming that you have a multiplier-unlocked CPU, head on to the BIOS, look for a CPU-modifying option within the BIOS (it depends between manufacturers), and raise the All-Core multiplier by a notch(For example, if you have a 3.5 GHz chip with a multiplier of 35x, raise it to 36x).
Then boot back into Windows and then run a stress tool like Prime95. It is a good idea to run it for some time (like an hour) but not for too long as you may end up damaging your CPU instead. Keep a watchful eye at the CPU temperatures; you should not go over 85C. If you do, you may need a better CPU cooler. Do NOT use the stock cooler if you are overclocking!
If it passes, go back into the BIOS and increase the multiplier again by a notch. If it fails, return back to the BIOS and then raise the CPU voltage slightly. Then repeat the stress test.
Continue this process till
- The stress test has failed and you've applied enough voltage, or
- The CPU is running too hot.
- The CPU is throttling (reducing speeds)
It is important that you do not apply too much CPU voltage as you may end up damaging the CPU. Also remember to keep any adaptive voltage settings on, as they reduce the voltage and prolong the life of your CPU when it is in idle.
Video card
Two different parts of a video card may be overclocked[1], the GPU (Graphics Processing Unit) and the RAM. In addition, disabled pipelines on a video card may also be enabled through third-party drivers, third-party software, or direct hardware modifications depending on your video card type. Overclocking a video card is usually done through third-party or proprietary software.
Recent AMD proprietary Catalyst drivers feature an interface called Overdrive that allows for dynamic GPU frequency scaling based on its temperature and load. Increase the load, the clock rate increases for performance, but it's balanced against the increasing temperature. Sufficient for simple increases in overall performance, this doesn't allow for the best performance increase which requires overclocking the memory. For that you'll need third-party applications or drivers.
An application example is ATITool. This program has many options, including GPU and memory overclocking, temperature monitoring, and fan control, allowing for a much more complete solution to overclocking ATI based video cards. There are many third party drivers, omegadrivers.net, for example hosts ATI and nVidia drivers as well. Both of which include integrated overclocking and many unlocked features, including enhanced image quality for nVidia-based cards.
nVidia users can use one of the many overclocking tools like MSI Afterburner to overclock their GPU. Many of them also include stress-testing tools built-in to validate the stability of the overclock.
For Intel integrated graphics, one can overclock using Intel's Extreme Tuning Utility, in much the same way as one would overclock the processor.
The most important thing to remember about overclocking a video card is cooling. This can't be stressed enough. Just as a CPU can be damaged or have a shortened lifespan by overclocking or excessive and prolonged heat, so can a video card. In the past year many inexpensive and easy to install options have surfaced for cooling a video card, from adhesive ram heatsinks which attach to un-cooled ram chips, to rather expensive water-cooling solutions. A good midpoint (both in cost and effectiveness) solution is to purchase and install a direct exhaust, "sandwich" cooling solution. Direct exhaust means all air from the cooling fan is blown across the video card and directly out of the computer case, usually using the open PCI slot below the AGP (or PCIe) slot. This allows for substantially lower GPU temperatures.
A sandwich cooler is two aluminum or copper heatsinks, shape formed for a particular video card, that "sandwiches" the video card in between the two and are usually connected by some kind of copper heat pipe which allows for the hotter side to convey heat to the cooler side for dissipation. The GPU should never surpass 80 degrees Celsius for optimal performance and to avoid damaging the card. Most of the latest video cards are rated to go up to 90 C, but this is NOT recommended by anyone. The optimal temperature for a video card is 55 - 70 C for the card itself (the GPU's temperature differs depending on which you have,) but the lower you can get it, the better.
It is also possible to use software to change the fan speed on certain cards. Changing the fan to run at full speed can cool the card better, dependening on your card and the speed of the fan in the first place. Software such as Rivatuner can be used for Nvidia based cards.
Getting the few extra MHz out of a chip
Cooling
When increasing the speed of any computer components you are making the components work harder and by doing so they output more heat. Heat can cause system instability so cooling is necessary to help keep your components stable at higher speeds. Without good cooling you could harm or shorten the life of your system. CPU temperature can usually be checked from within the BIOS. However, these are inaccurate as your CPU is under almost no load in the bios. SiSoftware Sandra may be used within Windows to check temperature. This should be done when your CPU has been under a heavy load for a while for optimum results.
There are three types of cooling that are generally accepted for overclocking: Air, water and peltier.
With both air cooling and water cooling some type of transfer material is needed to move the energy away from the sensitive electronics. The device used for this purpose is a heatsink. The two most popular heatsink materials are Aluminum and Copper. The heatsink that is stock on factory computers by major manufacturers (Dell, Gateway, IBM) is usually made of aluminum, which has satisfactory heat transfer characteristics. However when overclocking more heat is being produced from the increase in power consumption. In order to obtain lower temperatures a material with better heat transfer properties is important and copper is the material that offers the best ratio of price/performance.
Power
Chips at higher speeds may need more power. Raising the vcore voltage on a CPU might enable it to go at slightly faster speeds but by doing so you add a lot more heat output from the CPU. The Vcore of a processor is the voltage at which a chip is set to run at with the stock speed. This voltage may need to be changed when the multiplier is raised because otherwise the transistors in the chip won't switch fast enough - transistors switch faster the higher the supply voltage. If there is not enough voltage then the chip will become unstable and crash randomly. Good cooling is needed to keep the system stable at higher speeds. Raising the vcore too much may harm or shorten the life of your system. Raising the vcore can also greatly affect the stability of the system. This is where a high quality PSU will come into play. While many cheap, no-name brand PSU's will crash and die with more Vcore, a good quality one will live to serve you for a long time. For most modern Intel and AMD processors, it is strongly recommended not to exceed 1.45V on the vcore, however even 1.45V can significantly reduce the lifetime of a CPU.
Note: increasing the speed (multiplier or fsb) without changing the voltage will also increase heat output, but not as much as when also increasing voltage. Having said that, increasing the multiplier or FSB without adjusting the voltage may make your system unstable (undervolt).
Undervolting
Instead of raising Vcore during overclocking, you could also simply reduce Vcore and stay at stock clock speed. This is possible because modern CPU's are ususually set at a voltage above the voltage it really requires so as to account for manufacturing variances. The advantage to undervolting include
- Lower heat output and power consumption
- Potentially higher performance (since the CPU can boost for a longer period and will hit the TDP limit less often)
- It works with any CPU; an overclockable CPU is not required.
Laptops can benefit the most from undervolting; their thin chassis means that power and temperatures play a greater role than in a desktop. However, only Intel laptops can be undervolted; the AMD Ryzen Master configuration tool does not run on Ryzen Mobile, nor are there any third party tools available (ThrottleStop is only for Intel).
Similar to overclocking, one can undervolt the CPU using tools like Intel Extreme Tuning Utility, ThrottleStop or in the BIOS.
Remember that just like when overclocking, you should start slowly and also test the stability of the CPU undervolt (eg: by running Prime95).
References
- ↑ Coles, Olin. "Overclocking the NVIDIA GeForce Video Card". http://benchmarkreviews.com/index.php?option=com_content&task=view&id=205&Itemid=38. Retrieved 2008-09-05.
External links
- Introduction to Overclocking Guide for Beginners by Vito Cassisi
- Overclocking the NVIDIA GeForce Video Card by Olin Coles
- PC Performance Tips Mostly Video Guides To Speeding Up And Overclocking Your PC.
- BIOS settings
- Book on BIOS optimization for PCs
- Overclocking guide for Centrino notebooks
- BlazingPC.com
- 3 methods to Overclocking Your Computer
- How to Lower Temperatures, Stop Throttling, and Increase Battery Life: The ThrottleStop Guide
Silencing
In contrast to overclocking, you may prefer to silence your computer. Some high-performance PCs are very loud indeed, and it is possible to reduce the noise dramatically. The main sources of noise are: Fans (CPU, case, power supply, motherboard, Graphics card), and Hard disks. While total silence in a PC is possible, it is far cheaper and easier to aim for something 'virtually inaudible'.
Note that quieter computers sometimes run slightly hotter, especially in small form factor (SFF) systems, so you need to monitor carefully what you do. Usually you can't overclock and silence at the same time (although it is possible with the right CPU and cooling techniques). Sometimes CPUs (and even GPUs) are underclocked and/or undervolted to achieve greater silence at the expense of performance.
Designing a powerful and quiet machine requires careful consideration in selecting components, but need not be much more expensive than a normal, loud PC. If you are looking to quiet an existing PC, find the offending component that produces the loudest or most irritating noise and replace it first, then work down from there.
Another way to do this is by undervolting; see here to find out more about it.
Fans
In general, large diameter (120 mm), high quality fans are much quieter than small diameter ones, because they can move the same amount of air as smaller (80mm or 92mm) fans, but at slower speeds. Temperature-regulated fans are also much quieter, as they will automatically spin at a reduced speed when your computer is not in heavy use. Wire mesh grills (or no grill at all) allow better airflow than the drilled holes used in many cases.
- CPU
- Modern CPUs can generate a lot of heat in a very small area: sometimes as much as 100-watt lightbulb! For the vast majority of processors, a dedicated fan will be a necessity. There are some, like VIA processors, that require only a heat sink, but you will not find passively cooled CPUs at nearly the same speeds allowed by active cooling. However, for modern computers, CPUs are not the limiting component for speed in daily tasks, so unless you do demanding 3D gaming or video editing, then a passively cooled processor may be just for you. They would also be very attractive in media-center PCs, or other specialized applications where computer noise would be more noticeable.
- The noisiest fan is usually the CPU fan: the Intel-supplied fan-heatsinks are particularly loud, although they do provide good cooling. Some BIOSs allow you to slow the CPU fan down automatically when it is not too hot - if this option is available, turn it on. Also, you can get 3rd party coolers, which are designed to be less noisy: for example, those made by Zalman.
- Power Supply (PSU)
- Noisy power-supplies simply have to be replaced with quieter ones. Consider selecting a power supply that intelligently throttles fan speed based on load, or an altogether fanless model, though those can be hard to find depending on the wattage you need. As a compromise, some power supplies will stay silent as long as it is under light load.
- Case Fans
- Case fans can be slowed down by using fan-speed controllers, or resistors (but beware of insufficient cooling). Also, they can be replaced with higher quality (ball bearing) or (sometimes) larger fans, both of which will make less noise.
- Video Card and Motherboard Chipset
- A graphics card with active fan-cooling is very common in gamer PCs. Since 2004, most of these cards have a built in fan-speed controller, so the fan will slow down if 3D acceleration is not needed.[1] As you will lose warranty coverage if you change the fan, you should check (through reviews) if the card is a noisy one. If you insist on exchanging the cooling device, be sure the card is compatible with the new fan. Motherboard and lower-end video card fans can often be replaced with a passive heatsink.
Many systems only have fan-speed controllers for the CPU and for the graphics card. Some people make the other fans quieter by undervolting them: running the 12 V fan on 9 V or 7 V or 5 V,[2][3][4] or adding a series resistor to the fan cable.[5]
Dust and debris can accumulate on fan blades in a short period of time. Dust on PC components acts as an insulator, trapping in heat and forcing your fans to spin at higher speeds to keep everything cool. Keep your PC clean to reduce noise and increase efficiency.
Water cooling

An efficient, if expensive way to eliminate the need for most fans in ones computer system is the implementation of water cooling devices. Water cooling kits are available for beginners, and additional components or "water blocks" can be added to the system, allowing virtually any system needing cooling to be put "on water".
Most water cooling systems are not fanless as the radiator component still needs to spread the heat. There are fanless solutions but they need to be placed exterior of the PC case making the computer less transportable. [6] [7]
Other cooling fluids are possible in a sealed system, although plain water is generally preferred because it has higher heat capacity and thermal conductivity than oil, and it is easier to clean up if a leak ever occurs: turn off the computer, shake off most of the water, and use a hair dryer to evaporate the rest of the water.
Keep in mind, however, that water and electronics don't mix, and that leaks could cause components to short out, seriously damaging them. Be sure you're willing to risk this and thoroughly check for leaks before providing power to the system components. If possible, activate the water pump(s) for 10-15 minutes and check potential trouble spots.
Full immersion cooling
Some people are experimenting with cooling personal computers by immersing them almost completely in non-conductive liquids such as transformer oil and flourinert.
Oil cooling
Transformer oil has been used to cool electrical equipment for decades.
Some people are experimenting with oil cooling personal computers. Since oil is non-conductive, the motherboard and graphics card and power supply (but not the hard drives or optical drives!) will continue to run submerged in a "fishtank" filled with oil. Some people prefer colorless transparent "mineral oil" or cooking oil, but Frank Völkel recommends motor oil.
Oil cooling is lower cost than water cooling, because it doesn't require water-tight "blocks" or hoses. Some people leave the fans running on the motherboard and power supply to "stir" the oil. Other people remove all the fans and add a (submerged) pump to "blow" a stream of oil onto the CPU hot spot. Some CPUs, if given a big enough metal heat sink, can be adequately cooled by passive convection currents in the oil (and the large surface area of the oil-to-case and case-to-air), without any fans or pumps.
If any cable (the hard drive ribbon cable, the power cable, the monitor cable, etc.) exits the case below the oil line, it must have an oil-tight exit seal -- consider making all cables exit the top of the case instead.
Low boiling point chemicals
Another point of recent experimentation has been Novec 1230 (trademarked and produced by 3M), which has a boiling point of 49 °C (120 °F). This means that as the liquid touches a part above that temperature, it evaporates immediately. It then condenses at the top of the tank, only to drip down and convect through the tank again. CPUs usually have no problem running in Novec 1230 without any heatsink at all. The force of convection is enough to drive the liquid around the tank, so it does not need any fans either.
Immersion in other cooling fluids has been attempted, such as fluorinert or liquid nitrogen, however they are generally not used because of the costs involved in the equipment and the liquid nitrogen [8][9].[10][11][12]
Hard disk
A 'resting' hard disk is generally quite quiet compared with any fan, but increases dramatically when it starts 'churning', as when you open or save a file or perform a virus scan. As most hard drive manufacturers place capacity and performance ahead of noise, it is recommended that you look for a hard drive with good acoustics to start with. SilentPCreview.com does comprehensive testing, so picking any of their recommended drives will serve you well. There will usually be a compromise between performance and sound, so opting for a slower RPM or smaller capacity single-platter HDD may be necessary to reach very quiet levels. Also, 2.5" notebook drives can be much quieter than any 3.5" desktop drive, but are more expensive and come in smaller capacities.
After selecting a quiet drive, or if you want to reduce the noise coming from a loud drive, look into mounting options. Hard drives are usually mounted with four screws attaching them directly to the case, providing very stable support, some heat dissipation and a lot of direct transmission of HDD vibrations to the case. Reducing this transmission to almost nothing is possible, though it is not always easy.
But do ensure sufficient cooling of the hard drive: running a hard drive moderately hot can reduce its lifespan to under a year![citation needed] Some mounts are designed to provide both extra cooling and silencing, such as the heat-pipe coolers. Spinning the HDD down when not in use will also reduce noise, but it can reduce the life of the drive by increasing the number of landings and take-offs performed by the read/write heads.
The best noise reductions come from suspending the hard drive with elastic, providing no direct route for sound transmission to the case. You can make your own from elastic in a fabric store, or buy kits that provide materials and instructions. (Rubber bands are not recommended, as they will become weak from the HDD heat and oxidation and snap.)
Foam can be used to dampen vibrations, but may trap more heat than is safe. Resting the hard drive on the floor of your case on a bed of foam can be very effective at reducing noise.
Using silicone or rubber screws instead of metal mounting screws will give you marginal sound reduction, but is easiest and cheapest to implement. You also won't have to worry about shifting of the HDD if you move your computer.
A software tool created by Maxtor exists which can adjust a hard disk's noise/performance ratio to what your system requires. The technique is called acoustic management. However, only certain drives currently support this feature. You can read more from the "Definitive Maxtor Silent Store Guide" and get the tool from Maxtor.
Completely silent computers will need to use solid state memory like flash drives or eeprom (also called SSD), which have no moving parts and make no noise. This is more expensive and has less capacity than a normal hard drive, so it can't be considered a mainstream storage solution, yet could suffice for a web-browsing PC. At the moment, hard drives are the only practical storage solution except in very specialised circumstances, though this will likely soon change with the rapidly dropping price of flash memory.
Other
- Steel cases are quieter than aluminum ones, because the denser material vibrates less easily.[13]
- Quiet cases are available, containing noise-damping acoustic foam. There are 3rd-party acoustic foams you may decide to add as well.
- Experiment with rubber or foam washers when mounting drives and fans. These will dampen any vibration these devices cause.
- Keep cables tied up and neat. Not only will this keep them clear of fans (which could quickly cause dangerous heat build-up), but the reduced impedance of airflow throughout your case will make things cooler. Flat, ribbon-shaped cables can safely be folded up to a fraction of their original width.
- Make sure your case has rubber or foam feet if it rests on a hard surface. Placing it on carpeting will also reduce vibrations.
- Underclocking will reduce system performance, but you can also then reduce the CPU voltage, and power consumption as a whole. Noisy fans may then also be operated at reduced speed or eliminated altogether, as the computer will produce less heat. The converse of the diminishing-returns law for overclocking is that underclocking can prove surprisingly effective.
- The really obvious, but surprisingly effective: keep the computer under your desk or even in a closed cupboard, rather than under or beside your monitor.
NOTE: No matter what technique you use to quiet the machine, be sure to keep a steady supply of fresh air over all components. Don't put your machine in a closed cupboard unless you are sure heat will not be an issue. If you use acoustic foams, be sure they aren't acting as insulators, too - and keeping components hot.
See also
Further reading
- ↑ Casey Labine. "How to Adjust a Graphics Card Fan Speed"
- ↑ "How to: Silence My Fans By Undervolting?"
- ↑ Silent PC Review: "Stock Fan Measurements"
- ↑ Gabriel Torres. "How to Create a Three-Speed Fan Control without Spending a Dime".
- ↑ Igor Wallossek. Tom's Hardware: "Case Fans: Speed Control"
- ↑ "Silent Convective Water Cooled PC"
- ↑ "Design and Performance Evaluation of a Compact Thermosyphon" by Aniruddha Pal, Yogendra Joshi, Monem H. Beitelmal, Chandrakant D. Patel, Todd Wenger, 2002
- ↑
- ↑
- ↑ Tom's Hardware: 5 GHz project
- ↑ Server help: Liquid Nitrogen Project and Hard forum: Liquid Nitrogen Project
- ↑ Wikipedia: computer cooling#Liquid nitrogen
- ↑ Mike Chin. Silent PC Review: "Case Basics & Recommendations"
External links
- Silent PC review
- Microchip AN771: Suppressing Acoustic Noise in PWM Fan Speed Control Systems
- "The Buzz on Quieter Computers" article by Daniel Greenberg in The Washington Post, September 3, 2006.
- Technorati "silent PC" blog posts
- "A Plea for Silence" by Loyd Case (ExtremeTech)
- "How to Quiet Your PC" by Jason Cross (ExtremeTech)
- "a diskless, fanless, completely silent PC"
- "fit-PC: a fanless PC that runs Linux or WindowsXP". Archived from the original on 2012-06-29. http://archive.is/JFCv.
- Koolu: a fanless PC that runs Linux; Koolu wiki
- "Building a Silent PC: My Quest for Quiet" by Terry Gray
- the oil-cooled computer wiki (in German) and oil-cooled computer discussion forum (in English)
- "Quiet PCs… shhh" by Thomas Ricker (oil-cooled computer)
- "Aquarium Full of Oil For PC Cooling" on slashdot
- "Want a Cool and Quiet PC? Dunk it in Oil" on slashdot
- "Xoxide Resource Center: Building a Quiet Computer
- fit-PC, a tiny quiet PC
- "Project: Passive" by Ville 'Willek' Kyrö, a PC that uses no fans, only completely passive cooling.
- "Tiny, sub-$100 PC runs Puppy Linux": a PC with no moving parts.
- "0 dBA ion cooled computer": a PC with no moving parts; blows air using "ion wind".
Conclusion
If you're serious you’ve probably at least glanced over this book as you considered building your own computer, and I hope it has inspired you to go ahead with that project. Throughout we’ve tried to steer you clear of some of the pitfalls and alert you to some of the safety issues involved, and in so doing, we have undoubtedly overemphasized the dangers and difficulty. In sooth, it’s pretty hard to hurt yourself building a computer and most people get through their first build without burning up any parts. With a little planning, anyone who can use a screwdriver can build a computer.
The computer you build will always mean a little bit more to you than one you buy, not least because you designed it yourself and will no doubt be upgrading it from time to time for years to come. You may find a little smile of satisfaction creeping onto your face each time you hit the power button, and I think you’ll find that smile is an ample return for your time and effort.
Lastly, if you go through with it and build your own PC, you’re bound to run into something we've missed here; a problem we didn’t anticipate, something we forgot to mention, or something that has changed recently. If you do, please come back here and add to or change this book. You don’t have to know everything to contribute, just one thing that’s true. If this guide has helped you at all, think of it as payback.
Appendices
Noted contributors
- Noogz - Editor, Hardcore contributor, Team member
- Reub2000 - Original Author, Hardcore contributor, Team member
- Hyperlink - Organizer, Team member, Structural Contributor
- Andreas - Consultant, Print version
- Yayyak - Contributors
- KunalThaggarse - Contributor
External links
Related Wikibooks
- Basic Computing Using Windows for tips on using your computer.
- Computer Hardware and A+ Certification for technical details on each part's function.
Related Wikipedia articles
Discussion forums
- Elephant Staircase wiki sometimes discussing computer case modding.
- "build your own arcade" wiki
- the overclocking wiki
- How to build a computer - with build ideas A heavy focus on configuring the perfect build.
- overclocker's club forum
- case modding forum
- Ölrechner-Wiki -- a wiki about running computers submersed in oil as a silent way of cooling.
- the Computer Components wiki -- a wiki that discusses computer components, including custom laptop components.
Operating systems
Here are some links to Windows and Linux pages which might be useful when you have to choose an operating system. Be careful and do your research to make sure you get the OS that's right for you. To download the CD images (*.iso) for making installment CDs, you will want to have a DSL connection or faster, since files are often around 700 MB (the size of one CD). Some distros are larger than one CD.
Downloading tips
- Download each ISO file separately. If you do them all at the same time, it will eat bandwidth and take lots of time to download.
- Do not use dial-up! It takes 3 hours to download a 12 MB Internet Explorer install package on dial-up. Dial-up is also shared bandwidth, so if you download, everything for most other people goes extremely slow.
- Don't download anything you think is unsafe. I recommend downloading items with proper names and the names of companies. Don't download something like "WW32@Bugbear.3.E" or "timestamp maker". Download stuff like "Adobe Acrobat 7.0.7" or "Macromedia Flash Professional".
- Virus check, and validate with the file's MD5 checksum before using. This ensures the download is not rigged or damaged.
Linux
- Fedore Core
- Based on Redhat, this is the newest Redhat supported distro available. Has most of the features that Redhat once including a new "bleeding edge" interface. This has become about the second most powerful Linux distros on the web.[citation needed]
- The Mandriva Distribution
- A common one with multiple uses.
- The SUSE Distribution
- Comes in all shapes and sizes. The OSS or the "Open Source Edition" is a set of four downloadable isos with many open-source programs that are useful if you want a low cost office. The Novell Edition is the paid for edition including stuff like StarOffice, Mesa, commercial/proprietary software. So if you have a business, where you want quality and good tools for your money then buy that.
- The Ubuntu distros
- A very popular distribution, Ubuntu is an attempt at "user friendly" Linux. Canonical Ltd. started Ubuntu with a 10 million dollar grant, and in less than a year has become a major player in the Linux field. All these distros can be configured as servers as well as running on their own.
- Ubuntu The standard Ubuntu edition comes packaged with the GNOME desktop environment and lots of other open source software.
- Kubuntu The same as the Ubuntu edition, except it runs KDE (K Desktop Environment) instead of GNOME.
- Edubuntu Edubuntu in the educational release of Ubuntu running GNOME or KDE and having more than 100 educational pieces designed for use in the classroom. In fact, five school districts in the United States now use the Edubuntu product, but of its educational functionality.
- Xubuntu Ubuntu with the Xfce desktop. Good for lower-end systems.
Live CDs
Live CD Linux Distros are some distros that you can use in kiosk mode or just for testing out the system. They are very useful for demonstrating the capabilities of Linux.
Advanced Linux distros
Note: this section is only for pros. If you do not want to damage your newly built computer, stick with a Linux distribution above, or ask your nearest computer geek to help you. This is your final warning!
- Gentoo
- Gentoo is an advanced Linux distribution with one of a few nice features including Portage. When you connect to the Internet, there is a portage folder which has thousands of software, and software libraries at your disposal. Cons: Need a geek to set it up. Refer to the instruction manual on the Gentoo Documentation page before you commence installation.
- Slackware
- Good Distro, though not up to date with good graphical interfaces. If you want something newer, get a distro above. Cons: Requires a geek to install apps in Slackware.
Microsoft Windows
Microsoft Windows is an operating system started in the late 80s after Apple Computer created the Macintosh. This is the OS running on the majority of PCs. Unlike open source systems like Linux, Windows is proprietary, and so must be purchased with a license. It is relatively easy to use, and runs on all PCs (except for Apple PCs, which run Apple's proprietary MacOS).
NLite is a free and legal[citation needed] tool to help you pre-install drivers and customize your Windows setup.