ISO 128
ISO 128 is an international standard (ISO), about the general principles of presentation in technical drawings, specifically the graphical representation of objects on technical drawings.[1]
Overview
Since 2003 the ISO 128 standard contains twelve parts, which were initiated between 1996 and 2003. It starts with a summary of the general rules for the execution and structure of technical drawings. Further it describes basic conventions for lines, views, cuts and sections, and different types of engineering drawings, such as those for mechanical engineering, architecture, civil engineering, and shipbuilding. It is applicable to both manual and computer-based drawings, but it is not applicable to three-dimensional CAD models.[1]
The ISO 128 replaced the previous DIN 6 standard for drawings, projections and views, which was first published in 1922 and updated in 1950 and 1968. ISO 128 itself was first published in 1982, contained 15 pages and "specified the general principles of presentation to be applied to technical drawings following the orthographic projection methods".[2] Several parts of this standard have been updated individually. The last parts and the standard as a whole were withdrawn by the ISO in 2001.
A thirteenth part was added in 2013.
Composition of ISO 128
The 15 parts of the ISO 128 standard are:
- ISO 128-1:2003 Technical drawings—General principles of presentation—Part 1: Introduction and index
- ISO 128-15:2013 Technical product documentation (TPD)—General principles of presentation—Part 15: Presentation of shipbuilding drawings
- ISO 128-20:1996 Technical drawings—General principles of presentation—Part 20: Basic conventions for lines
- ISO 128-21:1997 Technical drawings—General principles of presentation—Part 21: Preparation of lines by CAD systems
- ISO 128-22:1999 Technical drawings—General principles of presentation—Part 22: Basic conventions and applications for leader lines and reference lines
- ISO 128-23:1999 Technical drawings—General principles of presentation—Part 23: Lines on construction drawings
- ISO 128-24:2014 Technical drawings—General principles of presentation—Part 24: Lines on mechanical engineering drawings
- ISO 128-25:1999 Technical drawings—General principles of presentation—Part 25: Lines on shipbuilding drawings
- ISO 128-30:2001 Technical drawings—General principles of presentation—Part 30: Basic conventions for views
- ISO 128-34:2001 Technical drawings—General principles of presentation—Part 34: Views on mechanical engineering drawings
- ISO 128-40:2001 Technical drawings—General principles of presentation—Part 40: Basic conventions for cuts and sections
- ISO 128-43:2015 Technical product documentation (TPD)—General principles of presentation—Part 43: Projection methods in building drawings
- ISO 128-44:2001 Technical drawings—General principles of presentation—Part 44: Sections on mechanical engineering drawings
- ISO 128-50:2001 Technical drawings—General principles of presentation—Part 50: Basic conventions for representing areas on cuts and sections
- ISO/TS 128-71:2010 Technical product documentation (TPD)—General principles of presentation—Part 71: Simplified representation for mechanical engineering drawings
Other ISO standards related to technical drawing

- ISO 129 Technical drawings—Indication of dimensions and tolerances
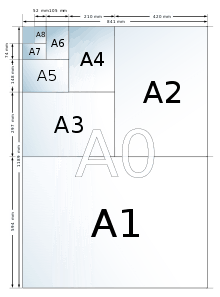
- ISO 216 paper sizes, e.g. the A4 paper size
- ISO 406:1987 Technical drawings—Tolerancing of linear and angular dimensions
- ISO 1660:1987 Technical drawings—Dimensioning and tolerancing of profiles
- ISO 2203:1973 Technical drawings—Conventional representation of gears
- ISO 3040:1990 Technical drawings—Dimensioning and tolerancing -- Cones
- ISO 3098/1:1974 Technical Drawing - Lettering - Part I: Currently Used Characters
- ISO 4172:1991 Technical drawings -- Construction drawings—Drawings for the assembly of prefabricated structures
- ISO 5261:1995 Technical drawings—Simplified representation of bars and profile sections
- ISO 5455:1979 Technical drawings—Scales
- ISO 5456 Technical drawings -- Projection methods
- ISO 5456-1:1996 Technical drawings—Projection methods—Part 1: Synopsis
- ISO 5456-2:1996 Technical drawings—Projection methods—Part 2: Orthographic representations
- ISO 5456-3:1996 Technical drawings—Projection methods—Part 3: Axonometric representations
- ISO 5456-4:1996 Technical drawings—Projection methods—Part 4: Central projection
- ISO 5457:1999 Technical product documentation—Sizes and layout of drawing sheets
- ISO 5459:1981 Technical drawings -- Geometrical tolerancing—Datums and datum-systems for geometrical tolerances
- ISO 5845-1:1995 Technical drawings—Simplified representation of the assembly of parts with fasteners—Part 1: General principles
- ISO 6410-1:1993 Technical drawings—Screw threads and threaded parts—Part 1: General conventions
- ISO 6411:1982 Technical drawings—Simplified representation of centre holes
- ISO 6412-1:1989 Technical drawings—Simplified representation of pipelines—Part 1: General rules and orthogonal representation
- ISO 6413:1988 Technical drawings—Representation of splines and serrations
- ISO 6414:1982 Technical drawings for glassware
- ISO 6428:1982 Technical drawings—Requirements for microcopying
- ISO 6433:1981 Technical drawings -- Item references
- ISO 7200:1984 Technical drawings — Title blocks
- ISO 7083:1983 Technical drawings—Symbols for geometrical tolerancing—Proportions and dimensions
- ISO 7437:1990 Technical drawings -- Construction drawings—General rules for execution of production drawings for prefabricated structural components
- ISO 7518:1983 Technical drawings -- Construction drawings—Simplified representation of demolition and rebuilding
- ISO 7519:1991 Technical drawings -- Construction drawings—General principles of presentation for general arrangement and assembly drawings
- ISO 8015:1985 Technical drawings—Fundamental tolerancing principle
- ISO 8048:1984 Technical drawings -- Construction drawings—Representation of views, sections and cuts
- ISO 8560:1986 Technical drawings -- Construction drawings—Representation of modular sizes, lines and grids
- ISO 8560:1986 Technical drawings—Construction drawings—Representation of modular sizes, lines and grids
- ISO 8826-1:1989 Technical drawings—Rolling bearings—Part 1: General simplified representation
- ISO 8826-2:1994 Technical drawings—Rolling bearings—Part 2: Detailed simplified representation
- ISO 9222-1:1989 Technical drawings—Seals for dynamic application—Part 1: General simplified representation
- ISO 9222-2:1989 Technical drawings—Seals for dynamic application—Part 2: Detailed simplified representation
- ISO 9958-1:1992 Draughting media for technical drawings—Draughting film with polyester base—Part 1: Requirements and marking
- ISO 9961:1992 Draughting media for technical drawings—Natural tracing paper
- ISO 10209-1:1992 Technical product documentation—Vocabulary—Part 1: Terms relating to technical drawings: general and types of drawings
- ISO 10578:1992 Technical drawings—Tolerancing of orientation and location—Projected tolerance zone
- ISO 10579:1993 Technical drawings—Dimensioning and tolerancing—Non-rigid parts
- ISO 13567 is an international Computer-aided design (CAD) layer standard.
- ISO 13715:2000 Technical drawings—Edges of undefined shape—Vocabulary and indications
- ISO 15786:2008 Technical drawings—Simplified representation and dimensioning of holes
See also
- List of ISO standards
- CAD standards
- ISO 216 paper sizes, e.g. the A4 paper size
- ISO 13567 is an international Computer-aided design (CAD) layer standard.
- Engineering drawing
References
- 1 2 ISO 128-1:2003 Abstract. Accessed 1 March 2009.
- ↑ ISO 128 techstreet.com, 2009.)