Summary
This page describes the actions to take for the making and restoration of whole-computer images. In particular, details are given on how to access the Windows Recovery Environments of Windows 7, Windows 8, and Windows 10.
Those who need only some detailed Windows function should go straight to Navigating to the Main Recovery Options.
Basics
For those unfamiliar with the subject, here are some basics:
- Common Terms
- Backup. This refers in the main to the saving of copies of user document files. Examples might include Word documents, spreadsheets, and other user interests. Backups can be done at any time by dragging copies of such files onto flash drives in the Windows Explorer, or by using applications like the Windows Backup and Restore utility for manual backups, or those made as a part of an automatic schedule.
- System Restore. This function replaces the system files of the computer with a clean set, to remove some kinds of problems. Users can set periodic snapshots of system files called Restore Points and can return to those points in time, at least as far as the system files are concerned. User data (documents) tend to be unaffected by a restore of this type, but because the registry is changed, some of the users applications might be.
- Recovery. Although System Restore is a distinct part of the Recovery option set, the term is more usefully used to describe the Advanced Recovery Options, and these include both a method to recover the original factory state of the computer, and also a method to recover a computer from a previously saved image. It is this latter state that interests us here.
- Recovery Environment. This refers to the set of functions and tools built into Windows that allows a user to either manually or automatically repair a damaged installation. For example, a user could manually open the Recovery Environment options to install an image file, or when a failed boot-up is detected by the computer it might go straight into a diagnostic mode, to fix the problem.
- An image is a complete copy of a computer's allocated memory space. Because an image copy can be made with the computer open and running, the image can contain not only its file lists, but all of the drives, loaded files and applications, user installations and updates, configurations and everything else that makes it work the way that it does at the moment of imaging. The factory partition, used to restore the computer to its original state, is also imaged along with everything else, so not even that option is lost. It is well described as a snapshot of a computer, taken hopefully at a time when it is at its best.
- An image can only be used on the computer from which it was saved. Specifically, the mother board must be the same, though other changes such as a new hard drive are possible. To install a larger hard drive on a computer we first make an image of everything, then change the drive. After that, the old image can be in installed again, with an adjustment of the drive partitions to make use of the unallocated space. (See later).
- Windows images are handled by the Recovery Environment software. Such software is installed in some form in every modern version of Windows, and in addition, can be downloaded onto a disc to work independently for startup and repair. The ways to access the Recovery Environment vary between the versions of Windows, so tables have been prepared for more immediate use and for reference. Navigating to the Main Recovery Options
- Images are larger than file backups. Typically, a whole-computer image occupies about 250 gigabytes of storage space, and such a data transfer can take about two or three hours to complete. External hard drives, (Figure 1), make for the most convenient image stores, though theoretically a set of DVD discs might be used with frequent disc changes. Images cannot be backed up to the same computer that is being imaged, but they can store images once they are made on a backup drive. In this case, once an image backup is completed, the entire WindowsImageBackup folder that was produced can be copied, again slowly, to the intended storage location for safekeeping.
- Most image backups exist alone on their own drive. This is the simplest way to do things, but for those who own big backup drives, several images might be installed on the same drive. Windows needs special attention for multiple saves, if data overwrites are to be avoided. There is more on this subject in the next section.
- Images should be made when computer times are good, for they will be needed when times are bad. Because there is likely to be a time delay in using the image for a restoration, the passwords used at recovery time might not be same as the ones used when the image was made. The solution, to avoid forgetting, is to label the saved image disc with the admin and standard passwords that then applied.
- Imaging can save effort and costs. Make an image for a new computer as early as possible. Then, as time passes, make a new image to bring up to date progress in installed programs and updates. In particular, after installing expensive software like Microsoft Office, with a limited number of installs, make an image of the whole computer. Then, if there is a problem a new purchase of Office can be avoided.
About Image Saves
- The imaging process places a set of folders onto the backup drive. The highest level folder is always called WindowsImageBackup, and the folder at the next level down has the computer's name, and the folder beneath that is called Backup. Several image files are located in the Backup folder. The folder sequence always looks like this:
WindowsImageBackup\(the computer name will be found here)\Backup\...files...
- Windows is a source of some confusion for those who save multiple images on one drive. Windows implies, at least by omission, that the only constraint in saving data concerns storage capacity. Windows fails to mention the inevitable overwriting of data. Without special effort, any existing images on a drive will always be overwritten by the next. For single saves there is no such problem, or when a user intends this to happen, but when multiple saves is the intention, the following points need special note:
- There must always be enough space on a drive for the current save, or any existing files or folders will be overwritten. The space needed for imaging is made clear before a save is initiated.
- At the time of the save there can be no folder called WindowsImageBackup on the user's backup drive or it will be overwritten. This will always happen regardless of whether or not there is enough space, since this folder name is used for every whole-image session. If there is such a named folder, then rename it to something else, say, HP290715WindowsImageBackup or something of that kind.
- Before restoring from such images, the image folder to use for the current restoration must have its name changed back to WindowsImageBackup, or it will not be found by the recovery process. Clearly before a recovery, only one folder can bear this default name.
- Images ignore unused space in their making. This makes for smaller storage spaces. That is to say an installation spread over a 2 TB computer drive would have an image size that is not much different from the same installation on a 300 GB drive, since the main difference between the two is the amount of unused or unallocated space.
- Parts of an image cannot be installed separately. The whole image must be installed at once. That said, the Backup and Restore facility can image individual drives separately. However, there is rarely any advantage in imaging parts of the computer, since any parts not needed are easy to remove, and a full image provides the best backup assurance.
- Images are specific for a particular computer. The motherboard has a security tag that fixes the use of images for that computer, but the same images can be used any number of times, provided that the motherboard is not changed. That is to say, the hard disc could be changed and the previously saved image installed onto it without restriction.
- When a new hard disc has just been installed that is much larger than the image to be re-installed on it, a fairly common situation for computer upgrades, the installed image works as it should but has a large area of unallocated space at its end. That is to say, the extra space does not show up on any of the drives. A common fix for this is to make use of third party software to extend the C: drive by the amount of the unallocated space. (See below at, Extending a partition after imaging). Windows Drive Management utilities are often more difficult to use than third party software, and for some such tasks, unsuitable altogether.
Navigating to the Main Recovery Options
- The first drop-box in this section, titled Navigating to the Main Recovery Options displays a summary of access routes to the Windows Recovery functions. Data is given for Windows 7, 8, and 10 in separate columns, since the navigation details are usually different for each.
- The recovery options on this page are those supplied with Microsoft Windows, as opposed to those of computer manufacturers. So, there are often other applications that bring together useful utilities, including links to the recovery tasks. Because manufacturers have some latitude in setting the f- number options, these can vary at times. In these cases trial and error, the user manual, or an internet search, should quickly resolve the matter.
- The second drop-box, Specific Recovery Options for Windows 7 displays facilities, the details of which have been arranged in a tree format that show the route to any function from the starting point. Three sections were necessary; one for starting within Windows, another for the f8 start during bootup, and one where a startup-repair disc is required.
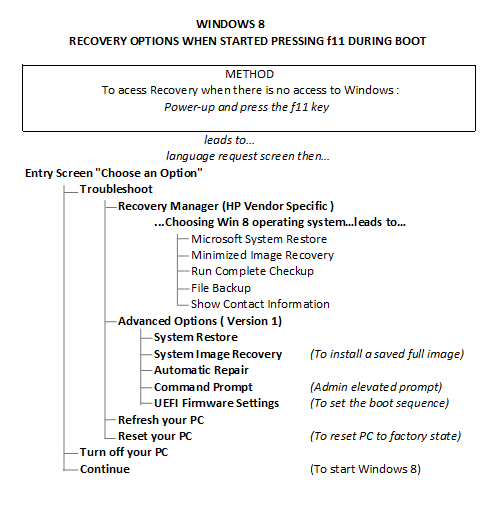
- The third drop-box's layout, Specific Recovery Options for Windows 8 takes the same approach as for that of Windows 7. In fact there are more methods shown than for Windows 7. and the three listings here are also in tree format. Notice the change to f11 for the key boot-up, but see the notes in the section below for the use of f8. If laptop viewing of such detail becomes difficult, just click the box contents to view the images in full scale. Use f8 starts in Windows 8.
- Notice that Windows 8 is slightly different from Windows 8.1, and that the table has not yet been updated to include it. In particular, there is no page called Windows 7 File Recovery in Windows 8.1. Instead, the page that contains the link to make an image is File History; it is accessed via Control Panel-System and Security-File History-System Image Backup, in the same way as in Windows 10. Notice that the link only becomes visible after the automatic drive search has completed. Restoration of images in Windows 8.1 is done via the control panel's Recovery selection. The Recovery options are available using the various methods of access that are broadly similar to those of Windows 8. Users who update from Windows 8 to Windows 8.1 are advised, after configuration, to make a new image of their computer installation in the usual way.
|

|


|


Make a Whole-PC Image

This particular drive has a 2 Terabyte, (2 x 10¹²), capacity and can work with USB 3 drivers for increased speed.
An image can only be made while the computer and Windows are fully operational. There are no other worthwhile options. For this reason a user should consider making images periodically, at any time when the computer is working well, for example, when the computer is new, or before making major changes such as the installing of a new hard drive or a major update to Windows. Before making an image it is as well to ensure that no problems are introduced in the process.
Before imaging consider the following
- Remove any clutter. e.g., the contents of the recycle bin, and temporary files.
- Make sure that all of the Windows Updates are current.
- Do basic maintenance including a full virus check.
- Set a restore point manually. Refer to the table in the drop-box above, Navigating to the Main Recovery Options , for the selections to use.
Preparation: You will need the following
- The Admin password for the computer.
- An external USB hard drive of sufficient capacity is preferred for the save, and its cable. Make sure too, that any data on the drive does not include a folder with the name WindowsImageBackup. If so, change its name before the imaging or its data will be lost by overwriting. Note that other storage media could be used to store an image too, such as a second internal hard drive, but the use of several DVD discs is much less manageable. If you intend to make a start-up disc too, then you will also need a blank or rewritable DVD.
Method
- Start the computer and log in as an administrator to Windows.
- Connect the backup drive to the computer.
- Refer to the table in the drop-box above, Navigating to the Main Recovery Options , for the actions and selections to follow to make the image. Note that this is specific for your version of Windows.
- Follow the prompts given by the computer. The entire process take a couple of hours or so.
- When the image is complete, decide whether or not to make a startup disc when invited to do so.
- If you intend to save more than one image on the drive, give the WindowsImageBackup folder in your saved image files a different name. This will avoid any accidental overwriting of the image.(Right-click folder, then select Rename; modify name then enter.)
- Label the backup drive with any relevant details of the image and the admin password that goes with it, along with any other user passwords that are likely to be forgotten by the time the image is used.
Make a Startup-Repair disc
If there is a failure in the computer that prevents its booting up in the normal way, then you must start the computer with a Windows Startup-repair disc. It contains the files needed to boot the computer, and also holds the files needed to run the transfer of an image from an external backup drive to the computer's main drive. This transfer action can be carried out even when a brand new (empty) hard drive has been installed. Startup discs are made on CD\DVD formats, and since they hold drivers, they are specific for 32 bit or 64 bit installations, and for different versions of Windows.
If you have not already done so, follow the links in Navigating to the Recovery Options to make a startup disc for your version of Windows.
For Windows 8, there is also a Recovery Disc. It is limited to a one-time copy, so get it right. It is not quite the same as the Windows Startup-repair disc but can allow boot-up access for the installation of a previously saved image. In addition, it allows the user to store the factory partition on the recovery drive. Storing the factory partition as well allows re-installation from the Recovery Disc, though the storage space will need to increase in size from about 250 Megabytes to about 32 Gigabytes to do so. A Windows 8 recovery disc can be placed onto a USB Flash Drive. Notice that although the Recovery Drive rules allow just one copying of the factory drive onto external media, there is no such restriction when it comes to making a whole computer image. That is to say, the whole computer image contains the factory partition too, and if needed after the image is installed, the computer could be reinstalled to factory standard from that.
Because a Recovery Disc for Windows 8 runs from a flash drive it allows users without a CD\DVD drive to access recovery options. The computer's BIOS / UEFI boot sequence should have the USB flash drive at the top of the list to boot-up with it. For example, a boot sequence such as Flash drive, then CD/DVD drive, then Boot Manager, etc should do it. When the usual CD \DVD repair disc is to be used, then that should be at the top of the boot sequence instead. See Navigating to the Recovery Options for the route to the UEFI/BIOS settings in Windows.
Install the Image
There are three main scenarios where a previously saved computer image may need to be installed. These are where windows opens normally, where the computer starts but Windows is damaged, and where the computer will not even boot up. For each of these scenarios follow the procedure below.
Preparation: You will need the following
- The Admin password for the computer.
- If you intend to start from a Startup-repair Disc or a Recovery Disc, make sure that it is in the computer before startup. Note that opening a CD\DVD drive with power off is awkward, so do it while the computer is running. If however you need to know how to do so, refer to Opening the drive with power off here.
- The external USB hard drive that holds the image files for the recovery, and its cable.
- Note that the folder that will be used by the recovery process is always called WindowsImageBackup.
- If there is only one backup image and its outer folder name has never been modified then the image folder will already have this default name, and all is well.
- If the outer folders have been modified,for example to allow multiple images on the same drive,then make sure that the image-set to be used for the recovery is contained in an outermost folder that is named WindowsImageBackup, and if necessary change that main folder so that it does so. Also, make sure that there are no other folders with the WindowsImageBackup name; change any others so that there is no confusion.
Method
- If windows is accessible, set a restore point. Refer to the table in the drop-box above, Navigating to the Main Recovery Options , for the selections to use.
- Start the computer and log in as an administrator to Windows.
- Connect the backup drive to the computer.
- Refer to the table in the drop-box above, Navigating to the Main Recovery Options , for the actions and selections to follow to install the image. Note that the method is specific for your version of Windows.
- Follow the prompts given by the computer. The entire process take a couple of hours or so.
- On completion of the installation, if you intend to save more than one image on the backup drive, give the WindowsImageBackup folder that you have just used a different name. This will avoid overwriting it and the loss of data.
- If you intend only one image for the drive in any case, there is no need to touch the folders.
- Assure yourself that the installation works, then set a restore point. Refer to the table in the drop-box above, Navigating to the Main Recovery Options , for the selections to use.
Related Tasks
Extending a partition after imaging
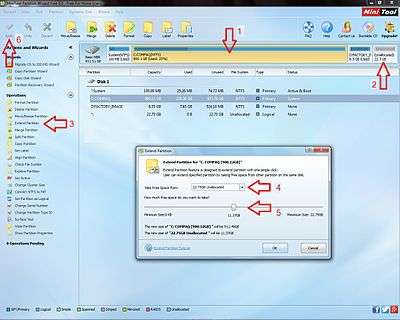
A typical task after installing a new, bigger hard drive, is to take up the space that is unallocated following the installation of a smaller image. It is assumed here that there is listed a system drive, a C: drive, and a D: drive, with the D: (factory drive) at the highest allocated memory position. Beyond the D: drive there is a large unallocated space. To increase C:, using unallocated space, the outline of the process is just this:
- Download and install the MiniTool Partition Wizard Free Edition 9
- Read the Help section that concerns the extending of a hard drive partition.
- Select the C: drive as the drive of interest, (marked 1 on adjacent image). Note also the unallocated space at the end of the disc. (2),
- Make sure that C: is still the selected drive, then select the link to extend a partition. (3)
- Select the source of the space to use in making the extension of C:, using the drop-down list. (Choose Unallocated.) (4)
- Move the slider until the new sizes of the C: drive and unallocated space are satisfactory. (5)
- Select Apply to complete the task. (6)
- The work is typically completed in less than a minute.
- In Windows Explorer, notice that the specified space is now allocated, and that the C: drive has been extended.
Opening a CD\DVD drive with power off
Such drives can be opened without power. The front of most disc drives has a very small hole drilled into it for this purpose. It is easily overlooked, because it is minute. The ideal tool is a paper clip. Straighten it and push it into the hole to trip the latch. When done, the front can be pushed shut again.
Adding Windows 7 f8 key behavior to Windows 8
For the f8 key in Windows 8 to behave like the f8 key in Windows 7, the option must be specially enabled in a command line. For those who are interested in doing so, proceed as follows:
To change Windows 8's ''f8'' behavior to resemble that of Windows 7, enter the following at an elevated command prompt:
bcdedit /set {default} bootmenupolicy legacy
Enter
It will remain on the computer until reset with:
bcdedit /set {default} bootmenupolicy standard
Enter
About boot sequence
- When a computer is switched on it searches through all of its drives in turn and starts (boots-up) using the first set of boot files that it finds.
- In conducting its search it follows a boot sequence that can be changed by the user, located in the computer's BIOS or UEFI settings.
- The drives that are searched typically include the USB flash drive, the DVD\CD rom drive, the main HDD drive, (or in UEFI, the Boot Manager), and the lesser known Network drive. If this were the boot sequence and neither of the first two drives held any boot files then the computer would make use of the hard drive or Boot Manager in the usual way. This is the so-called normal start-up sequence. Placing a start-up disc into the DVD\CD drive before switch-on however, would allow the computer to start from that instead.
- The boot sequence could be different, even in a new computer. For example, it the sequence were instead; the USB flash drive, the main HDD drive, (or Boot Manager), the DVD\CD rom drive, and the Network drive, then the intended use of a start-up disc would not work, in fact, the computer would never bother to check the DVD drive at all, starting instead from the HDD or Boot Manager.
- Some manufacturers use this latter arrangement but allow the user to skip to the disc drive by pressing a key early in the start-up process. However, there are sometimes problems with this method.
- In the past this key-press-to-skip system always worked well but with Windows 8 the start process is quite a bit faster than that of say, Windows 7, so despite offering to skip the HDD drive with a key-press, the actual interval in which the user must respond is shorter than he realizes, and so is repeatedly missed. The matter is most noticeable, (as little as 200mS), when using SSD drives (solid state drives).
- When a problem of this type persists then the best option is to change the boot sequence so that the intended starting drive is right at the top of the list.
- There are sometimes two different key start methods to change boot order. The first accesses the BIOS/UEFI settings, and another that chooses the boot device just for the current start-up. Also, within the Windows 8 Advanced Startup functions, the Use a device option can also allow the user a choice of drive to boot from.
- Refer to the link Navigating to the Main Recovery Options for how to get to the BIOS or UEFI settings, and consider the external links below for further reading.
See Also
External Links
- MiniTool Partition Wizard Free Edition 9 : A free tool that makes short work of moving partitions
- HP and Compaq Desktop PCs - BIOS Setup Utility Information and Menu Options : The Hewlett Packard manufacturer's most basic instructions about BIOS - navigation etc.
- HP and Compaq Desktop PCs - BIOS Settings for the AIRA Motherboard : More complete instructions, again by HP, on the use of the BIOS for a specific desktop motherboard. Specifics apart, this page has sufficient generality for those who want to understand more about the BIOS.
- HP Notebook PCs - BIOS Setup (F10) : HP's instructions for the use of the UEFI settings utility for their notebooks. Again, has good use in general for those who want to know more.