Size of objects on picture
The size of the object is inversely related to the distance from the lens. If the lens moves twice as far away, the object will appear to be 1/2 the size; 3 times as far: 1/3, etc. This, in practice, applies only when the distance of the object from the lens is at least 10 times the focal length of the lens.
Perfectly exposed images
In order to get the perfectly exposed black and white image (one that has all of the desired levels of gray from pure dark to pure white or every possible portion of that spectrum) a photographer must balance and coordinate three things: film speed, shutter speed and aperture ("f stop"). In addition, focus must be within acceptable ranges across the important elements of the image.
The film speed is determined by the film used, whereas shutter speed, aperture and focus are set on the camera.
Film speed
Film speed is the rate at which a film is able to capture or react to light. It is usually rated as ASA/ISO and is easily obtainable from 100 ASA/ISO (slow) to 3200 ASA/ISO (really fast). A film ASA/ISO ratings work multiplicatively. Example: 200 ASA/ISO film can capture light twice as fast as 100 ASA film. 400 ASA/ISO film can capture light twice as fast as 200 ASA/ISO film and 4 times as fast as 100 ASA/ISO film. There is however a trade off for speed; grain! The faster the film speed, the larger the crystalline structure of the developed film. That means when you make prints from faster films they will tend to show more grain and will not be as crisp as prints made from slower films. A print made from a 100 ASA/ISO 35mm film will generally look very crisp up to 11x14 inches. The same print from a 35mm negative using 400 ASA/ISO film will begin to show grain. Grain can be used as an image modifier, but I do not recommend it just yet. Faster films do have the advantage of often freeing one up from having to use a tripod, meaning that you will sometimes be able to get better candids or low light level shots without all the time or fuss of hauling a tripod. Like I said it is all a tradeoff. Over time you should be able to plan your shoots so that you know what type of film you need in your camera; at least to start. It is always a good idea though to carry a roll or two of each (fast like 400 ASA/ISO and slow like 100 or 125 ASA/ISO), just in case.
On a digital camera, there is no film speed (because there is no film!). However, the method by which the tiny computer in the camera processes the image can be varied, simulating the effect of changing the film.
On smaller "point and shoot" cameras, the film speed is set automatically by the camera, or can be changed in the main menu. More advanced digital cameras (such as SLRs) will have a separate control (often labelled simply "ISO") so that the virtual speed can be varied with each shot.
Shutter speed
Shutter speed is easy. It is simply how long the shutter is open.
The shutter speed control is located on the camera body. Shutter speed determines the fraction of a second that the shutter remains open. It thus controls the duration of time for which light is allowed to fall on the film. This is a series of numbers that is usually as follows: B 1 2 4 8 15 30 60 125 250 500 1000 2000...etc.
If the shutter speed is displayed as 125, it means that the film will be exposed for 1/125th of a second. Similarly if the setting displays 1 it means that the film will be exposed for 1/1 (i.e. 1 second). The B setting stands for "Bulb"—the shutter will remain open for as long as the shutter button is kept continuously depressed. If the pressure is released from the shutter button, the shutter closes.
So, starting with 1 second shutter speeds get twice as fast each step (scale): ½ a second, ¼ of a second, 1/8th, 1/16th, 1/30th, 1/60th, 1/125th, 1/250th, 1/500th, 1/1000th of a second.
Slow shutter speeds sometimes record blurred images either because the camera shakes, vibrates, or because the subject moves. The former is called camera shake and the latter is called motion blur. Quicker shutter speeds record images "frozen in time", and would be used for action or sports shots.
You should, as a soft rule, not hold a camera for longer than a 1/60th of a second exposure. Your heart beating will make the camera shake imperceptively and tend to make your image a bit blurry because of the “camera shake”. If you must hand hold for longer than a 1/60th of a second try to steady the camera, or yourself, against a tree, a doorframe or some other handy solid object and use your feet set wide as two elements of a human tripod.
Action Photos
Action photos are photos of subject in motion. To capture motion one may want to completely freeze the action or may want to creatively use the streaks produced by the relative movement between camera and subject. This one can do by moving camera along with the subject (Panning) or keeping the camera steady and changing the shutter speed to get the desired result.
When taking action photos, there are a few tricks you can use to take the three types of action photos.
Panning: Before you take the picture, set the shutter to stay open so you have time to follow the subject (faster for faster moving subjects, slower for slower moving objects).
Stop Action: You put it on the highest shutter speed and make sure the subject is in focus. You also make sure that the background is blurred. So you want the subject to be in focus and the background to be blurred.
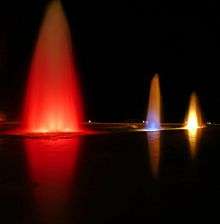
You may use low shutter speed and achieve creative results. Like this fountain at night.
F stop and Aperture
F stop! I am often amazed at how many “professionals” do not really understand what an f stop is or does. Here it comes, plain and simple. Memorize this and you will be way ahead of the game.
When you push the shutter release on an SLR a mirror inside your camera body flips up and the shutter exposes the film to whatever is showing through the lens. Behind the lens is an adjustable opening called the aperture, through which the light passes on its way to the film. The F stop is a measure of the size of this opening.
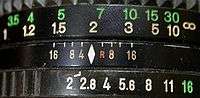
The size of the hole through the lens, f stop, does not change what is in the film frame; it only controls how much light gets through. Full f stops in order from LARGEST HOLE to SMALLEST HOLE are (scale): f/1, f/1.4, f/2, f/2.8, f/4, f/5.6, f/8, f/11, f/16, f/22, f/32. The smaller the number, the bigger the hole. Each successive full f stop allows in half as much light as the next. Example f/4 allows twice as much light through as f/5.6 and f/5.6 allows twice as much light as f/8.
Now, the aperture's diameter is not the same from lens to lens. A lens' aperture is a ratio between an aperture's diameter and that lens' focal length. A 50mm lens' aperture f/2 has a diameter of 25mm. A 100mm lens' f/2 has a diameter of 50mm. But both of these lenses at the same aperture setting allow the same amount of light to reach the film because each aperture's diameter is exactly half of that lens' focal length, 1/2. f/2 is an abbreviation for the formula to find an aperture's diameter where f = focal length of the lens. f/4 for 210mm lens. 210/4=53mm aperture diameter.
The real question is: why do we care about f stops? Why not just have a great big hole and let as much light fall onto the film as possible. Because a larger aperture gives a smaller depth of field (explained below).
The Aperture Control is a ring located on the circumference of the lens. Some lenses have half-stops as well as the full stops given above.

Example
Uncle Ed is sitting on a bench in the park. Behind him is a yucky old warehouse. We do not want the to capture the detail of the warehouse, so we will use an f 2, big hole, and its corresponding shutter speed for the light conditions. We hit the shutter release button and we have Uncle Ed crisply on film with a warehouse behind him that is soft or very soft and lacking in detail, basically a blur that shows the light and dark areas only and all blurry. Clear as mud? OK, now we are at the beach with a fabulously lovely young woman. Let’s call her Marriah. We want her and the wonderful cliffs a half mile behind her all crisp and in focus. We focus on Marriah, Goddess, and use a “long” f stop like f 22. We then dial in the necessary shutter speed for proper exposure and take the image. Marriah is captured in sharp focus in all her glory as are cliffs way behind her.
Depth of field
Depth of field is the distance, front and back, that is the in focus on the film from whatever we are “hard” focused on. A small f stop (big hole) requires a faster shutter speed so the film does not have as much time to record detail (focus) on object in front of or behind the subject we are focused on. A large f stop (small hole, big number like f 22) allows the light through more slowly so we have to use a longer shutter speed to get the right exposure. Depth of field for each f stop is often shown on as a small bars with numbers on the f stop ring of our lens. This is best learned by looking at a camera lens that has these calibration marks. It will show that if we are focused on something that is 20 feet away for example at f 5.6 then everything between 15 and 25 feet is within the depth of field for that f stop. This is hard to visualize unless you are looking a high quality lens that has the markings.
Now, lets assume that we had enough light for the previous 2 examples that we were able to use a shutter speed of 1/60th of a second or faster (1/125th, 1/250th …) so that we did not have to use a tripod. But how do we know?
A very simple way to set depth of field is to focus on your subject, then set your "f-stop" to the number that best represents how much of the foreground and background you would like in focus... i.e.: Say you are shooting a photo of a child and you want very little of the background in focus, you would firstly focus on the child's eyes or at least his/her face. Next, choose an "f-stop" of the lowest available to the lens you are using. Think of the "f-stop" number as the number of meters in front of and behind the subject you would like in focus. The higher the number, the more in focus.... f2.8 would then relate to about 2.8 meters in front of and behind the subject in focus, f22 would mean 22 meters in front of and behind the subject in focus.
Obviously these meterages are not accurate, not even close but it gives you the train of thought for using f-stops accurately....I have used this method to teach people to think of f-stops with great results.
Metering
All cameras, or most anyway, made since the early 1960’s have what is called “through the lens” or “TTL” metering. What that means is that while we are looking through our eyepiece, which is by means of the mirror mentioned earlier, we are looking out through our lens and also light coming in through the lens is hitting a light sensor. Some light sensors are shown as a meter, others as a needle. The camera already knows film speed. We dialled this in when we loaded the film. TTL meters tell us how much light we have coming through, generally in a “not enough/underexposed” or “too much/ overexposed” context. If your meter even “goes out” or batteries die, tear open the box the film came in and there is usually a chart that show f stops and shutter speeds for that film in general lighting conditions from full sun to soft light. Check it out! Another bit of photographer trivia but also a good tool for this part of the learning process.
Example
There, again, is Ed’s sitting on the bench. We have decided that we want a shallow depth of field so the warehouse is not in focus. We need a fast f stop, large hole, shallow depth of field, of f2. So we dial in f 2 on our lens by twisting the f stop ring on our lens. We look through the camera at Ed. We focus on him by using the focus ring on our camera lens or tap the shutter release on auto focus cameras. Our meter says we have too much light! We are staying with f 2 hole size so that we have a shallow depth of field and we cannot change the film speed so there is only one thing to do; we must lessen the shutter speed, how long the shutter is open, down to less and less time until the meter is happy and we know the image will be properly exposed.
Focus
...
Review
The perfectly exposed image is obtained by metering available light onto the light sensor with a set speed of whatever film is loaded. We can then adjust one of two things to make the meter happy and get a proper exposure; either f stop (hole through lens size), or shutter speed (how long the shutter is open). If we want a deep (or long) depth of field (Marriah with cliffs) then we want a long or big f stop (big number, small hole) and a slow shutter speed. If we want a shallow depth of field (Ed but no warehouse) then we want a short or small f stop (small number, big hole) and a faster shutter speed. We adjust and coordinate these two things (f stop and shutter speed) until we have the correct exposure (the meter is happy) and the depth of field we want (deep or shallow or somewhere in between). Remember to avoid hand holding for shots that are longer than 1/60th of a second.
- Twice the light; half the speed.
- Since we know that each full f stop allows in twice or half as much light through the lens as the full f stop next to it and that each shutter speed is twice or half as long as its neighbor we can, and will, coordinate them. Warning! Many camera lenses have 1/s stops. This means that they can and will have a click that is halfway between each full stop. It can be handy to get the proper exposure to use half stops but be aware of what f stop you are actually using. I will insist that you keep notes of film, f stop and shutter speed of EVERY shot for a while.
- (Full f stops again (scale) in order f 1.4, f 2, f 2.8, f 4, f 5.6, f 8, f 11, f 16, f 22, f 32)
- Example: We meter Bob the squirrel and come to the conclusion by playing with our f stop and shutter speed that we can properly expose him on the 400 ASA film we have loaded (and told the camera we have loaded) by using an f stop of f 4 and a shutter speed of 1/125th of a second. We take the shot. So Bob is still sitting there playing with his nuts and we realize that the carving on the other end of the bench of Bob would look cooler in the shot if it were also in focus! Scotty! I need more depth of field! So, we dial in the next larger full f stop of f 5.6 (HALF THE LIGHT!) and we double the amount of time we leave the shutter open to 1/60th of a second and get the shot with the end of the bench also in focus. See they work hand in hand! An f stop of f 5.6 requires twice as much time to capture the same image as f 4 and has MORE depth of field. An f stop of f 4 requires half the time as f 5.6 to capture the same image but f 4 has less depth of field.
Exercises
With some practice this will make sense. I will give you exercises and hands on time that will illustrate these principals in an artistic and understandable way. Not to worry. Remember that when you really understand these principles and how film speed, shutter speed and f stop work in unison then you already know WAY more than most. Once you get the basics down it is all art! Yes it takes a long time to learn it all but you will likely be taking good images and making nice prints of them very soon. Apply yourself. It will be worth it.
- If an image is properly exposed using 100 ASA film, f 4, 1/125th of a second; what is the correct shutter speed for the same shot using f 5.6? F 8? F 2.8? Try using the shutter speed scale above.
- If an image is properly exposed using 100 ASA film, f 8, 1/30th of a second; what is the correct f stop if want to use a shutter speed (no tripod) of 1/60th of a second? 1/125th? 1/250th? Try using the full f stop scale above.
- I am standing on a train going 427 MPH headed South towards Mexico and am wearing a blue shirt. My last shot on a roll was correctly exposed using 100 ASA film, f 8, 1/250th of a second. The only film I have left is 200 ASA film. I load it. What is the proper shutter speed with this film if I want to stay with f 8? What if I only have 400 ASA film and want to stay with f 8?